
Objectives: Specifications and Identification - what is the function of objectives in microscope
Keep in mind that a shallow Depth Of Field and a wide aperture will increase the quantity of light reaching your sensor, allowing you to increase the shutter speed. If you’re shooting in poor light or need extremely quick shutter rates to freeze the action, this is a huge advantage.
You might wonder how resolution relates to cameras, especially if you’re taking pictures with an iPhone or other smartphone. The higher the resolution of your camera, the larger you can print images and still get a clear output.
For instance, in night photography, the stars will be blurred if you focus closer than the hyperfocal distance since the Depth Of Field in the photo will not be infinite. The Depth Of Field near the limit will be a little farther away from the camera by concentrating at a somewhat greater distance, but the stars will be sharply in focus.
Distance is another factor in Depth Of Field that the photographer can adjust in addition to the aperture. Objects’ sharpness at a given distance from the subject is controlled by the aperture, but changing that distance also affects how focussed or unfocused they are.
Generally speaking, it’s ideal to utilize a shallow depth of field if your background is distracting. However, if the background enhances the scene—for example, by providing stunning mountain scenery, lovely clouds, or important context—then use a shallow depth of field.
Set your lens to its widest aperture if you want a shallow Depth Of Field effect. Then, get as close to your subject as you can before taking your picture.
Get closer to the subject, concentrate on the area of the subject that you want to be razor-sharp, and use large focal lengths (from 70mm) and wide apertures (f/1.4-f/5.6) to achieve a shallow Depth Of Field.
Depth offield examples
When using a deep Depth Of Field, even objects that are somewhat distant from the focal point are sharply focused over a broad section of the image.
The good news is that you just need to focus on the hyperfocal distance when using a wide-angle lens (10-35 mm) to maximize Depth Of Field, as we’ll go into detail in this tutorial.
View the image in playback mode for a moment. If you want to make sure everything is sharp across the entire frame, enlarge the image and inspect the closest foreground object and the farthest background object.
Your image will now be set to 300 PPI without significant loss of quality; however, it will have changed dimensional size – in this case, from 8” x 10” to 1.92” x 2.4”. That’s pretty small, but if you’re designing a brochure it might be large enough, dimensionally, for an image set in the text.
The crisp zone varies from image to image depending on a number of variables, including aperture, sensor size, and subject distance (described in more depth below). Therefore, you can control how much of your image is sharp and how much of it is blurry by adjusting your camera settings and composition.
You may be familiar with the phrase Depth Of Field (DoF) in Photography Composition, but what does it actually mean and how can you manipulate it to achieve creative effects? You will learn everything there is to know about the Depth Of Field in this post.
The chosen aperture, focal length, camera sensor size, circle of confusion assumptions, or what is deemed to be “acceptably sharp” determine the hyperfocal distance.
In this case, Photoshop will attempt to add new pixels between existing pixels to increase the resolution and maintain dimensional size. It does this by analyzing individual pixels and automatically calculating what should go between them. For example, if a blue pixel is next to a red pixel, it might add a purple pixel between them.
Fortunately, the latest-model iPhones feature camera resolutions up to 12 MP; and DSLR cameras often feature 18 MP and up, so you don’t need to be a professional photographer to start with a high-resolution image.
In order to distinguish your subject from a cluttered background, you may occasionally prefer to employ a shallow Depth Of Field to focus emphasis on a particular location in images. This occurs frequently in portraits. However, it is also very useful when shooting macro, close-ups, street photography, products, events, and landscapes.
For example, if you use a telephoto lens, get near to your subject, and shoot at f/2.8, you’ll get an ultra-shallow depth of field.
It helps photographers focus on their topic while avoiding surrounding distractions. However, you’ll also come across macro photography with a limited depth of field, as in this image:
Shallowdepth offield photography
Image resolution can be defined as the level of detail in an image. Raster images are comprised of a series of pixels, where resolution is the]]> total number of pixels along an image’s width and height]]>, expressed as pixels per inch (PPI).
The best resolution for a given project depends on multiple factors, including the type of project you’re printing and the type of printer you’re using. For example, if you want to print high-quality business flyers on an offset or digital printing press, your flyers should be 300 PPI. If you want to print 8” x 10” photos on your inkjet printer, a resolution of 220 PPI might be enough to produce acceptable results.
Again, the best option is to start with an image that’s already as large – or larger – than you need it, both by document dimension and resolution. If that’s not possible, you can try the options listed here to increase your image resolution without losing quality. Learn more with this free print quality checklist.
Other factors specific to the image may restrict your choice of aperture. For instance, in wildlife photography, if you want to freeze movement and capture an image of an animal in action, you must consider shutter speed and ISO.
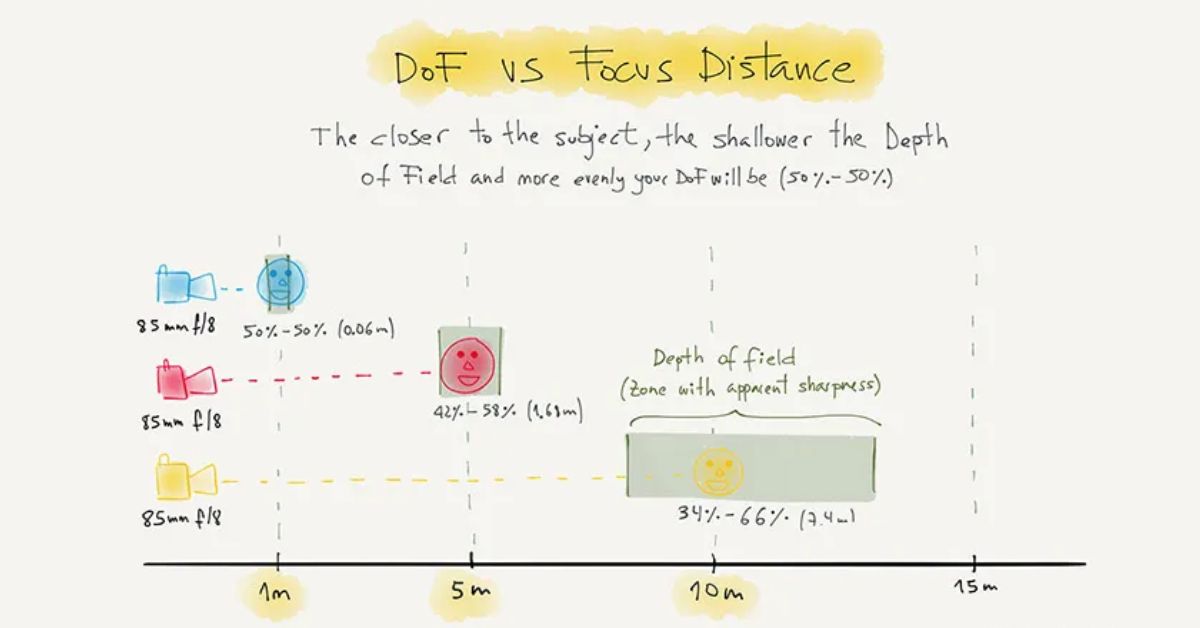
The distribution of depth of field is not equal in front of (close to) and behind (far from) your focus point. The far DoF is often greater than the near DoF.
Shallow depths of the field are frequently employed in portrait photography because their unfocused nature removes any background distractions and makes the subject more prominent. Street photography with a small depth of field is also a thing, as is photojournalistic and even landscape photography.
If the depth of field is Shallow, just a tiny section of the image will be clearly focused, leaving the backdrop (and frequently the foreground) out of focus.
You can play around with each of these options to see which produces the best results for your image. However, resampling often leads to undesirable effects such as poor image quality. Many experts recommend resampling by only 5 to 10 percent to minimize image distortion.
It’s really challenging to focus precisely at the hyperfocal distance when you’re shooting outside. When you’re out in the field, you don’t typically use a ruler to measure distance. In reality, you needn’t!
DoF near limit refers to the distance between the camera and the first object that is deemed to be sufficiently sharp. Similarly to this, the DoF far limit refers to the separation between the camera and the furthest element that is deemed to be acceptable sharp. Due to the gradual nature of defocus, the depth of field’s limits do not clearly delineate between sharp and unsharp.
Those are examples; every printing company has its own resolution requirements. The best pixel size for print can vary between printing companies, printing formats and printing presses. It’s best to check with your printing company before you create your artwork so you can format it in the proper resolution.
Tip: When using your camera’s viewfinder, you often see an image preview taken at the lens’s widest aperture. But many cameras offer a depth of field preview button; press this, and you can preview the actual depth of field in real-time before hitting the shutter button. Check your manual to see whether it’s an option on your camera!
The hyperfocal distance is 7.62 feet (2.32 meters) for a full-frame camera with a 14mm focal length and an aperture of f/2.8. Let’s examine the effects of depth of field when focusing at three different distances: 7.12 feet (2.17 meters), 7.62 feet (2.32 meters), and 8.12 feet (2.47 meters). Enter the following data into the DoF calculator to obtain the results shown:
If your artwork appears pixelated, it’s low resolution. If it appears crisp at 300 percent, then your artwork is print-ready.
Watch your environment carefully. Do you want the background to be blurred? Or should you keep the focus on the entire shot?
The closer you focus, the more evenly dispersed your DoF will be (50%–50%) for a given focal length. On the other hand, the distribution becomes less even the more distant you look.
One of the most important creative aspects of photography is how sharp a picture is. It makes a big difference if your image has a shallow or deep Depth Of Field; it frequently determines whether the composition works.
Additionally, the depth of field is shallower the bigger the hole is. The shallowest depth of fields are associated with the smallest f-numbers, which also have the widest apertures. Additionally, the deeper depth of fields are corresponding to the larger f-numbers, which also have the narrowest apertures.
The camera’s depth of field preview button lowers the lens aperture to the predetermined value, providing you with a preview of the sharpest portions of the image.
To perfect photography, you must comprehend the Depth Of Field In Photography. When it comes to Depth Of Field, Innovature BPO there are a few additional suggestions (as well as some danger zones to avoid).
However, the depth of field changes to approximately 29.5-37.5 feet (9-11.4 meters) for a total DoF of 8 feet (2.4 meters) if you zoom into 100mm while remaining in the same position and still using an aperture of f/4.
If your printing company requires artwork in a certain DPI, chances are they’re really referring to PPI. Again, the easiest way to think about it is:
Your depth of field is determined by your focal length, distance from your subject, and aperture. Therefore, these three variables may work together to create an extremely extreme depth of field effect or they may negate one another.
Depth offield calculator
When you focus the lens at a distance greater than the so-called hyperfocal distance or at any other distance, you will experience the final infinite depth of field condition.
You typically don’t need to calculate the depth of field precisely if you’re going for a shallow depth of field look. However, if you want to maintain sharpness throughout the entire shot, you may want to calculate the hyperfocal distance to find the ideal point of focus (see the section on hyperfocal distance below).
A 4” x 6” image at 300 pixels per inch (a common size for postcard printing), on the other hand, would have a total pixel dimension of 1,200px (height) by 1,800px (width). Compared to the 72 PPI version, the four-inch span would be represented by 1,200 pixels instead of 288 pixels – or 912 more pixels. That means the pixels can be smaller, resulting in higher definition and clear, sharp image.
Low resolution, or low-res, images will appear pixelated and blurred after printing – even though they might look perfect on your computer screen. That’s because there aren’t enough pixels per inch to maintain a sharp image at large document dimensions.
However, the distance between the subject and the camera also matters. If you can’t reduce your aperture any further and aren’t obtaining the desired background out of focus, simply go closer to your subject. Your Depth Of Field will be shallower the closer you are to your subject.
When you want to optimize Depth Of Field when using a wide-angle lens (under 35mm), you simply need to follow these instructions, regardless of the kind of photo you’re taking (landscape, night, ocean, cityscape, architectural, etc.):
Proper image resolution is critical to printing a professional piece that features crisp graphics, sharp definition and beautiful color depth. It’s important to check your image resolution before you print to ensure your project looks as amazing on paper as it does on your computer screen.Our guide to image resolution includes:
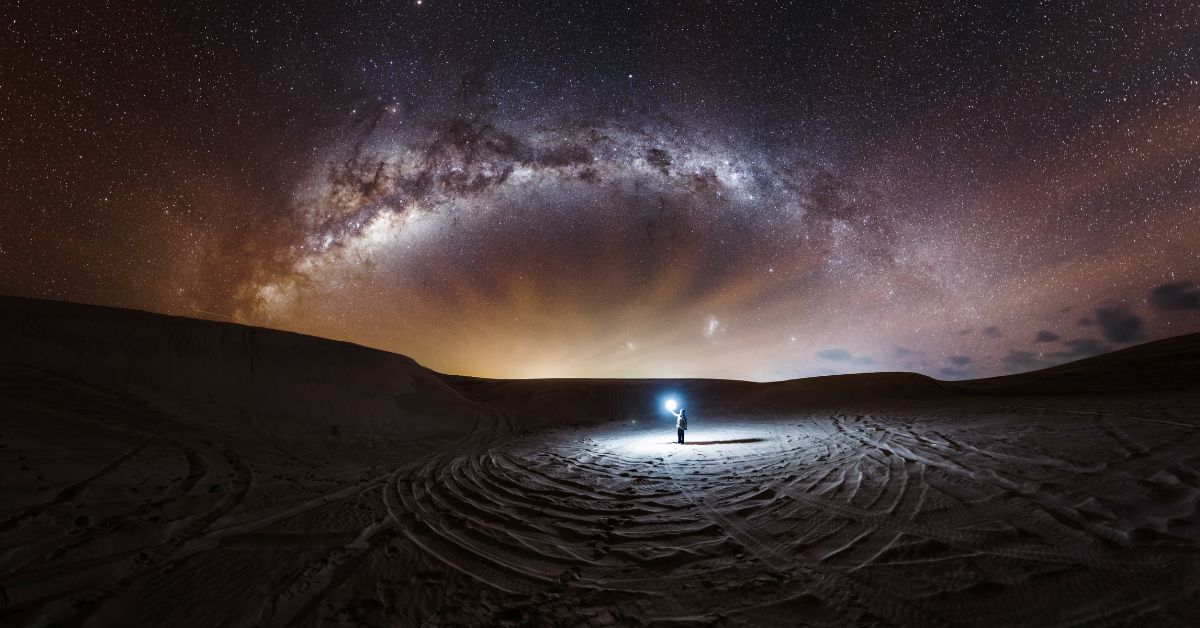
You may occasionally want to increase the Depth Of Field to keep everything sharp. When photographing the Milky Way, for instance, you typically want to capture detail from the foreground to the horizon as well as stars and large bright spots. When photographing landscapes (day and night), seascapes, cityscapes, and architecture, you’ll frequently use a deep depth of field.
Most cameras only include two settings that make it simple to adjust the aperture and, consequently, you should manual and Aperture Priority modes. So the first step is to select one of these modes on your camera’s Mode dial.
The greater the PPI, the greater the detail and the better the print quality – whether you’re printing invitation cards for an upcoming event or a family photo to frame on your wall.
Unfortunately, resampling in this manner often leads to undesirable effects. Many experts recommend resampling by only 5 to 10 percent to minimize image distortion. Learn more about print layout guidelines for Photoshop.
Depth offocus
Resolution isn’t the only thing that dictates quality. Bring your artwork to life with vivid soy-based inks and state-of-the-art digital and offset printing services at discount prices.
A lens’ aperture (F-stop)is the opening through which light enters the camera. F-stop values, which appear as f/2, f/2.8, f/4, f/5.6, f/8, f/11, f/16, etc., may be well known to you.
Depth offield photography
In Japanese, bokeh is translated as “blur”. The regions of your image that are out of focus (i.e., outside of the depth of field) have a prominent bokeh effect. The greatest bokeh requires a very small depth of field, but there are other techniques to increase its quality, such as by putting more distance between the subject and the backdrop.
At 300 pixels per inch (which roughly translates to 300 DPI, or dots per inch, on a printing press), an image will appear sharp and crisp. These are considered to be high resolution, or high-res, images. (If you’re working with photography, you’re probably working with high-resolution JPEGs, which can be printed as stand-alone photos or incorporated into your brochure printing and other projects).
The DoF assistance you select ultimately relies on your preferences, so feel free to experiment with each one to find out which one you like.
Shallowdepth offield
The best way to fix image resolution issues is to start with a high-res image that’s at least 300 PPI; however, that’s not always possible. Finding your image resolution is simple, and if it’s already set in the proper resolution you’re good to go.
Large aperture = Small f-number = Shallow (small) depth of field Small aperture = Large f-number = Deep (large) depth of field
So, to get foreground-to-background sharpness when shooting a landscape with a deep depth of field, simply set your aperture to f/11 or so. Set your aperture to f/2.8 while taking a portrait photo if you want a shallow depth of field and a lovely background blur.
NOTE: Resolution applies to raster images, which are comprised of pixels, but not vector images, which use mathematical calculations to produce images. Learn more about the difference between raster and vector images.
It’s time to make the necessary adjustments to your composition and/or camera settings now that you are aware of the Depth Of Field effect you desire.
When using a telephoto lens (200mm, 300mm, or 500mm) for landscape photography, the hyperfocal distance is so great that you cannot focus on it. The general idea is to focus on a point in the lower third of the image because you’ll be utilizing tiny apertures (f/11, f/16, etc.) to maximize depth of field. This approach works because the Depth Of Field is often distributed 1/3 (33.33%) in front of the focus point and 2/3 (66.66%) behind it when you use these small apertures and long focal lengths. A blurry foreground will result when focusing at infinity, therefore be careful not to do this.
In this instance, the DoF far limit is just 107 feet (32.57 meters) distant from the camera when focusing at 7.12 feet (2.17 meters). Beyond this range, the image will appear to be out of focus.
Results might be mixed, depending on the original resolution of your image and your desired output. If your original image is too small, no image resolution converter can maintain quality when you increase resolution.
But if you use a wide-angle lens and get close to your subject, the two effects will typically balance each other out, giving you a medium depth of field.
A deep depth of the field is usually used in landscape photography to highlight more of the scene, and it is also recommended for group photographs to keep the back row in focus.
You can use this knowledge to figure out other questions, such as “how big is 1920 x 1080 in inches?” All you need to know how to convert pixels to inches.
Often, PPI and dots per inch (DPI) are used interchangeably; however, PPI and DPI are not identical. Though they are similar, PPI refers to the pixels per inch on your computer screen, while DPI refers to the ink dots per inch applied by a printing press.
Once your image is sized and in the proper resolution, you can add it to your artwork and send it to print, confident it will look as incredible on paper as it does on your computer screen. Bring your artwork to life with premium printing services at discount prices today!
Yes. The hyperfocal distance must be used; when you focus at this location, you’ll maximize depth of field and generally keep the entire image sharp.
What about the best resolution for pictures online? Web images are commonly created in 72 or 96 PPI, which are considered to be low resolutions. They’re perfect for the web because they feature smaller file sizes that can load quickly online, but they do not translate well to print.
Search online for a photo quality checking tool. One example is the ]]>Ghiro Digital Image Forensic Analyzer]]>. You can upload your photo and select the EXIF tab to see your photo resolution. It’s an easy way to check the resolution of a JPEG image before you begin editing.
But what if your resolution is too low for high-quality printing? How do you make a low-resolution photo high resolution? Do you need to change the size of a JPEG, or make a high resolution JPEG?
Use a wide-angle lens (if possible) and move as far away from your subject as you can without ruining the composition if you want to create a photograph with a deep depth of field. Then dial in a narrow aperture – often f/8 or beyond is ideal, though see the next section on hyperfocal distance if you’re not sure what’s best – focus a third of the way into the scene, and take your shot.
Depth offield photography examples
The majority of photographers don’t need to determine the Depth Of Field precisely when shooting, so making rapid judgments or applying simple guidelines is OK, especially if you check your LCD later.
Aperture! Why? because it is the simplest technique to obtain the required Depth Of Field. To decrease DoF and increase it, use larger apertures. However, selecting an aperture based on a depth of field criterion is not always feasible.
We strongly advise you to check your camera’s LCD after you take an image to make sure you’ve got the Depth Of Field right, especially if you’re just getting started.
The DoF far limit, on the other hand, will remain at infinity if the lens is focused at a distance slightly greater than the hyperfocal distance of 8.12ft (2.47m). In other words, the background elements (like stars) will be sharp.
Another name for 7.2 million pixels is 7.2 megapixels (MP); which means you’ll need a minimum 7.2 MP camera to get the best resolution for your 8” x 10” photo.
If you’re just starting off, Aperture Priority mode is usually the preferable choice because it allows you to set the aperture while the camera chooses the appropriate shutter speed for exposure. If you’re more experienced, Manual mode will allow you to independently choose the aperture and shutter speed for more creative control.
If you want to increase image resolution yet maintain document dimensions, you would follow the same process as above – except this time, you’ll make sure the “resample” box is checked:
Depth offield definition microscope
The notion that a lens’s focal length affects depth of field also causes a lot of confusion. However, getting close to your subject does not alter the depth of field any more than a lens’s focal length does. The depth of field will be the same if you shoot an image at 300mm and then the same composition at 35mm by moving closer to your subject. The 300mm photo will have a smaller depth of field if you capture it while standing in the same place and at 35mm and 300mm, but it is due to “getting closer” to the subject rather than the focal length itself.
How many pixels are in 300 PPI depends on the document dimensions. Let’s say, for example, you want to print an 8” x 10” photo at 300 PPI (the best resolution for a photo, in most cases).
In a similar vein, a telephoto lens will provide you with a more uniform DoF than a wide-angle lens at a given focus distance. The region that is deemed to be acceptably crisp in your image might range from less than a millimeter (Macro Photography) to kilometers, and even beyond infinity (Landscape or Astrophotography), depending on the settings used for the shoot.
You don’t need to worry about resolution when you design your own brochures, postcards, business cards, greeting cards, stickers, and more with our free design templates and online design tool!
You can also consider using an online picture resizer to change the size of images. These tools can be used to check image quality online.
No. Although the distribution of Depth Of Field does become more equal as your focal length increases, it typically lies one-third in front and two-thirds behind your point of focus.
If you’re unable to achieve a high-quality, high-resolution photo on your own, professional photo enlargers can help. Instead of using automated processes, they use software to manually manipulate your photos to increase resolution and even document dimension, if required.Even if you’re pretty savvy in Photoshop, you might want to consult a professional photo enlarging service if you’re printing large-format graphics; for example, wall graphic printing.
How do you find the resolution of an image? How can you tell if an image is high resolution? Here are five easy ways to determine the resolution of any image. Use them to check files for proper resolution before printing.
According to the data in the table above, your DoF far limit will be significantly closer to infinity if you focus too near the hyperfocal distance, even by a few inches (or centimeters). As a result, the stars in the faraway backdrop won’t be in great focus.
Whether you’re printing marketing tools such as business cards, brochures, and postcards or keepsakes such as family photos, refrigerator magnets, or greeting cards, you can print picture-perfect artwork with these tips for proper image resolution.
In reality, it is exceedingly challenging to focus precisely at the hyperfocal distance. Therefore, you must ensure that you are focusing at a distance a little bit greater than the hyperfocal distance. Actually, it doesn’t need to be much bigger; one foot (30 cm) will do. Instead of blurring the background elements, it is preferable to have a little bit less depth of field in front of the main point.
Although having theoretical knowledge is important, you also need to know how to use Depth Of Field In Photography when shooting in fact. Here is a simple, step-by-step method for getting the ideal Depth Of Field:
Take the guesswork out of file preparation with free layout templates for brochures, postcards, business cards, greeting cards, stickers and more!
However, you might find yourself in a scenario where Depth Of Field is crucial. For example, if you’re a landscape photographer working with a very deep scene, a macro photographer using extreme magnification, or a product photographer and you don’t have the option to reshoot if the depth of field is off, these scenarios might apply to you.
For example, a 4” x 6” image at 72 pixels per inch would have a total pixel dimension of 288px (height) by 432px (width). That means there would only be 288 pixels spread out over four inches. To make that stretch, each of those 288 pixels would need to be rather large, resulting in a blurry, pixelated image.
Therefore, if your subject is 33 feet (10 meters) away from you and your aperture is set to f/4, a focal length of 50mm will give you a depth of field that ranges from about 22 to 63 feet (6.7 to 19.2 meters) for a total DoF of 41 feet (12.5 meters).
The depth of field (DOF) is the distance between the closest and farthest objects in a picture acquired with a camera that are in acceptable fine focus.
The largest depth of field you can have is when the lens is focused at the hyperfocal distance, at which point everything that falls at any given distance from half of this distance out to infinity will be acceptably sharp.
The size of your final printed project can determine whether you can print in a lower resolution; for example, a 150 PPI image might look fine at 4” x 6” but look blurry at 8” x 12”. Often, it’s best to err on the side of caution and create your artwork in 300 PPI, since you can downsize if needed without sacrificing quality.

What resolution should photos be for printing? What should DPI (or PPI) be for printing high-quality artwork? In many cases, the best resolution for printing is 300 PPI.
Be aware that the Depth Of Field far limit will not be limitless if you focus at a distance that is closer than the hyperfocal distance. The horizon’s elements (or the farthest backdrop elements like mountains or stars) will become blurry as a result.
You’ll have more artistic freedom to produce the images you desire if you know how to control the Depth Of Field In Photography. The best way to learn is to practice. Spend some time experimenting and getting to know your camera. Try with various focal lengths, alter the aperture, and shift your feet to get a new angle. Analyze your photos to understand how your equipment works. When the time comes to snap photos that matter, you will be prepared.
The area of a photograph that appears sharp and in focus is known as the depth of field. Every photograph has a point of focus or the location where the lens is actually focused. However, there is also a region that appears sharp both in front of and behind your point of focus, and that region corresponds to the Depth Of Field.
The simplest approach to managing your depth of field while positioning your photo is to change the aperture of your lens.
A factor is the separation of the subject from the background. For instance, even at f2.8, if you capture a portrait of a subject leaning against a brick wall, the majority of the brick’s characteristics will still be visible. However, if you ask the subject to stand a few feet away from the wall, the wall loses clarity.
If the original image has large document dimensions (actual printed size) yet low resolution, you can increase the resolution without sacrificing much quality – however, your document dimensions will decrease significantly.Let’s say you have a JPEG file that has a document size of 8” x 10” but a resolution of 72 PPI. How do you make a JPEG higher resolution or make a picture 300 DPI? You can use Photoshop to change the resolution to 300 PPI.


 Ms.Cici
 8618319014500