
Optical Power Meters - power meter laser
In the context of spherical aberration, paraxial rays are light rays that pass close to the optical axis and far from the edge of the lens, while marginal rays are those near the lens's surface and far from the optical axis.
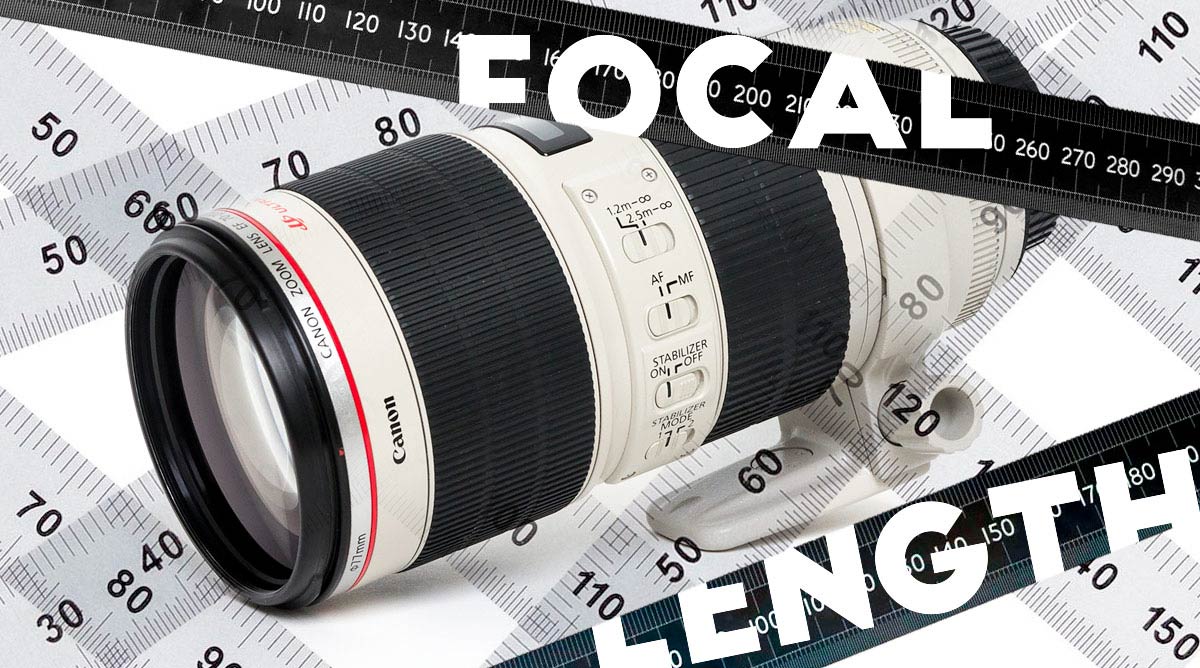
Once that’s done, center your middle focus-point on the end of the ruler. Since your AF point is most likely a rectangle, the end of the ruler should bisect it, dividing it in half (if your ruler’s scale doesn’t start right at the end of the ruler, then center the first markings on the scale in the center of the AF point instead).
Let's consider a **concave spherical mirror**. When light rays parallel to the mirror's axis strike the outer parts (the edges forming marginal rays), they get reflected at steeper angles and, hence, converge more quickly than rays striking nearer to the axis (paraxial rays). The points of convergence for marginal and paraxial rays are understandably different, causing the image to become blurred this difference in focusing points leads to spherical aberration.
The primary aim when correcting spherical aberration in lenses is to ensure that all the rays -- central, marginal, and paraxial -- hit the lens and converge at a common focal point.
Embracing the world of spherical aberration requires a dive into its corrective measures. After all, an understanding of how to mitigate this common optical error has a massive impact on improving optical device performance. So, let's delve into the various techniques employed to correct spherical aberration.
The intensity of these effects is proportional to the extent of the aberration. Meaning, the more severe the spherical aberration, the more pronounced these impacts will be on the lens's performance.
Focal lengthcalculator from image
In an ideal scenario, light rays entering a lens at different points should converge at a single focus. However, in optical systems with spherical surfaces, this is not always the case. Instead, rays that pass further from the lens's centre are refracted more, hence failing to meet at the central focus. This scenario is the root cause of spherical aberration.
The primary distinction between these two aberrations lies in the nature of the error. Chromatic aberration relates to the colour-dependent focus of light, while spherical aberration arises from the lens or mirror's physical geometry.
So, if you found an angle of 22 degrees, then the calculation will return 61.73mm as a focal length. Wolfram is an education site, so you can get a full, step-by-step solution if you want one, too.
I’d also love to hear your results from using other methodology, and your explanations of those methods. It would be great if I could find a testing method that’s easier than this and just as accurate or better.
Both chromatic and spherical aberrations play key roles in determining an optical device's performance, hence understanding these aberrations and their prevalent characteristics become paramount in the realm of physics. They present distinctive challenges, but through efficient design and corrective measures, their effects can be reduced, ensuring clear, sharp, and accurate images.
Next, load the image into Photoshop. Create a horizontal guide at 50%. That line should match the beginning of the ruler’s scale in the image. From there, it’s simple: look at the top border of the image and read where the ruler leaves the frame. That measurement is the opposite side of the triangle, which we’ll call Y.
They’re not a perfect match, of course, but part of that reason is that there was a lot of room for slop in this second measurement; I had to set the focus to 7 feet by looking at the range indicator window on the lens rather than by actually focusing on something, for example. But they’re still pretty close… the worst difference is about 3.75%.
You should remember that this correction is not a one-size-fits-all game; the methods adopted depend heavily on the specific lens application and system design requirements.
In the default example, the calculation assumes that we’re measuring using a vertical angle (which we are) and a full frame 35mm sized sensor (36 x 24mm). If you’re using an APS-C camera or another size, enter the vertical size of the sensor instead of 24mm. So, in the computational inputs, enter the angle of view (A) that we found above in the computational input, and press “compute”.
In a **spherical mirror**, the mirror's edge and centre do not lie at equal distances from the mirror's focal point. Consequently, light rays striking these two areas are reflected differently, resulting in separate focal points for the mirror's central and edge rays.
How to find focal lengthfrom radius of curvature
First, determine the location of your lens’s entrance pupil (described below), and then measure that distance to the wall (X in the diagram above) I like to use a precise laser measuring tape. My Bosch GLM 50 is accurate to about 1.5mm, but some others are even better. If you’re careful and have some help, a tape measure will also work, though with reduced accuracy.
Beyond its nuisance in causing blurry images, spherical aberration opens up interesting study areas in physics, such as the Schlieren system. This method exploits the focusing discrepancies due to spherical aberration to visualise changes in a fluid's density, temperature, or composition.
Even without the numbers, though, it’s plain to the eye that the lights are getting further apart; the distances involved are not especially subtle. This can be seen simply by looking through the lens and racking the focus. (Note that the CENTERS of the lights are getting further apart, not just the the edges. If I had simply opened the aperture to increase the size of the blur, we’d see results mimicking what you’d expect from zero focus breathing).
Cameras can use spherical aberration for soft focus effects. In telescopes, it can degrade image quality causing blurry stars or planets, whereas eyeglasses can cause difficulty in seeing clearly, especially in high-powered glasses, due to spherical aberration.
I’ve measured a several lenses this way, each lens multiple times, and the numbers have all come out as I’d expected (after a brief moment of confusion in one case). It’s not my formula, but the equation is simple enough, and certainly makes sense to me. That said, I’m certainly open to the possibility that there’s a mistake or that it’s missing something that would make it more accurate. If it is, and you can explain it to me, I’d be very grateful. Please let me know in the comments below!
Interestingly, spherical aberration, despite being an optical error, can be used to advantage in some optical instrument designs. For instance, in the Schmidt telescope, also known as the "Schmidt camera", spherical aberration is cleverly used to broaden the field of view without compromising the image quality. A specially designed corrector plate is used at the entrance pupil of the telescope to impose a desirable amount of spherical aberration that counteracts the aberration due to the mirror, resulting in a flat and wide field of view. This has made the Schmidt telescope an invaluable instrument in the field of astronomical surveying.
My favorite of these is Wolfram Alpha, which is accurate and flexible. Click here to see Wolfram Alpha’s “Lens Angle of View” calculation page.
As a student of physics, you might have encountered confusing concepts. Today, we're demystifying one such topic - spherical aberration. To fully grasp this concept, it's crucial to dive deep into its definition, fundamentals, and learn how it influences light behaviour.
Summarily, the spherical shape of the mirror, which leads to different incident angles for marginal and paraxial rays, results in spherical aberration. The more pronounced this difference, the more severe the aberration. This makes managing aberration a critical factor in optical design. Special design considerations and corrective measures like aspheric elements, correction plates, or compound lens systems are employed to mitigate the effects of spherical aberration to the maximum extent possible.
Now, focus the camera and take a photo. If your setup is not completely rigid, take several photos to ensure that the exact center of the image is over the end of the ruler scale.

Several factors can exacerbate spherical aberration in mirrors. One of the primary contributors is the mirror's aperture. Large-aperture mirrors are more prone to this aberration given that their marginal and paraxial rays strike the mirror at more distinctively different angles.
The repercussions of spherical aberration can be identified in various everyday optical instruments. From cameras to eyeglasses, the presence and management of this optical error shape the device’s utility and performance.
Spherical aberration, an optical effect that occurs when light passes through a spherical lens or mirror, can make or break the performance of an optical instrument. Whether it’s a telescope scouring the cosmos, a camera capturing precious moments, or a microscope analysing tiny specimens, spherical aberration can heavily dictate the device’s image clarity. Let's explore this further.
I’m still chewing on some of the details, but instead of using Wolfram Alpha, you can simply paste the formula: 24/(2 * tan(3.22 degrees)) into Google and it’ll give you the answer as well: 213.299798393
An optical system's foremost role involves managing light, bending it, and focusing its rays to generate a sharp and clear image. **Chromatic aberration** and **spherical aberration**, however, introduce discrepancies in this process. Broad knowledge of these aberrations and their effects on light offers a solid foundation in managing them effectively in practical applications.
If that guide didn’t match up with the beginning of the ruler’s scale, then adjust your camera and re-shoot or, if you’re comfortable with the ruler tool in Photoshop, figure out how far away the guide is from the start of the scale, and add or subtract that amount. You can avoid using the ruler tool or making estimates by centering your AF point at the 10cm mark rather than the very end, and then subtracting 100mm (plus or minus adjustments) from your final measurement, but since that adds in another opportunity for errors to creep in to the process, I prefer starting at 0.
How to find focal lengthformula
If you remember your geometry, this is pretty easy, but it’s even easier using an online calculator, like this one at EasyCalculation.com.
After doing this, I went back and measured the focal length of the lens at each of these distances from the subject using the original method that I outlined above. My measured focal lengths were:
I took an under-exposed photo, shot at f/22 (to cut down on bokeh/circle of confusion) with the camera sensor about 26 feet away from the lights, with the lens focused at that distance. The lens, incidentally, was the Canon 70-200 f/2.8L non-IS, since I had read that it behaves similarly to the IS II, but I hadn’t measured it for myself yet. It looked like this:
Landscape photographers often know the entrance pupil as the “Nodal Point” of the lens, and use nodal rails on their camera when shooting panoramas. If you’re shooting a panorama and the pivot point of your camera is directly below the entrance pupil / nodal point, then you’ll avoid parallax problems. Although finding the nodal point is relatively simple, it’s beyond the scope of this article, but there are numerous good tutorials out there already.
As you can see, I loaded those images into Photoshop, set guides to mark the centers of each light (easier than I expected to get within a few pixels of the center) and then used the ruler tool to measure the distance from center to center. Those distances are marked on the images above.
In conclusion, understanding spherical aberration and its impact on light behaviour is crucial in designing optical systems. Armed with the knowledge you've gained today, you're better equipped to handle related problems in physics.
Remarkably, spherical aberration is independent of the wavelength of the incoming light. This means that, unlike chromatic aberration, spherical aberration affects all colours of light equally. This invariant behaviour across the colour spectrum is based on the geometry of the optics rather than the nature of light.
As we see, spherical aberration can significantly impact an optical instrument's functioning, for better or worse. By exploring its intricate properties and recognising its effect on instrument performance, we equip ourselves with the knowledge to manage its presence and transform potential optical hurdles into innovative design solutions.
Peeling back the layers, spherical aberration presents a fascinating set of properties that can be calculated and manipulated in optical design and engineering.
The chief culprit behind **spherical aberration** is the lens's geometric shape. This aberration causes incoming light rays to focus on different points in the image plane, the result is a blurred, or fuzzy, image. It's worth noting how this impact manifests:
A spherical mirror, irrespective of being concave or convex, is associated with spherical aberration due to its spherical shape. As a standard rule, light rays reflecting off this mirror ought not to diverge; instead, they should ideally converge at a single focal point. However, a deviation is observed due to the inherent geometry of the mirror surface.
Sleuthing deeper into **chromatic aberration**, it's crucial to learn its characteristic features. Understanding these can help you identify and mitigate this optical error more effectively:
As such, it is crucial in all types of optical instruments, from basic eyeglasses to advanced telescopes, to minimise spherical aberration to produce clear and detailed images.
I’ve been involved in an interesting exchange of ideas over the past couple of days with Tony Northrup about the effective focal length of Canon’s 70-200mm f/2.8L IS II lens when it is focused at distances closer than its infinity setting (ie, focus breathing). We’ve been coming up with wildly different numbers (mine were presented in a video last month), and we don’t have many outside sources to check ourselves against… perhaps because making the calculation is not a very straight forward process. So, if you’ve ever had the desire to see how your lenses really measure up or how much they breath, here’s how I do it, with a few of the tools that I use to make it faster.
Navigating through the forest of **spherical aberration**, you will soon encounter the necessity for effectual correction techniques. This is especially true in the case of lenses. While spherical lenses are more straightforward to manufacture, their spherical aberration poses a genuine challenge in ensuring clear and sharp imagery.
All reviews are as unbiased as we can possibly make them, and we try to show you why we come to our conclusions, rather than asking you to accept our word alone.
Digging deeper into spherical aberration, it's notable that this optical error is heavily influenced by light behaviour and two key factors—paraxial rays and marginal rays.
Spherical aberration is a form of optical error that arises when light passing through a spherical surface is refracted at different angles, leading to a blurred or distorted image.
Let's not limit ourselves to theory; it's equally crucial to illustrate the concept of spherical aberration with practical examples, particularly related to spherical mirrors. Though simpler in shape, spherical mirrors - both convex and concave - unfortunately do experience some degree of spherical aberration.
Gain insights into the intriguing world of physics with a thorough understanding of spherical aberration. This comprehensive guide elucidates the definition, fundamentals, practical examples, and the causes of spherical aberration, especially in mirrors. Dive deep into the disparities between chromatic and spherical aberration, and learn about efficient techniques to correct these flaws. Moreover, grasp an in-depth perspective of the impacts and applications of spherical aberration in everyday optical instruments. This enlightening journey will equip you with the intricate science behind light behaviour, enriching your grasp on optical physics.
A practical example is the faulty mirror used in the Hubble Space Telescope launched in 1990. The mirror suffered from severe spherical aberration due to a manufacturing error and resulted in blurry images upon launch. It was subsequently fixed by bringing corrective optics into play, thereby rectifying the path of the light rays and concentrating them into a single focus.
In 2016 I had an email discussion with the great Pierre Toscani who really clarified the matter of where to make the camera-side measurement for me. The entrance pupil of the lens is the point where the angle of view begins, and unless you have a lot of technical data about the lens formula of the lens in question and are adept at ray-tracing, it is best to find it via experimentation.
Some people have claimed that the Canon 70-200 f/2.8L and IS II do not breath at all. If that were the case, then both of these sets of measurements would have to be off by at least 20% at the 5 foot mark, but hardly at all at the 26 foot end!
How to find focal lengthof phone camera
Imagine you're trying to illuminate a sheet of paper using a flashlight with some degree of spherical aberration. If you focus on the centre, the peripheral regions may appear blurred. Conversely, if you focus on the edges, the central part might appear unfocused. This fuzzy image results from the convergence of the light rays at different points instead of a common focus.
In terms of mathematical representation, the spherical aberration (SA) can be expressed with the proportional relation: \( SA \propto D^4 \), where \( D \) is the diameter of the lens's aperture. Also, the point spread function (PSF), a measure of the image quality, for a lens suffering from spherical aberration is given by \( PSF = (J_1(x)/x)^2 \), where \( J_1 \) is the first-order Bessel function of the first kind and \( x \) is proportional to the radial distance from the optical axis. This formula expresses how light is distributed in the image plane due to spherical aberration.
How to find focal lengthof parabola
The mirrored scenario is seen in a **convex spherical mirror**. Marginal rays reflecting off this mirror diverge more hastily than paraxial rays, adding to the blurring effect caused by spherical aberration. The severity of the aberration is directly proportional to the difference in the focal lengths of the marginal and paraxial rays.
Spherical aberration, at its core, is caused by the geometry of spherical optics. While they are easier to manufacture and work with, spherical mirrors and lenses introduce distortions in their output. The curved surface of these mirrors results in varying focal lengths for light rays striking different parts of the mirror.
How to find focal lengthof concave mirror
**Chromatic aberration** occurs when a lens fails to focus all colours to a single convergence point. It's highly influenced by dispersion, the phenomenon where different light wavelengths are refracted by different amounts in a medium. Light's wavelength alters its speed when travelling through different mediums, and hence, its refraction degree. Consequently, a lens refracts blue light more than red light because blue light has a shorter wavelength. Therefore, lenses without chromatic correction focus blue light at a shorter distance than red light, resulting in a coloured fringe around the image, a clear sign of chromatic aberration.
Visual: Over the past week, I’ve been looking at a couple of different ways to cross-check my measurements and make sure that what I’m getting makes sense. If you’ve seen my video comparison of the Canon and Tamron lenses and their breathing, you’ve seen a clip from Matt Granger’s video on the subject that shows the effect of breathing on his model while shooting video. It’s a simple, visual comparison but it shows what you’d expect: as the Tamron and Nikon lenses are focused towards the MFD, the subjects get smaller, but on the Canon, the subject gets larger.
The effects of spherical aberration on an optical instrument can be likened to a double-edged sword: they can either spoil or enhance the performance, depending on the design and application of the device.
Yet, there is another quintessential aspect of spherical aberration that makes it a key player in optical design: it's dependence on the aperture size of the lens or mirror. Linking back to the premise that spherical aberration arises due to the path difference between marginal and paraxial rays, it becomes clear that the larger the aperture (the wider the lens or mirror), the greater the difference between the marginal and paraxial rays, and thus the intensity of the spherical aberration.
In the fields below, enter your X measurement for adjacent side, and your Y measurement for opposite side, and press “calculate”. That will give you an the angle we need. We’ll call it A.
How to find focal lengthof convex lens

I wanted a way to quantify this visual change, and Bob Atkins’ article on focus breathing gave me the idea for a way to do it. He used stars as subjects, but I live in Seattle, so that’s not a practical option (hello cloudy skies). So, instead, I used two small LED lights and did this:
It bears noting that these corrective techniques are often implemented in combination to optimise lens performance in an array of applications, spanning from consumer electronics like cameras to scientific instruments like microscopes and telescopes.
Once you have found A, you have half of the vertical angle of view of lens, so to get the complete angle of view, just double it. From there, the easiest course it to look up the corresponding focal length based on that angle; there are numerous standardized tables of such things all over the internet, and also tools that will do the exact calculation.
I then focused the lens to about 12 feet away (using the range indicator on the lens) but did not move the camera. The idea here is to get the same effect as Matt Granger’s racking the focus of his lens in his video, but at some distances that I could measure.
On one hand, spherical aberration can critically degrade the image quality in an optical instrument. It leads to the inability of all the light rays to focus at a single point, causing blur and decreasing the instrument's resolution. This is detrimental in instruments where capturing fine details is of utmost importance, such as high-power microscopes and astronomical telescopes.
StudySmarter is a globally recognized educational technology company, offering a holistic learning platform designed for students of all ages and educational levels. Our platform provides learning support for a wide range of subjects, including STEM, Social Sciences, and Languages and also helps students to successfully master various tests and exams worldwide, such as GCSE, A Level, SAT, ACT, Abitur, and more. We offer an extensive library of learning materials, including interactive flashcards, comprehensive textbook solutions, and detailed explanations. The cutting-edge technology and tools we provide help students create their own learning materials. StudySmarter’s content is not only expert-verified but also regularly updated to ensure accuracy and relevance.
**Spherical aberration**, on the other hand, stems from the geometry of a spherical lens or mirror. It's a form of optical error where light rays striking different parts of a lens or mirror are focused at different points. Marginal rays (those passing further from the lens or mirror's axis) are refracted more than paraxial rays (those closer to the axis), causing an inability to meet at a common focal point. The consequence? A blurred image.
Though unwanted in most scenarios, spherical aberration has its merits. For instance, in the design of certain types of telescope eyepieces such as Erfle and Konig, spherical aberration is purposely introduced to achieve a wider field of view. Fascinating, isn't it?
By signing up, you agree to the Terms and Conditions and the Privacy Policy of StudySmarter.
What isfocal lengthof lens
To begin, mount your camera on a tripod near a wall or other vertical surface. Measure from the center of your camera’s sensor to the floor (you can use the vertical center of the lens mount). We’ll call this H. Then, tape something like a metric precision ruler (or metric measuring tape, depending on how wide the lens is) vertically to the wall, with the low end at the exact height of the center of your camera’s sensor from the floor (H). This is just to set up the square angle of a triangle. It’s also important to make sure that the camera is vertically aligned with the ruler.
Of course, understanding the need for these corrective techniques stems from recognising the influence of spherical aberration on a lens's performance. Let's peel back the layers and expose this optical miscreant's effect on lens operation.
This means that from our two different methods, one in which the camera is a stationary 26 feet from the target and one in which the camera is moved to as close as 5 feet from the target, the numbers support each other pretty nicely.
Paraxial rays pass close to the lens's optical axis and are refracted less, focusing at \(F_{P}\), while marginal rays pass near the lens's edge, are refracted more and focus closer to the lens at \(F_{M}\).
Spherical aberration depends on the aperture size of the lens or mirror. The larger the aperture, the greater the difference between the marginal and paraxial rays, and thus the intensity of the spherical aberration.
Spherical aberration stems from the geometry of a spherical lens or mirror. It's an optical error where light rays hitting different parts of a lens or mirror focus at different points. This inability to converge at a common focal point results in a blurred image.
Light & Matter is supported by commission from affiliate sales and Google/YouTube ads. We are Amazon Associates, as well as affiliates with B&H Photo and Adorama, among others, and we will earn a commission for qualifying purchases made through our links. It won’t cost you a thing, and it will help support quality, un-biased reviews and journalism.
[Update: 10/4/2022] I have updated this article to show a method that is more intuitively easy to understand, and which attempts to measure the angle of view of a lens rather than a focal length directly.
Spherical aberration is a form of optical error or defect that arises when light passing through a spherical surface is refracted at different angles, leading to a blurred or distorted image.
In a nutshell, spherical aberration is a common optical error that degrades lens performance by preventing a single common focus point for all light rays. However, by harnessing the power of correction techniques like aspheric lenses, aperture stops, and corrective lens elements, it's possible to manage and rectify this aberration, consequently enhancing lens performance tremendously.
Spherical aberration is when the mirror's centre and edge do not have equal distances from the mirror's focal point, causing reflected light rays to converge at separate focal points, leading to a blurry image. It occurs with both concave and convex spherical mirrors due to the mirror's geometry.
Here at Light & Matter, we never accept payment or goods in exchange for positive reviews. We don’t publish “sponsored posts”, and don’t have sponsorship from any manufacturers. We do not accept editorial input or limitations from manufacturers on product reviews.
Due to this difference in focusing levels, an optical system with spherical aberration fails to produce a sharp image. In essence, instead of a single focal point, the system ends up with a focal region, leading to a blurred output.
In the realm of optics, you'll encounter varied optical aberrations that hinder the formation of sharp and clear images. Two such common aberrations include the **chromatic aberration** and **spherical aberration**. Though they both result in image distortions, they differ significantly in root cause and characteristics. Addressing these aberrations is a prime concern in optical system design, such as in telescopes or microscopes, so understanding their differences is imperative.


 Ms.Cici
 8618319014500