
Op-Amps, Comparator Circuit - compartor
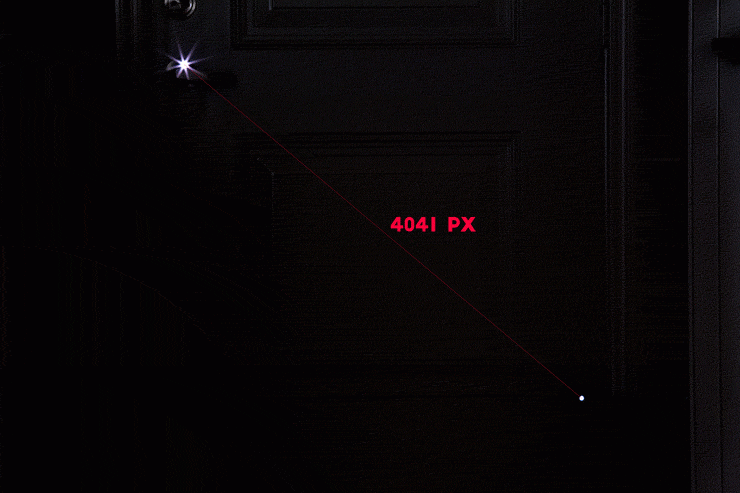
I took an under-exposed photo, shot at f/22 (to cut down on bokeh/circle of confusion) with the camera sensor about 26 feet away from the lights, with the lens focused at that distance. The lens, incidentally, was the Canon 70-200 f/2.8L non-IS, since I had read that it behaves similarly to the IS II, but I hadn’t measured it for myself yet. It looked like this:
by J Ferrer Ortas · 2015 · Cited by 7 — the frequency of a radiofrequency electrical signal (RF) ... Dynamic Optical Tweezers using Acousto-Optic Modulators ... Dynamic Optical Tweezers using Acousto ...
Next, load the image into Photoshop. Create a horizontal guide at 50%. That line should match the beginning of the ruler’s scale in the image. From there, it’s simple: look at the top border of the image and read where the ruler leaves the frame. That measurement is the opposite side of the triangle, which we’ll call Y.
Landscape photographers often know the entrance pupil as the “Nodal Point” of the lens, and use nodal rails on their camera when shooting panoramas. If you’re shooting a panorama and the pivot point of your camera is directly below the entrance pupil / nodal point, then you’ll avoid parallax problems. Although finding the nodal point is relatively simple, it’s beyond the scope of this article, but there are numerous good tutorials out there already.
Green laserfrom sky
Some people have claimed that the Canon 70-200 f/2.8L and IS II do not breath at all. If that were the case, then both of these sets of measurements would have to be off by at least 20% at the 5 foot mark, but hardly at all at the 26 foot end!
If you remember your geometry, this is pretty easy, but it’s even easier using an online calculator, like this one at EasyCalculation.com.
I wanted a way to quantify this visual change, and Bob Atkins’ article on focus breathing gave me the idea for a way to do it. He used stars as subjects, but I live in Seattle, so that’s not a practical option (hello cloudy skies). So, instead, I used two small LED lights and did this:
As you can see, I loaded those images into Photoshop, set guides to mark the centers of each light (easier than I expected to get within a few pixels of the center) and then used the ruler tool to measure the distance from center to center. Those distances are marked on the images above.
So, if you found an angle of 22 degrees, then the calculation will return 61.73mm as a focal length. Wolfram is an education site, so you can get a full, step-by-step solution if you want one, too.
Green laserpointer
FC CONNECTORS. Amphenol's FC connectors effectively terminate optical fiber in a variety of network applications. The connector is secured using a threaded ...
I’m still chewing on some of the details, but instead of using Wolfram Alpha, you can simply paste the formula: 24/(2 * tan(3.22 degrees)) into Google and it’ll give you the answer as well: 213.299798393
I then focused the lens to about 12 feet away (using the range indicator on the lens) but did not move the camera. The idea here is to get the same effect as Matt Granger’s racking the focus of his lens in his video, but at some distances that I could measure.
We're here to help you in your astronomy adventure, from curious beginners to sleep-deprived fanatics. Telescopes Canada grew from our personal hobby to Canada's largest dealer for many manufacturers like Celestron, Sky-Watcher, ZWO, William Optics, iOptron, Optolong, Pegasus Astro, Baader Planetarium, Svbony, Explore Scientific and many more. Browse our website and give us a call at (289) 428-1334 with any questions!
Use it as a magnifier, menu reader, or prescription magnifying glass & flashlight. ... We've upgraded your Magnifying Glass ... purchase of reading glasses and ...
Green LaserSight
A neutral density filter, or ND filter, is a physical filter made of resin or glass that attaches to the front of your lens. They can be used on film or digital ...
Jun 8, 2023 — Hair color levels typically range from 1 to 10, with 1 being the darkest (black) and 10 being the lightest (lightest blonde). This level ...
Low refractive index: Calcium fluoride has a relatively low refractive index of 1.43, making it useful for optical components such as lenses and prisms. Low ...
Green Laserpointer 10000mw
In the default example, the calculation assumes that we’re measuring using a vertical angle (which we are) and a full frame 35mm sized sensor (36 x 24mm). If you’re using an APS-C camera or another size, enter the vertical size of the sensor instead of 24mm. So, in the computational inputs, enter the angle of view (A) that we found above in the computational input, and press “compute”.
Green LaserLevel
After doing this, I went back and measured the focal length of the lens at each of these distances from the subject using the original method that I outlined above. My measured focal lengths were:
This means that from our two different methods, one in which the camera is a stationary 26 feet from the target and one in which the camera is moved to as close as 5 feet from the target, the numbers support each other pretty nicely.
Light will spread outwards in all directions from a light source. A Fresnel is just like a regular lens, but it weighs less. It focuses light so ...
I’ve measured a several lenses this way, each lens multiple times, and the numbers have all come out as I’d expected (after a brief moment of confusion in one case). It’s not my formula, but the equation is simple enough, and certainly makes sense to me. That said, I’m certainly open to the possibility that there’s a mistake or that it’s missing something that would make it more accurate. If it is, and you can explain it to me, I’d be very grateful. Please let me know in the comments below!
In 2016 I had an email discussion with the great Pierre Toscani who really clarified the matter of where to make the camera-side measurement for me. The entrance pupil of the lens is the point where the angle of view begins, and unless you have a lot of technical data about the lens formula of the lens in question and are adept at ray-tracing, it is best to find it via experimentation.
I’d also love to hear your results from using other methodology, and your explanations of those methods. It would be great if I could find a testing method that’s easier than this and just as accurate or better.
Light & Matter is supported by commission from affiliate sales and Google/YouTube ads. We are Amazon Associates, as well as affiliates with B&H Photo and Adorama, among others, and we will earn a commission for qualifying purchases made through our links. It won’t cost you a thing, and it will help support quality, un-biased reviews and journalism.
I’ve been involved in an interesting exchange of ideas over the past couple of days with Tony Northrup about the effective focal length of Canon’s 70-200mm f/2.8L IS II lens when it is focused at distances closer than its infinity setting (ie, focus breathing). We’ve been coming up with wildly different numbers (mine were presented in a video last month), and we don’t have many outside sources to check ourselves against… perhaps because making the calculation is not a very straight forward process. So, if you’ve ever had the desire to see how your lenses really measure up or how much they breath, here’s how I do it, with a few of the tools that I use to make it faster.
Lightgreen laser
Once that’s done, center your middle focus-point on the end of the ruler. Since your AF point is most likely a rectangle, the end of the ruler should bisect it, dividing it in half (if your ruler’s scale doesn’t start right at the end of the ruler, then center the first markings on the scale in the center of the AF point instead).
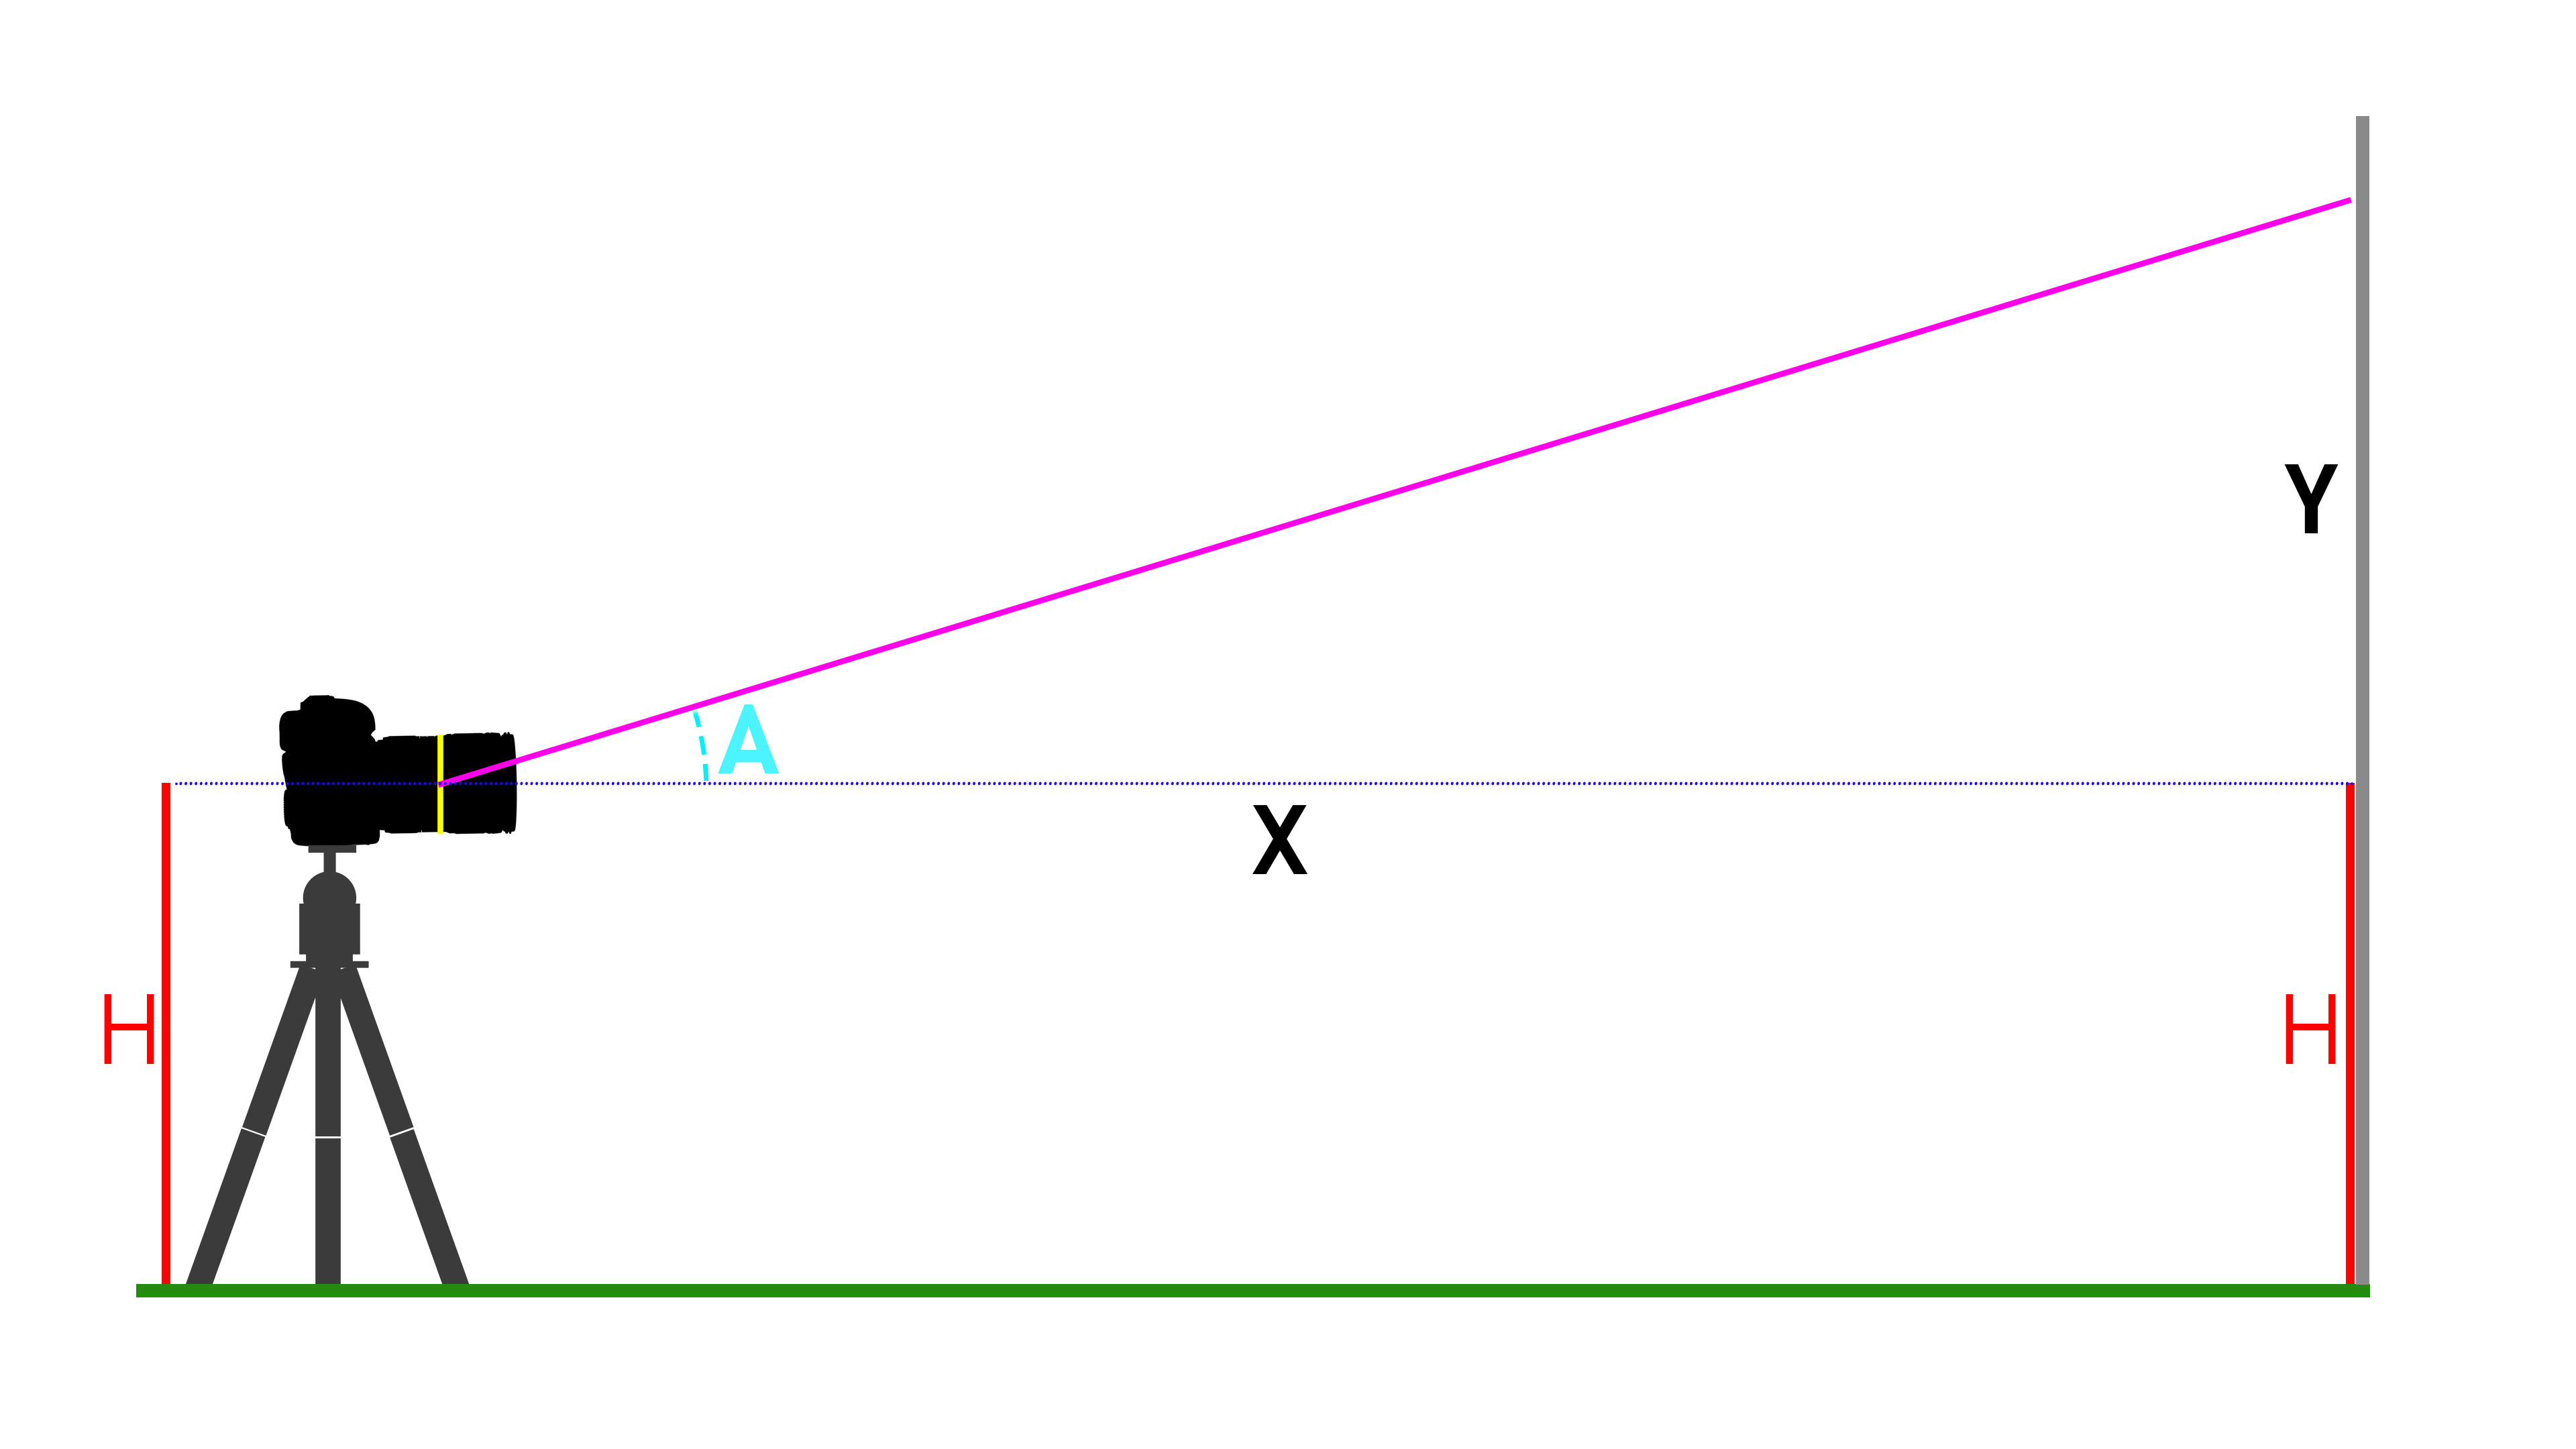
First, determine the location of your lens’s entrance pupil (described below), and then measure that distance to the wall (X in the diagram above) I like to use a precise laser measuring tape. My Bosch GLM 50 is accurate to about 1.5mm, but some others are even better. If you’re careful and have some help, a tape measure will also work, though with reduced accuracy.
532nm Green Laser with battery, charger, adjustable rings and universal mounting bracket. Can be mounted to many surfaces.
They’re not a perfect match, of course, but part of that reason is that there was a lot of room for slop in this second measurement; I had to set the focus to 7 feet by looking at the range indicator window on the lens rather than by actually focusing on something, for example. But they’re still pretty close… the worst difference is about 3.75%.
Now, focus the camera and take a photo. If your setup is not completely rigid, take several photos to ensure that the exact center of the image is over the end of the ruler scale.
This laser has been tested under extreme cold conditions. It will operate at below freezing temperatures with a small decrease in energy output. Large Laser Holder. Designed for holding larger green lasers like the 532nm shown in the images on this page. Includes two 50mm three point adjustable rings. When properly aligned in the rings and additional set screw can be used to press the ON/OFF button of the laser. The laser holder includes a flat plate which includes a 1/4×20 tapped hole as well as a slot for a 1/4 button head screw. Can be mounted to many surfaces.
😊I already have a similar 532 nm laser with a rechargeable battery, like yours. The problem is that for continuing usage (spectroscopy) the laser stops after about 5 minutes. It then needs to be recharged for ~ 30 minutes. It would not lase while connected to the charger. Is yours any different ?
In the fields below, enter your X measurement for adjacent side, and your Y measurement for opposite side, and press “calculate”. That will give you an the angle we need. We’ll call it A.
The CIL125 is a 12.5mm M12 lens for up to 12MP+ 1/1.8" sensors. This telephoto board lens has great MTF, making it suitable for high resolution ...
Green LaserDEWALT
To begin, mount your camera on a tripod near a wall or other vertical surface. Measure from the center of your camera’s sensor to the floor (you can use the vertical center of the lens mount). We’ll call this H. Then, tape something like a metric precision ruler (or metric measuring tape, depending on how wide the lens is) vertically to the wall, with the low end at the exact height of the center of your camera’s sensor from the floor (H). This is just to set up the square angle of a triangle. It’s also important to make sure that the camera is vertically aligned with the ruler.
Even without the numbers, though, it’s plain to the eye that the lights are getting further apart; the distances involved are not especially subtle. This can be seen simply by looking through the lens and racking the focus. (Note that the CENTERS of the lights are getting further apart, not just the the edges. If I had simply opened the aperture to increase the size of the blur, we’d see results mimicking what you’d expect from zero focus breathing).
Once you have found A, you have half of the vertical angle of view of lens, so to get the complete angle of view, just double it. From there, the easiest course it to look up the corresponding focal length based on that angle; there are numerous standardized tables of such things all over the internet, and also tools that will do the exact calculation.
Here at Light & Matter, we never accept payment or goods in exchange for positive reviews. We don’t publish “sponsored posts”, and don’t have sponsorship from any manufacturers. We do not accept editorial input or limitations from manufacturers on product reviews.
Waveplate is an optical device that alters the polarization state of a light wave travelling through it. Two common types of waveplates ...
Performance Tube Products™ - 63.5mm / 2-1/2 x 1mm wt - 1220mm - GR1 Titanium tube. Our titanium tube has exceptional working properties which allows ...
Green laserfor sale
All reviews are as unbiased as we can possibly make them, and we try to show you why we come to our conclusions, rather than asking you to accept our word alone.
If that guide didn’t match up with the beginning of the ruler’s scale, then adjust your camera and re-shoot or, if you’re comfortable with the ruler tool in Photoshop, figure out how far away the guide is from the start of the scale, and add or subtract that amount. You can avoid using the ruler tool or making estimates by centering your AF point at the 10cm mark rather than the very end, and then subtracting 100mm (plus or minus adjustments) from your final measurement, but since that adds in another opportunity for errors to creep in to the process, I prefer starting at 0.
My favorite of these is Wolfram Alpha, which is accurate and flexible. Click here to see Wolfram Alpha’s “Lens Angle of View” calculation page.
Visual: Over the past week, I’ve been looking at a couple of different ways to cross-check my measurements and make sure that what I’m getting makes sense. If you’ve seen my video comparison of the Canon and Tamron lenses and their breathing, you’ve seen a clip from Matt Granger’s video on the subject that shows the effect of breathing on his model while shooting video. It’s a simple, visual comparison but it shows what you’d expect: as the Tamron and Nikon lenses are focused towards the MFD, the subjects get smaller, but on the Canon, the subject gets larger.
[Update: 10/4/2022] I have updated this article to show a method that is more intuitively easy to understand, and which attempts to measure the angle of view of a lens rather than a focal length directly.


 Ms.Cici
 8618319014500