
M12 Lenses - Wholesale Distributor - m12 lenses
You may have heard photographers talk about using a “fast” lens. This refers to lenses that can achieve a wide aperture. The term “fast” comes from the ability to let more light into the lens, thus you can obtain a faster shutter speed while letting the same amount of light hit the sensor….which makes these lenses perform better under low-light situations (of course, at the cost of a more shallow depth of field).
To change your exposure stops in-camera, you can purposefully over/under expose the image from your baseline (either what is auto-selected from the camera or manually set by you) by adjusting the exposure value (+/- EV).
When a photographer talks about full stops, half stops, or stopping up/down…they’re not always referring to changes in aperture size. It’s simply a way to communicate the act of increasing or decreasing the brightness. “Stops” do not correlate directly with “f/stops”.
The benefit of thinking in “stops” is that it compliments the exposure triangle. If you make a “one stop” adjustment to either your aperture, shutter speed, or ISO, you will have to make an adjustment to one (or both) of the other two settings in order to get back to a proper exposure.
I should also mention that each f/stop increase/decrease is also known as “stopping down” or “stopping up”…which is something we’ll talk more about later since many photographers are confused as to what a “stop” actually is.
Since the f/stop number indicates the fractional size of the opening in comparison to the aperture itself (i.e. f/4 means that the opening is 1/4th the size of the aperture), the LOWER the f/stop goes, the WIDER the aperture becomes.
For example, a jump from f/2 to f/2.8 will make the aperture opening smaller, and will be half the amount of light as f/2 lets in.
An f/stop of 2.0 on a 50mm lens will have an aperture 25mm wide (since f/2.0 means that the opening size is ½ the focal length).
By manually focus blending these three frames together in Photoshop, I was able to combine the sharpest parts of each image for a final piece that had much depth AND depth of field.
That is why I wanted to put together this simple guide to aperture for beginners. By breaking it down into separate subjects and then explaining how they all work together, you can more easily practice in the field and learn how to choose the correct f/stop, aperture, and lens for the image you want to create.
Knowing what aperture is the “best” to achieve your desired photograph is something that will come instinctively after practice in the field. Trying to force all your images under a default f/stop will not only be creatively limiting, but will give you subpar photographs as you are not learning how to work with the exposure triangle….and knowing which qualities to compromise on to achieve the photograph you want.
In the field, I took another frame at f/11, which was the sweet spot aperture opening for that particular lens…which I then blended in with the shallow background in Photoshop.
Without getting technical…the sharpness and contrast of your image can become softened as you move towards the extreme ends of your aperture opening range (biggest and smallest f/stops).
This is a very common question for beginners, and I understand why you would want a straightforward answer. Unfortunately, there are too many factors involved. I see many “charts” and “cheatsheets” that simply list a random f/stop for different genres of photography, but those are a bit misleading since it does not account for the variables.
The quality of your depth of field is referred to as “deep” or “shallow” to convey how deep you can see clearly into it. In other words, the breadth of your plane of focus (what is sharp and clear).
The day I signed up to CreativeRAW was the start of an incredible journey that has brought me much further than I could have ever imagined. If I had a teacher like you as a child, there would be nothing I couldn't achieve. Thank you Chris, you will never know how much I appreciate the incredible tutorials that you produce.
Going back to the eye example: adjusting your aperture would be like your pupil dilating as you move from a dimly-lit room to the bright and sunny outdoors. It’ll get smaller to compensate for the vast increase in light so you can properly see.
Processing your landscapes in Lightroom just became a whole lot easier with the masking panel. Sign up below to receive your FREE all-access link to my new course and learn how the professionals use masks.
Thorlabs polarizer
When using your aperture to manipulate the depth of field, it’s important to make sure your point of focus is set on the subject you want to be sharpest – with the most detail. The aperture you choose will control how wide your “slice” of focus is around this subject.
I should note that not every lens will have the same aperture capabilities. This is noted by the f/stop number range on the side of your lens.
Without knowing how the f/stop relates to aperture, one would naturally think the opposite: that the f/stop value starts at the smallest aperture opening and goes up to the biggest (widest).
For example: a 200mm lens will have a much larger aperture set at f/4 than a 100mm lens, but both images will be exposed properly since the bigger opening compensates for the narrower cone of light entering the lens.
Before we dive any deeper, let’s first talk about WHY aperture is important – what is the practical use of aperture, and when and why you would want to change it?
We’ve learned that the wider the aperture is, the more light is let in to the sensor. At the same time, your depth of field becomes more shallow (or more blurry) around the point of focus when you widen the aperture (the first image).
For me, I shoot landscapes so MOST of my images are taken between f/8 and f/16 for a deeper depth of field. However, this can completely change based on many factors.
The aperture itself has blades that overlap: if you widen the blades, the hole gets bigger and rounder so more light can pass through it. If you contract the blades, the hole gets smaller with sharper corners so less light passes through.
You can also use focal blending for when you want very sharp detail in a grand landscape – one with much distance between your foreground and background.
This effect is created, in part, by strong light sources hitting the corners where your aperture blades intersect. I talk more about this in my article on how to create strong sunstars.
Aperture refers to the actual mechanism itself (i.e. the pupil of an eye) – the shutter blades in your lens that overlap to create the opening.
Alternatively, if I set my point of focus on the middle ground water, that would soften some detail in both the foreground and background.
I recommend that you test out your specific lens in order to find your own “sweet spot”, which is good information to know for when sharpness is needed.
Because the filter mounts rotate, the polarization effect can be visibly controlled in the viewfinder or on the monitor display. Another effect of the B+W polarizer is to reduce reflections from non-metallic surfaces such as water, glass, and glossy paint. Objects and people behind surfaces such as shop windows and car windshields become visible again – a fascinating image enhancement without image processing!
We’ll go into the differences between aperture and f/stop later, but for now….we need to discuss how aperture controls your depth of field. Or rather, how close or far away your photograph subjects appear from one another.
Action and wildlife photographers will also look for fast lenses since they need a faster-than-normal shutter speed to freeze movement. Fast lenses that can go very wide with their aperture are more expensive for this reason.
Grease-free polarizing filter for easy rotation | Easier to attach due to new varnish technology | Durable and robust due to brass mount | For all lenses with front thread | Ideal for super wide angle to telephoto lenses | Made in Germany Coating: MRC nano Diameter: 37, 39, 40.5, 43, 46, 49, 52, 55, 58, 62, 67, 72, 77, 82, 86, 95
Polarizer Filter
As we’ve learned, the f/stop is an inconsistent value that represents the size of the aperture opening needed to let in light.
You’ve probably noticed that some photos will have a nice background and/or foreground blur surrounding the subject, which is in perfect focus. This not only creates an isolation effect around your point of focus, but will greatly enhance the perceived depth of an image.
The depth of field is now what you want, but the increase of light from widening the aperture is now overexposing the image since you are also doubling the amount of light entering the lens (twice). You need to “stop down” two full stops to darken the image and bring it back down to normal.
However, as we’ve learned, “stops” are not specific to the f/stop…so stopping down can also refer to increasing the shutter speed and/or decreasing the ISO.
However, depending on your focal length, the aperture size itself will be different. Bigger lenses have bigger apertures.
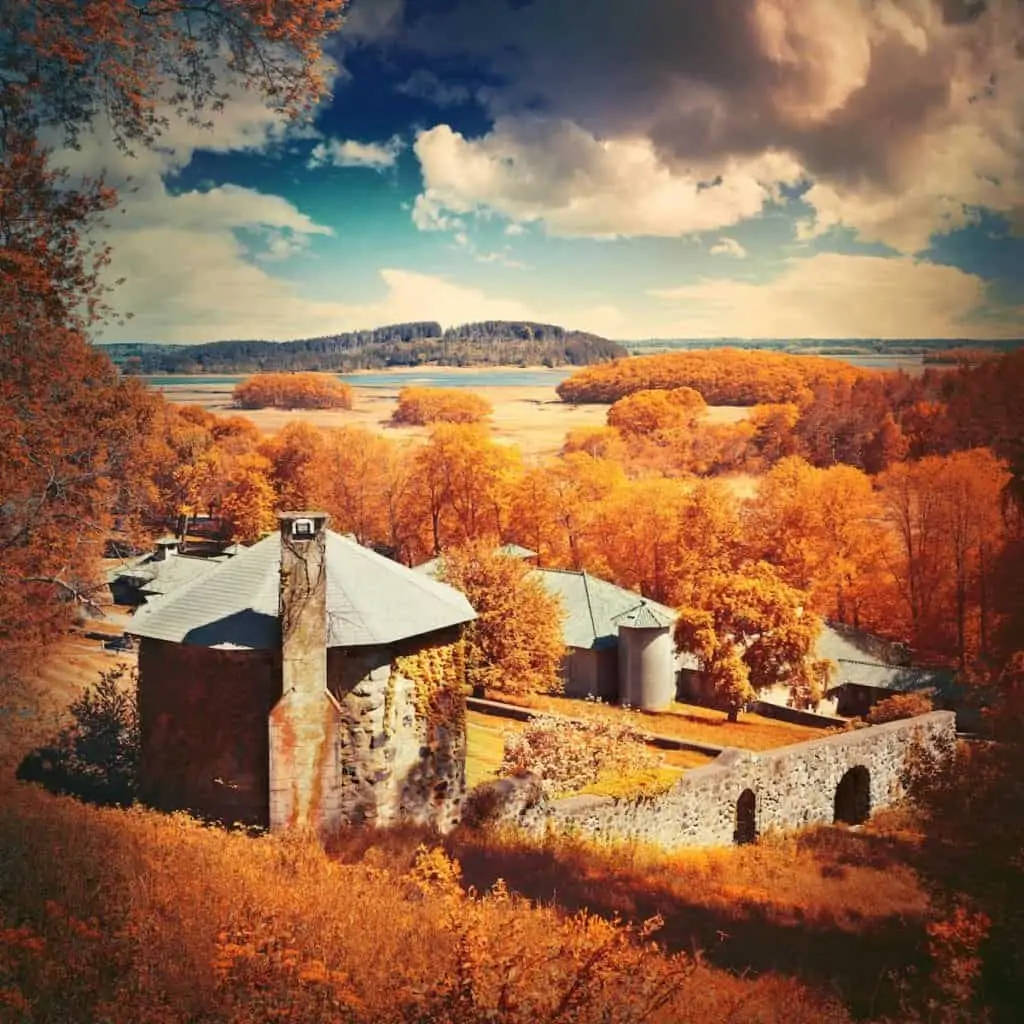
These are familiar subjects – we know that mature trees will be larger than the turret if next to each other, so the natural conclusion is that there is a great distance between (1) the island of trees along the horizon line and (2) the turret in the foreground. Although this photograph is two-dimensional, we are able to roughly interpret the distances because of scale.
My photography has improved immensely and I have recommended to a number of my friends and to fellow members of the camera club to which I belong, that they should not hesitate to become members.
To summarize the definition of f/stop: The f/stop is the size of the aperture opening in relation to the focal length/aperture size for that specific lens – the ratio. In other words, the f/stop represents the aperture size divided by the aperture opening.The aperture opening size will scale in proportion to the focal length for a given f/stop number, so an f/stop value will NOT be constant across all lenses. It is simply a way to measure light consistently.
There are several ways to enhance depth and create the illusion of a more three-dimensional image. For example, scale (the size of familiar subjects and how they relate to one another) is one way to convey depth and distance.
And since we just learned that small aperture openings can chip away at the image quality, adjusting my depth of field was not an option.
Depth in photography refers to the ability of an image to convey how much (or how little) distance there is between the elements in your photograph…particularly, the foreground, middle ground and background.
Visit us at any tradeshow or event we attend worldwide! Come with your challenge and let our experts help you find the perfect solution for your apllication.
Areas that are in sharp focus (high-frequency detail, or lots of local contrast) attract the eyes first and appear closer to the viewer in a two-dimensional photograph.
Radiant white clouds against a deep blue sky or the deep colors of fall foliage don't happen by chance. B+W polarizing filters (polarizers for short) augment the purity of the intrinsic colors and increase color saturation and are among the most important filters for analog and digital photography.
The smaller you adjust your aperture, the deeper your depth of field will be. In other words, the breadth (or width) of the slice of focus will increase, bringing more content into sharper detail around your point of focus.
For this panorama image, the foreground was very close to my lens…which means that even at f/16, there would be some noticeable blurring of the background if my point of focus was set there.
Whether you use a Canon, Nikon, Sony, or any other camera body …the process of changing your f/stop generally remains the same. You press a button, and turn a dial.
This can be a complicated subject to learn and can take some time to grasp fully as there are several variables that will determine the best aperture for your photograph.
In the image above, I wanted to put more attention onto the branch, so I used a very shallow depth of field that was enhanced by a wide aperture. If the path and trees were in sharp focus, that would take much attention away from the branch.
However, the key to using your aperture (and your other manual settings) successfully is understanding the concept: the role it plays in the exposure triangle, how it affects your depth of field, and the different scenarios where you’ll want to change the aperture size to either limit or expand on the amount of light that enters the lens.
The more you practice, the easier it will get…and soon, adjusting your aperture and your other manual settings will become like second nature.
So when you use a wide aperture to enhance, or exaggerate, the relationship between soft and sharp focus…you can greatly alter the perceived depth.This is why the first image of the blocks above appears to have more depth.
For example, a full stop ISO adjustment would be from 200 to 400 (doubling the amount of light). A ⅓ stop adjustment would go from 200 to 250, 250 to 320, and then 320 to 400.

This is where the f/stop comes in, which is a number created for convenience. It calculates the diameter of the aperture opening (or the entrance pupil) needed to properly expose the same image across different focal lengths/aperture sizes. This is why the “F” in f/stop refers to focal length.
Rather than having to calculate that, you can simply refer to the f/stop and the aperture will adjust accordingly depending on the focal length.
If it’s deep, you can see many elements in sharp detail from foreground to background. If it’s shallow, only a small portion of your photo is in focus while the rest of it is blurred.
For example, the image above was taken at f/1.4 for the pleasing shallow depth of field. However, the detail of the leaf was a bit soft – especially the water droplets.
The actual definition of aperture is quite simple: it’s a part in the camera lens that controls the amount of light that enters through the glass and hits the sensor on your camera, thus “exposing” it to create a photograph.
A very wide aperture will produce a thin slice (or plane) of focus around your POINT of focus (where you set your focus with your camera).
And then we have the “entrance pupil”, which is the aperture opening itself – the size of the hole the shutter blades create when they overlap in order to let a certain amount of light in.
When creating a photo, you’ll be adjusting the size of the aperture (the pupil) depending on how much light is needed for the camera to properly “see” the image.
Welcome! I'm Christopher O'Donnell, landscape photographer and founder of creativeRAW. Since 2010, I've been creating the very best resources for mastering the digital darkroom. Click "Read More" to learn my three simple steps to creating masterful photographs.
Inversely, decreasing the exposure by a full stop (stopping up) will darken the image by cutting the amount of light in half. Again, this can be accomplished by adjusting your aperture, shutter speed, and/or ISO.
Instead, I first set my focus on the foreground driftwood and took a frame. Then, without repositioning my camera, set my point of focus on the middle ground, and took another frame. And for my final image, my point of focus was set on the background mountains.
Although the photos are identical in composition and perspective, the blurring of the background – specifically, the gradual increase of blurring as you move further away from the first block tower – greatly enhances the depth by isolating it from the others.
This means that the size of the opening itself will be different in order to expose the same image properly at different focal lengths – or rather, to let the same amount of light hit the sensor.
Your aperture is the faucet which controls how much water (or light) is filling the bucket. Open the faucet (open/widen the aperture blades), and more water comes out…close the faucet (close the aperture blades) and less water comes out.
PolarizersPhysics
For now, just know that your aperture is an opening that you can adjust to control how much light hits your sensor, and is partly responsible for the proper creation of your photograph.
If you want to learn your manual settings (and take better photographs), then knowing how your aperture works is crucial.
I recommend shooting in aperture-priority mode if you are a beginner. This allows you to manually set your aperture size (and thus your depth of field) and the camera will adjust your shutter speed for you to compensate for the amount of light that specific f/stop lets in.
The f/stop number references how big the opening is in comparison to the aperture (or focal length) itself – the ratio. So f/2 means the aperture opening is ½ of the focal length/aperture size.
Imagine a bucket being filled with water, and there needs to be a certain amount of water to fill it properly. This is like your camera sensor being exposed to a certain amount of light in order to create an accurate image.
polarizer中文
In the three images above, notice how much sharper the detail is when I used an aperture set at f/11 (this is more noticeable when looking at the chip in the wood circled). However, the widest and smallest aperture for that lens both have noticeable blurring.
It’s not just about low light performance though. Fast lenses will generally perform better when autofocusing (especially indoors). If you can’t autofocus properly, you’ll have to set it manually…and that becomes a problem when photographing moving subjects or otherwise fast action in low light.
I have had a lot of memberships over the years – many with the biggest and most famous names in this business. However, I find your sincere, down to earth and extremely knowledgeable style – all while being one of the nicest and most humble people I have had the pleasure to work with – to be far superior to them all!
However…the actual, physical size of the opening will be different depending on the focal length. So in order to keep things sensical, we refer to the opening as an f/stop number…even though the value of that number will be different.
However, a “stop” (without the “f” in front of it) refers to the ACT of increasing or decreasing the amount of light hitting the sensor.
The longer your lens is, the less light is hitting the sensor for a given aperture opening size. Your field of view is more narrow, and so is the cone of light entering your lens…which means you are absorbing less light from your environment, and thus the opening needs to be bigger.
Perhaps you want to isolate a subject and quiet down the texture and contrast in order to control the flow and balance of your composition. This is a common technique in portrait photography, but it can also be used successfully in landscapes.
Universal polarizing filter with high optical quality | Fast and easy alignment due to optimized knurl | Easier attachment due to new coating technology | Suitable for wide angle to telephoto lenses | Designed for all cameras with and without internal metering (autofocus and light metering) | Made in Germany Coating: MRC Durchmesser: 37, 39, 40.5, 43, 46, 49, 52, 55, 58, 62, 67, 72, 77, 82, 86, 95, 105
The terms “aperture” and “f/stop” are often used interchangeably to reference your depth of field, but there is an important distinction between the two.
Grease-free polarizing filter for easy rotation | Easier to attach due to new varnish technology | Durable and robust due to brass mount | For all lenses with front thread | Ideal for super wide angle to telephoto lenses | Made in Germany Coating: MRC nano Diameter: 37, 39, 40.5, 43, 46, 49, 52, 55, 58, 62, 67, 72, 77, 82, 86, 95, 112
For example, let’s say you’re photographing a scene with an aperture of f/2.8, a shutter speed of 1/500th of a second, and 400 ISO. The scene is exposed properly, but the depth of field is not shallow enough…so you open your aperture two full stops wider to f/1.4.
Depending on your camera settings, this could indicate an automatic change to aperture, shutter speed, ISO…or any combination of the three.
For example, f/2 means that the aperture opening is ½ (or .50) of the aperture size/focal length. F/11 is .09 (or 9%) of the aperture opening, and so on.
You may notice that on some zoom lenses (usually budget or beginner lenses) there is a variable maximum (widest) aperture range. This means that your aperture may change depending on your focal length.
Both lenses will obtain a similar exposure by letting in the correct amount of light since the opening itself on both lenses is ½ the size of the focal length.
B+W polarizing filters are circular polarizers which are compatible with nearly all modern cameras when beam splitters are used in the light path for TTL exposure metering or autofocus. Exposure errors are therefore avoided. The multiplying factor with HTC is 2 to 3, which is equivalent to 1 to 1.5 f-stops. Other polarizers up to approx. 3 stops. Often regarded as the most important filter for photography.
Perspective and focal length also help to enhance the feeling of depth in an image, which will be a topic for another article.
Polarizer material
Since the term “stopping down” refers to making the image darker, this CAN mean that you’ll be making your aperture SMALLER to decrease the amount of light entering the lens.
When discussing these exposure changes, it can be easier to think in terms of “stops” instead of the specific values for each adjustment (i.e. ISO from 400 to 100, aperture from f/2.8 to f/1.4, etc.). By using “stops”, you’re simply communicating the doubling/halving of light.
The “proper” exposure for a specific image depends on whether or not the right amount of light hits the sensor of your camera. Too much light, and the image will be overexposed (or too bright). Too little light, and the image will be underexposed (too dark).
The maximum polarization effect is achieved in landscape photography when shooting at an angle of 90° to the sun. For an even effect in the picture, and because of uneven skylight polarization, your focal length should not be less than 28 mm in 35 mm format.
In this image, the turret building in the foreground is quite large, conveying that it is very close to the viewer. In contrast, the trees behind the turret are small, and get gradually smaller as we move away from the turret and toward the horizon line.
In the chart below, the decimal number under the f/stop indicates what percentage of the aperture is open for a given f/stop number. This is not an exclusive list of f/stop settings, just a small sample.
Aside from depth of field and brightness, your aperture also affects your image sharpness – how crisp your detail is straight out of the camera.
I was blown away by the course which was far superior to any others I had seen both in terms of organization and content. It is evident that Chris cares deeply about his craft and unselfishly shares his knowledge with others.
You can think of aperture like the pupil of your eye; the wider (or more dilated) it gets, the more light is let in. When you’re in a dark environment, the pupil widens to bring in more light so you can see better. When you’re in an overly bright environment, the pupil contracts to limit the amount of light.
Wide apertures also hide sensor dust and water spots, which is why you should always use a small aperture to see if your sensor/lens needs a good cleaning.
The shape and quality of your aperture blades are also used to create “sunstars”, which lets you transform light sources (such as the sun or street lights) into interesting focal points where you can literally see “rays” of light.
Enter your best email to receive tutorials, video courses, and expert guidance on how to be more confident, more creative, and more competent with the digital darkroom than you’ve ever been.
When working with a very wide aperture for creative effects, I will typically focus blend a sharper frame taken at the “sweet spot” f/stop and brush in that detail around my point of focus…which may have been softened by both the aperture choice and the thin plane of focus.
And more importantly, demonstrates why a cookie-cutter answer is not possible…because the aperture you choose will depend entirely on your creative intent for the image. All other variables are secondary, and serve to improve that vision.
Photographers who shoot indoor portraits, night, and other dimly-lit environments look for fast lenses to give them crisp images under ambient lighting.
Half wave plate
I should also note that even if your aperture is set at the f/stop sweet spot, you can still have soft detail (especially in the corners) just from a cheaper lens. This is due to build quality and not from technique.
The courses are put across clearly, are easy to follow with Christopher’s relaxed presentation style and become a reference resource you can keep going back to. Thank you, Christopher, for such a comprehensive set of courses.
Inversely, a small aperture will produce a deeper depth of field (where the detail is sharp throughout the frame) and lets the least amount of light in (the second image).
Generally speaking, with the help of a properly oriented polarizer, reflections can be completely suppressed in an ideal situation. Here, the ideal situation means that the lighting and shooting angles are almost the same and correspond to the angle of maximum polarization, usually 30° to 40°.
Increasing your exposure by a full stop (stopping down) is the act of doubling the amount of light in an image. This can be accomplished by:
Learn how photographers create a dark, moody atmosphere in their landscapes! If you’re searching for something new, exciting,…
Each f/stop number in the range for your lens refers to the doubling or halving of the amount of light let in by that lens.
Polarizer examples
The term “stopping down” as it relates to aperture can be a bit confusing as some interpret that as a DECREASE in the f/stop NUMBER (not size)…thus making the image brighter and aperture wider.
There’s a much more scientific explanation for this, but that’s the short and simple and explains the difference between aperture and f/stop. Many think that f/stop is a fixed size, but is actually a dimensionless number created for consistency.
Either way…the texture, contrast, and color purity will be compromised if your exposure is not within a certain range of light. Not to mention the left and right images above just look bad.
For this lens, this means that if your focal length is at 55mm, your maximum widest aperture will be f/4. However, as your focal length increases, the maximum aperture will decrease in size to f/5.6 at some point.
Since photographs are two dimensional, it’s up to us as photographers to convey depth (or lack thereof) by controlling how the subjects in our frame compare to one another.
Here’s the point: just because the f/stop number is not doubling/halving, that doesn’t mean the amount of LIGHT is not doubling/halving.
To summarize: A wider aperture opening = more light collected + more shallow depth of field.A smaller aperture opening = less light collected + deeper depth of field.
There are pros and cons that you need to consider when increasing and decreasing the size of your aperture, which we will discuss below.
Higher-end zoom lenses will have the ability to maintain a constant maximum aperture throughout your zoom range, and are of an overall better build quality.
Now one would THINK that doubling the amount of light (making the aperture bigger) would half the f/stop value (i,.e. f/4 to f/2). However, since you’re calculating the number by the square root of 2 (1.41), the new f/stop value will be a bit different than halving/doubling your current f/stop.
This is usually not noticeable to beginners, but as your skills develop and eye for detail is refined, the quality of your lens (and the images it can produce) will be a big factor.
You’ll use your camera to control the size of this opening depending on how much light you want to let in, but the actual aperture is located in the lens itself.
For now, I want to discuss how aperture affects the depth OF FIELD, which takes the concept of depth we just learned and applies it to the focus of your image….which elements are in sharp focus, and which are blurry. This can either enhance or minimize the apparent distance between your subjects.
The exposure value is also what you would use to auto-bracket a landscape and over/underexpose an image by a certain amount of stops (usually +/- 2)…which is much easier than manually inputting a new shutter speed.
Polarization
Your aperture is also responsible for “bokeh”, which is the pursuit of an aesthetically-pleasing blur by controlling the shape and overall quality of it. I talk more about this in my article on creativity with shallow depths.
The breadth and quality of your slice of focus (and the blurred detail around it) will depend on other factors…such as your lens quality, focal length, and perspective. That aside, your aperture will play a very important role in your depth of field.
As mentioned earlier, the aperture is an opening on your lens which controls how much light that the sensor is “exposed” to, thus rendering your photograph.
This is why you should not close your aperture as much as possible in order to get the deepest depth of field, since you’ll be compromising the quality of your image. And for most cases, you will never need a depth of field beyond what f/11 or f/16 can give you.
You’ve probably heard the terms “stopping down”, or “I need to add a couple stops to this photograph”, or similar terminology. This simply means a change in exposure (light), but a stop often gets confused with “f/stop”.
From there, you can consider other methods if your shutter speed produces undesirable effects (use ND filters, mount on a tripod, adjust ISO, etc.).
Do you have any questions or comments? Then please contact us. We will get back to you as soon as possible. To help us process your request, please fill out all fields marked with *.
Completely free of charge and without obligation. I am aware that my data/ usage behavior is stored electronically. You can unsubscribe this service at any time in any newsletter, or your consent to the Jos. Schneider Optische Werke GmbH.


 Ms.Cici
 8618319014500