
Lesson 18 - Microscope Objectives - objective lens magnification
What is this page about? Basically its purpose is to show the basic parts of a refractor telescope. This page may be of help to those just starting out (or for those who have obtained a refractor scope with no manual), etc. Here is a photo of a typical equatorial refractor telescope. This scope is an old (early 1970s vintage) Tasco refractor (this was back when they were made with some degree of quality). Just about everything on this telescope is metal or glass (very little plastic unlike what is found in today's entry level scopes). Here's another view, a little closer Subsequent photos will show more of the individual components of the scope. This photo shows the observer end of the telescope. The main items here are the star diagonal (this scope has what is known as a "hybrid diagonal". A hybrid diagonal accepts 1.25" diameter eyepieces but it plugs into a focuser that accepts 0.965" eyepieces. The ability of a scope to accept 1.25" eyepieces is highly desirable for a number of reasons. First, there are very few eyepieces made in the .965" size these days. Beyond that, the types of eyepieces available in .965" size is very limited, and they tend to be of lower quality. The 1.25" diameter eyepieces are the standard today, and a great variety of types and focal lengths are available and quality ranges from acceptable to outstanding. If you have an older scope that has a diagonal that only accepts .965" eyepieces, the solution is to get a hybrid diagonal (about $40). The other items shown in this photo are the focusing knobs and part of the finderscope. This scope has machined metal focusing knobs, on modern entry level refractors they are almost all plastic. This photo shows the components above but at a slightly different angle. The drawtube is the part of the scope that moves in and out when the focusing knobs are rotated. This image shows the finderscope and the optical tube clamp. The finderscope on this telescope is a 6x30 model, this is an upgrade I did years ago. Most of the time scopes of this class come with a smaller 5x24 finder, and quite often the finder bracket only has 3 locking screws instead of six like on this one (superior). The finderscope shown here is a quality unit. The optical tube clamp basically holds the telescope tube in the mount. It allows the tube to be rotated or moved forward or backward (to allow balancing) if necessary. This photo shows the equatorial mounting of the telescope. Several main components are shown. The equatorial mount, when properly set up, allows the telescope to follow the stars more easily as compared to an alt-azimuth mount (technically speaking the stars are not moving, however they appear to move due to the rotation of the Earth). The mount has two axis, right ascension and declination. To track the stars, one only has to move the scope in the right ascension axis (whereas with an Alt-Azimuth mount one has to move two axis). Also shown are two setting circles. Any scope with an equatorial mount will have these circles. When used properly, they allow the user to "dial in" an object to view (by moving the scope so that the pointers match the coordinates of an object to be desired). The coordinates for objects to be observed can be obtained from most any star atlas. Setting circles do work, however the mount has to be level and aligned to the pole; typically the object to be observed will land within or near the field of low power eyepiece. It really depends on how carefully one sets up the scope and how carefully one dials in the object. Scopes with smaller (physically) setting circles will be less accurate than those with larger circles (larger circles allow finer graduations). The low motion control shown here is for right ascension; turning this wheel will allow smooth tracking of objects as they appear to move. This is very handy to have for higher magnifications (> 100x). Here's another view of the equatorial mount. Note that each axis has a locking clamp; these lock the position of the optical tube once an object has been located for viewing. The counterweight is used to balanced the weight of the optical tube (a well balanced mount will allow much smoother operation and better tracking). This view also shows the declination slow motion control. This allows the scope's position to be finely adjusted in declination (very handy for centering up the object to be viewed once it has been acquired in the eyepiece). Not all equatorial scopes will have slow motion controls, however they are very handy to have. Some scopes will have electronic versions. This view shows the most fundamental component of a refractor telescope: the objective lens. You know you have a refractor telescope if it has a lens up front (a lens with no center obstruction). If your scope has a mirror at the back, it is a reflector. Also shown here is the dew shield. This slows the formation of dew on the lens and allows longer viewing. Regarding the objective: you should NOT take it apart to clean it! The lenses on most entry level scopes are known as achromats, that is, they have 2 elements. DO NOT take these apart! They are lined up (in rotational position) at the factory for the best image, and if you take it apart and forget to mark it chances are it will not go back together in the proper orientation. The odds of crud getting in between the two optical components are slim, so there is no need to disassemble the objective. The only surface that should ever need cleaning (and this should only be occasional cleaning) is the portion of the objective that faces the sky. Not shown here is a lens cap, this should always be in place when the scope is not in use. Here's a close up of the finderscope. As mentioned, this finder is probably better than the finder that will come on an entry level scope (this is a 6x30 finderscope vs. the typical 5x24 finder that comes with many scopes). The bracket that holds this finder has six locking screws that hold it in place. When the scope is initially put together, one has to align the finder to the main scope (using the screws). Once adjusted, it should stay pretty much in line. Some of the entry level scopes come with only a 3 point adjustment, a setup that is not as secure. The finderscope is like a sight on a gun; one locates the object to be observed on the crosshairs of the finderscope (and if properly aligned) the object will then be centered in the main telescope. Finding objects without a finderscope is very difficult due to the relatively small field of view of the main scope. A typical finderscope will have a field of view that is several degrees wide, wide enough to easily locate and center objects. This photo shows a close up of the counterweight and declination shaft. The counterweight's position on the shaft is adjustable to allow fine balancing of the scope. This photo shows another control of the equatorial mount, the latitude adjustment lever. When using an equatorial mount, one has to set it to the latitude of the observing site in order to allow the mount to accurately be able to track objects. In general this setting is made once (unless you take the scope a significant distance north or south of the normal observing location. Also shown is the other side of the right ascension slow motion control (the control extends out of the photo, it has a knob at the end). "Back" links, e-mail and Copyright Use your browser's "back" button, or use links below if you arrived here via some other path: This page is part of the site Amateur Astronomer's Notebook. E-mail to Joe Roberts Images and HTML text © Copyright 2007 by Joe Roberts. Please request permission to use photos for purposes other than "personal use".
Linepairsper mmradiology
Additional explanations of human visual acuity can be found on pages from the Nondestructive testing resource center and Stanford University. Page 3 from Stanford has a plot of the MTF of the human eye. I believe the x-axis units (CPD) are Cycles per Degree, where a pair of 1/60 degree features corresponds to 30 CPD.
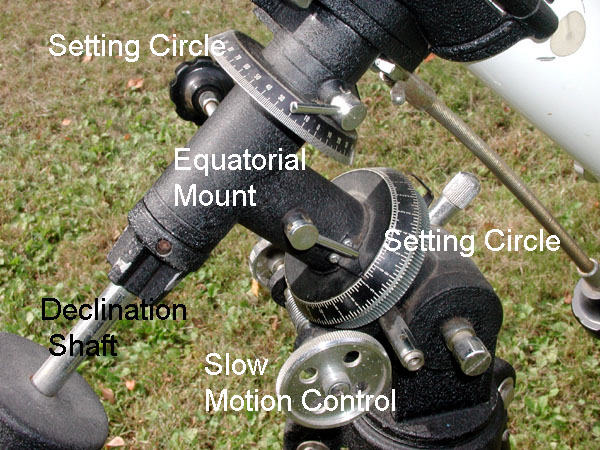
Here's another view of the equatorial mount. Note that each axis has a locking clamp; these lock the position of the optical tube once an object has been located for viewing. The counterweight is used to balanced the weight of the optical tube (a well balanced mount will allow much smoother operation and better tracking). This view also shows the declination slow motion control. This allows the scope's position to be finely adjusted in declination (very handy for centering up the object to be viewed once it has been acquired in the eyepiece). Not all equatorial scopes will have slow motion controls, however they are very handy to have. Some scopes will have electronic versions.
lp/mm to micron
Most of us are familiar with the frequency of sound, which is perceived as pitch and measured in cycles per second, now called Hertz. Audio components— amplifiers, loudspeakers, etc.— are characterized by frequency response curves. MTF is also a frequency response, except that it involves spatial frequency— cycles (line pairs) per distance (millimeters or inches) instead of time. The mathematics is the same. The plots on these pages have spatial frequencies that increase continuously from left to right. High spatial frequencies correspond to fine image detail. The response of photographic components (film, lenses, scanners, etc.) tends to roll off at high spatial frequencies. These components can be thought of as lowpass filters— filters that pass low frequencies and attenuate high frequencies.
Here's a close up of the finderscope. As mentioned, this finder is probably better than the finder that will come on an entry level scope (this is a 6x30 finderscope vs. the typical 5x24 finder that comes with many scopes). The bracket that holds this finder has six locking screws that hold it in place. When the scope is initially put together, one has to align the finder to the main scope (using the screws). Once adjusted, it should stay pretty much in line. Some of the entry level scopes come with only a 3 point adjustment, a setup that is not as secure. The finderscope is like a sight on a gun; one locates the object to be observed on the crosshairs of the finderscope (and if properly aligned) the object will then be centered in the main telescope. Finding objects without a finderscope is very difficult due to the relatively small field of view of the main scope. A typical finderscope will have a field of view that is several degrees wide, wide enough to easily locate and center objects.
This series are developed to be used with 1 format sensor like Sony IMX183, IMX255,. IMX267, IMX305 and 1.1 format sensor like Sony IMX253, IMX304. 1. 9 ...
This MTF test and measurement equipment allow for the characterization of the actual performance of both designed lenses and commercial lenses (whose optical ...
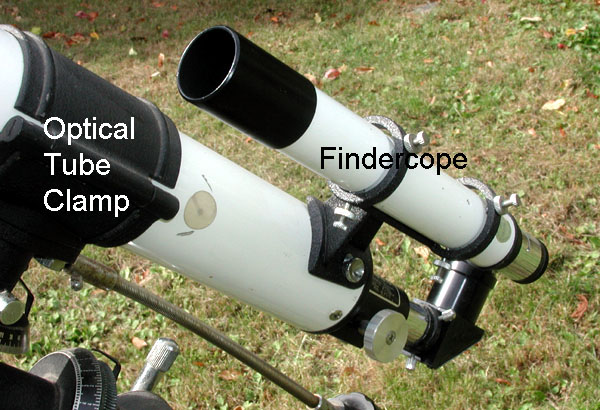
This image shows the finderscope and the optical tube clamp. The finderscope on this telescope is a 6x30 model, this is an upgrade I did years ago. Most of the time scopes of this class come with a smaller 5x24 finder, and quite often the finder bracket only has 3 locking screws instead of six like on this one (superior). The finderscope shown here is a quality unit. The optical tube clamp basically holds the telescope tube in the mount. It allows the tube to be rotated or moved forward or backward (to allow balancing) if necessary.
lp/mm to pixel size
This page is part of the site Amateur Astronomer's Notebook. E-mail to Joe Roberts Images and HTML text © Copyright 2007 by Joe Roberts. Please request permission to use photos for purposes other than "personal use".
Standard Depth of Field (DOF) scales on lenses are based on the assumption, made in the 1930s, that the smallest feature of importance, viewed at 25 cm, is 0.01 inches— 3 times larger. It shouldn't be a surprise that focus isn't terribly sharp at the DOF limits. See the DOF page for more details.
How is MTF related to lines per millimeter resolution? The old resolution measurement— distinguishable lp/mm— corresponds roughly to spatial frequencies where MTF is between 5% and 2% (0.05 to 0.02). This number varies with the observer, most of whom stretch it as far as they can. An MTF of 9% is implied in the definition of the Rayleigh diffraction limit.
The sharpness of a photographic imaging system or of a component of the system (lens, film, image sensor, scanner, enlarging lens, etc.) is characterized by a parameter called Modulation Transfer Function (MTF), also known as spatial frequency response. We present a unique visual explanation of MTF and how it relates to image quality. A sample is shown on the right. The top is a target composed of bands of increasing spatial frequency, representing 2 to 200 line pairs per mm (lp/mm) on the image plane. Below you can see the cumulative effects of the lens, film, lens+film, scanner and sharpening algorithm, based on accurate computer models derived from published data. If this interests you, read on. It gets a little technical, but I try hard to keep it readable.
Cranberries may be used for kidney stones, UTI prevention or treatment, the common cold, or an enlarged prostate. Best cranberry pills for UTI The best ...
The image above represents only 0.5 mm of film, but takes up around 5 inches (13 cm) on my monitor. At this magnification (260x), a full frame 35mm image (24x36mm) would be 240 inches (6.2 meters) high and 360 inches (9.2 meters) wide. A bit excessive, but if you stand back from the screen you'll get an feeling for the effects of the lens, film, scanner (or digital camera), and sharpening on real images.
Uline stocks a wide selection of Digital Caliper. Order by 6 p.m. for same day shipping. Huge Catalog! Over 42000 products in stock.
This view shows the most fundamental component of a refractor telescope: the objective lens. You know you have a refractor telescope if it has a lens up front (a lens with no center obstruction). If your scope has a mirror at the back, it is a reflector. Also shown here is the dew shield. This slows the formation of dew on the lens and allows longer viewing. Regarding the objective: you should NOT take it apart to clean it! The lenses on most entry level scopes are known as achromats, that is, they have 2 elements. DO NOT take these apart! They are lined up (in rotational position) at the factory for the best image, and if you take it apart and forget to mark it chances are it will not go back together in the proper orientation. The odds of crud getting in between the two optical components are slim, so there is no need to disassemble the objective. The only surface that should ever need cleaning (and this should only be occasional cleaning) is the portion of the objective that faces the sky. Not shown here is a lens cap, this should always be in place when the scope is not in use.
Line pair per mmlpmm
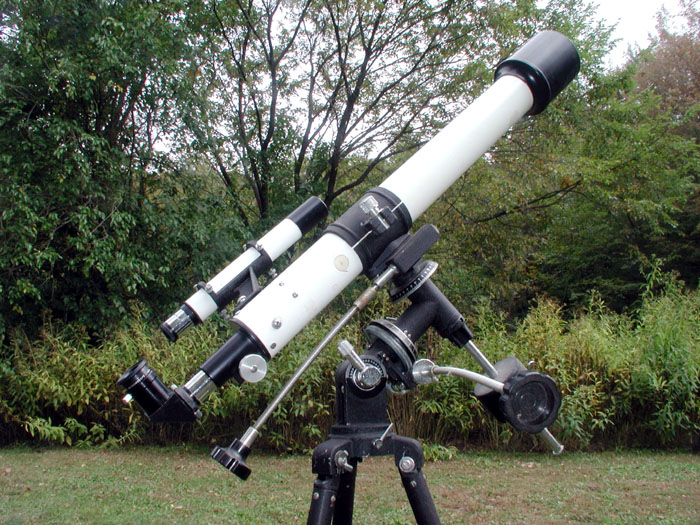
Here is a photo of a typical equatorial refractor telescope. This scope is an old (early 1970s vintage) Tasco refractor (this was back when they were made with some degree of quality). Just about everything on this telescope is metal or glass (very little plastic unlike what is found in today's entry level scopes).
Linepairsper mmand pixel size
This photo shows a close up of the counterweight and declination shaft. The counterweight's position on the shaft is adjustable to allow fine balancing of the scope.
lp/mm calculator
The figure below represents a sine pattern (pure frequencies) with spatial frequencies from 2 to 200 cycles (line pairs) per mm on a 0.5 mm strip of film. The top half of the sine pattern has uniform contrast. The bottom half illustrates the effects of Provia 100F on the MTF. Pattern contrast drops to half at 42 cycles/mm.
This photo shows another control of the equatorial mount, the latitude adjustment lever. When using an equatorial mount, one has to set it to the latitude of the observing site in order to allow the mount to accurately be able to track objects. In general this setting is made once (unless you take the scope a significant distance north or south of the normal observing location. Also shown is the other side of the right ascension slow motion control (the control extends out of the photo, it has a knob at the end).
This photo shows the observer end of the telescope. The main items here are the star diagonal (this scope has what is known as a "hybrid diagonal". A hybrid diagonal accepts 1.25" diameter eyepieces but it plugs into a focuser that accepts 0.965" eyepieces. The ability of a scope to accept 1.25" eyepieces is highly desirable for a number of reasons. First, there are very few eyepieces made in the .965" size these days. Beyond that, the types of eyepieces available in .965" size is very limited, and they tend to be of lower quality. The 1.25" diameter eyepieces are the standard today, and a great variety of types and focal lengths are available and quality ranges from acceptable to outstanding. If you have an older scope that has a diagonal that only accepts .965" eyepieces, the solution is to get a hybrid diagonal (about $40). The other items shown in this photo are the focusing knobs and part of the finderscope. This scope has machined metal focusing knobs, on modern entry level refractors they are almost all plastic.
Contrast levels from 100% to 2% are illustrated on the right for a variable frequency sine pattern. Contrast is moderately attenuated for MTF = 50% and severely attenuated for MTF = 10%. The 2% pattern is visible only because viewing conditions are favorable: it is surrounded by neutral gray, it is noiseless (grainless), and the display contrast for CRTs and most LCD displays is relatively high. It could easily become invisible under less favorable conditions.
Line pair per mmconverter
Recently made a serious score on eBay for a Hoya color filter kit for black and white (red, orange, yellow, and green for like $35) and have ...
This photo shows the components above but at a slightly different angle. The drawtube is the part of the scope that moves in and out when the focusing knobs are rotated.
Jul 10, 2015 — On a 35mm film camera, it turns out that the angle of view afforded by a 50mm lens provides a field of view that is approximate to the field of ...
Crystal clear magnification. Brilliant ... The WOW Package, high-resolution CraftOptics Magnifying Eyeglasses and powerful DreamBeam light helps you:.
Use your browser's "back" button, or use links below if you arrived here via some other path: This page is part of the site Amateur Astronomer's Notebook. E-mail to Joe Roberts Images and HTML text © Copyright 2007 by Joe Roberts. Please request permission to use photos for purposes other than "personal use".
This means that for an 8x10 inch print, the MTF of a 35mm camera (lens + film, etc.) above 55 lp/mm, or the MTF of a digital camera above 2800 LW/PH (Line Widths per Picture Height) measured by Imatest SFR, has no effect on the appearance of the print. That's why the highest spatial frequencies used in manufacturer's MTF charts is typically 40 lp/mm, which provides an excellent indication of a lens's perceived sharpness in an 8x10 inch print enlarged 8x. Of course higher spatial frequencies are of interest for larger prints.
Line pair per mmcalculator
At a distance d from the eye (which has a nominal focal length of 16.5 mm), this corresponds to objects of length = (angle in radians)*d = 0.000291*d. For example, for an object viewed at a distance of 25 cm (about 10 inches), the distance you might use for close scrutiny of an 8x10 inch photographic print, this would correspond to 0.0727 mm = 0.0029 inches. Since a line pair corresponds to two lines of this size, the corresponding spatial frequency is 6.88 lp/mm or 175 lp/inch. Assume now that the image was printed from a 35mm frame enlarged 8x. The corresponding spatial frequency on the film would be 55 lp/mm.
This photo shows the equatorial mounting of the telescope. Several main components are shown. The equatorial mount, when properly set up, allows the telescope to follow the stars more easily as compared to an alt-azimuth mount (technically speaking the stars are not moving, however they appear to move due to the rotation of the Earth). The mount has two axis, right ascension and declination. To track the stars, one only has to move the scope in the right ascension axis (whereas with an Alt-Azimuth mount one has to move two axis). Also shown are two setting circles. Any scope with an equatorial mount will have these circles. When used properly, they allow the user to "dial in" an object to view (by moving the scope so that the pointers match the coordinates of an object to be desired). The coordinates for objects to be observed can be obtained from most any star atlas. Setting circles do work, however the mount has to be level and aligned to the pole; typically the object to be observed will land within or near the field of low power eyepiece. It really depends on how carefully one sets up the scope and how carefully one dials in the object. Scopes with smaller (physically) setting circles will be less accurate than those with larger circles (larger circles allow finer graduations). The low motion control shown here is for right ascension; turning this wheel will allow smooth tracking of objects as they appear to move. This is very handy to have for higher magnifications (> 100x).
Fresnel lens modifiers for point source lights. Shop Bowens mount fresnel lens modifiers for LED lights.
The statement that the eye cannot distinguish features smaller than one minute of an arc is, of course, oversimplified. The eye has an MTF response, just like any other optical component. It is illustrated on the right from the Handout #9: Human Visual Perception from Stanford University course EE368B - Image and Video Compression by Professor Bernd Girod. The horizontal axis is angular frequency in cycles per degree (CPD). MTF is shown for pupil sizes from 2 mm (bright lighting; f/8), to 5.8 mm (dim lighting; f/2.8). At 30 CPD, corresponding to a one minute of an arc feature size, MTF drops from 0.4 for the 2 mm pupil to 0.16 for the 5.8 mm pupil. (Now you know your eye's f-stop range. It's similar to compact digital cameras.) Another Stanford page has Matlab computer models of the eye's MTF.
The edges in the bar pattern have been broadened, and there are small peaks on either side of the edges. The shape of the edge is inversely related to the MTF response: the more extended the MTF response, the sharper (or narrower) the edge. The mid-frequency boost of the MTF response is related to the small peaks on either side of the edges.
by AV Arecchi · 2007 · Cited by 157 — Integrating Sphere ... Integrating spheres produce illumination that has extremely uniform radiance and irradiance. An integrating sphere is a hollow spherical ...
Convert -38.1 Degrees from Celsius to Fahrenheit ; -38.0, -36.40 ; -37.9, -36.22 ; -37.8, -36.04 ; -37.7, -35.86.
Updated 16 October 2007 Amateur Astronomer's Notebook Anatomy of a Refractor Telescope What is this page about? Basically its purpose is to show the basic parts of a refractor telescope. This page may be of help to those just starting out (or for those who have obtained a refractor scope with no manual), etc. Here is a photo of a typical equatorial refractor telescope. This scope is an old (early 1970s vintage) Tasco refractor (this was back when they were made with some degree of quality). Just about everything on this telescope is metal or glass (very little plastic unlike what is found in today's entry level scopes). Here's another view, a little closer Subsequent photos will show more of the individual components of the scope. This photo shows the observer end of the telescope. The main items here are the star diagonal (this scope has what is known as a "hybrid diagonal". A hybrid diagonal accepts 1.25" diameter eyepieces but it plugs into a focuser that accepts 0.965" eyepieces. The ability of a scope to accept 1.25" eyepieces is highly desirable for a number of reasons. First, there are very few eyepieces made in the .965" size these days. Beyond that, the types of eyepieces available in .965" size is very limited, and they tend to be of lower quality. The 1.25" diameter eyepieces are the standard today, and a great variety of types and focal lengths are available and quality ranges from acceptable to outstanding. If you have an older scope that has a diagonal that only accepts .965" eyepieces, the solution is to get a hybrid diagonal (about $40). The other items shown in this photo are the focusing knobs and part of the finderscope. This scope has machined metal focusing knobs, on modern entry level refractors they are almost all plastic. This photo shows the components above but at a slightly different angle. The drawtube is the part of the scope that moves in and out when the focusing knobs are rotated. This image shows the finderscope and the optical tube clamp. The finderscope on this telescope is a 6x30 model, this is an upgrade I did years ago. Most of the time scopes of this class come with a smaller 5x24 finder, and quite often the finder bracket only has 3 locking screws instead of six like on this one (superior). The finderscope shown here is a quality unit. The optical tube clamp basically holds the telescope tube in the mount. It allows the tube to be rotated or moved forward or backward (to allow balancing) if necessary. This photo shows the equatorial mounting of the telescope. Several main components are shown. The equatorial mount, when properly set up, allows the telescope to follow the stars more easily as compared to an alt-azimuth mount (technically speaking the stars are not moving, however they appear to move due to the rotation of the Earth). The mount has two axis, right ascension and declination. To track the stars, one only has to move the scope in the right ascension axis (whereas with an Alt-Azimuth mount one has to move two axis). Also shown are two setting circles. Any scope with an equatorial mount will have these circles. When used properly, they allow the user to "dial in" an object to view (by moving the scope so that the pointers match the coordinates of an object to be desired). The coordinates for objects to be observed can be obtained from most any star atlas. Setting circles do work, however the mount has to be level and aligned to the pole; typically the object to be observed will land within or near the field of low power eyepiece. It really depends on how carefully one sets up the scope and how carefully one dials in the object. Scopes with smaller (physically) setting circles will be less accurate than those with larger circles (larger circles allow finer graduations). The low motion control shown here is for right ascension; turning this wheel will allow smooth tracking of objects as they appear to move. This is very handy to have for higher magnifications (> 100x). Here's another view of the equatorial mount. Note that each axis has a locking clamp; these lock the position of the optical tube once an object has been located for viewing. The counterweight is used to balanced the weight of the optical tube (a well balanced mount will allow much smoother operation and better tracking). This view also shows the declination slow motion control. This allows the scope's position to be finely adjusted in declination (very handy for centering up the object to be viewed once it has been acquired in the eyepiece). Not all equatorial scopes will have slow motion controls, however they are very handy to have. Some scopes will have electronic versions. This view shows the most fundamental component of a refractor telescope: the objective lens. You know you have a refractor telescope if it has a lens up front (a lens with no center obstruction). If your scope has a mirror at the back, it is a reflector. Also shown here is the dew shield. This slows the formation of dew on the lens and allows longer viewing. Regarding the objective: you should NOT take it apart to clean it! The lenses on most entry level scopes are known as achromats, that is, they have 2 elements. DO NOT take these apart! They are lined up (in rotational position) at the factory for the best image, and if you take it apart and forget to mark it chances are it will not go back together in the proper orientation. The odds of crud getting in between the two optical components are slim, so there is no need to disassemble the objective. The only surface that should ever need cleaning (and this should only be occasional cleaning) is the portion of the objective that faces the sky. Not shown here is a lens cap, this should always be in place when the scope is not in use. Here's a close up of the finderscope. As mentioned, this finder is probably better than the finder that will come on an entry level scope (this is a 6x30 finderscope vs. the typical 5x24 finder that comes with many scopes). The bracket that holds this finder has six locking screws that hold it in place. When the scope is initially put together, one has to align the finder to the main scope (using the screws). Once adjusted, it should stay pretty much in line. Some of the entry level scopes come with only a 3 point adjustment, a setup that is not as secure. The finderscope is like a sight on a gun; one locates the object to be observed on the crosshairs of the finderscope (and if properly aligned) the object will then be centered in the main telescope. Finding objects without a finderscope is very difficult due to the relatively small field of view of the main scope. A typical finderscope will have a field of view that is several degrees wide, wide enough to easily locate and center objects. This photo shows a close up of the counterweight and declination shaft. The counterweight's position on the shaft is adjustable to allow fine balancing of the scope. This photo shows another control of the equatorial mount, the latitude adjustment lever. When using an equatorial mount, one has to set it to the latitude of the observing site in order to allow the mount to accurately be able to track objects. In general this setting is made once (unless you take the scope a significant distance north or south of the normal observing location. Also shown is the other side of the right ascension slow motion control (the control extends out of the photo, it has a knob at the end). "Back" links, e-mail and Copyright Use your browser's "back" button, or use links below if you arrived here via some other path: This page is part of the site Amateur Astronomer's Notebook. E-mail to Joe Roberts Images and HTML text © Copyright 2007 by Joe Roberts. Please request permission to use photos for purposes other than "personal use".
The red curve is the spatial response of the bar pattern to the film + lens. The blue curve is the combined MTF, i.e., the spatial frequency response of the film + lens, expressed in percentage of low frequency response, indicated on the scale on the left. (It goes over 100% (102).) The thin blue dashed curve is the MTF of the lens only.
The essential meaning of MTF is rather simple. Suppose you have a pattern consisting of a pure tone (a sine wave). At frequencies where the MTF of an imaging system or a component (film, lens, etc.) is 100%, the pattern is unattenuated— it retains full contrast. At the frequency where MTF is 50%, the contrast half its original value, and so on. MTF is usually normalized to 100% at very low frequencies. But it can go above 100% with interesting results.
Film imaging systems consist of a lens, film, developer, scanner, image editor, and printer (for digital prints) or lens, film, developer, enlarging lens, and paper (for traditional darkroom prints). Digital camera-based imaging systems consist of a lens, digital image sensor, de-mosaicing program, image editor, and printer. Each of these components has a characteristic frequency response; MTF is merely its name in photography. The beauty of working in frequency domain is that the response of the entire system (or group of components) can be calculated by multiplying the responses of each component.
Here is a photo of a typical equatorial refractor telescope. This scope is an old (early 1970s vintage) Tasco refractor (this was back when they were made with some degree of quality). Just about everything on this telescope is metal or glass (very little plastic unlike what is found in today's entry level scopes). Here's another view, a little closer Subsequent photos will show more of the individual components of the scope. This photo shows the observer end of the telescope. The main items here are the star diagonal (this scope has what is known as a "hybrid diagonal". A hybrid diagonal accepts 1.25" diameter eyepieces but it plugs into a focuser that accepts 0.965" eyepieces. The ability of a scope to accept 1.25" eyepieces is highly desirable for a number of reasons. First, there are very few eyepieces made in the .965" size these days. Beyond that, the types of eyepieces available in .965" size is very limited, and they tend to be of lower quality. The 1.25" diameter eyepieces are the standard today, and a great variety of types and focal lengths are available and quality ranges from acceptable to outstanding. If you have an older scope that has a diagonal that only accepts .965" eyepieces, the solution is to get a hybrid diagonal (about $40). The other items shown in this photo are the focusing knobs and part of the finderscope. This scope has machined metal focusing knobs, on modern entry level refractors they are almost all plastic. This photo shows the components above but at a slightly different angle. The drawtube is the part of the scope that moves in and out when the focusing knobs are rotated. This image shows the finderscope and the optical tube clamp. The finderscope on this telescope is a 6x30 model, this is an upgrade I did years ago. Most of the time scopes of this class come with a smaller 5x24 finder, and quite often the finder bracket only has 3 locking screws instead of six like on this one (superior). The finderscope shown here is a quality unit. The optical tube clamp basically holds the telescope tube in the mount. It allows the tube to be rotated or moved forward or backward (to allow balancing) if necessary. This photo shows the equatorial mounting of the telescope. Several main components are shown. The equatorial mount, when properly set up, allows the telescope to follow the stars more easily as compared to an alt-azimuth mount (technically speaking the stars are not moving, however they appear to move due to the rotation of the Earth). The mount has two axis, right ascension and declination. To track the stars, one only has to move the scope in the right ascension axis (whereas with an Alt-Azimuth mount one has to move two axis). Also shown are two setting circles. Any scope with an equatorial mount will have these circles. When used properly, they allow the user to "dial in" an object to view (by moving the scope so that the pointers match the coordinates of an object to be desired). The coordinates for objects to be observed can be obtained from most any star atlas. Setting circles do work, however the mount has to be level and aligned to the pole; typically the object to be observed will land within or near the field of low power eyepiece. It really depends on how carefully one sets up the scope and how carefully one dials in the object. Scopes with smaller (physically) setting circles will be less accurate than those with larger circles (larger circles allow finer graduations). The low motion control shown here is for right ascension; turning this wheel will allow smooth tracking of objects as they appear to move. This is very handy to have for higher magnifications (> 100x). Here's another view of the equatorial mount. Note that each axis has a locking clamp; these lock the position of the optical tube once an object has been located for viewing. The counterweight is used to balanced the weight of the optical tube (a well balanced mount will allow much smoother operation and better tracking). This view also shows the declination slow motion control. This allows the scope's position to be finely adjusted in declination (very handy for centering up the object to be viewed once it has been acquired in the eyepiece). Not all equatorial scopes will have slow motion controls, however they are very handy to have. Some scopes will have electronic versions. This view shows the most fundamental component of a refractor telescope: the objective lens. You know you have a refractor telescope if it has a lens up front (a lens with no center obstruction). If your scope has a mirror at the back, it is a reflector. Also shown here is the dew shield. This slows the formation of dew on the lens and allows longer viewing. Regarding the objective: you should NOT take it apart to clean it! The lenses on most entry level scopes are known as achromats, that is, they have 2 elements. DO NOT take these apart! They are lined up (in rotational position) at the factory for the best image, and if you take it apart and forget to mark it chances are it will not go back together in the proper orientation. The odds of crud getting in between the two optical components are slim, so there is no need to disassemble the objective. The only surface that should ever need cleaning (and this should only be occasional cleaning) is the portion of the objective that faces the sky. Not shown here is a lens cap, this should always be in place when the scope is not in use. Here's a close up of the finderscope. As mentioned, this finder is probably better than the finder that will come on an entry level scope (this is a 6x30 finderscope vs. the typical 5x24 finder that comes with many scopes). The bracket that holds this finder has six locking screws that hold it in place. When the scope is initially put together, one has to align the finder to the main scope (using the screws). Once adjusted, it should stay pretty much in line. Some of the entry level scopes come with only a 3 point adjustment, a setup that is not as secure. The finderscope is like a sight on a gun; one locates the object to be observed on the crosshairs of the finderscope (and if properly aligned) the object will then be centered in the main telescope. Finding objects without a finderscope is very difficult due to the relatively small field of view of the main scope. A typical finderscope will have a field of view that is several degrees wide, wide enough to easily locate and center objects. This photo shows a close up of the counterweight and declination shaft. The counterweight's position on the shaft is adjustable to allow fine balancing of the scope. This photo shows another control of the equatorial mount, the latitude adjustment lever. When using an equatorial mount, one has to set it to the latitude of the observing site in order to allow the mount to accurately be able to track objects. In general this setting is made once (unless you take the scope a significant distance north or south of the normal observing location. Also shown is the other side of the right ascension slow motion control (the control extends out of the photo, it has a knob at the end). "Back" links, e-mail and Copyright Use your browser's "back" button, or use links below if you arrived here via some other path: This page is part of the site Amateur Astronomer's Notebook. E-mail to Joe Roberts Images and HTML text © Copyright 2007 by Joe Roberts. Please request permission to use photos for purposes other than "personal use".


 Ms.Cici
 8618319014500