
Bar Sign Ideas - Top 12 Bar Signs - Pro Guide - bar sign in lights
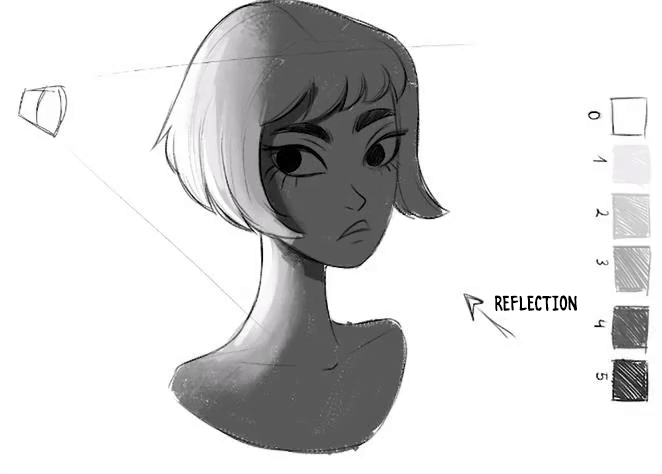
Let’s start increasing the depth by adding reflected light. Reflected light does not come directly from a light source, but from the reflections generated in the area where the light hits. This could be the floor, the wall or a table. All these objects have no light of their own, but they do reflect it. An obvious example would be the reflector or diffuser panels used in professional photography to allow light to reach darker areas and enrich the scene, which is exactly what we want. Keep in mind that the reflected lights cannot be as intense as the main light sources.
Before moving on to the next step, I’d like to share some tips that helped me a lot to improve my shading. I will use the image we are already working on as a reference.
Of course, you can also practice this same exercise with actual photos, in which case you would have to find a photo, analyze it and study its lighting to reproduce it on your canvas.
The first step is to paint the core shadows and highlights to know where the light is coming from. Then I go up or down the shades one by one using the grayscale I created before as a reference.
Illusiondrawing
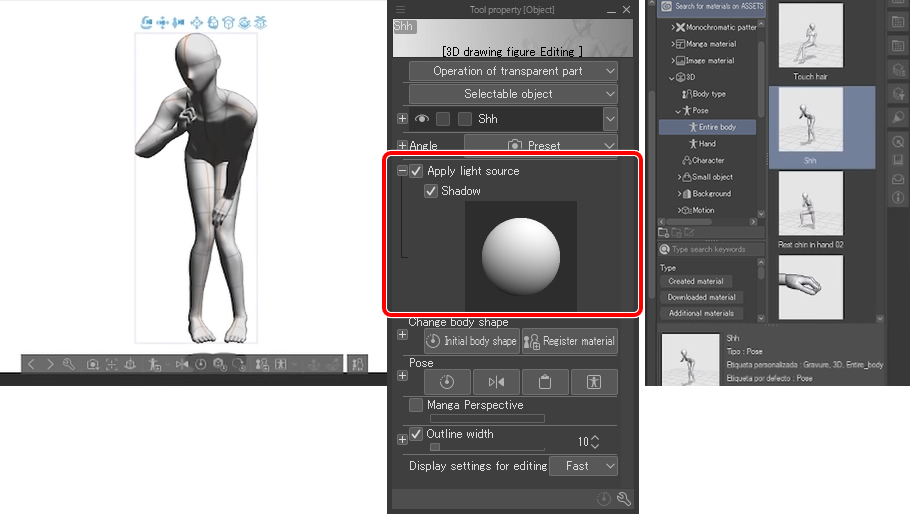
Clip Studio Paint users also have tools that make the task much easier, such as the 3D drawing figures, which you can automatically shade at will changing the light source position, body shape and pose. Once you have the 3D figure on the canvas, you can use the lighting function from the Tool property palette > Apply light source. To edit the position of the light source, just drag the sphere circled in red in the image below. Setting up the lighting for these figures can be a good reference for beginners or if you need to work with a particularly complex pose.
Cookies of this category are required for the basic functions of the OPT website. They are used for safe and proper use. They contribute to the provision of useful functions of the website and therefore cannot be deactivated.
Hello everyone! In this tutorial I’ll show you how to light and shade your drawings, although it will also be helpful if you’re simply looking to improve your lighting techniques!
In short, with ambient lights, where the lighting is more general, the lights and shadows are softer, while in hard lighting, the transition between lights and shadows is harsher and more defined.
As you can see in the image below, shadows are farther away from the light source than the highlights. Also, to add depth to the drawing, we should take the parts that stick out or have volume, such as the hair, chin, nose or lower lip, into account to cast shadows there as well.
Fitment of Additional Driving Lights (Including LED Light Bars)1. Number: Up to a maximum of four (4) additional driving lights2. Position: At the front of ...
Now that we have learnt these basics, let’s practice placing the light source in different places to achieve various different lighting effects.
Illuminated manuscript
Spot Lights ideal for intense, direct light for a number of imaging or optical applications are available at Edmund Optics.
For me, I lose motivation quickly if I have to reproduce poses or photos, but I love working with simple model sheets like the one in the image below to practice my lighting techniques. You can search online for poses of your favorite characters and try to apply various types of lighting to them with the light sources in different positions and shading just with a pencil.
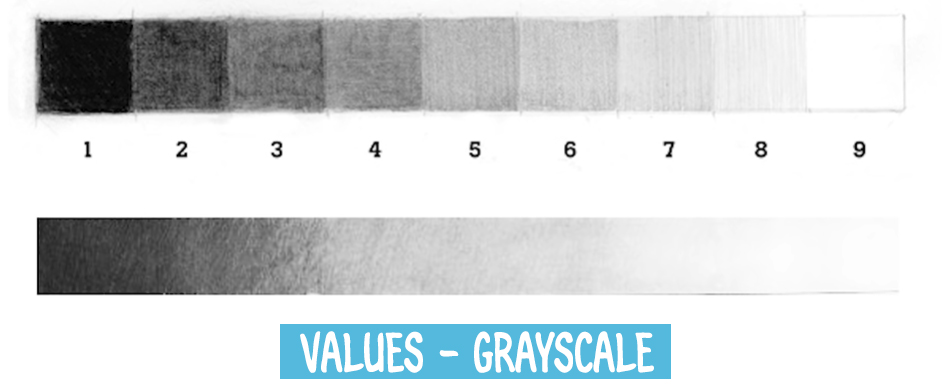
On the far right is the lightest light tone while on the far left is the darkest shadow tone. Lighting is a complex subject. There are even artists dedicated exclusively to lighting.
I have seen artists using the same tones for their lights and shadows, regardless of how far they are from the light source. Remember these tips and you’ll be able to place your highlights and shadows in a much smarter, realistic and volumetric way.
Parts with highlights, such as the white strand circled in red in the image below, will always cast the core shadow as well.
Try different positions for the light source. Don’t worry if you make mistakes at first. When you are done with one position, move on to a different one. Once you’ve mastered them all, you’ll be free to work with any kind of lighting.
Because of this, and to make the tutorial accessible to artists of all levels, I will limit the lighting to one main light source.
Cookies of this category also help us to continuously improve our online service. These cookies are set by partners who may also be based in non-EU countries. These partners may combine the information with other data.
Bring the night sky indoors and explore outer space from the comfort of home. Enter the next generation of our popular Original Galaxy LED Projector™ – a ...
On the other hand, ambient lighting refers to natural light sources, such as the sun. Here the lights and shadows are softer and do not contrast as much.
With hard lighting, the light source is direct, intense and comes from a specific point, so the shadows cast are strong and very distinct, with blacker blacks and whiter whites. An example would be the light produced by a flashlight.
Insular art
Diffuse Ring Light Panels The DLP Front Light Series of dimmable lights is highly versatile with many custom sizes available. The series offers backlit LEDs ...
And so we come to the end of this tutorial. I am sure that once you master these basics, you’ll be able to create your own lighting setups with as many light sources as you want, including realistic and fantasy lightings!
Say, Hello to your new best friend. The Swing Dome Light gives off a warm glow perfect for reading and nighttime. Position the fixture exactly where you ...
Undercabinet fixtures come in different sizes and shapes to fit any corner of your kitchen, from strips to panels to light bars.
Illustration, concept art, comics, and beyond: find drawing tutorials and art advice that meets every creator's needs with Art Rocket!
2022120 — Dark-field microscopes are optical microscopes with an extra non-transparent disc placed beneath the condenser lens or a specially designed ...
Diffused light · Big Soft- and Octaboxes at short distances for rather small objects. · Indirect lights reflected by several bright walls. (These walls must be ...
Medieval art
Some of our busts lack depth, especially those with very dense shadows. The most obvious example is the backlit one, which almost looks like it’s painted in solid black. To address that, we’ll have to take our lighting to the next level by adding secondary light sources. After all, in real life there is not just one light source, nor is it always close to the face.
Another thing to keep in mind is that the highlights, represented with the whitest whites, should always be in the parts closest to the light source. For example, in our drawing the light from the shoulder cannot be as bright as the light from the face or from the hair strands closest to the light source.
I draw the light source directly to keep it in sight. Some people like to use an arrow, but I prefer to draw a cone, since this way the area reached by the light is more evident.
In the image below you can see the differences between a bust with a single main light source and a bust with a main light source and reflected light.
The LED Light Ring illuminates and decorates with a beautiful warm white glow. This light ring is energy-efficient, waterproof, and stays cool during ...
In the image below you can see the model sheet with and without reflected light. This effect, although it can be subtle, gives more depth to our characters.
Before applying lights and shadows, let’s prepare a grayscale with a maximum of six shades. You’ll be able to add more shades once you get some experience. We will paint the lighting as a hard light, as it is more obvious and easier to understand. Once you know how to handle hard lighting, it will be much easier to work with ambient lighting.
There's lighting, and then there's DARK lighting. We turn lamps, chandeliers, sculptures and lighting concepts into an art form, for your interior.
I painted the base color of the busts using the shade 2 of the grayscale we prepared at the beginning. Starting from that shade as a base, I add first the highlights (shade 0) and the core shadows (shade 5). Then, as we did earlier, I apply the other lights and shadows stepping up or down the shades one by one. And don’t forget the parts that stick out or cast shadows! Now we are working only with busts, but if we had a full body, the arms, for example, could also cast shadows on the body depending on their position. Keep always in mind the light angle.


 Ms.Cici
 8618319014500