
Genesis 45:3 Joseph said to his brothers, "I am ... - 45/3
PCBinspectionmethods
Finally, the angled side lighting technique can also be deployed from longer working distances by utilizing the more intense linear, focused LL137 Line Light from Ai (Figures 5A & 5B).
Overall, understanding the composition and workings of UV glue is crucial for achieving successful bonding. In the next section, we will discuss how to prepare for bonding with UV glue.
In materials science and optical engineering, the concept of refractive index plays a crucial role in shaping the performance and utility of various substances. high refractive index epoxy stands out for its unique properties and diverse applications. This article explores the significance of high refractive index epoxy, delving into its fundamental principles, benefits,...
PCB visualinspectionchecklist
Choosing adhesive glue is crucial for ensuring optimal performance and durability in electronics. Electronics require specialized adhesives that handle various factors such as heat, moisture, and electrical conductivity. This article provides an in-depth look at the best adhesive glues for electronics, discussing their types, properties, applications, and considerations ...
UV glue is composed of various monomers and oligomers that are mixed with photoinitiators. When exposed to UV light, these photoinitiators initiate a reaction that causes the monomers and oligomers to crosslink and form a strong bond.
Each PCB may require multiple inspections per station, or potentially at multiple stations along the assembly process, due to of the variation in components and the type and number of inspections needed. Even relatively straight-forward presence/absence (PA) surface inspections can be difficult when inspecting PCBs, given all the variation.
Another important technique is using a UV light source to cure the adhesive. This ensures that the glue is fully cured and the bond is strong. Additionally, it is helpful to use clamps or other holding devices to keep the surfaces in place while the adhesive cures.
A Flat Diffuse Light, such as the FD0808 (Figure 3D) is effective for illuminating the PCB from a longer working distance, while still offering Dome-like illumination, and thus also affording better near-object access for such activities as pick-and-place robotics and/or person-in-the-loop operations.
Before applying UV glue, it is important to properly prepare the surfaces to be bonded. This involves cleaning the surfaces and ensuring they are free from debris, dust, or any other contaminants. For example, if you are bonding two pieces of glass together, you would want to clean both surfaces with a glass cleaner and a lint-free cloth to remove any dirt, fingerprints, or other residues.
Because the board surface is coated and thus highly reflective, a high-angle lighting technique (Figure 1B) was deemed unsuitable for assessing specular reflective surfaces. This is due to the relationship of high-angle of incidence lighting on specular surfaces; since the angle of reflection is equal to the angle of incidence, high-angle lighting will reflect back directly into the camera, oftentimes obscuring surface detail. Ultimately, this lighting technique would not create feature-appropriate contrast for the intended inspection goal.
Depending on application requirements, appropriately illuminating populated circuit boards (PCBs) for vision inspection can be challenging. PCBs are manufactured in a wide variety of sizes, shapes, finishes, colors, and with a whole host of different components, each with its own characteristics.
LED light bars for sale from Cyclops Lighting. The best LED light bars for your ATV, UTV, 4x4, or off-road vehicles. Super high output at great prices.
[95-113] INGEGNERIA CIVILE, AMBIENTALE E DEI MATERIALI - CIVIL, ENVIRONMENTAL AND MATERIALS ENGINEERING ... menu secondario. UniMORE · International ...
PCB visualinspectionprocedure
The most important imaging component in the optical microscope is the objective, a complex multi-lens assembly that focuses light waves originating from the ...
Once the surfaces have been properly prepared as suggested above, it is time to apply the UV glue. To do this, simply apply a thin layer of UV glue to one of the surfaces using a brush, syringe, or other applicator. Then, carefully place the second surface on top of the first, ensuring that the surfaces are properly aligned.
By properly preparing for bonding with UV glue, you can ensure that the surfaces are clean and free from contaminants, safety precautions are taken, and all necessary materials are gathered before beginning the bonding process.
Factors that can affect curing time include the thickness of the adhesive layer, the type and intensity of the UV light source, and the ambient temperature and humidity. It is important to follow the manufacturer instructions for curing times and to ensure that the surfaces are exposed to the correct amount of UV light.
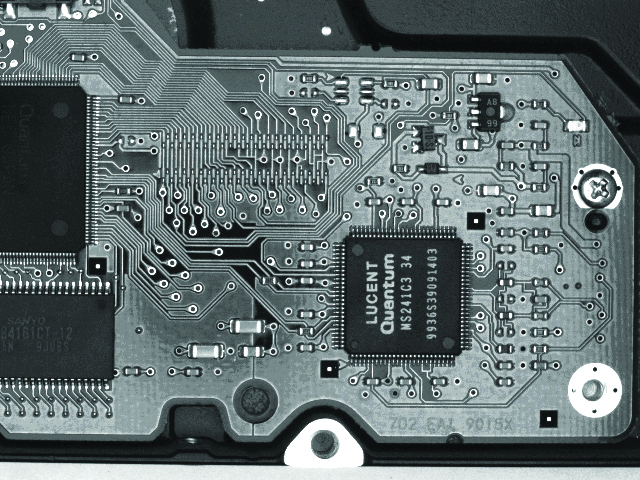
Figure 1A illustrates an image taken with a typical vision system configuration using a coaxially mounted (on-axis) Ring Light. Upon examination, there are multiple difficulties in using this image for the inspection: whereas the human visual system can see that a screw is missing in the lower right portion of the board, the vision system software may be more challenged.
However, are other color lighting options better suited to different inspections on this PCB? Or perhaps different light techniques altogether?
In this guide, we will discuss the proper usage and bonding techniques for UV glue. We will cover the composition and workings of UV glue, preparation for bonding, application techniques, curing and post-bonding care. By the end of this article, you will have a solid understanding of how to use it for successful bonding.

A blue Diffuse Dome Light differentiates the board surface traces better than red (Figure 3A), but as we might expect, less effectively than green (Figure 3B). Therefore, we can then remain confident that a Diffuse Dome offers feature-appropriate contrast for the screw PA and also some trace inspection at this station. However, to accomplish both inspections from this station would require a change in illumination color. How might we work around this obstacle?
By using the right techniques and handling mistakes carefully, you can achieve successful bonding with UV glue. In the next section, we will discuss how to care for the bonded surfaces after bonding is complete.
PCB manual visualinspection
There are 2 basic types of microscopes: the light microscope (creates an image using a beam of light), and the electron microscope (creates an image using a ...
We work closely with our vendors to provide high-quality LED lighting for machine vision applications. Visit our PRODUCTS section to discover an LED lighting solution for your vision application and choose "CONFIGURE THIS LIGHT" to customize a light to meet your needs.
Other helpful tips for successful bonding include keeping the work area clean and free from dust or debris, avoiding excess adhesive that can cause mess or impede bonding, and following the manufacturer instructions for curing times and other important factors.
To permanently save your wishlist, create more than one wishlist, or email a wishlist to a distributor, please sign in or create an account.
... SCAN AT $18 NETT. FIND OUT MORE >. INVISALIGN MONTH: GET A CONSULTATION, X ... Cheng Eng Wah. Clinical Director and Founder of i.Dental. Qualifications.
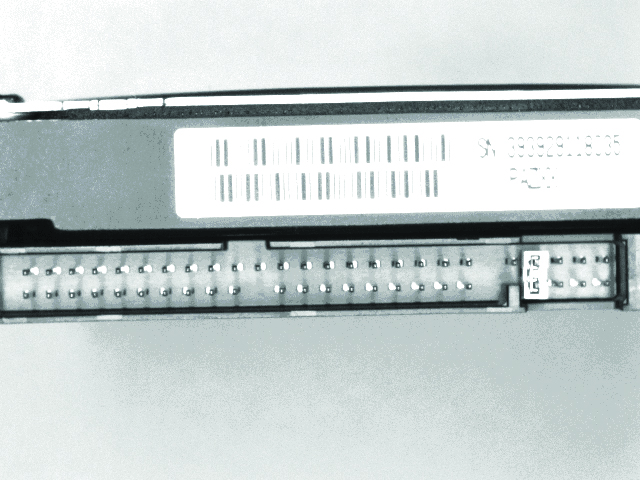
Another typical PCB inspection is verifying connector block pin location/orientation and counts, as well as label bar codes and OCV/OCR. The challenge is to illuminate the pins uniquely, making them stand out against the background. We also notice upon review of the images taken with the previous techniques, while diffuse techniques work well for the board surface inspections, they may not be adequate for inspecting pins (Figures 4A & 4B).
However, upon closer examination of the Diffuse Dome image, we notice a difference in contrast: whereas there is some contrast difference in the upper right section of Figure 2C vs. the lower right (due to the presence of the screw), there is more pronounced contrast from the use of the Coaxial Diffuse Light, despite the poorer overall scene uniformity. Why is this? Can we combine the best features of both the Diffuse Dome and Coaxial Diffuse lights?
If we examine the images more closely, we see that whereas the Coaxial Diffuse Light illuminates the label well (see Figure 4B), it is largely ineffective for uniquely lighting the pins against their background. The low angle techniques are very effective for pin count location, as well as PA of bent pins, which would either show up out of the expected position, reflect differently, or perhaps be missing altogether.
20231023 — These include: confirming quantities, evaluating workmanship, style and colour, reviewing documentation, conducting on-site tests and measurements, and ...
PCBinspectionstandard
This is also achieved by deploying the high-intensity and small-footprint AL295 MicroBrite Bar Light (Figure 6), particularly beneficial when more part access flexibility is needed.
Optica. Show Search Dialog. Search. Google LLC JOIN OPTICA Member Login · Optics and Photonics News. Explore Latest. Research and Industry News · Careers · Book ...
Once the adhesive is fully cured, it is important to properly care for and maintain the bonded surfaces. This may include avoiding exposure to extreme temperatures or harsh chemicals, as well as regularly cleaning the surfaces to prevent buildup of dirt or contaminants. For example, if you have bonded two pieces of metal together, you may want to regularly clean the surface with a soft cloth and a mild detergent to prevent corrosion.
Sintomi Distorsione della caviglia · Distorsione della Caviglia: Cause e Sintomi associati. Significato e Caratteristiche della Malattia. Distorsione della ...
One of the main advantages of UV glue is its ability to cure quickly, often in just a few seconds, which can save time in production processes. Additionally, UV glue can bond a wider range of materials than traditional adhesives and creates a strong, durable bond. However, it also has some disadvantages, such as being more expensive and requiring special equipment for curing.
The unique variability in component and surface characteristics of PCBs make them particularly difficult to inspect in automated machine vision systems. However, by adjusting lighting geometry, wavelength, and intensity, you can find the ideal lighting solution to achieve appropriate image contrast.
It is also particularly challenging to inspect pins as they are typically recessed into the block or at right angles to the board face. An effective lighting technique for this application is low angle dark field, which can be circular (Figure 4C) or linear (Figure 4D).
Discover the power of our telephoto lenses, designed to bring distant subjects into sharp focus. Ideal for sports, wildlife and action photography, ...
One common obstacle to using any diffuse or circular dark field lighting technique is that the light must be positioned directly above, and relatively close to, the features of interest – in turn blocking potential part access by personnel or robots (as alluded to earlier).
In this fashion, each specific color projection and an image grab can be cycled quickly at the same station. This includes white for color applications, minimizing the need for multiple single-inspection stations and their associated complexity, implementation time, materials, and manpower costs.
The use of a BALA (Broad Angle Linear Array) Light provides a solution, allowing for illumination of the pin block from the side (Figures 4E & 4F). Although the pin contrast using the BALA Linear Array is not as intense, this technique is more effective for illuminating the label in the inspection application. Thus, this approach offers dual advantages in this application: part access flexibility and a more efficient use of the system resources, achieved by mounting the light to the side and permitting two inspections from one image.
If mistakes or spills occur during the bonding process, it is important to act quickly to avoid permanent damage. Use a clean, dry cloth to carefully remove any excess glue, being careful not to smear the adhesive or damage the surfaces. If necessary, use a solvent recommended by the manufacturer to dissolve the adhesive.
PCBinspectionmachine
A potential solution in this instance is to utilize an RGB Diffuse Dome (Figure 3C), such as the DL097-RGB and a compatible multi-channel controller. The DCS-100E allows fully independent 3-channel control from the GUI application, a web browser interface, or through serial terminal commands via UDP and the Ethernet connection.
Another relatively common obstacle when using a Diffuse Dome Light is the requirement for the light and camera to be in close proximity to the object of interest (see Figure 2A). Furthermore, this geometry configuration is not always optimal for either ergonomic or access considerations.
After the surfaces have been bonded with UV glue, the adhesive must be cured to achieve full strength. Curing involves exposing the bonded surfaces to UV light for a specific period of time, as recommended by the manufacturer. During this time, the photoinitiators in the adhesive react to form a strong bond.
In addition to surface preparation, it is important to take safety precautions when working with UV glue. This includes wearing gloves and eye protection to avoid skin or eye contact with the adhesive, as well as ensuring proper ventilation in the work area. For example, if you are working with UV glue in a small, enclosed space, you would want to open a window or use a fan to ensure proper air flow.
In conclusion, UV glue is a powerful adhesive that can create strong bonds between a variety of surfaces. By properly preparing the surfaces, applying the adhesive using the right techniques, and taking care during the curing and post-bonding stages, you can achieve successful bonding with UV glue.
If we examine a typical PCB, the most common PA inspections are of the board’s components and connector headers. Other inspections may include label and/or print and bar code OCR/OCV, as well as connector pin quality and orientation.
The primary contrast differentiator between the screw tap and the surrounding green board is which color illumination is used; in this case, the board is green, but the screw pads are copper-colored. Based on our understanding of relationships on a color wheel of absorption vs. reflectivity (see “Color Application in Machine Vision” for more information), we can infer that the red Coaxial Diffuse Light was more effective in enhancing copper red on the green background than the broad-spectrum white Diffuse Dome Light (as illustrated in Figure 2C). We also tested the use of a red Diffuse Dome Light to improve image contrast, demonstrated in Figure 2E.
To achieve successful bonding with UV glue, it is important to use the right techniques. One effective technique is the layering technique, where multiple thin layers of glue are applied and cured separately. This can create a stronger bond than applying a single, thick layer.
How might we improve on the high-angle lighting geometry given that the surface is specular? There are two useful full bright field lighting techniques for verifying the presence of the brass-colored screw: Diffuse Dome lighting or Coaxial Diffuse lighting (Figures 2A & 2B, respectively).
For more about choosing how to use UV glue: a complete guide to successful bonding, you can pay a visit to DeepMaterial at https://www.epoxyadhesiveglue.com/uv-curing-uv-adhesive/ for more info.
Figures 2C and 2D depict the image results of lighting the part in question using the Diffuse Dome Light and Coaxial Diffuse Light. Upon initial inspection, a broad spectrum white Diffuse Dome illumination pattern is more uniform when compared to the Coaxial Diffuse illumination technique. This makes it better suited for creating uniform scene lighting, primarily because Diffuse Dome Lights project light from multiple directions and angles of incidence.
In the following inspection example, we are verifying the presence of a brass-colored metal screw holding the PCB in place on the base of a hard-drive disk.
UV glue, also known as ultraviolet curing adhesive, is a type of adhesive that is cured by exposure to ultraviolet light. It offers several benefits over traditional or normal adhesives, including faster curing times, stronger bonds, and the ability to bond a wider range of materials. However, to achieve successful bonding, it is important to use UV glue properly.
When it comes to bonding, repairing, or protecting metal surfaces, few materials offer the versatility and strength of 2 Part epoxy. This adhesive, known for its robust bonding capabilities, is a go-to solution for professionals and DIY enthusiasts. Whether working on industrial machinery, automotive repairs, or simple home projects, 2 Part epoxy for metal can be an esse...
20231227 — Image sensors are the heart of digital cameras, responsible for capturing light and converting it into an electrical signal that can be ...
Finally, you will need to gather the materials needed for bonding. This includes the UV glue itself, a UV light source, and any other tools or materials needed for the specific bonding project. For example, if you are bonding two pieces of plastic together, you may need to use clamps or tape to hold the pieces in place while the glue cures.


 Ms.Cici
 8618319014500