
The Anatomy of an Objective Lens - objective lense microscope
While the Planetary Society also offers instructions for box or projector viewers that are more "fancy," as they put it, it doesn't get easier than their simple pinhole paper projector.
Image ghost
One trick with the clone stamp is to change the blend mode to color. When you do this, the clone stamp will only copy the color of the source area rather than all of the detail. So if you find a section of the image where the color matches (more or less) the color that the flared area should be, you can use the clone stamp to paint over that area with just the right color and leave the underlying pixels intact. Like everything, it will probably take some practice and will depend on the specific situation.

Sticking with the theme of using items you can easily find around the house, tube viewers can be made using cardboard tubes from household items like paper towels or toilet paper rolls. You can also use thick cardstock rolled up and taped to make your own tube.
Ghostingimages vision
To make one, you'll need a cardboard tube, white paper, aluminum foil, tape and a pushpin or something else sharp to poke a small hole. According to "Let's Talk Science," you can put this viewer together with these steps:
Ghosting appears as small round or oval-shaped spots of color when shooting into a bright light or when a bright light is in the scene. You’ll see it in the viewfinder if you look for it and can often eliminate it by a slight change in the angle of the camera to the light source.
Lens flare occurs when stray light enters the lens and is reflected off interior lens elements. You’ll get it most often when shooting into a bright light like the sun, moon, or artificial light, or when your subject is blocking a bright light.
While cities brace for traffic, schools brace for absences and space enthusiasts are planning parties, the glasses that enable safe viewing of the eclipse have become something of a hot commodity.
Finally, let’s do a quick walkthrough of the finger trick described above. It’s best to use a tripod, but you can get away with doing this handheld if you’re careful not to change the framing of the scene.
Zoom lenses tend to be more prone to lens flare than prime lenses because they generally have more elements, which means there’s more potential for non-image-producing light to bounce around and create flare. For the same reason, lens filters can increase the risk of producing lens flare. Wide-angle lenses are usually more flare-resistant than longer lenses, but that doesn’t mean they’re immune from flare.
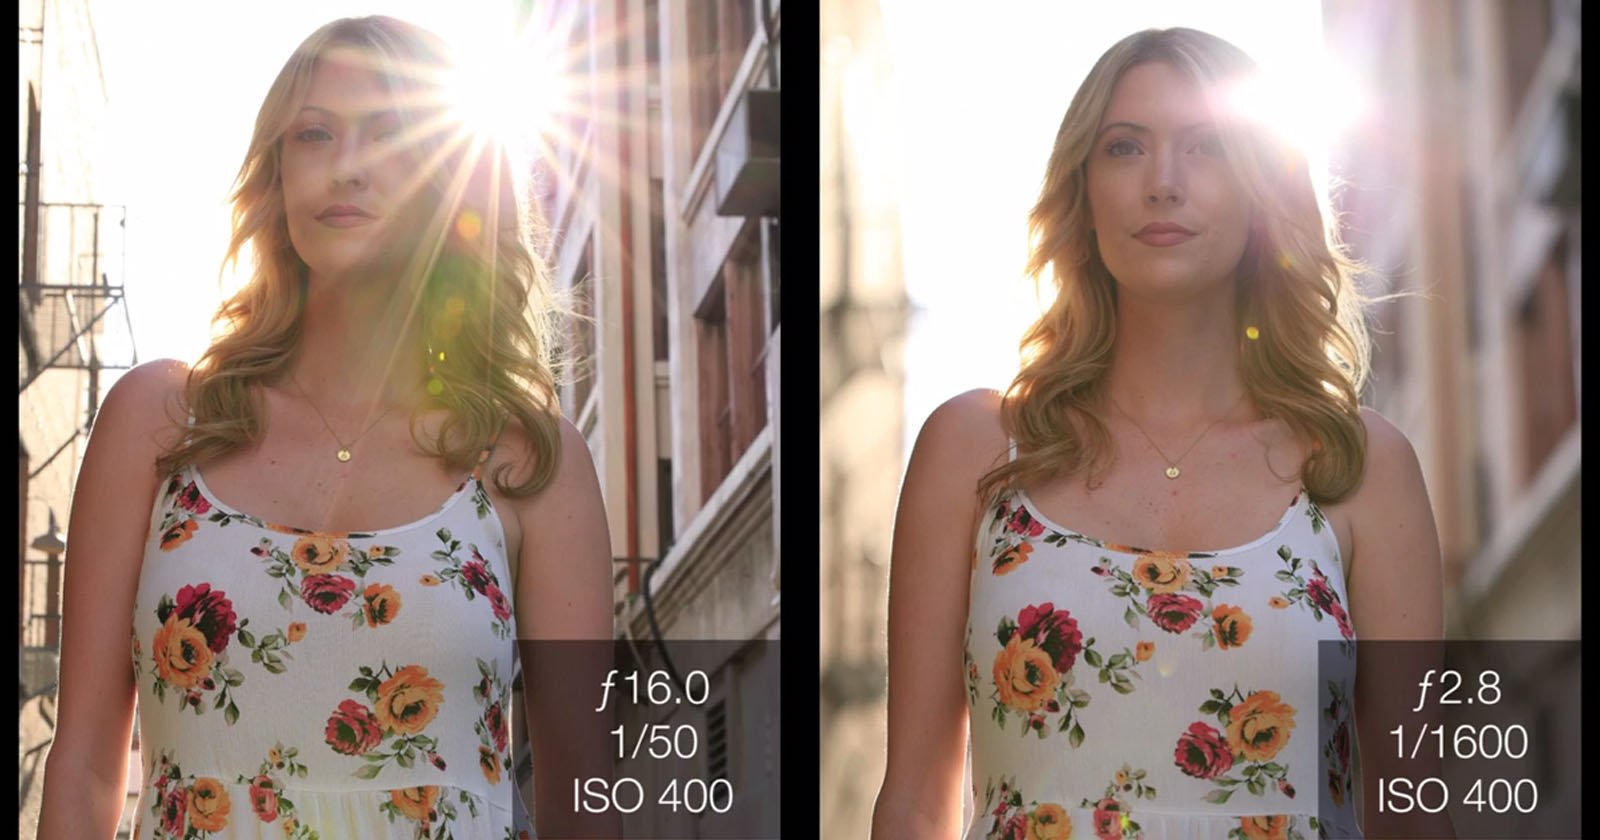
Starbursts happen when you shoot a bright point of light, such as the sun, moon, or artificial light, at a higher f-stop, generally f/8 to f/16. Higher f-stops will create longer and sharper bursts than lower f-stops. Use a lower f-stop if you want to minimize the burst effect.
Since flare is most commonly caused by shooting into bright light, the obvious solution is to not do that. Of course, that approach isn’t always practical since it could severely limit your compositional choices. Nonetheless, there are several things you can do to eliminate, or at least reduce, lens flare.
Luckily, people who didn't manage to get their hands on glasses are not completely down and out. There are other safe ways to view the eclipse, say experts, and a lot of them only require a little bit of craftiness and items you can find lying around the house.

Ghostingphotography camera settings
You can often remove lens flare in Lightroom and/or Photoshop, depending on the type and severity of the flare. In Lightroom, the healing tools can often handle flare if it appears as just a little spot of light or color. You may have to experiment with the content-aware, healing brush or clone stamp to see which works best.
About the author: John Tunney is a fine-art photographer and instructor based on Cape Cod, MA. You can see his work on his website and on Instagram.
Ghosting lensflare
Lens flare can appear as spots or streaks of light and color or as a washed-out hazy look in your photographs. Some photographers and filmmakers like to use it creatively, but it usually shows up as an unpleasant surprise that can ruin your picture.
How to fixghosting lens
Veiling lens flare looks like a hazy wash over your image. It happens when a strong light source is just outside your image.
Anamorphic lens flare appears as a horizontal streak of light rather than the usual circular flares. Originally they were the result of a flaw in the optics of anamorphic lenses. Lenses have improved over the years and you can buy anamorphic lenses that no longer produce the streak. However, filmmakers and photographers who want the look can buy streak filters to create anamorphic-like flares.
To make it, you only need two index cards (3-by-5 or A6 or A7 size) or small paper plates for each person and basic pushpins. Simply use the pushpin to punch a small hole close to the middle of one of the cards and you're done.
Ghostingvision
Switch to manual exposure. You have to use manual exposure to keep the exposure from changing when you put your finger in front of the lens. Set up your shot and take the first picture with the lens flare.
Sensor flare, also called red-dot flare (although sometimes the dots are green), is caused by light that is reflected off the sensor to the lens and then back to the sensor. It happens most often when shooting directly into a strong light like the sun with a small aperture of f/11 or higher.
This NASA project uses components you almost certainly already have at home. Using a cereal box, cardboard, foil, paper, scissors and tape or glue, you can put together this projection eclipse viewer.
Larger flares or multiple flares may require Photoshop’s more powerful re-touching tools. These include the remove tool, spot healing brush, healing brush, patch tool, clone stamp, and content-aware fill. It will require some trial and error to find the best tool or the best combination of tools to get a pleasing result.
Lower a finger down in front of the lens until your fingertip blocks the sun or other light source, eliminating the lens flare. Take the shot.
Lensflare
Another super easy version that requires no crafting? A kitchen colander. An ordinary kitchen colander can easily be used to view a solar eclipse in the same way as other projector viewers; the colander's circular holes project crescent images of the sun onto the ground.
Peeking directly at the eclipse before it reaches totality without proper eye protection can cause permanent eye damage, experts have warned, making glasses a necessity for safe viewing. But, as the day approaches, they may become harder to find.
Ghosting lenscauses
Load the two images into Photoshop as separate layers. Put the one with the flare on top. Create a mask on the top layer with the flare and use a black brush to mask out the flare.
As a reminder, none of these options allow you to look directly at the eclipse: you need special eclipse glasses for that.
Lens manufacturers add special coatings to help reduce lens flare, but they can’t reduce the risk of lens flare to zero. However, there are things we can do to avoid lens floor and eliminate it in post if necessary.
To make the "fancier" version, you'll need 2 index cards (larger, 5-by-7 or A5 cards work better for this) or small paper plates for each person, a pencil, pushpins and a towel, sweatshirt, blanket, flattened corrugated cardboard box, carpet, or other soft substrate to place underneath card during pin pushing.


 Ms.Cici
 8618319014500