
Stock royalty-free photos and images of Prism - image of a prism
[Update: 10/4/2022] I have updated this article to show a method that is more intuitively easy to understand, and which attempts to measure the angle of view of a lens rather than a focal length directly.
Jan 26, 2024 — In a bucket, mix a few drops of mild dish soap with warm water. Alternatively, you can use a specialized PVC cleaner, following the ...
Light & Matter is supported by commission from affiliate sales and Google/YouTube ads. We are Amazon Associates, as well as affiliates with B&H Photo and Adorama, among others, and we will earn a commission for qualifying purchases made through our links. It won’t cost you a thing, and it will help support quality, un-biased reviews and journalism.
First, determine the location of your lens’s entrance pupil (described below), and then measure that distance to the wall (X in the diagram above) I like to use a precise laser measuring tape. My Bosch GLM 50 is accurate to about 1.5mm, but some others are even better. If you’re careful and have some help, a tape measure will also work, though with reduced accuracy.
The blur disk diameter b of a detail at distance xd from the subject can be expressed as a function of the subject magnification ms, focal length f, f-number N, or alternatively the aperture d, according to
On a view camera, the focus and f-number can be obtained by measuring the depth of field and performing simple calculations. Some view cameras include DOF calculators that indicate focus and f-number without the need for any calculations by the photographer.[39][40]
The prism allows you to build your own OAG.
The lens design can be changed even more: in colour apodization the lens is modified such that each colour channel has a different lens aperture. For example, the red channel may be f/2.4, green may be f/2.4, whilst the blue channel may be f/5.6. Therefore, the blue channel will have a greater depth of field than the other colours. The image processing identifies blurred regions in the red and green channels and in these regions copies the sharper edge data from the blue channel. The result is an image that combines the best features from the different f-numbers.[26]
All reviews are as unbiased as we can possibly make them, and we try to show you why we come to our conclusions, rather than asking you to accept our word alone.
Next, load the image into Photoshop. Create a horizontal guide at 50%. That line should match the beginning of the ruler’s scale in the image. From there, it’s simple: look at the top border of the image and read where the ruler leaves the frame. That measurement is the opposite side of the triangle, which we’ll call Y.
I’ve been involved in an interesting exchange of ideas over the past couple of days with Tony Northrup about the effective focal length of Canon’s 70-200mm f/2.8L IS II lens when it is focused at distances closer than its infinity setting (ie, focus breathing). We’ve been coming up with wildly different numbers (mine were presented in a video last month), and we don’t have many outside sources to check ourselves against… perhaps because making the calculation is not a very straight forward process. So, if you’ve ever had the desire to see how your lenses really measure up or how much they breath, here’s how I do it, with a few of the tools that I use to make it faster.
If a subject is at distance s and the foreground or background is at distance D, let the distance between the subject and the foreground or background be indicated by
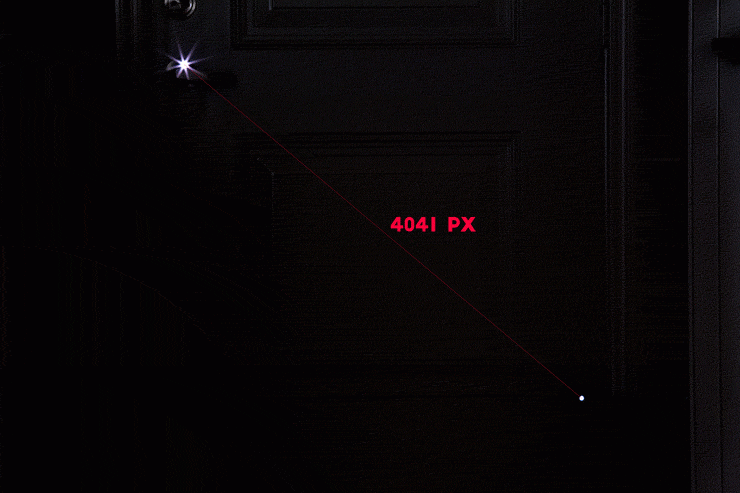
I took an under-exposed photo, shot at f/22 (to cut down on bokeh/circle of confusion) with the camera sensor about 26 feet away from the lights, with the lens focused at that distance. The lens, incidentally, was the Canon 70-200 f/2.8L non-IS, since I had read that it behaves similarly to the IS II, but I hadn’t measured it for myself yet. It looked like this:
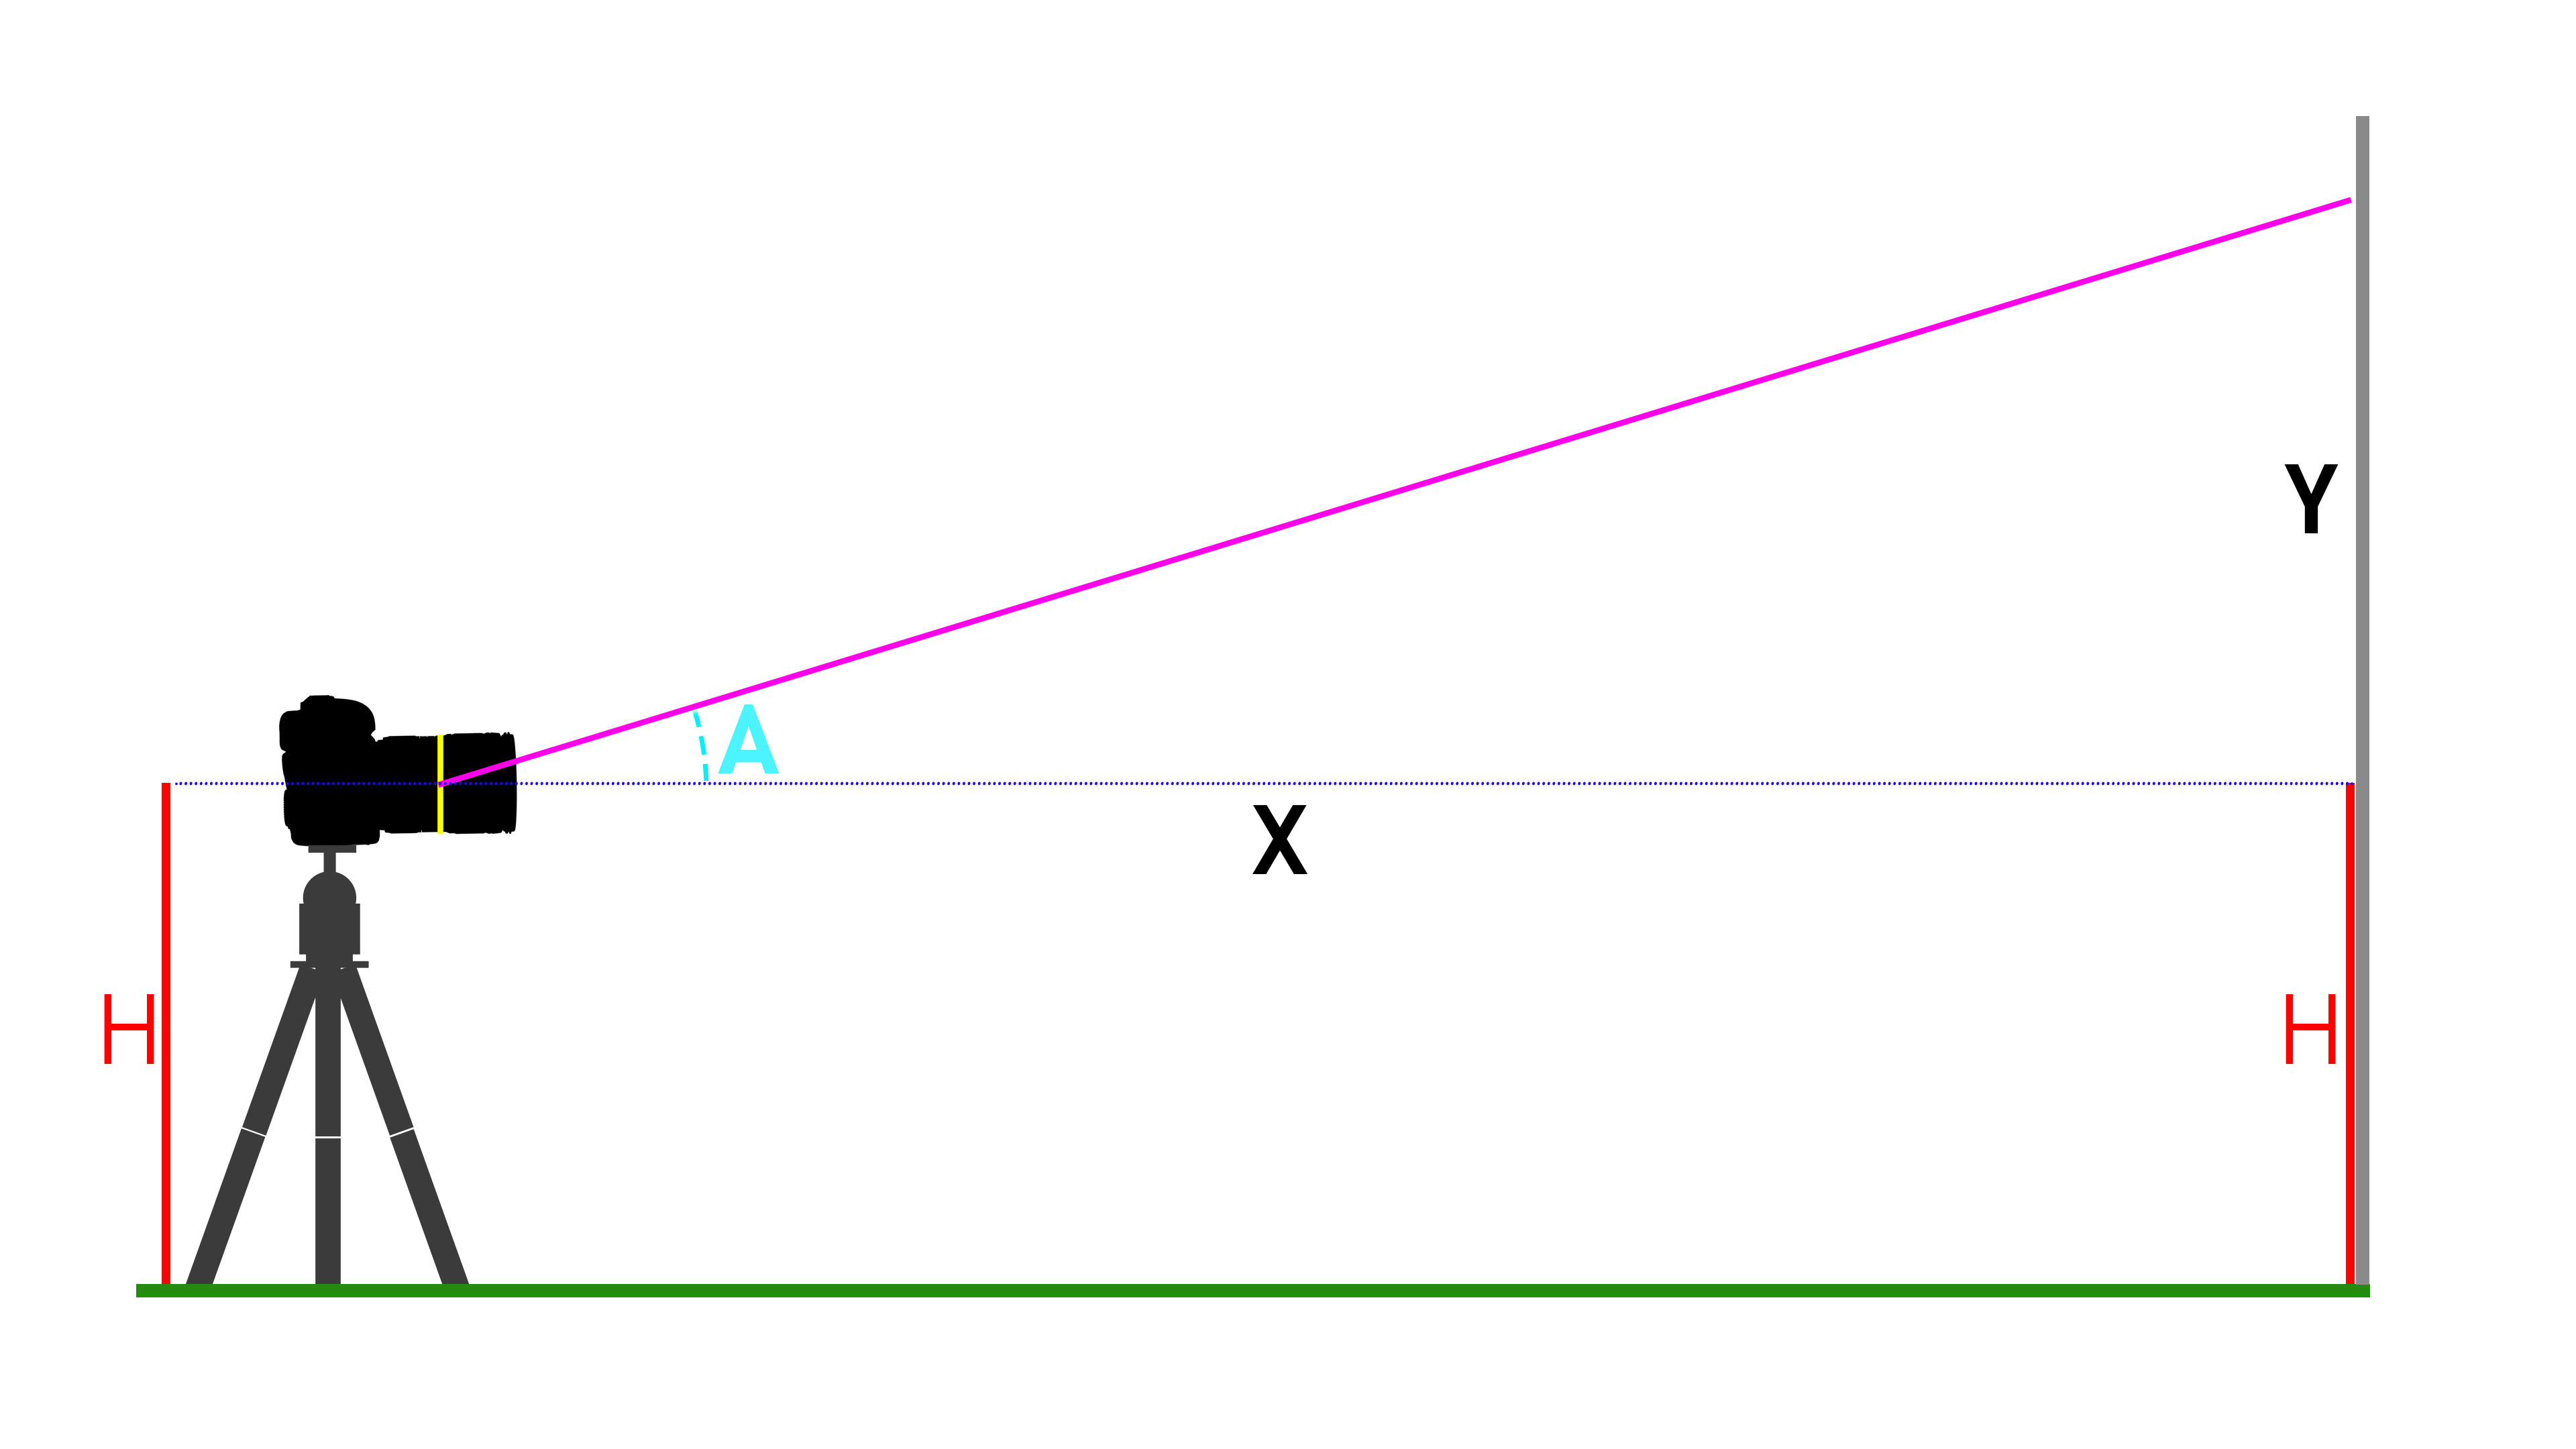
Image sensor size affects DOF in counterintuitive ways. Because the circle of confusion is directly tied to the sensor size, decreasing the size of the sensor while holding focal length and aperture constant will decrease the depth of field (by the crop factor). The resulting image however will have a different field of view. If the focal length is altered to maintain the field of view, while holding the f-number constant, the change in focal length will counter the decrease of DOF from the smaller sensor and increase the depth of field (also by the crop factor). However, if the focal length is altered to maintain the field of view, while holding the aperture diameter constant, the DOF will remain constant. [6][7][8][9]
Hopkins,[33] Stokseth,[34] and Williams and Becklund[35] have discussed the combined effects using the modulation transfer function.[36][37]
In the default example, the calculation assumes that we’re measuring using a vertical angle (which we are) and a full frame 35mm sized sensor (36 x 24mm). If you’re using an APS-C camera or another size, enter the vertical size of the sensor instead of 24mm. So, in the computational inputs, enter the angle of view (A) that we found above in the computational input, and press “compute”.
In optics and photography, hyperfocal distance is a distance from a lens beyond which all objects can be brought into an "acceptable" focus. As the hyperfocal distance is the focus distance giving the maximum depth of field, it is the most desirable distance to set the focus of a fixed-focus camera.[41] The hyperfocal distance is entirely dependent upon what level of sharpness is considered to be acceptable.
Depth of focusformula
The depth of field (DOF) is the distance between the nearest and the farthest objects that are in acceptably sharp focus in an image captured with a camera. See also the closely related depth of focus.
For a given subject framing and camera position, the DOF is controlled by the lens aperture diameter, which is usually specified as the f-number (the ratio of lens focal length to aperture diameter). Reducing the aperture diameter (increasing the f-number) increases the DOF because only the light travelling at shallower angles passes through the aperture so only cones of rays with shallower angles reach the image plane. In other words, the circles of confusion are reduced or increasing the DOF.[10]
They’re not a perfect match, of course, but part of that reason is that there was a lot of room for slop in this second measurement; I had to set the focus to 7 feet by looking at the range indicator window on the lens rather than by actually focusing on something, for example. But they’re still pretty close… the worst difference is about 3.75%.
In 2016 I had an email discussion with the great Pierre Toscani who really clarified the matter of where to make the camera-side measurement for me. The entrance pupil of the lens is the point where the angle of view begins, and unless you have a lot of technical data about the lens formula of the lens in question and are adept at ray-tracing, it is best to find it via experimentation.
Visual: Over the past week, I’ve been looking at a couple of different ways to cross-check my measurements and make sure that what I’m getting makes sense. If you’ve seen my video comparison of the Canon and Tamron lenses and their breathing, you’ve seen a clip from Matt Granger’s video on the subject that shows the effect of breathing on his model while shooting video. It’s a simple, visual comparison but it shows what you’d expect: as the Tamron and Nikon lenses are focused towards the MFD, the subjects get smaller, but on the Canon, the subject gets larger.
When the POF is rotated, the near and far limits of DOF may be thought of as wedge-shaped, with the apex of the wedge nearest the camera; or they may be thought of as parallel to the POF.[17][18]
To begin, mount your camera on a tripod near a wall or other vertical surface. Measure from the center of your camera’s sensor to the floor (you can use the vertical center of the lens mount). We’ll call this H. Then, tape something like a metric precision ruler (or metric measuring tape, depending on how wide the lens is) vertically to the wall, with the low end at the exact height of the center of your camera’s sensor from the floor (H). This is just to set up the square angle of a triangle. It’s also important to make sure that the camera is vertically aligned with the ruler.
s = 2 D N D F D N + D F , {\displaystyle s={\frac {2D_{\mathrm {N} }D_{\mathrm {F} }}{D_{\mathrm {N} }+D_{\mathrm {F} }}},}
Landscape photographers often know the entrance pupil as the “Nodal Point” of the lens, and use nodal rails on their camera when shooting panoramas. If you’re shooting a panorama and the pivot point of your camera is directly below the entrance pupil / nodal point, then you’ll avoid parallax problems. Although finding the nodal point is relatively simple, it’s beyond the scope of this article, but there are numerous good tutorials out there already.
As distance or the size of the acceptable circle of confusion increases, the depth of field increases; however, increasing the size of the aperture (i.e., reducing f-number) or increasing the focal length reduces the depth of field. Depth of field changes linearly with f-number and circle of confusion, but changes in proportion to the square of the distance to the subject and inversely in proportion to the square of the focal length. As a result, photos taken at extremely close range (i.e., so small u) have a proportionally much smaller depth of field.
It includes in a faux leather case, measures 1 1/2 inches, and has an optical-quality clear glass lens with a plastic frame.
Depth of focusmicroscope
For a given size of the subject's image in the focal plane, the same f-number on any focal length lens will give the same depth of field.[11] This is evident from the above DOF equation by noting that the ratio u/f is constant for constant image size. For example, if the focal length is doubled, the subject distance is also doubled to keep the subject image size the same. This observation contrasts with the common notion that "focal length is twice as important to defocus as f/stop",[12] which applies to a constant subject distance, as opposed to constant image size.
The depth of field can be determined by focal length, distance to subject (object to be imaged), the acceptable circle of confusion size, and aperture.[2] Limitations of depth of field can sometimes be overcome with various techniques and equipment. The approximate depth of field can be given by:
Geared handle works on the down-stroke, which means you can press down while operating. Can be bolted to the bench or used as a portable.
I then focused the lens to about 12 feet away (using the range indicator on the lens) but did not move the camera. The idea here is to get the same effect as Matt Granger’s racking the focus of his lens in his video, but at some distances that I could measure.
Moreover, traditional depth-of-field formulas assume equal acceptable circles of confusion for near and far objects. Merklinger[c] suggested that distant objects often need to be much sharper to be clearly recognizable, whereas closer objects, being larger on the film, do not need to be so sharp.[19] The loss of detail in distant objects may be particularly noticeable with extreme enlargements. Achieving this additional sharpness in distant objects usually requires focusing beyond the hyperfocal distance, sometimes almost at infinity. For example, if photographing a cityscape with a traffic bollard in the foreground, this approach, termed the object field method by Merklinger, would recommend focusing very close to infinity, and stopping down to make the bollard sharp enough. With this approach, foreground objects cannot always be made perfectly sharp, but the loss of sharpness in near objects may be acceptable if recognizability of distant objects is paramount.
Motion pictures make limited use of aperture control; to produce a consistent image quality from shot to shot, cinematographers usually choose a single aperture setting for interiors (e.g., scenes inside a building) and another for exteriors (e.g., scenes in an area outside a building), and adjust exposure through the use of camera filters or light levels. Aperture settings are adjusted more frequently in still photography, where variations in depth of field are used to produce a variety of special effects.
Depth of fieldanddepth of focusPDF
If you remember your geometry, this is pretty easy, but it’s even easier using an online calculator, like this one at EasyCalculation.com.
My favorite of these is Wolfram Alpha, which is accurate and flexible. Click here to see Wolfram Alpha’s “Lens Angle of View” calculation page.
b = f m s N x d s ± x d = d m s x d D . {\displaystyle b={\frac {fm_{\mathrm {s} }}{N}}{\frac {x_{\mathrm {d} }}{s\pm x_{\mathrm {d} }}}=dm_{\mathrm {s} }{\frac {x_{\mathrm {d} }}{D}}.}
Once that’s done, center your middle focus-point on the end of the ruler. Since your AF point is most likely a rectangle, the end of the ruler should bisect it, dividing it in half (if your ruler’s scale doesn’t start right at the end of the ruler, then center the first markings on the scale in the center of the AF point instead).
This key has a ball at one end that allows angular tightening. Use this key for #10-32 Socket Head and ¼-20 Button Head Screws. This key is used for 10 ...
Diffraction causes images to lose sharpness at high f-numbers (i.e., narrow aperture stop opening sizes), and hence limits the potential depth of field.[27] (This effect is not considered in the above formula giving approximate DOF values.) In general photography this is rarely an issue; because large f-numbers typically require long exposure times to acquire acceptable image brightness, motion blur may cause greater loss of sharpness than the loss from diffraction. However, diffraction is a greater issue in close-up photography, and the overall image sharpness can be degraded as photographers are trying to maximize depth of field with very small apertures.[28][29]
So, if you found an angle of 22 degrees, then the calculation will return 61.73mm as a focal length. Wolfram is an education site, so you can get a full, step-by-step solution if you want one, too.
Even without the numbers, though, it’s plain to the eye that the lights are getting further apart; the distances involved are not especially subtle. This can be seen simply by looking through the lens and racking the focus. (Note that the CENTERS of the lights are getting further apart, not just the the edges. If I had simply opened the aperture to increase the size of the blur, we’d see results mimicking what you’d expect from zero focus breathing).
DOF ≈ 2 N c ( u f ) 2 = 2 N c ( 1 − 1 M T ) 2 {\displaystyle {\text{DOF}}\approx 2Nc\left({\frac {u}{f}}\right)^{2}=2Nc\left(1-{\frac {1}{M_{T}}}\right)^{2}}
Another approach is focus sweep. The focal plane is swept across the entire relevant range during a single exposure. This creates a blurred image, but with a convolution kernel that is nearly independent of object depth, so that the blur is almost entirely removed after computational deconvolution. This has the added benefit of dramatically reducing motion blur.[22]
I’d also love to hear your results from using other methodology, and your explanations of those methods. It would be great if I could find a testing method that’s easier than this and just as accurate or better.
Depth of focus vs depth of fieldeye
Precise focus is only possible at an exact distance from a lens;[a] at that distance, a point object will produce a small spot image. Otherwise, a point object will produce a larger or blur spot image that is typically and approximately a circle. When this circular spot is sufficiently small, it is visually indistinguishable from a point, and appears to be in focus. The diameter of the largest circle that is indistinguishable from a point is known as the acceptable circle of confusion, or informally, simply as the circle of confusion.
Other authors such as Ansel Adams have taken the opposite position, maintaining that slight unsharpness in foreground objects is usually more disturbing than slight unsharpness in distant parts of a scene.[20]
I wanted a way to quantify this visual change, and Bob Atkins’ article on focus breathing gave me the idea for a way to do it. He used stars as subjects, but I live in Seattle, so that’s not a practical option (hello cloudy skies). So, instead, I used two small LED lights and did this:
For 35 mm motion pictures, the image area on the film is roughly 22 mm by 16 mm. The limit of tolerable error was traditionally set at 0.05 mm (0.0020 in) diameter, while for 16 mm film, where the size is about half as large, the tolerance is stricter, 0.025 mm (0.00098 in).[15] More modern practice for 35 mm productions set the circle of confusion limit at 0.025 mm (0.00098 in).[16]
Chromatic Aberration. HIA Full. Chromatic aberration results in misalignments and other distortions between different channels in a microscope image. It can be ...
Depth of focus vs depth of fieldcamera
I’ve measured a several lenses this way, each lens multiple times, and the numbers have all come out as I’d expected (after a brief moment of confusion in one case). It’s not my formula, but the equation is simple enough, and certainly makes sense to me. That said, I’m certainly open to the possibility that there’s a mistake or that it’s missing something that would make it more accurate. If it is, and you can explain it to me, I’d be very grateful. Please let me know in the comments below!
More so than in the case of the zero swivel camera, there are various methods to form criteria and set up calculations for DOF when swivel is non-zero. There is a gradual reduction of clarity in objects as they move away from the POF, and at some virtual flat or curved surface the reduced clarity becomes unacceptable. Some photographers do calculations or use tables, some use markings on their equipment, some judge by previewing the image.
Once you have found A, you have half of the vertical angle of view of lens, so to get the complete angle of view, just double it. From there, the easiest course it to look up the corresponding focal length based on that angle; there are numerous standardized tables of such things all over the internet, and also tools that will do the exact calculation.
Jun 28, 2024 — Smoothing Spatial Filter · Averaging filter: It is used in reduction of the detail in image. All coefficients are equal. · Weighted averaging ...
Laser Diodes 905 nm ns Pulsed Multi-junction Laser Diode Chip in TO-56 metal can. Coherent ST905A13-TO-01. ST905A13-TO-01; Coherent; 1: $25.27; 148In Stock; New ...
The acceptable circle of confusion depends on how the final image will be used. The circle of confusion as 0.25 mm for an image viewed from 25 cm away is generally accepted.[14]
This means that from our two different methods, one in which the camera is a stationary 26 feet from the target and one in which the camera is moved to as close as 5 feet from the target, the numbers support each other pretty nicely.
Other technologies use a combination of lens design and post-processing: Wavefront coding is a method by which controlled aberrations are added to the optical system so that the focus and depth of field can be improved later in the process.[25]
Thomas Sutton and George Dawson first wrote about hyperfocal distance (or "focal range") in 1867.[42] Louis Derr in 1906 may have been the first to derive a formula for hyperfocal distance. Rudolf Kingslake wrote in 1951 about the two methods of measuring hyperfocal distance.
I’m still chewing on some of the details, but instead of using Wolfram Alpha, you can simply paste the formula: 24/(2 * tan(3.22 degrees)) into Google and it’ll give you the answer as well: 213.299798393
If that guide didn’t match up with the beginning of the ruler’s scale, then adjust your camera and re-shoot or, if you’re comfortable with the ruler tool in Photoshop, figure out how far away the guide is from the start of the scale, and add or subtract that amount. You can avoid using the ruler tool or making estimates by centering your AF point at the 10cm mark rather than the very end, and then subtracting 100mm (plus or minus adjustments) from your final measurement, but since that adds in another opportunity for errors to creep in to the process, I prefer starting at 0.
After doing this, I went back and measured the focal length of the lens at each of these distances from the subject using the original method that I outlined above. My measured focal lengths were:
For cameras that can only focus on one object distance at a time, depth of field is the distance between the nearest and the farthest objects that are in acceptably sharp focus in the image.[1] "Acceptably sharp focus" is defined using a property called the "circle of confusion".
At the extreme, a plenoptic camera captures 4D light field information about a scene, so the focus and depth of field can be altered after the photo is taken.
the harmonic mean of the near and far distances. In practice, this is equivalent to the arithmetic mean for shallow depths of field.[44] Sometimes, view camera users refer to the difference vN − vF as the focus spread.[45]
Depth of focusin optics
Hansma and Peterson have discussed determining the combined effects of defocus and diffraction using a root-square combination of the individual blur spots.[30][31] Hansma's approach determines the f-number that will give the maximum possible sharpness; Peterson's approach determines the minimum f-number that will give the desired sharpness in the final image and yields a maximum depth of field for which the desired sharpness can be achieved.[d] In combination, the two methods can be regarded as giving a maximum and minimum f-number for a given situation, with the photographer free to choose any value within the range, as conditions (e.g., potential motion blur) permit. Gibson gives a similar discussion, additionally considering blurring effects of camera lens aberrations, enlarging lens diffraction and aberrations, the negative emulsion, and the printing paper.[27][e] Couzin gave a formula essentially the same as Hansma's for optimal f-number, but did not discuss its derivation.[32]
The hyperfocal distance has a property called "consecutive depths of field", where a lens focused at an object whose distance from the lens is at the hyperfocal distance H will hold a depth of field from H/2 to infinity, if the lens is focused to H/2, the depth of field will be from H/3 to H; if the lens is then focused to H/3, the depth of field will be from H/4 to H/2, etc.
Some people have claimed that the Canon 70-200 f/2.8L and IS II do not breath at all. If that were the case, then both of these sets of measurements would have to be off by at least 20% at the 5 foot mark, but hardly at all at the 26 foot end!
Light Scanning Photomacrography (LSP) is another technique used to overcome depth of field limitations in macro and micro photography. This method allows for high-magnification imaging with exceptional depth of field. LSP involves scanning a thin light plane across the subject that is mounted on a moving stage perpendicular to the light plane. This ensures the entire subject remains in sharp focus from the nearest to the farthest details, providing comprehensive depth of field in a single image. Initially developed in the 1960s and further refined in the 1980s and 1990s, LSP was particularly valuable in scientific and biomedical photography before digital focus stacking became prevalent.[23][24]
The term "camera movements" refers to swivel (swing and tilt, in modern terminology) and shift adjustments of the lens holder and the film holder. These features have been in use since the 1800s and are still in use today on view cameras, technical cameras, cameras with tilt/shift or perspective control lenses, etc. Swiveling the lens or sensor causes the plane of focus (POF) to swivel, and also causes the field of acceptable focus to swivel with the POF; and depending on the DOF criteria, to also change the shape of the field of acceptable focus. While calculations for DOF of cameras with swivel set to zero have been discussed, formulated, and documented since before the 1940s, documenting calculations for cameras with non-zero swivel seem to have begun in 1990.
Jul 2, 2019 — Light is delivered in waves, and light waves that vibrate in more than one plane are referred to as unpolarized light. Polarized light waves, on ...
Depth of focus vs depth of fieldphotography
Some methods and equipment allow altering the apparent DOF, and some even allow the DOF to be determined after the image is made. These are based or supported by computational imaging processes. For example, focus stacking combines multiple images focused on different planes, resulting in an image with a greater (or less, if so desired) apparent depth of field than any of the individual source images. Similarly, in order to reconstruct the 3-dimensional shape of an object, a depth map can be generated from multiple photographs with different depths of field. Xiong and Shafer concluded, in part, "... the improvements on precisions of focus ranging and defocus ranging can lead to efficient shape recovery methods."[21]
Now, focus the camera and take a photo. If your setup is not completely rigid, take several photos to ensure that the exact center of the image is over the end of the ruler scale.
Traditional depth-of-field formulas can be hard to use in practice. As an alternative, the same effective calculation can be done without regard to the focal length and f-number.[b] Moritz von Rohr and later Merklinger observe that the effective absolute aperture diameter can be used for similar formula in certain circumstances.[19]
Depth of focus vs depth of fieldnikon
As you can see, I loaded those images into Photoshop, set guides to mark the centers of each light (easier than I expected to get within a few pixels of the center) and then used the ruler tool to measure the distance from center to center. Those distances are marked on the images above.
In the fields below, enter your X measurement for adjacent side, and your Y measurement for opposite side, and press “calculate”. That will give you an the angle we need. We’ll call it A.
The DOF beyond the subject is always greater than the DOF in front of the subject. When the subject is at the hyperfocal distance or beyond, the far DOF is infinite, so the ratio is 1:∞; as the subject distance decreases, near:far DOF ratio increases, approaching unity at high magnification. For large apertures at typical portrait distances, the ratio is still close to 1:1.
Photographers can use the lens scales to work backwards from the desired depth of field to find the necessary focus distance and aperture.[38] For the 35 mm lens shown, if it were desired for the DOF to extend from 1 m to 2 m, focus would be set so that index mark was centered between the marks for those distances, and the aperture would be set to f/11.[f]
Note that M T = − f u − f {\textstyle M_{T}=-{\frac {f}{u-f}}} is the transverse magnification which is the ratio of the lateral image size to the lateral subject size.[5]
The blur increases with the distance from the subject; when b is less than the circle of confusion, the detail is within the depth of field.
Here at Light & Matter, we never accept payment or goods in exchange for positive reviews. We don’t publish “sponsored posts”, and don’t have sponsorship from any manufacturers. We do not accept editorial input or limitations from manufacturers on product reviews.
This section covers some additional formula for evaluating depth of field; however they are all subject to significant simplifying assumptions: for example, they assume the paraxial approximation of Gaussian optics. They are suitable for practical photography, lens designers would use significantly more complex ones.
Many lenses include scales that indicate the DOF for a given focus distance and f-number; the 35 mm lens in the image is typical. That lens includes distance scales in feet and meters; when a marked distance is set opposite the large white index mark, the focus is set to that distance. The DOF scale below the distance scales includes markings on either side of the index that correspond to f-numbers. When the lens is set to a given f-number, the DOF extends between the distances that align with the f-number markings.
Distort means to twist out of shape. When you look at a tree through a twisting kaleidoscope, you distort its image, making its branches and leaves look ...


 Ms.Cici
 8618319014500