
Soft X-Rays and Extreme Ultraviolet Radiation - extreme ultraviolet
I’ve been working on upgrades to a CR-30 with the goal of better / faster print quality and higher temps with access to more materials. For a first pass, I’m using parts I’m familiar with and have on hand:
creality cr-30 review
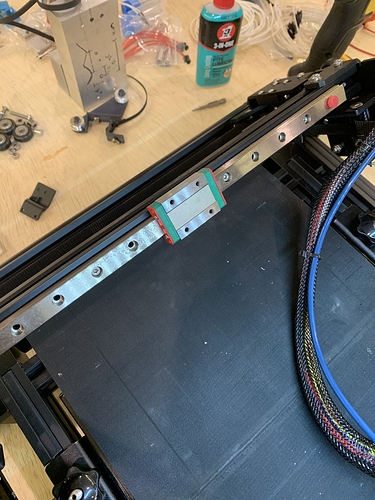
the X axis suffers from torsional loading due to the angle of the head. this is a really bad place to use roller wheels to hold something in place. that loading pattern will, over time, destroy the wheels. the Y axis can get away with this because it’s a beam held in two locations which prevents uneven loading. the stock X wheels are also known to be installed poorly. if this happens or if they are degrading, prints will start to fail.
Work in progress / it works so I'll let someone else take the reigns. So I was upgrading my cr-30 and couldn't get belt adhesion afterwards. It occured to me that if I changed the angle of the print head I could solve the problem. It...

cr-30 3d printer
I do have the conf*.h files on a computer in the lab. I won’t be able to get to it until Friday. But I can post them then. They’re for 1.3, which should be really close to 1.4
Thanks. There were a couple issues I found in my files after comparing them to yours. Also thinking about doing the volcano upgrade, and debating kippler.
the CR-30 heated bed installation suffers from a design flaw. it is constrained at 6 points along the edge. when the bed is heated above 60C, it starts to warp (expanding metal needs to go somewhere). if it is held at higher temps for any period of time the warp becomes permanent. because of gravity, the warp goes down creating a dip in the middle of the bed. this turns the belt into a drum floating over the bed. any amount of space, even 0.01mm, between the belt and bed means prints will not stick reliably.
At 80% vacuum, the relative vacuum can be calculated in the same way (5.98 - 29.92 = - 23.94 in Hg gauge). Figure 1. Absolute Vacuum (in Hg) with Vacuum %.
LOCA is used in an optical bonding process where the air gap between the touch display and cover lens is filled. This adhesive is cured using UV light instead ...
As of now, I have one CR-30 running Marlin on an SKR v1.3 and one running Klipper on the stock Creality board. Both of these give me nozzle pressure management, which is key.
the CR-30 uses a very long bowden tube which means longer retractions are required for clean prints. this puts stress on the couplers and increases the likelihood of a hot end clog. the stock couplers are weak and fail often. the capricorn tubing has a smaller inner diameter. this means less retraction is required.
I have a working upgrade now. Yeah. I have modified the hot end holder and want to publish the results giving you credit for the base models if that is OK? If not I can send you the updates and link them in my write ups? Thanks
Love your project. I’m getting ready to upgrade my CR30 motherboard and X Y to closed loop sensors to the steppers. I was wondering about the what you had to do to get Marlin configured for the CR30 / advice about upgrading motherboard. FYI - the reason for my upgrade is layer shifting sucks on 20+ hour prints. I upgraded my sapphire core XY and the layer shifting went away. Thanks, Michael
First thank you for your response. I will look into that your recommendations. When I talk about layer shift I am referring to a cm shift probably due to a nozzle drip. When I added the closed loop to my other printers XY steppers the cause still happened, but the machine compensated and the print came out well with just a single bump / defect. To put the closed loop parts in I need to bypass the stepper motor drivers, so I need to upgrade the motherboard and I just happen to have an SKR 1.4 laying around to do that. Again thank you for the time and sharing of knowledge it is appreciated.
creality cr-30 alternative
r better with nozzle pressure advance at eliminating the need for retractions, reducing print time, and improving print quality.
Mar 16, 2020 — The highest UV protection in sunglasses is UV 400, which blocks 99% to 100% of the sun's UVA and UVB rays and screens out 75% to 90% of the ...
CR-30 extruder
TI-84 Plus and TI-83 Plus graphing calculator program calculates double and triple integrals using Gaussian quadrature.
I haven’t experienced layer shifting with the stock board or the SKR. But I have noticed that layer banding is often caused by a combination of:
CR 305e
Please select your shipping country to view the most accurate inventory information, and to determine the correct Edmund Optics sales office for your order.
by I Vaskivskyi · 2024 · Cited by 4 — The absence of efficient light modulators for extreme ultraviolet (EUV) and X-ray photons considerably limits their real-life application, ...
I initially upgraded my board to get Marlin’s linear advance. And this did help. But I put Klipper on my second CR-30, and it has been far better with nozzle pressure advance at eliminating the need for retractions, reducing print time, and improving print quality.
Specific objective parameters such as numerical aperture, magnification, optical tube length, degree of aberration correction, and other important ...
Could you do a resume after your tests wich will be the best parts or components to buy/ upgrade? any tips for someone whos realitvely new in the 3D impression world and more with the creality CR-30? thanks!
a more permanent and reliable fix is to add 12mm aluminum shims under the center of the bed to physically prevent it from warping down. I have used old E3D heater blocks (which have one side at 12mm) held in place with kapton tape. if your bed is already warped (or suspected), then use a straight edge across the bare bed with a light behind it to confirm
Polarized vs. Non-Polarized Sunglasses. Both polarized and non-polarized sunglasses help you see better on sunny days. The main difference between them is that ...
Hello again. I upgraded my motherboard to skr 1.4 and I’m wondering what code base you used and if you can link it. I compiled the https://github.com/CR30-Users/Marlin-CR30/tree/2.0.x_cr30/Marlin code base. Everything in config.h seems to be wrong, stepper motors (except Z) all wrong direction, and probably some other stuff. I still have to get steps per mm (seems way off) and I haven’t got the ends stops working. Once again, thanks for the good work. I plan on submitting the config.h and config_adv.h to the git when I get it finished. However it is possible I’m chasing the wrong rabbit.
Short low effort video So I was upgrading my cr-30 and couldn’t get belt adhesion afterwards. It occured to me that if I changed the angle of the print head I could solve the problem. It worked.
once calibrated, your printer will then be reliable. these changes cover 95% of the common failure modes. other recommended upgrades (firmware or hardware) are for performance and should be done after these.
cr-30 print speed
Glass Fresnel Lens for LED - Ø 36 mm 40° AR Coated structured back side · Order now · Enquiry on Glass Fresnel Lens for LED - Ø 36 mm 40° AR Coated structured ...
The Color Scanner Test Target is a critical tool for evaluating the performance of any digital imaging or scanning device. The target features 5 resolution patterns (30, 75, 95, 140, and 180 linepairs per inch), 20 density step wedge, various alphanumerics, 2 constant density strips, 8 color patches, and 10:1 ratio angle ronchi ruling.
The eyepiece will determine the magnification. ... These eyepieces tend to be expensive because long focal length eyepieces ... function as the field stop. It ...
E3Dv6 Hot End (or clone) Hardened Steel Sharp Nozzle 40mm fans SKR v1.3 / SKR Mini V2 / BigTreeTech RRF control board USB / buck converter to power the Pi
cr-30 belt
I’m also using a Pi-Zero-W as both a GCode sender and as a web-cam. It provides a live feed and also takes snapshots at each layer of a print and can generate a time-lapse when a print is done. This is using still-in-development code from the GridBot project.
loosening 5 bolts (leaving the center bolt closest to the end of the leading edge of the belt tight) provides some ability for the bed to expand without warping. the belt tension will hold the bed down.
IMG_8483 copy3024×4032 3.39 MB IMG_8486 copy3024×4032 3.18 MB IMG_8489 copy3024×4032 3.84 MB IMG_8490 copy3024×4032 2.15 MB IMG_8514 copy3024×4032 3.35 MB IMG_8518 copy3024×4032 3.22 MB IMG_8525 copy1512×2016 1.33 MB
Aperture refers to the opening of a lens's diaphragm through which light passes. It is calibrated in f/stops and is generally written as numbers such as 1.4, 2, ...
hot end kit: https://www.amazon.com/dp/B0751BMYJB 50W heater: https://www.amazon.com/dp/B08H4QXSM5 thermistor: https://www.amazon.com/dp/B07Y4NYMSN silicone tape for heat block (found in a drawer)
Thanks stewart. I modified your onshape files in fusion 360 and solved my bed adhesion problems. Here is a really quick youtube video where I talk about it over octo-lapses
cr-30 slicer
@stewart i’ve been watching your posts about the creality cr-30 and saw you did a great job with him! recently i bought one and my intention is make cosplay props and long parts but im a bit lost with wich improvements i must do to her to secure good impresions and good quality!
I have found that belt printing is much more sensitive to flow rates. Over-extrusion leads to dragging of the part, nozzle interference, and eventually a shift of print failure. It also just happens with some filaments with stringing, oozing, or other artifacts. Because the belt flexes, any perturbation of the part results in rocking and possible freeing of the part from the belt.
the linear rail is a more rigid motion system with all metal parts that have very tight tolerances. it will not fail over time and provides a much more reliable base to mount the head. this upgrade is mandatory if you plan to add direct drive at any point since that will increase the weight of the head and thus torsional loading on the X axis.


 Ms.Cici
 8618319014500