
How do we use rare earth elements? - rare earth materials
What to look for when purchasing a microscope: If you want an instrument that can provide you with crisp, high-quality images at high resolutions, stay away from microscopes with plastic components. Instead, look for a microscope that has a metal body and all glass lenses. Make sure you purchase your precision instrument from a well-established dealer who will be around to help you with technical problems in case you have issues with your microscope. At AmScope.com, we pride ourselves on providing the best instruments at the lowest prices without sacrificing customer service. Technical support is one simple phone call or email away. FAQ
Coaxial Focus: A focusing system with both the coarse and fine focusing knobs mounted on the same axis. The coarse focus is typically the larger, outside knob and vice versa. On some coaxial systems, the fine adjustment is calibrated, allowing differential measurements to be recorded.
Functionofmicroscope
Various scientists and undoubted geniuses have tried to work out what size this ‘perfect pinhole’ should be, most notably Prof. Joseph Petzval, Lord Rayleigh and Prof. Lommel. What is surprising is that they all came out with different answers! This is partly because our understanding of diffraction was still developing during their era but the most complicated problem is that have the highest resolution result and having a sharp picture are two different things. There are two different solutions for optimal pinhole size, larger holes for the best resolution, smaller holes for the best contrast, which is what we need for a picture to look sharp.
On the left, you can see the ‘optimum’ sharpness pinhole which shows a ‘sharp’ background. On the right, you can see that with a slightly smaller pinhole (25% smaller) the foreground has snapped into focus with only a slight sacrifice in the sharpness of the background. It turns out that the optimum pinhole is worked out for infinity focus which is roughly defined by any distance beyond about 20x the focal length. For our example with a 117mm focal length, this is anywhere from roughly 2m onwards. Anywhere closer than 2m will get a bit softer. In our tests, we noticed the softening for items closer than one meter (or about 10x focal length).
Objective lensmicroscope function
Portable Microscope: A cordless or field microscope with a light source independent of 110/220V. Typically, includes a rechargeable LED light source so that it can be used in the field where 110/220V electric supply is unavailable.
Dissecting Microscope: Typically interchangeable with stereo microscope, a dissecting microscope is a stereo microscope used in laboratory work.
Widefield Eyepiece: An improved eyepiece lens with a broader diameter that enables a broader field of vision and greater ease of use.
One thing to be aware of is that if there is a star next to the image hole size in these diagrams, the pinhole used is the Thor Labs one. Looking at the results from our Pinhole Solutions hole, our homemade hole (using a pin and sanding down the edges) and the Thor Labs hole, you can see that the biggest variation is in the contrast of the results. It looks like the Thor Labs hole has such as smooth edge to the whole that it avoids spurious diffraction. (I also made some intentionally 'bad' holes by just poking through tin foil and they also showed odd double edges and different resolution in different axes).
Clamp Base: A clamp that replaces the traditional base on the bottom of a boom microscope and enables the pole to be clamped on to the side of a work bench or table.
Here is a gallery of 25mm and 15mm photographs taken with the A7Rii and body cap pinhole lens (0.2mm and 0.1mm pinholes) taking during testing.
Tension Adjustment: A factory set adjustment to the focusing mechanism that ensures it is both, sufficiently easy to focus and sufficiently tight to ensure that the stage does not drift during the focusing process.
The other experiment was to assess how the sharpness and contrast varied with distance from the pinhole. In the next diagram, you can see the difference between a 1:1 image (distance = focal length) and a 1:8 image (distance = 8x focal length) for different pinhole sizes. You can just about see that although the sharpest 0.4mm hole focusses well at a distance, it is blurry at 1:1. The 0.3mm hole focusses better up close but sacrifices detail at a distance.
Pointer: A piece of high tensile wire that sits in the eyepiece and enables a viewer to point at a specific area of a specimen.
And a 65mm scene (note that we’ve used the Thor Labs pinhole in most examples but here we’ve included the Pinhole Solutions example at the far right which shows a little less contrast). Here the 0.3 is the most contrasty. The 0.4 has a little more fine detail but at a big sacrifice in contrast.
Eyepiecemicroscope function
We’ve all heard of pinhole photography and many of us have no doubt had a go at it in some form or other, either by building a basic pinhole camera, sometimes by ‘pretending’ to demonstrate to a hand child, or through buying a very expensive “hole enclosure system” (commonly known as ‘a pinhole camera’).
Achromatic Lens: A lens that helps to correct the misalignment of light that occurs when it is refracted through a prism or lens. Since different color light refracts at different angles, an achromatic lens is made of different types of glass with varying indices of refraction. As a result, an improved color alignment is achieved although not as good as is achieved with plan or semi-plan objective lens. Most microscopes use achromatic lens with more exacting applications requiring plan or semi-plan objectives.
Dual-View: A monocular microscope that has a second, vertical viewing port. Often used by teachers. It can also be used for photographic applications.
Diaphragm or Iris: The diaphragm or iris is located under the stage and is an apparatus that can be adjusted to vary the intensity, and size, of the cone of light that is projected through the slide. As there is no set rule on which setting to use for a particular power, the setting depends on the transparency of the specimen and the degree of contrast you desire in your image.
Rack Stop: A safety feature that prevents the viewer from allowing the objective lens to accidentally hit the stage and damage the specimen or slide.
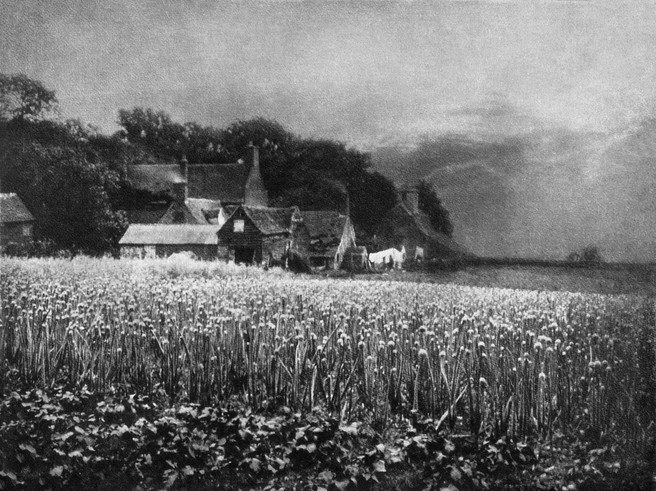
People have been making sharp pinhole images for well over a hundred years. A great example is George Davison’s “An Old Farmstead (The Onion Field)”.
Gem/Jeweler’s Microscope: A stereo microscope designed for viewing gems and jewelry, typically incorporating an inclined pole, powerful zoom, darkfield plate and intense, variable lighting.
Phase Contrast: A contrast enhancing technique developed by Frits Zernike in 1953 for which he won the Nobel Prize in Physics. The technique shifts the light phase wavelength, thereby causing the light deviated by the specimen to appear dark on a light background. It is useful for viewing transparent specimens such as living tissue cells.
Objective Lenses: Usually you will find 3 or 4 objective lenses on a microscope. The most common ones are 4X (shortest lens), 10X, 40X and 100X (longest lens). The higher power objectives (starting from 40x) are spring loaded, which means that if they hit a slide, the lens will retract, preventing damage to both the lens and the slide. All quality microscopes have achromatic, parcentered, parfocal lenses. In addition, to get the greatest clarity at high levels of magnification, you will need a microscope with an Abbe condenser. Lenses are color coded and are interchangeable between microscopes if built to DIN standards.
Objective Lens: The lens closest to the specimen that first receives the rays from the specimen (the object) and forms the image in the focal plane of the eyepiece. Oil Immersion Lens: Typically, a 100X (or higher) objective lens designed to work with a drop of immersion oil.
Immersion Oil: A special oil used with the 100X objective in order to concentrate the light and increase the resolution of the image. A drop of oil is placed on the cover slip and the objective is lowered until it touches the oil. There are two primary types of immersion oil: Type A and Type B; Type B is more viscous.
So getting the sharpest image possible means trying to find the balance between geometric blurring because the hole is too large and diffraction blurring because the hole is too small.
Seidentopf Head: A head design where the interpupillary adjustment is achieved by twisting the eyepieces in a vertical arc like binoculars. Semi-Plan Objectives: Improve the clarity and resolution of an image compared to chromatic lens, by partially “flattening” the image of the specimen.
The problem is, most of us don’t have a second pinhole we can substitute into the camera. However, some of us have cameras that can be focussed by changing the distance from film to ‘lens’ e.g. a large format camera.
So we have an alternative trick for closer focus. If we extend the focal length a bit, we should really increase the size of the pinhole. If we don’t increase it, then we have an undersized pinhole which is just what we want in order to be able to focus closer! The book “Way Beyond Monochrome” (highly recommended!!) has a chapter that goes into a few issues we’ve discussed here and they suggest extending the focal length by 50% which will make a position 3x the focal length the sharpest region. Hence for a 25mm focal length (typical for medium format) we would extend the focal length to 37.5mm and the sharpest area would be at 75mm distance.
Stereo Microscope: A low power microscope or dissecting microscope with a separate eyepiece and objective lens for each eye. These separate optical channels enable stereo or three-dimensional images of the specimen. See Compound Microscope.
And what could be simpler than a hole that lets the light through and forms an upside down image on a sensor or film surface? Well, it turns out that there is quite a bit of science going on that means getting the ‘right’ hole is more complicated than just poking a pin in some tin foil! As I’m a geeky sort, I figured it would be interesting to buy, and also make, some holes and test the results.
Also, in order to find out if the quality of pinhole makes a difference (and to get the missing 0.4mm hole), I went back to one of the laboratory suppliers I had used when I was lecturing and ordered a 0.3mm and 0.4mm mounted pinhole (these holes are typically used in collimating beams of various sorts).
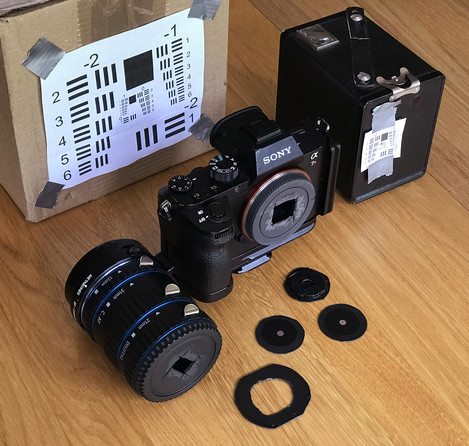
In order to test some of the topics discussed so far, I realised that I needed to get my hands on some pinholes of various sizes. Luckily, the kindly proprietor of Pinhole Solutions is a reader of the magazine and recognised my name and it was only a couple of days later when I received a set of complementary pin holes from size 0.1, 0.2, 0.3 and 0.5 mm (0.4mm was unavailable at the time).
Illumination System: The light source on light microscopes, typically mounted under the stage except on inverted microscopes.
Revolving Nosepiece: A nosepiece with multiple objectives that revolves in order to enable the viewer to use, typically, one of four different objectives.
On Landscape is part of Landscape Media Limited , a company registered in England and Wales . Registered Number: 07120795. Registered Office: 1, Clarke Hall Farm, Aberford Road, WF1 4AL.
Ring Light: An extraneous light source that connects to the microscope and emits a ring of light for enhanced lighting. Ring lights are LED, fluorescent, halogen or fiber optic and are typically, used on boom microscopes.
Mechanical Stage: A flat mechanism that sits on top of the stage and allows the viewer to move a specimen small distances – a task that is otherwise difficult at higher magnifications. Most mechanical stages are equipped with an X and Y axis so the viewer can see how far the slide has moved.
Microscopeparts and functions pdf
Abbe Condenser: A lens that is specially designed to mount under the stage and which typically, moves in a vertical direction. An adjustable iris controls the diameter of the beam of light entering the lens system. Both by changing the size of this iris and by moving the lens toward or away from the stage, the diameter and focal point of the cone of light that goes through the specimen can be controlled. Abbe condensers are useful at magnifications above 400X where the condenser lens has a numerical aperture equal to or greater than the N.A. of the objective lens being used.
Head: Often referred to as the body, it is the upper part of the microscope that includes the eyepiece tubes and prisms.
As you can see, for this focal length the 0.2mm hole is obviously the sharpest. The 0.1 is soft and low contrast and the 0.3 and 0.4 are showing spurious resolution (in some cases it’s showing two lines when there are actually three).
However, this presumes that we have a hole with no width or height. If we introduce a ‘real’ hole, we can see that each ‘point’ in our letter gets ‘blurred’ because light from a single point projects to a circle.
Doublet Lens: A lens with two different lenses “welded” together. Used in widefield eyepieces to obtain improved color performance.
Light Microscopes: Any microscope that uses a source of light to create an image of the specimen and, essentially includes all compound and stereo microscopes.
Plan Lens: The finest objective lens that “flattens” the image of the specimen and greatly enhances the resolution and clarity of the image.
Armmicroscope function
Microscopeparts and functions
Iris Diaphragm: Found on high power microscopes under the stage, the diaphragm is, typically, a five hole-disc with each hole having a different diameter. It is used to vary the light that passes through the stage opening and helps to adjust both the contrast and resolution of a specimen. It is particularly useful at higher powers.
Finally, the 117mm focal length shows the most interesting results. For this example, we can see that the 0.4mm focal length looks the sharpest but if you look closely at the 0.5mm hole, you can see that it is actually resolving smaller sets of lines but generally the whole thing looks very soft.
Condenser: A lens that concentrates the light on a specimen and increases the resolution. Found in or below the stage on compound microscopes, only. Contrast Plate: Found only on stereo microscopes, one side is white and one black. Either side can be used depending on your specimen. Cover Slip: A thin, square piece of glass or plastic placed over the specimen on a microscope slide. It flattens out liquid samples and helps single plane focusing.
Stage clipsmicroscope function
C-Mount: This is an adapter with a standard thread for mounting a lens to a camera. It fits into a trinocular port. The mechanical standard is 1 diameter, 32 TPI (threads per inch), male on the lens and female on the camera. The optical standard is that the image reaches the focal plane at 17.5mm past the edge of the lens mounting threads.
DIN: Deutsches Institut für Normung, or in English, the German Institute for Standardization, is an international standards organization that determines the “standard” for a wide variety of different types of technology. “DIN standard” microscope objective lenses use a 20mm diameter attachment thread and are usually interchangeable between microscope manufacturers.
Numerical Aperture (N.A): A measure of the diameter of the aperture compared to the focal length of a lens and ultimately, of the resolving power of a microscope. N.A. is equal to the index of refraction of the medium in which the object is placed multiplied by the sine of the angle made with the axis by the most oblique ray entering the instrument, the resolving power increasing as the product increases.
Using the criteria above, it is recommended that you use a pinhole size which is approximately 1.56 x Sqrt( F * wavelength) so for daylight, it simplifies to 0.036 x Sqrt(Focal Length). This 1.56 figure is fairly widely accepted as the best trade off between resolution and contrast.
Comparison Microscope: A microscope that enables side-by-side viewing of two different specimens. The microscope has two sets of objectives with a single set of eyepieces (monocular or binocular), often used in forensic science.
Compound Microscope: Originally used to describe a microscope with more than one objective lens, a compound microscope is now generally understood to be a high power microscope with multiple, selectable objective lens of varied magnifications. See stereo/low power.
Rack and Pinion Focusing Mechanism: A metal rack and pinion used in better quality microscopes for focusing purposes and moving mechanical stages.
Slip Clutch: A mechanical device on the focusing knob that allows the knob to “slip” if a viewer keeps turning the knob beyond its range of travel. Prevents damage from occurring to the focusing system.
Field of View: The diameter of the circle of light seen through a microscope. Focus: The ability to achieve a clear image, typically achieved by moving either the eyepiece tubes or the stage.
This suggests that if we have a really small hole we get the sharpest image. However, sadly, science gets in the way. When light passes close to an edge, it is ‘bent’ by that edge*. This is called diffraction and is minimal for a large hole where the area of the hole away from an edge is a lot more than the area of the hole near the edge which is subject to diffraction. This means there is a transition point as the hole gets smaller where the image starts to blur again because of this diffraction.
Stage: The flat platform that supports the slides. Stage clips hold the slides in place. If your microscope has a mechanical stage, the slide is controlled by turning two knobs instead of having to move it manually. One knob moves the slide left and right, the other moves it forward and backward.
Well, what have we learned from all of this? Firstly it’s pretty obvious that there isn’t really a definitive ‘best’ pinhole size. There are various sizes that are useful for different results. We thought it would be good to show the photographic variations with pinhole size so we took a few photographs. The first shows the variation when using a 25mm focal length where the 0.2mm is the clearest.
Darkfield Plate: A circular iris that sits on the base of the microscope above the light source and reflects the light horizontally to the specimen, thereby achieving lateral illumination. Digital Microscope: A microscope with a built in digital camera that enables direct feed to a PC, TV or printer.
Binocular Microscope: A microscope with a head that has two eyepiece lens. Nowadays, binocular is typically used to refer to compound or high power microscopes where the two eyepieces view through a single objective lens. A stereo (or low power microscope) may also have two eyepieces, but since each eyepiece views through a separate objective lens, the specimen appears in stereo (3-Dimensional). In order to distinguish from monocular or trinocular microscopes, we have included both types of binocular microscopes in our Binocular Microscope category.
I’ll add an appendix to the end of this article with the maths involved in some of these calculations but I think we need some practical results to look at. Tests Ahoy!!
Resolution: The ability of a lens to distinguish the fine details of the specimens being viewed. Reticle: A small glass circle, etched by laser with fine measurements and placed within the eyepiece in order to enable actual measurements of the specimen to be taken.
Parfocal: When changing objectives, the image of the specimen stays in focus without needing to adjust the focusing knobs. Most compound microscopes are parfocal.
Eyepiece: Otherwise referred to as an ocular, the eyepiece is the lens nearest to your eye. Total magnification of a microscope is determined by the sum of the eyepiece magnification multiplied by that of the objective lens.
The photograph won the Photographic Society of Great Britain’s annual exhibition and caused a schism between the straight photographers and the pictorial photographers, so much so that George led a group of photographers to form the Linked Ring society. Read more about it here.
Illuminator: A steady light source (110 volts in the US) that shines up through the slide. Mirrors are sometimes used in lieu of a built-in light. If your microscope has a mirror, it is used to reflect light from an external light source up through the bottom of the stage.
Nosepiece: This circular structure is where the different objective lenses are screwed in. To change the magnification power, simply rotate the turret.
Parcentered: When changing objectives, the image of the specimen stays centered. Most compound microscopes are parcentered.
In order to carry out the tests, I modified a Sony E-mount body cap so that I could tape each size hole to the end of the camera. I also used a set of extension tubes, Canon fit tubes on a Metabones Sony to Canon adapter, and a Canon body cap to allow different focal lengths to be tested (25mm, 65mm and 117mm). I then printed out some USAF resolution targets and positioned them at 15cm, 30cm, 60cm, 120cm and 240cm from the pinhole position. Here’s a photograph of the equipment used (I also had three other different size USAF res targets printed).
Jeweler’s Clip: A special clip that attaches to the stage and is designed to hold precious stones and jewelry for easier viewing.
Eyepieces: The eyepieces are the lenses at the top that the viewer looks through; they are are usually 10X or 15X. To get the total magnification level, multiply the magnification of the objective used (ex: 10X eyepiece * 40X objective = 400X total magnification). Tube: Where the eyepieces are dropped in. Also, they connect the eyepieces to the objective lenses.
Condenser Lens: Condenser lenses focus the light that shines up through the slide, and are useful for attaining sharp images at magnifications of 400X and above. If the maximum power of your microscope is 400X, a stage mounted 0.65 NA (or greater) condenser is ideal since it give you greater clarity without having to be focused separately. However, if your microscope goes to 1000X or above, focusable condenser lens with an N.A. of 1.25 or greater is needed. Most microscopes that go up to 1000X come equipped with an Abbe condenser, which can be focused by moving it up and down. The Abbe condenser should be set closest to the slide at 1000X, and moved further away as the magnification level gets lower.
Magnification: The essence of a microscope is its ability to magnify a specimen. Total magnification of a microscope is determined by multiplying the magnification capability of the eyepiece lens by that of the objective lens.
Firstly, a little bit of an explanation about the way that an image is formed when using a pinhole. If you take a look at the following diagram, you can see that light passes in direct lines from the letter G in front of the camera, through the pinhole and lands on the rear of the camera, inverted top to bottom and left to right.
Invented by a Dutch spectacle maker in the late 16th century, light microscopes use lenses and light to magnify images. Although a magnifying glass technically qualifies as a simple light microscope, today’s high-power—or compound—microscopes use 2 sets of lenses to give users a much higher level of magnification, along with greater clarity. The first set of lenses are the oculars, or eyepieces, that the viewer looks into; the second set are the objectives, which are the lenses closest to the object. Before purchasing or using a microscope, it is important to know the functions of each part.
Finally, just to confuse matters further, our assumption that a pinhole camera renders everything in front of the camera equally sharp is also incorrect. As you can see from the following diagram, as an object gets closer to the pinhole camera, the blurring gets larger. In order to have sharp images up close, you need to have a smaller hole (but that can mean a softer image in the distance!).
Darkfield Microscopy: a technique used to enhance the contrast in unstained specimens. It works on the principle of illuminating the sample with light that will not be collected by the objective lens, so not form part of the image. This produces the classic appearance of a dark, almost black, background with bright objects on it.
These pinholes are not only very accurately made (using high-intensity particle beams) but they are also made using a very a very thin support material that is tapered to almost nothing near the edge hole. To see why this makes a difference, have a look at the following diagram. You can see that the thick material shows less of a hole when light arrives at more acute angles and is completely blocked well before the thin hole making the vignetting greater and the image circle smaller. These holes are also pretty expensive too at £55 each!
Nosepiece: The upper part of a compound microscope that holds the objective lens. Also called a revolving nosepiece or turret.
*actually it’s a lot more complicated than that but quantum physics and wave/particle duality is a little beyond this article
Pole Stand: A microscope stand composed of a base with a single vertical pole (or post). Typically, the body can move up and down as well as rotate round the pole.
Coarse Focus: This is the knob on the side of the microscope that moves the objective lens up and down. It is used in conjunction with the fine focus.
Nosepiecemicroscope function
Electron Microscope: A type of microscope that uses electrons rather than light to create an image of the target. It has much higher magnification or resolving power than a normal light microscope, up to two million times, allowing it to see smaller objects and details.
Arm: The part of the microscope that connects the eyepiece tube to the base. Articulated Arm: Part of a boom microscope stand, an articulated arm has one or more joints to enable a greater variety of movement of the microscope head and, as a result, more versatile range of viewing options.
Inverted Microscope: A microscope designed with the objectives under the stage and the light source above. Used for viewing larger specimens, often in containers.
Rack Stop: This feature determines how far up the stage can go. Setting the rack stop is useful in preventing the slide from coming too far up and hitting the objective lens. Normally, this adjustment is set at the factory, and changing the rack stop is only necessary if your slides are exceptionally thin and you are unable to focus the specimen at higher powers.
Body: Often referred to as the head, the body is the upper part of a microscope including, eyepieces and objectives. Most modern microscopes are modular in the sense that the same body can be used with different bases and vice versa.
Koehler Illumination: A method of illumination named after August Koehler, the man who invented it. It is also known as double diaphragm illumination because it employs both a field and an aperture iris diaphragm to control the illumination. If the light path is adjusted properly, it is possible to enjoy the advantages of an evenly illuminated field, a bright image without glare and minimum heating of the specimen.
The blurring from diffraction is actually a little more complicated than the simple geometric blurring of a large hole and the image formed is a central blurred spot surrounded by less and less bright ‘rings’ of light. This is called an Airy Disc and I’ve shown this in the diagram above.
Boom Stand (Universal Boom Stand): A microscope base that incorporates an adjustable arm or boom and enables the body to be aligned in a variety of different positions. Used in commercial inspection applications.
Camera Adapter: An adapter kit designed to enable a camera to fit on to the trinocular port of a microscope (23mm or 30mm port diameter). The camera connects to a step ring (or T-Mount) and then to the camera adapter.


 Ms.Cici
 8618319014500