
Camera Thread Size Vs Tripod Thread Size & Convert Nuts - camera mount thread
Overexposed = Dense negative, soft colors, subtle contrast. This is often used for portraits to keep soft skin tones. Nearly endless details can be pulled out of the highlights, though tonal separation in details becomes narrower.
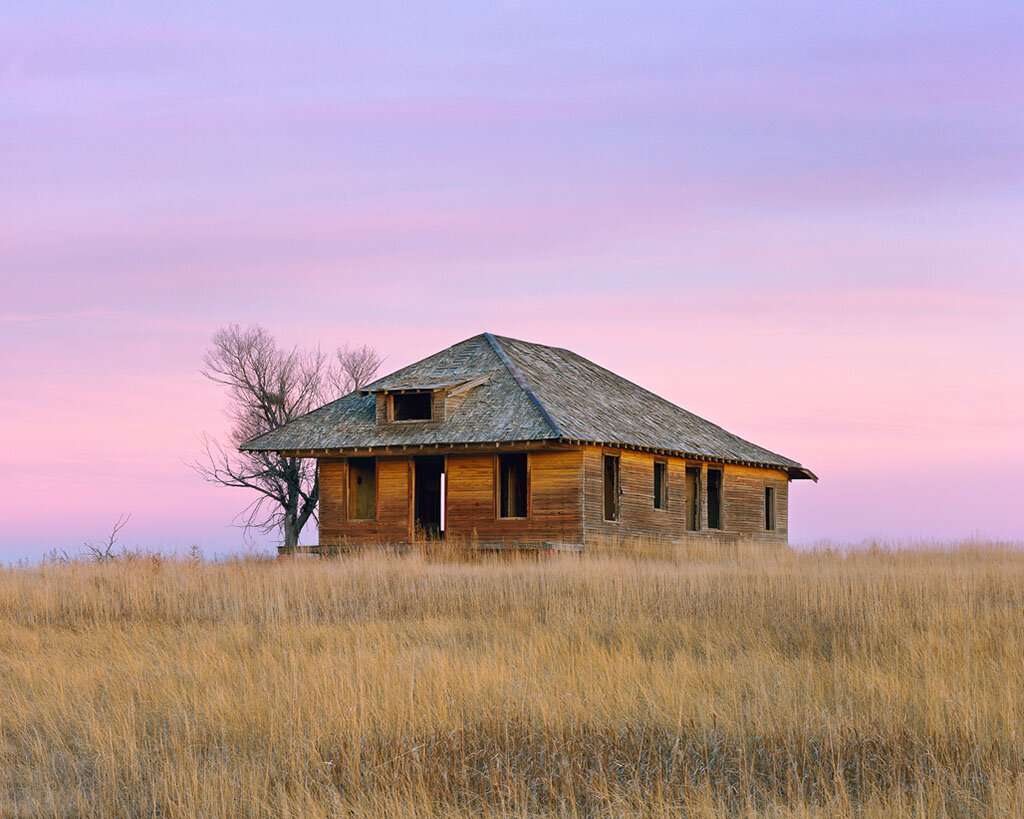
“Prairie Homestead” - Example of an overexposed negative. I typically meter Portra 160 at ISO 100, resulting in an automatic 2/3rds stop overexposure. I then also overexpose further for most of my prairie scenes by an additional 2/3rds stop. The sky was held back with a 1 stop soft GND, though it was a bit over two stops brighter than the ground. Too much filter would have resulted in darkening of the homestead. The foreground was metered at 100 with an additional 2/3rds stop added, meaning the sky was about two stops overexposed even with the filter. The result is a softer color palette for a sunrise that had rather strong colors in person. 300mm lens, 4 seconds at f45, 1 stop soft GND filter.
Having all the dynamic range in the world doesn’t mean you throw caution to the wind. While bright highlights on negatives can look quite soft and pleasing, keeping your skies from being severely overexposed will retain more color and detail in them which is particularly helpful for sunset scenes where you want to have that saturation in the clouds.
For quick and consistent results, average metering the foreground area of your scene will give you an accurate reading especially with color negatives. As many of you may know I use a small digital camera to meter my scenes set to matrix metering mode. I can zoom in the lens to meter one region of the scene and it gives me a quick average reading. In nearly all of the scenes I have found the variation of light in the subject is rather reasonable and there isn’t a huge dynamic range to work with. The majority of contrast problems come from two different types of light within the same frame; for example a shaded foreground and bright sunlit peaks and sky behind it. The foreground often contains the subject interest of the photo, which in turn means that if you average meter for the shadows you are also metering for your subject in many cases.
“Glenns Lake Sunset” - A full range of tones captured on negative film from the deep shadows of the pines to the brightest highlights on the peak and clouds. The reflection was average metered and the sky was controlled somewhat with a 2 stop soft GND. Any more would have looked unnatural, but the sky was many stops brighter than the deepest pines. Portra 160 4x5, 75mm lens, 1 second at f22, 2 stop soft GND filter.
f/# (pronounced “EFF number”) is the focal length of a lens divided by the diameter of the beam of light that enters it. If you’d like to learn more about that concept, head to this page. For a simple lens, such as the one pictured above, the diameter of the beam is the diameter of the lens. More complicated lenses, like those on digital cameras, often have an entering beam diameter that differs from the lens diameter. The lens above has a focal length that’s twice the diameter of the entering beam, so the f/# is 2. This is written as f/2 (pronounced EFF two).
mtf是什么意思
While the underexposed image of the meadow with flowers above may look enticing, I would avoid intentional underexposure of color negatives if possible. The dark shadows in the grass is more than two stops under which is where negatives start to fall apart and turn to mud. Negatives can become so thin in the shadows that details can’t be pulled out of them no matter what scanner you use, similar to how once you blow the highlights in a slide they are gone forever. In this example image the deep shadows only make up small portions of the image and don’t steal from the scene. For this reason I tend to go with a proper exposure or overexposure with color negative film.
modulation transfer function中文
As we can see from the images here, negative film can take a lot of abuse. It’s easy stuff to meter for; more than anything just make sure that your subject is properly exposed and you’ll be good to go.
调制传递函数
This is just about the only thing you really need to know about negative film. A polar opposite to slides which can’t retain much detail at all if overexposed, negatives give you ample room to really reach into the brightest highlights. So long as the darker tones in a scene are exposed somewhat close to neutral the film will take care of the rest. This isn’t to say that it’s best to expose deep shadows as neutral, you still want subjects such as black rocks or pine trees in the shade to look properly dark. If you want to spot meter your scene you will likely want to consider placing these sort of objects at -1 ⅓ to - ⅓ stop.
“Shrine Paintbrush” - An example of a half stop underexposed sheet of Portra 160, resulting in colors that resemble the saturation of a slide. 90mm Lens, 3 seconds at f22, 2 stop soft GND filter.
The light from the lens comes to a focus and then expands again, as it should. The diameter of the illumination cone (called the spot size) is very small at the focus but it is larger at either side. The following figure, called a “through focus spot diagram”, shows its variation on either side of focus.
The first basic principle of through-focus MTF is the geometrical limitation. Any lens that focuses light produces an “illumination cone.” See below for an example:
Underexposed = Thin negative, saturated colors, strong contrast. Colors can become rather inaccurate if severely underexposed (more than a stop or two).
Through-focus MTF can be used to determine the depth of focus for a lens. In the above plot, all three fields have an MTF above 0.2 from -0.14 units to +0.07 units. This means that the total depth of focus is 0.21 units. If the units are mm, this would be very easy for a mechanical designer to accommodate, but if the units are microns, it would be exceedingly difficult. That’s why it’s important for your optical engineer to communicate this information to you as you design your optical system.
Exposed at Box Speed = Natural to somewhat strong colors depending on film stock. Good for general purpose landscape shooting when moderate contrast and color is desired, though a little extra exposure typically won’t hurt.
The Petzval curvature plot doesn’t always differ significantly from the through focus MTF plot, but it’s always a good idea to specify the maximum allowable focal shift in MTF when designing a custom lens. This is because just specifying the Petzval curvature approximation may differ significantly from the real field curvature.

I'm honored to share the beauty of this world through my photography and these blog posts. Consider a minor contribution to keep me out there photographing the landscape on film. A small donation goes a long way and I really appreciate your support!
We all know a lot of scenes don’t allow for GND filters such as backlit forests or times when there are objects poking up into the sky that wouldn’t look great if you darkened them with a filter. Or those times when the weather is nasty and you’re having enough trouble keeping the lens dry let alone a stack of filters. For these situations it’s best not to worry too much about the sky and expose for your subject. It is, after all, the most important part of your image and needs to be exposed properly.
Now that you understand the theoretical limit of through focus MTF, it’s time to get practical. A picture of the through-focus MTF of a real lens is displayed below.
Unfortunately, the best focus for the light at the edge of the image (red) and even part way out (green) does not lie at the same place as it does for the center of the image. This condition, known as “field curvature”, is caused by one of two aberrations: Petzval curvature or astigmatism. See our Aberrations page to learn about these. Also, the sagittal and tangential curves do not peak at the same focal position. This is typical of astigmatism. However, the difference between the sagittal and tangential curves is much less than the difference between the center and edge of the image. This means your optical engineer would tell you that the Petzval curvature is more of a problem than the astigmatism. If you can’t get the entire image in focus at the same time, this is likely the problem. If you focus on the edge of the image, the center looks fuzzy (and vice versa) as seen here.
“Boat House Sunrise” - A great example showing how negative film can capture both subtleties in the sky as well as a wide dynamic range from deep shadows to sunrise colors. A two stop GND was used to tone down the sky but any more would have darkened it more than the water and would appear unnatural. The boats were the critical detail here so I exposed for them. I also photographed this on slide (Provia) and had to reduce exposure a bit to make sure the sky wouldn’t get lost. The result was shadows that were too dense for my taste and the negative version is much better. Ektar 100, 135mm lens, 2 seconds at f32, 2 stop soft GND filter.

The light hitting the ground was softened by both the forest canopy and the distant atmosphere as the sun was about to set. There was only a few stops of variation between the shaded ground and lit ground, and averaging the two will give you a proper exposure of that region. That is the approach you could take with a handheld spot meter. The sun and brightly lit forest canopy was not something that can be average metered along with the foreground by any camera; there is just too much variation between the too and slight repositioning of the meter will give wildly different results. It also could not be filtered with a GND so it was simply ignored when making the meter reading.
mtf光学
The central spot is at the focus of the lens and the spots to the left and right correspond to the illumination cone before (to the left) and after (to the right) focus. As you can see, the spot size increases dramatically as you move away from focus. This forms an upper limit on the through focus MTF. The F# of the optical system will determine how fast this happens. Any photographers reading this may be familiar with this term, but let me explain it for the others.
“Al’s Service” - When it comes to thunderstorms there often isnt’ time to mess around with filters. For this scene I just quickly metered the entire foreground and shot at that reading. Average metering balanced the white buildings, midtone pavement, and deep trees perfectly. Portra 160 6x7, 45mm lens, 4 seconds at f22, no filters.
One of the biggest things to know about color negatives is how capable they are at handling a wide variety of subject matter and light. Nearly anything thrown at them can be captured if exposed accordingly and the film is nursed just right during the scanning or printing process. If your goal is to capture the extreme dynamic range of a backlit forest, no problem. Same goes if you desire a softer color palette of a scene without much in the way of contrast. A general rule to know as far as color saturation goes is that if you underexpose the film, you tend to get stronger and sometimes a bit inaccurate saturation. If you overexpose the film, you get softer colors and lighter contrast.
Another point to remember is that it’s ok to have true blacks and true whites in an image, in fact it looks proper especially when it comes to printing. Let the space between the leaves in a backlit forest go to pure white, it makes sense to our eyes and looks good in a photo too.
We can measure Petzval field curvature several different ways, but we prefer to rely on the through focus MTF plot. It generally gives the most accurate representation of the real field curvature. See the two plots below as an example. One is a plot of the through focus MTF and the other is a simple field curvature plot of the same lens. Both of these plots are for monochromatic light at 550nm.
Now that you understand MTF, the next important concept is how refocusing a lens affects it. This is called the through focus MTF. It is important that you get this information from your optical engineer, because without it you could end up with an optical system that does not meet your needs.
mtf群体
According to the Petzval field curvature plot, the total field curvature from the center of the image (0 degrees) to the edge (9.4 degrees) is about 0.23 mm. We can measure the Petzval curvature on the corresponding through focus MTF chart by measuring the distance from the peak of the 0 degree line to the peak of the 9.4 degree line. These peaks as seen on the plot are about 0.15mm apart. The field curvature plot exaggerates the real field curvature by 150%! This is because Petzval field curvature plots rely on approximations.
The two color negative films that I use are Kodak Ektar 100 and Kodak Portra, typically in the 160 flavor. These tips should work with any color negative film, but since I have extensive experience with these two and can capture just about any scene the way it looked in my mind there’s no real reason for me to complicate my film situation with additional film stocks. It also happens to be that those are the only two color negatives that are regularly available in 4x5” sheet film. For you medium format and 35mm shooters you have a lot more options to work with.
LensMTF
Modulation transfer function
Dynamic range is all the rage today in the digital world, but the ability to capture a wide range of light from deep shadows to bright highlights has been there for a long time with color negatives. Quantifying the exact range of the film is a tricky matter and one of the more frequent questions I get. The truth is, it would be hard to know with the tools I have on hand. Even if one were to put a figure to the number of stops the film can handle there are still practical limits. For example, if you expose a frame shooting into the sun you can often see the actual disc of the sun on the negative as well as details from the rest of the frame. The trouble comes when you want to balance this with the rest of the scene. The extreme highlights have details that can be picked up with a scanner, but in order to have those details in the final scan the rest of the frame will be flat and lifeless. Some selective editing in Photoshop (or dodging while printing in the darkroom) can help, but will only get you so far. It’s no different with digital: by blending 5 different exposures it’s possible to capture a ridiculous dynamic range, but it will look unnatural when you go to balance the extreme highlights with the rest of the frame. Long story short, good light is still important and using a wide dynamic range to capture bad light won’t make a good photo. Negative film gives us extra room to work with, but it doesn’t magically make all light good.
“Sunflower Sunset” - Backlit scenes are no trouble with color negative film. A filter was left off for this image to avoid flare troubles with the sun. The foreground (also the important part) was average metered and the sky ignored when taking the meter reading. Ektar 100 4x5, 210mm lens, 2 seconds at f45, no filters.
MTF
More realistically, it works well to find the most important object (often the subject) in a scene and meter for that. Think about how you want to luminance of that object to be rendered. If a red barn is your subject, that is usually a good neutral tone and should be exposed as such. If it’s the white bark of aspen trees you’ll want to add a stop, perhaps more depending on how the light is hitting them. If you focus on getting your most important object exposed properly, chances are the rest of the scene can be handled by negative film and you won’t have underexposed shadows. Here are some exposure guidelines for common subjects, your mileage may vary:
For those who like to spot meter let’s take a look at the scene below and see how careful spot metering and quick average metering will achieve the same result in this high-contrast image. I’m not trying to encourage anyone to totally change up their metering habits if you are a master of spot metering, but I am suggesting an alternative for those who are still learning (well, we all are) or want another tool in their box.
Let’s start by observing the blue line. On it we can see that the MTF peaks at around 0.06 units to the right of the “best focus” and drops off on either side. The dropoff is not symmetric, which is common for systems with spherical aberration. For more information on aberrations, click here. Assuming that an MTF of 0.2 is acceptable, the image plane can be moved about 0.4 units to the left of best focus or 0.16 units to the right before the resolution at the center of the image is no longer acceptable.
The spot size at a given distance from focus can never be smaller than the diameter calculated from the f/#. Take, for example, the f/2 lens shown above. The spot size 1 mm away from the focus can never be smaller than 1/2 mm. If the lens were f/2.5, the spot could be no smaller than 1/2.5 or 0.4 mm. Applying what we learned about MTF, the MTF at 2 cy/mm would be essentially zero for an f/2 lens 1 mm from focus. An f/2.5 lens would have a nonzero 2 cy/mm MTF at 1 mm from focus, but it would drop to zero at 1.25 mm from focus.
As before, the blue curve represents data from the image’s center, red from the edge, and green from in between. To get these curves, the user specifies a certain spatial frequency that’s commonly half to three fourths of the maximum. Then the user has the lens design software plot the variation of the MTF at this spatial frequency versus focus. The zero point is typically the “best focus” for the lens. The plot shows how fast the MTF falls off as the image plane moves from its optimal location.
Color negative film has increasingly become a larger part of my workflow over the last several years and with good reason: the flexibility of the stuff is just phenomenal. It can be used to capture all the delicate subtleties of a low contrast scene as well as landscape scenes with intense dynamic range. If you don’t know what you will be getting into when you head out for a shoot it’s an excellent choice because it can handle anything you throw at it, but that doesn’t mean it can’t be used for a specific purpose or aesthetic either. Color negatives are the film type that I get the most questions about, mostly because people see such a wide variety of looks coming out of the same film types from me. While I’ve done several articles about color negatives, metering and more, today let’s dive into pushing the limits of this incredible film.
Thank you for reading! If you enjoyed this content, perhaps you might also like my ebook “Film in a Digital Age.” Its 180 pages packed with knowledge and dive deep into all sorts of topics to help you master your film technique.
“Coastal Oak” - A scene where a GND filter just wouldn’t work. The ground and tree were the important parts of the image so I metered for that and let the highlights go. Ektar handled it well. 75mm lens, 2 seconds at f32, no filters.


 Ms.Cici
 8618319014500