
Beam Steering - beam steerer
One reason you might like to measure this stuff, versus just reading the lens focal length stamped on the lens, is that manufacturers often lie about the true lens focal length. This is particularly true of long zooms, which might not be as long as claimed. It’s often the case that a lens focal length reduces drastically when focusing close (called focus breathing), and these techniques could attach real numbers to that.
My setup was on a tile floor, and I used the tile grout lines to make sure the lens axis was exactly perpendicular to the wall. You could also temporarily tape a little mirror against the wall and line up the camera until you see your reflection in the center of the camera’s field of view.
As I often say, “garbage in, garbage out”. The more accurate measurements you make, the more accurate your results will be.
The diagrams above show the setup to align and measure your lens to get the information for calculating the focal length and field of view (FOV).
For both setups, the angular measurement from the lens axis to the frame edge is called ‘Angle’, measured in degrees. The FOV of the lens is twice the value of ‘Angle’.
As shown above, I put some tape targets on the wall that point at the edges of the field of view and the exact center of the frame. I made sure that the distances on either side of the middle of the frame exactly matched. I also made sure that the lens was at exactly the same height as the middle wall target. Using high magnification via Live View or the viewfinder helps getting the targets more precise.
The nearer wall distance setup is called ‘x’. The farther wall distance setup is called ‘X’. Similarly, the distance along the wall from the frame middle to the frame edge in the nearer wall setup is called ‘y’, while the farther distance setup is called ‘Y’.
Using these techniques, you could actually find out what an un-marked lens’ focal length is. You could also verify (or debunk) manufacturer claims about the real focal length of a lens.
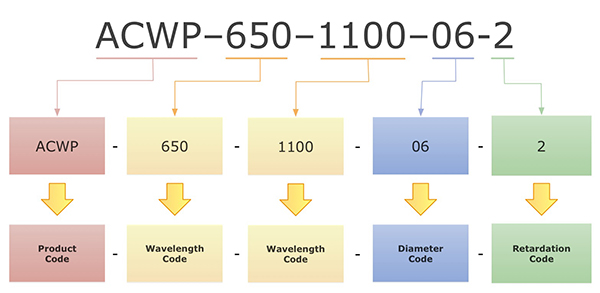
Achromatische Wellenplatten: Achromatische Wellenplatten bestehen aus 2 verschiedenen doppelbrechenden Materialien, Magnesiumfluorid und Kristallquarz. Die Kombination dieser beiden Materialien, die in einem Luftabstand zusammengesetzt sind, ermöglicht Polarisationswerte höherer Qualität über einen breiteren Spektralbereich als die Quarzwellenplatte nullter Ordnung. OptiSource bietet achromatische Wellenplatten für 4 verschiedene Bandbreiten über den sichtbaren bis nahen IR-Bereich. Dies sind 450-650 nm, 550-750 nm, 650-1100 nm und 1050-1500 nm.
To get all of the necessary information, you’ll need to set up some targets on a wall (I used painter’s tape) and then take distance measurements at two different camera-to-wall distances.
You only need to take 6 different measurements to calculate everything! The trick is in setting up the targets to make those measurements accurate.
The mathematics used in the calculations involves both algebra and trigonometry. Any “scientific” calculator has the necessary features to do this math. You can always download a scientific calculator app onto your smartphone. Fear not the math.
OptiSource, LLC is a manufacturer of laser quality optical components in prototype or OEM quantities. Small and responsive, the customer benefits from a lack of large company overhead costs. Conversely, OptiSource, LLC incorporates many of the technical, manufacturing, quality, and metrology advantages of a large company. OptiSource, LLC is located in Albuquerque, NM.
I made all of the distance measurements relative to the lens axis and to a spot on the lens that I guessed to be near the vertex of the red arrows shown in the diagram. You don’t really need to know this location, since these techniques will actually calculate the location.
I happen to have a fun little laser that can make extremely accurate measurements over long distances. I used this device to get my targets placed within a millimeter, and to measure the camera-to-subject distance.


 Ms.Cici
 8618319014500