
Bar light - lights for bar
Confirm with Yes if you want to have multiple devices open. Pressing No closes all open devices and opens your selected device.
Doubleclick on the device (for GigE devices use Filter Driver in Windows and Socket Driver in Linux), which has a green camera icon now, or use the Open Device button to get a live view and to configure the device.
All available transport layers are displayed with a check box. Deselect the transport layers, which you want to hide and confirm with the OK button.
Please note: Generally you should use the device with the siNetFilter Driver in Windows (Linux: Socket Driver) for GigE Vision as it is used to bypass the standard network stack (used by the operating system) for all data stream packets. It filters GigE Vision related data packets and transfers them directly to an application-provided data buffer. This greatly reduces the CPU load of the system. All non GigE Vision data stream related packets are unaffected.
With the GenICam Browser you can easily configure the devices, in order to use your application with the GenICam.vin driver located in %CVB%Drivers folder.
Double click on the device (use Filter Driver in Windows and Socket Driver in Linux), which has a green camera icon now, or use the Open Device button to get a live view and to configure the device.
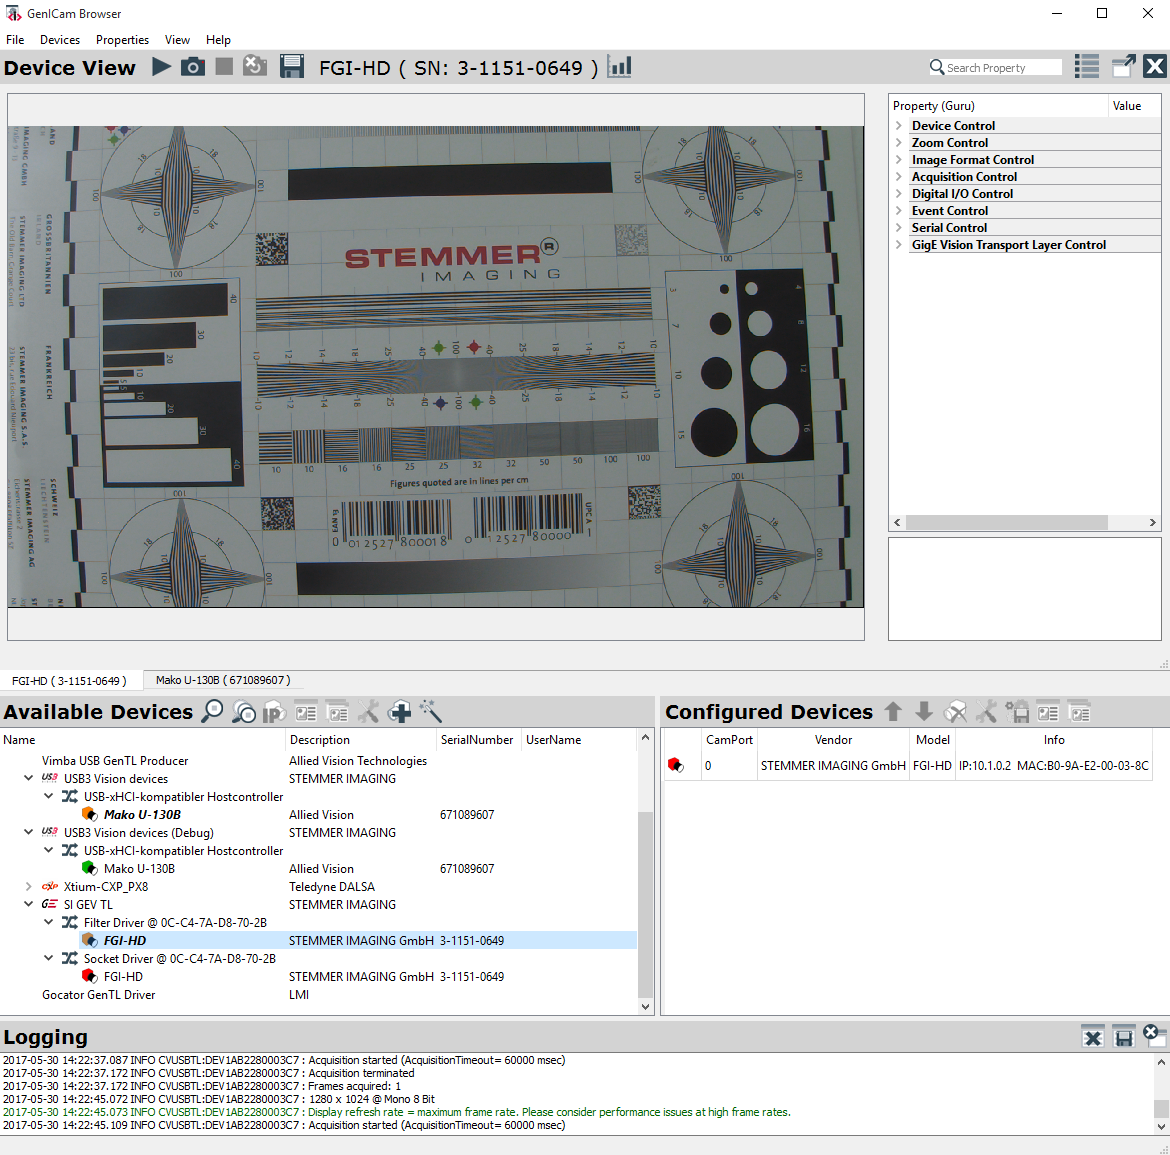
The Save image... button is available to store an image as BMP, PNG, TIF or JPG. Images higher 8 bit can only be stored as TIF. Please note that in Linux some formats are not available.
Color conK
Confirm with Yes if you want to have multiple devices open. Pressing No closes all open devices and opens your selected device. Â If you want to open multiple devices, you can also use the button Open additional device.
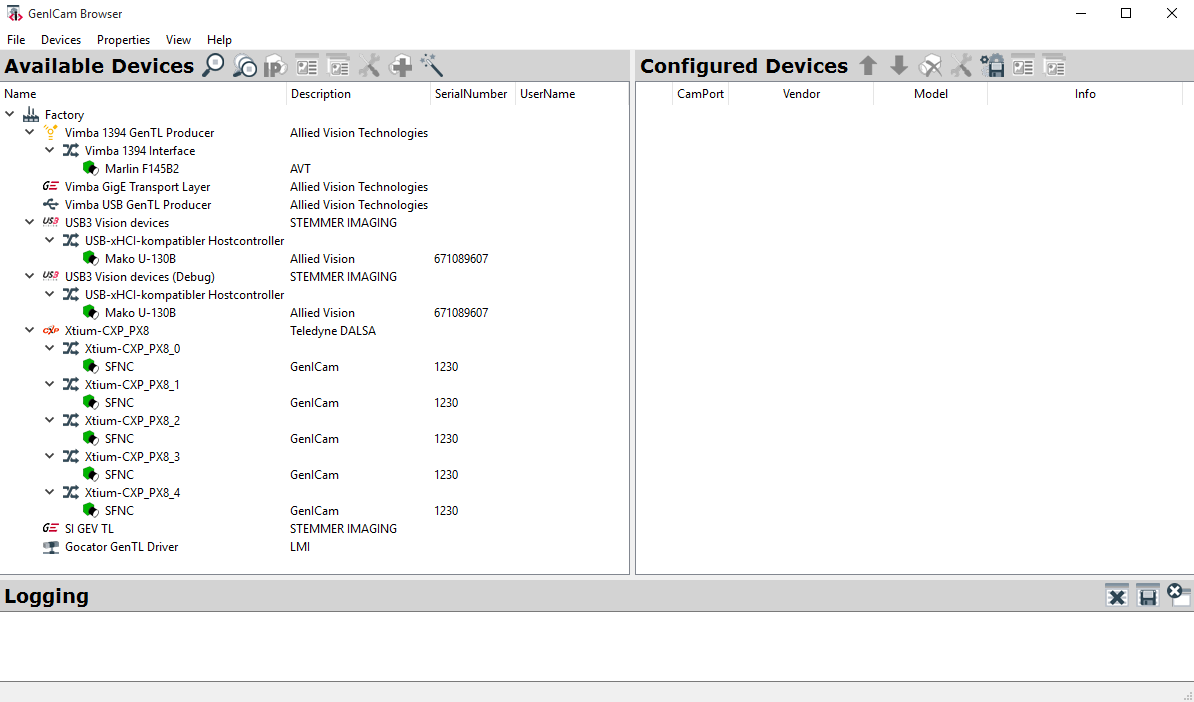
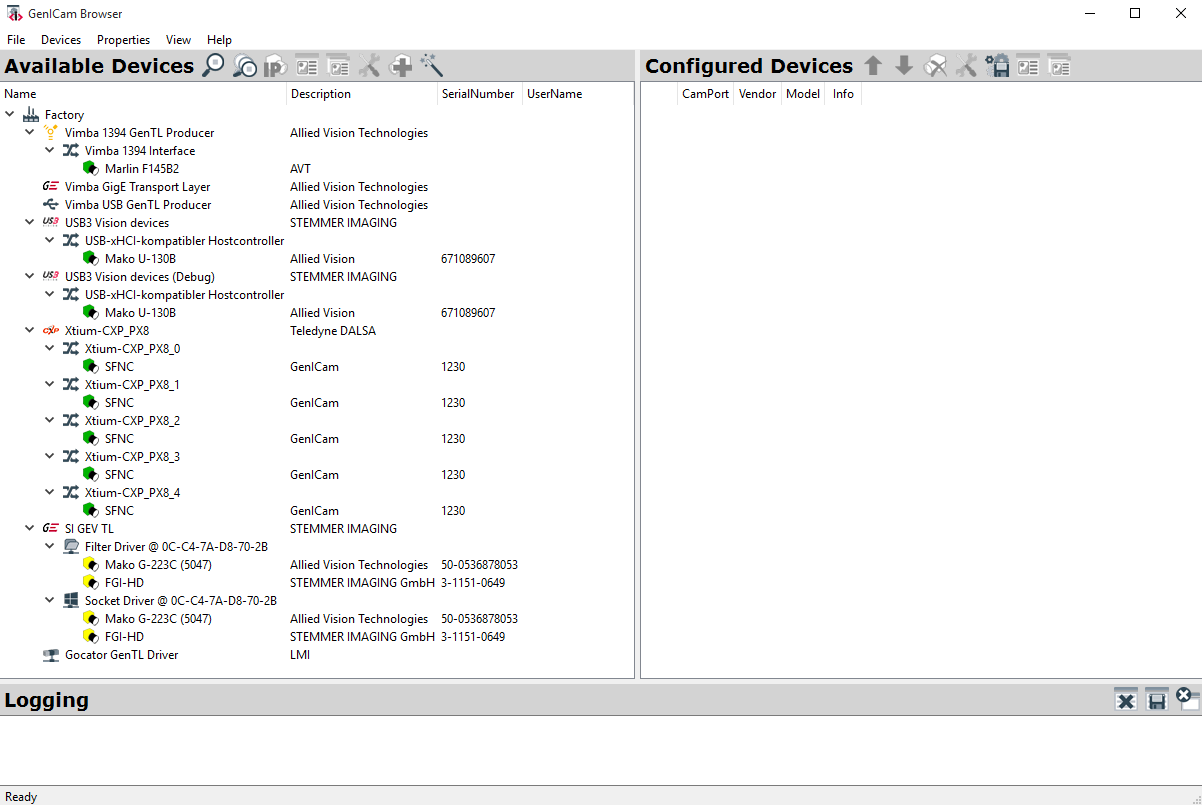
To search for available devices and to refresh the Available Devices tree use the Discover button. Available devices show up as green cameras.
To get a single image use the Snap button, to start the acquisition press the Grab button and to stop the acquisition press the Stop button.
Setting an IP persistent (static) means that after powering the device, the IP address will be the persistent IP address and does not need to be set manually again.
Show and Hide Transport Layers Show all Interfaces Find Devices Detailed Information on Devices, Interfaces and Transport Layers Open a Device For Live View and Configuration Configure and Add Device to Configuration File Show / Hide a View
Color conW
Double click on the device (use Filter Driver in Windows and Socket Driver in Linux), which has a green camera icon now, or use the Open Device button to get a live view and to configure the device.
If there are transport layers, which you do not need, you can hide them in this tree view. Select Show / hide TLs in the View menu:
Color conG
Log and error messages are shown in the log window. Messages of a specific device are logged with the device identifier as prefix.
â Please note: You can only select the Display Engine, if no device is open. If the selection is disabled, close all devices first.
The toolbar shows the name and serial number of the device for identification if multiple devices are open. If you have multiple devices open, the windows are tabbed, so you can select the device's live view with the tab.
To set the IP persistent, you have to use the Auto Select IP button again on this device, then the Assign persistent IP (Static) option will be available.
The device will be opened in the Device View. On the left side a live image is shown, on the right side you will find the property grid to configure the device. In Available Devices the device shows up with an orange icon. In the Logging part of the application you get some detailed information.
The timeout for discovery is set to 200 ms (milliseconds) by default. If devices are not found, this timeout can be set to a higher value.
While acquiring images, the number of acquired frames as well as the frame rate in fps (frames per second) is shown below the image.
By default the OpenGL engine type is used to display a live image, but you may also switch to engine type Raster. This might be necessary with old monitor drivers, in Linux or using a remote session.
To avoid a long list of interfaces, which do not have devices attached, they are hidden. If you want to show all interfaces in the tree view, enable Show all interfaces in the Configuration menu. To save this setting permanently, select Save configuration in the Configuration menu.
If you encounter an unresponsive GUI, when the frame rate is high, you can either reduce the display refresh rate or disable the display, so only the frame counter and the frame rate are shown.
Color conS
After starting GenICam Browser for the first time, the available transport layers (TL), available interfaces and devices are listed in a tree view. To search for available devices and to refresh the Available Devices tree use the Discover button. Available devices show up as green cameras.
It is also possible to save consecutive images. The folder, where the images should be saved, has to be configured with Configure save consecutive images. Then the buttons Save next consecutive image and AutoSave consecutive images will be enabled. While acquiring images, the images can be stored automatically in increasing order each time, when the button Save next consecutive image is pressed. In case of AutoSave consecutive images enabled, the storage of the images will start automatically at acquisition start. Additionally an emu file will be created in the predefined folder. This emu file can be loaded by any CVB example to play the consecutive images. A CVMock.ini will be created as well (which is using the emu file), in order to use the CVMock driver in CVB examples to replay the consecutive images.
To work with Common Vision Blox applications and tutorials it is necessary to configure the devices. To do so, follow the instructions in chapters
Only generate the extended log file if requested by STEMMER IMAGING support. The extended logging is started via LogGUI. For details see LogGUI User Guide. The logging within the LogGUI can be stored to a text or JSON (preferred) file.
Please note, that opening and running a device in the GenICam Browser, does NOT use the GenICam.vin driver, but the transport layer. Therefore only Number of Buffers and Packet Size are considered at image acquisition with the GenICam Browser. Even when opening a device in Configured Devices the transport layer is used. To test the settings, any Image Manager application can be used by loading the GenICam.vin driver.
GigE devices in another subnet have to be configured to show up as available devices. To make the device available for usage, either doubleclick on the device (yellow camera) or press the Assign IP button, in order to change the IP address of the device. Please note, that the button is disabled, if the device is not detected as GigE device.
Please note: Generally you should use the device with the siNetFilter Driver in Windows (Linux: Socket Driver) for GigE Vision as it is used to bypass the standard network stack (used by the operating system) for all data stream packets. It filters GigE Vision related data packets and transfers them directly to an application-provided data buffer. This greatly reduces the CPU load of the system. All non GigE Vision data stream related packets are unaffected.
For testing multiple devices, you might detach the Device Views, disable Properties (in Devices - Device Selection - Properties), so only the live images are shown and start the acquisition with Grab start all (Shortcut F3). You can stop all devices at the same time with Grab stop all (Shortcut F4) or you can acquire only a single image on all devices with Snap all (Shortcut F2).
Edit the Configured Devices Open a Device For Live View and Configuration Show / Hide a View Testing the Configuration / Load driver
To see the windows beside each other (and not tabbed), you can undock the window with the Undock button and dock it with the Dock button.
GigE devices do not show up at first startup, if they are in a different subnet. Therefore run the discover with ignore subnet option. Use the Ignore Subnet Discover button to search for all devices, which can be in another subnet too. Devices in another subnet will show up as yellow cameras.
To close the log window, use the Close button or disable the log window in the Configuration menu. You can enable the log window there again.
Fruta ycolor con J
If you want to quickly add a device to the configuration file, use the Add Device button. You can configure the device after that action too.
To get statistical information of the device, use the Statistics button from the Devices menu or from the Device View toolbar.
The parameters have to be set before opening the device, in order to be taken into consideration at current acquisition. For details see Configured Devices (Configuration).
To get a single image use the Snap button, to start the acquisition press the Grab button and to stop the acquisition press the Stop button.
There is also the possibility to maximize and to minimize the undocked acquisition window with the Maximize and Minimize buttons.
Color conI
Some parameters marked with need to be reloaded at runtime, for example the statistics parameters. To update them during acquisition press the Reload features button in Properties menu or use the Shortcut F5.
Generally the extended logging is not necessary as the log file will be large. Only generate the extended log file if requested by STEMMER IMAGING support. The extended logging can only be started via command line and supports following parameters (–debug or -d):
To find a property type the property name or a part of the property name into the search box and press Enter. The properties containing the search text will be shown and highlighted.
Click on Display refresh of the device, of which you want to reduce the refresh rate. Disable the checkbox Use max. framerate (the display is refreshed as fast as possible then, but may lead to unresponsive GUI) and set the display refresh rate in milliseconds (ms). Confirm with OK.
GigE devices do not show up at first startup, if they are in a different subnet. Therefore run the discover with ignore subnet option. Use the Ignore Subnet Discover button to search for all devices, which can be in another subnet too. Devices in another subnet will show up as yellow cameras.
 To acquire an image immediately when a device has been opened, the Acquire image immediately has to been checked in Devices menu (default), otherwise uncheck this setting.
To get some information on vendor, model, version etc. of transport layers, interfaces and devices either go to the according module and hover over its name or right click on the module and select Info.
The Register Access dialog provides a Nodemap selection, Register / Memory as well as Dec / Hex selection and the endianess. Enter the address to read and enter the address and value to write the device's register. A status line at the bottom informs about the result of the command (Success or error message).
The view Configured Devices shows a list of all configured devices, which are stored or should be stored in CVB configuration file. The configuration of the devices is necessary to run any Common Vision Blox application / tutorial by loading the GenICam.vin driver, which is located in the %CVB%Drivers folder.
To set the IP address persistent, reopen the Assign IP dialog and select the Assign persistent IP option. Press Set to store this setting in your device.
The GenICam Browser is an easy to use application to detect devices in the network and to get a live view without programming. Further it offers an easy way to configure devices for further use in your own application with the CVB GenICam driver.
If the log window is closed and an error occurs and is logged, a blinking red exclamation mark appears. By clicking on the exclamation mark, the log window will open. The log messages are displayed there. The error log message has a red color.
 To hide or show Configured Devices View or Available Devices View, uncheck or check it in View menu. The settings in the View are saved automatically after leaving the application.
To hide or show Configured Devices View or Available Devices View, uncheck or check it in the View menu. The settings in the View are saved automatically after leaving the application.
The default visibility is Beginner. By selecting Expert or Guru in Properties menu, you increase the number of properties to be displayed. The maximum number of properties is shown with Guru.
After setting a temporary IP, you are asked, if you want to set the IP address persistent. You can do this later as well.
To make the device available for usage, either doubleclick on the device (yellow camera) or press the Assign IP button, in order to change the IP address of the device.
On the left side a live image is shown, on the right side you will find the property grid to configure the device. In Available Devices the device shows up with an orange icon. In the Logging part of the application you get some detailed information.
The dialog shows statistical information during grabbing an image like the frame rate and the data rate. Further it shows the statistical values of the DataStream NodeMap as well as hints to optimize performance. As some parameters are not available for all devices, check the device's manual as well as CVB GenICam User Guide for other parameters to optimize.
A logging window on bottom of the GenICam Browser gives some additional information on the device, on the acquisition, but also error messages.
Run the configuration with one of Common Vision Blox tutorials and create your own. The tutorials are located in %CVB%Tutorial folder.
Either double click on the device or press the Assign IP button in the Available Devices view, in order to change the IP address of the device.


 Ms.Cici
 8618319014500