
Musco Sports Lighting: The World Leader in Lighting - led sport light
In refractive state 0, a unit increase in log-illuminance from the reference level of 500 lx (i.e. a ten-fold increase into 5000 lx) is associated with an average improvement of 0.06 in LogMAR (p < 0.001), see Table 3. This effect is more marked in the presence of myopia. The effect of illuminance on refractive states 1, 2 and 3 is significantly different to that in refractive state 0 (p = 0.035, < 0.001 and < 0.001). In refractive state 1 (0.50DS Myopia), a tenfold increase in illuminance causes an average improvement of 0.07 LogMAR (0.06 + 0.01). In refractive states 2 and 3, the same increase in illuminance results in an improvement in VA of 0.10 (0.06 + 0.04) and 0.12 (0.06 + 0.06) LogMAR.
Increasing the f-stop, thus producing a smaller aperture diameter, forces the image sensor to collect less light information, producing a darker image, with increased depth of field.
Let’s get started… Table of Contents Depth of Field Photography VideoDepth of Field Photography BasicsCamera Lens Basics for Depth of FieldExposure Stops & Depth of FieldExample Photos & Camera SettingsSelecting the Correct F-Stop & Depth of FieldHow to 10X Your Learning Speed Depth of Field Photography Video Watch this video to learn the best f-stop settings to maximize depth of field and image sharpness. Next, read the guide to dial in your camera technique. Depth of Field Photography Basics In photography, aperture diameter, determined by f-stop, controls two important factors: Depth of Field (DOF) determines the closest and farthest objects in an image, both of which are in focus. The entire image between these objects also maintains sharp focus. Amount of Light exposed to the image sensor, which controls the image brightness, rated in stops. Mastering depth of field requires a basic understanding of f-stop, focal length, focus range, and camera lenses. We will quickly cover these first. What is Aperture in Photography? The terms f-stop and aperture are often used interchangeably, this is incorrect. Aperture is the opening in the front of the lens where light enters the camera. F-stop is the ratio of lens focal length to aperture diameter. F-stop is a dimensionless number, denoted by a hooked “ f ”, with an underlying number denoting the f-stop value. f/2.8 and f/8 are two examples of common f-stop settings, where 2.8 & 8 are the f-stop values, respectively. F-Stop = Lens Focal Length (mm) / Aperture Diameter (mm) The aperture diameter is the straight distance across the widest part of the aperture. The focal length of the lens determines your field of view (composition) and the magnification of the scene. The graphic shows increasing f-stop values with decreasing aperture diameters. Attribution – Wikipedia If the lens focal length is 20mm and the aperture diameter is 10mm, then f-stop = 20mm/10mm = 2. This is denoted as f/2. The photographer controls the f-stop, which determines the depth of field and how much light enters the lens. The larger the f-stop value, the less light enters the lens, over a set exposure time. The smaller the f-stop value, the more light enters the lens, over a set exposure time. What is Depth of Field in Photography? Depth of Focus vs Depth of Field (DOF) – To clear up any confusion, these terms mean the same thing. They can be used interchangeably with focus range and DOF. Depth of field is defined as the distance between the closest and furthest objects within a composition, both of which are in focus. All objects between the closest and furthest objects are also in focus. By adjusting the f-stop, the photographer controls the depth of field. Smaller f-stop value = larger aperture diameter = smaller DOF Larger f-stop value = smaller aperture diameter = larger DOF The following examples show small or shallow depth of field vs large or deep depth of field. The first photo was taken at f/5.6 and the second was captured at f/16. Photographed at f/5.6 The red lines show the closest and furthest objects that are in focus. Notice how everything between these lines is also in focus. The red box denotes the focal point within the image. This is the location that I focused on to take the shots. The focal point always lies within the focal range or depth of field. Photographed at f/16 In the images above, the focal point, denoted by the red box, stays at approximately the same location. The depth of field or focus range extends beyond the focal point, as the f-stop increases from f/5.6 to f/16. Here is another example of two landscape photos showing varying depths of field. The first example below shows a deep also known as large depth of field. Everything in the entire image, foreground to background is in focus. Large Depth of Field @ f/8 The second image shows a shallow depth of field example. Only the subject is in focus, while the foreground and background are not in focus. The focus range is very shallow providing a small depth of field. Shallow Depth of Field @ f/4 What is Focal Length in Photography? The lens focal length, selected by the photographer, determines the field of view (FOV) The field of view defines your composition. It’s everything seen for a selected focal length. The larger your focal length, the smaller the field of view becomes & vice versa. Focal length also determines the depth of field, as we will cover below. Example Images – Focal Length & Field of View When the focal length increases, the field of view decreases, and the subjects in the image become magnified. 14mm Focal Length 24mm Focal Length 80mm Focal Length Camera Lens Basics for Depth of Field Prior to selecting the correct f-stop & focal length settings, producing the desired depth of field, the basics of a camera lens must be understood. Different Types of Camera Lenses Human vision is approximately 50mm focal length. Focal lengths larger than approximately 50mm will magnify the composition. Focal lengths less than 50mm are denoted as “wide-angle”. Wide Angle Lenses produce a field of view larger than our standard vision & usually range from 8mm to 35mm in focal length. Standard Lenses produce a field of view similar to our standard vision & usually range from 40mm to 60mm in focal length. Telephoto Lenses produce a field of view smaller than our standard vision & usually exceed 70mm in focal length. Camera Lens Focal Lengths The 28-300mm lens shown in the graphic below has a focal length range of 28mm to 300mm. This is denoted as a wide-angle telephoto lens since it covers above & below 50mm focal length. The focal length range for this specific lens is labeled in gold letters as 28-300mm, seen just above the “AF-S NIKKOR” label. The photographer can select any focal length, within the focal length range. This is what determines the composition. The white dot on the lens above shows the currently selected focal length of 28mm. The 14-24mm lens, shown below, is known as a wide-angle lens. It covers fields of view greater than what the human eye can see. The smaller the focal length the “wider” the field of view. Crop Factors & Focal Lengths Cameras with crop factors above or below 1 change the field of view and focal length. Using your camera’s crop factor an effective focal length can be calculated. A full-frame sensor has a crop factor of 1. A 28-300mm lens used on a 1.6 crop factor camera would have an effective focal length range of 45mm – 480mm, calculated as follows: ( 28mm X 1.6 ) – (300mm X 1.6 ). The following image was taken on a full-frame camera with a crop factor of 1. The same image taken at 14mm on a 1.6 crop factor camera would look like it was taken on a 22mm lens (14 X 1.6) The red box shows what this composition would look like on a 1.6 crop factor camera. Camera Lens F-Stop Values Each camera lens has a minimum f-stop value, or widest aperture diameter, in which it can operate for any given focal length. Most lenses are designed so the minimum f-stop value increases as the focal length increases. The lens label shows the focal length range to be 18-35mm in the example below. The photographer can shoot at any focal length, in the range of 18-35mm, producing their desired field of view. Following the focal length range is the minimum f-stop range of f/3.5 to f/4.5, noted on this lens and most others as 1:3.5-4.5. The range of f/3.5 to f/4.5 provides the minimum f-stop values (widest aperture diameters), that this specific lens can maintain while shooting at the minimum and maximum focal lengths, respectively. For example, the minimum f-stop value this lens can maintain is f/3.5 while shooting at 18mm. As the focal length increases, from 18mm to 35mm, the minimum f-stop also increases, until it reaches f/4.5 at 35mm. All focal lengths between 18mm and 35mm will have minimum f-stop values ranging from f/3.5 to f/4.5. You can always increase the f-stop to larger values. The noted values are only the minimums. Lens Speed, Explained The lens speed refers to the minimum f-stop value a lens can shoot at for any focal length. As the focal length increases, from 18mm to 35mm, on the lens above, the aperture diameter becomes smaller, reducing the f-stop from f/3.5 to f/4.5. To capture the same amount of light from the scene, as the focal length increases, the shutter speed would also have to become longer. The “faster” the lens, the lower the f-stop value it can maintain over its entire focal length range. Lens Speed Example Looking at the 14-24mm f/2.8 wide-angle lens above, there is a single minimum f-stop value given of 1:2.8. This means that this lens can maintain f/2.8 minimum f-stop value no matter the focal length. Lenses like this are much more expensive because they require more glass and better engineering to produce. There is also a maximum f-stop value for each lens, but it’s not listed since it doesn’t change the “speed” or how fast the lens can expose for a given scene. Exposure Stops & Depth of Field An exposure stop, or stop for short, is a scale to measure the change in light, exposed to the image sensor, due to different exposure settings such as f-stop and shutter speed. For ISO, exposure stops provide the increase or decrease in signal (light information) amplification, thus how much light is required to produce the optimal exposure. Stops provide an easy way to balance the exposure triangle while changing settings. Click Here & Download the chart as a PDF to reference while reading. The Stops Column shows the difference in stops between different f-stop values. The F-Stop Value Column shows different standard f-stops in 1 stop intervals. Each change in stops doesn’t correlate to a specific f-stop value. Stops show you how much light is captured from one f-stop setting to the next. This makes it easy to maintain the correct exposure when changing settings.f Increasing the f-stop, thus producing a smaller aperture diameter, forces the image sensor to collect less light information, producing a darker image, with increased depth of field. By increasing the f-stop value, the aperture diameter gets smaller. Doing so produces an increased depth of field, and a darker image if no other settings are changed. This is known as stopping down. Decreasing the f-stop, thus producing a larger aperture diameter, allows the image sensor to collect more light information, producing a brighter image, with a decreased depth of field. By decreasing the f-stop settings the aperture diameter gets bigger. Doing so produces a decreased depth of field, and the image gets brighter if no other settings are changed. This is known as stopping up. Depth of Field & Exposure Stop Examples In the following examples, ISO and shutter speed are constant. Only f-stop changes in 1 stop increments. The first example was taken at f/11, followed by f/8, f/5.6, and f/4. The focal point stays the same for each of the images. As the f-stop becomes smaller, by 1 stop at a time, the image gets brighter, but the depth of field decreases. Notice how the sharpness in the bottom of each image drops off as the f-stop decreases. This shows the depth of field becoming smaller and smaller. Settings: f/11, ISO100, 1/5th second Settings: f/8, ISO100, 1/5th second Settings: f/5.6, ISO100, 1/5th second Settings: f/4, ISO100, 1/5th second If you wanted to maintain constant exposure (image brightness), while changing the f-stop values, then changes in ISO or shutter speed would have to be made in the opposite direction. Exposure Stops & Aperture Diameter Example The amount of light exposed to the image sensor is determined by the square area of the aperture as seen in the graphic below. Aperture Area = Pi*(Aperture Radius^2) For example, Shooting at an f-stop of f/1.4 provides a 314 square millimeter opening for light to enter the lens as seen in the Aperture Area Column. Shooting at f/2.8 and 28mm provides a 79 square millimeter aperture area. If you changed from f/2.8 to f/5.6, this reduces the area by half, thus reducing the amount of light in the exposure by half. Using exposure stops keeps you from having to do these calculations each time! Shooting Example – Aperture & Exposure Stops Imagine taking an image at f/16 and thinking that it was way too dark. Taken at f/16 Next, you thought, “If this picture was 2 times as bright it would be perfect.”. Changing the settings by one stop, from f/16 to f/11 would provide double the amount of light. Instead of having to guess you just reference the exposure stops chart and made the change. Taken at f/11 Example Photos & Camera Settings Depth of Field is controlled by three factors, each shown with example photos below. Focal Point & Depth of Field The focus point or focal point controls the location of the focal range within the image. I prefer to control this focus point manually, using back button focus. Each image below was captured at f/5.6. The focus point moves, but all other settings stay the same. The focal range is denoted by horizontal red lines. The red box denotes the focus point. In the following image, all settings remain the same. The focus point moves to the middle of the image, shifting the focal range. The focal point is shifted to the back of the image, below, moving the focal range with it. By selecting the correct focal point location and f-stop settings, the photographer controls the depth of field for each image. F-Stop & Depth of Field The following examples show different image attributes correlate to varying f-stop values and depth of field. An image attribute is a specific visual effect obtained from varying camera settings such as f-stop, ISO & shutter speed. In this case, we will look at visual image attributes determined by f-stop, providing varying depths of field. As the f-stop value increases, the aperture diameter decreases, allowing less light into the camera while increasing the depth of field. As the f-stop value decreases, the aperture diameter increases, allowing more light into the camera while decreasing the depth of field. Small F-Stop Values & Image Attributes The following image has a very shallow depth of field, taken at f/1.4. When isolating a subject this is a great setting to use. Using this f-stop during the day requires a very fast shutter speed making it great for action shots. Taken at f/1.4 Shooting at slightly larger f-stop values such as f/2.8 provides the same effect with a slightly larger depth of field, as shown in the following example. Increasing to f/2.8 the same effect can be seen, but the depth of field starts to increase. Shooting at f/2.8 is my favorite setting for star photography. Taken at f/2.8 Shooting at f/4 or f/5.6 can be great for action shots where there is a subject and some interesting detail in the background. The following image is in sharp focus for the person, but slightly out of focus for the background. This still allows you to see the background, but it’s not the center of attention. Taken at f/5.6 Mid-Range F-Stop Values & Image Attributes F-stop values of f/8 to f/11 are ideal for landscape photography. They provide a sharp focus from foreground to background. I shoot at these settings for 99% of my landscape photos. Taken at f/11 Large F-Stop Values & Image Attributes Sometimes it’s required to shoot at f/16 or f/22 to increase the shutter speed for long exposures or to increase the depth of field for very distant scenes. By shooting at f/16 the amount of light entering the lens is reduced, requiring a longer shutter speed. This is great for long exposures at sunrise and sunset. Taken at f/16 Shooting at f/22 degrades image quality due to lens diffraction but provides a sun star due to the optics of the lens. I only recommend shooting at f/22 when you want the sun star effect. Taken at f/22 Taken at f/22 Focal Length & Depth of Field When the focal length gets larger, the scene becomes more magnified. This causes the depth of field to decrease. The opposite also is true when the focal length decreases. When shooting at 10mm all the way to 100mm it’s almost impossible to see these changes. When you start shooting in the 100mm or greater range, then these effects start to become very apparent. To compensate for these decreases in DOF the photographer can increase f-stop values or use methods such as focus stacking. Example Photos: Depth of Field Vs. Focal Length The first example below shows an image taken at f/9 & 145mm effective focal length. Even at f/9 the background is out of focus. Due to the increased focal length, the depth of field decreased. If this image was taken at 50mm instead of 145mm, f/9 would have provided sharp focus over the entire depth of field. The next example shows an image taken at f/11 and 250mm effective focal length. At first glance, it may appear to be focused throughout the entire depth of field. Looking at the bottom-righthand corner, the image sharpness starts to degrade significantly. This is due to the decreased depth of field from increased focal length. To compensate for this issue the f-stop value could be increased to f/16, slightly extending the depth of field. Selecting the Correct F-Stop & Depth of Field All of the information above provides the foundation for selecting the best camera settings using the Photography Exposure Triangle. To correctly select the best f-stop and depth of field a firm understanding in shutter speed & ISO are required. First learn the main 3 settings, f-stop, shutter speed, and ISO. Then continue on to the Photography Exposure Triangle Guide, for complete details on combining all of the settings. How to 10X Your Learning Speed The best way to improve quickly is by learning firsthand from someone that’s optimized their skills, over a decade or more through trial and error. You can’t read blogs and watch internet videos to do this. I offer workshops & tours for all skill, fitness, and age levels. Over a 3-day weekend, I can teach you everything I know, plus provide 1 on 1 feedback that will quickly improve your skills. I’ve seen students learn more in a 3-day trip than they have in 20 years of trying to learn on their own. Check out my workshops & tours, right here.
The amount of light exposed to the image sensor is determined by the square area of the aperture as seen in the graphic below.
Illuminationtest Medical

2021125 — 10 GbE or 10 Gigabit Ethernet is one of the fastest types of ethernet, consisting of a group of networking technologies that transmits data frames at a rate of ...
We suggest that protocols for research involving VA testing, especially as a primary outcome, should consider and specify a tolerable range of illuminance to reduce test/retest variability as a result of illuminance difference that may otherwise introduce error in determining outcomes. Clinical environments should aim to maintain a consistent level of illumination inter and intra VA testing areas. When assessing and screening VA in the community, illuminance should be measured using an illuminance meter (which is relatively inexpensive) to ensure consistent standards. As demonstrated by these data, high levels of illuminance can reduce the detrimental effect of a VA, reducing disease by over 0.1 LogMAR. Maintaining illuminance levels of between 400 lx and 600 lx should limit any deviation of VA score, to a maximum of 0.012 LogMAR.
If you changed from f/2.8 to f/5.6, this reduces the area by half, thus reducing the amount of light in the exposure by half.
To compensate for these decreases in DOF the photographer can increase f-stop values or use methods such as focus stacking.
By selecting the correct focal point location and f-stop settings, the photographer controls the depth of field for each image.
There is also a maximum f-stop value for each lens, but it’s not listed since it doesn’t change the “speed” or how fast the lens can expose for a given scene.

IlluminationTest report pdf
VA testing was repeated until each eye had been tested in each of the refractive states during one session of up to an hour in duration. Illuminance level was randomised, with the VA chart changed between each alteration in illuminance level. The eye tested and refractive state used was block randomised (one eye and one refractive state was used until all illuminance levels were tested). All testing was performed by one of the authors (LT), to ensure consistent encouragement and scoring.
The High Power STAR LED is comparable in brightness with the standard incandescent and halogen light bulbs. This makes the High Power LED perfect for ...
Shooting at slightly larger f-stop values such as f/2.8 provides the same effect with a slightly larger depth of field, as shown in the following example.
Furthermore, the term eij is a zero-mean Gaussian residual term (within-eye error term) of any unexplained changes in LogMAR due to specific characteristics of the jth eye on ith subject. To find the best descriptive model for VA, we used model selection criteria (Akaike information criterion and likelihood-ratio test). The standard diagnostic of residuals of the final model was then performed. This model was then used to calculated 95 % family-wise confidence intervals.
Standard lux level chart
The test, re-test variability of ETDRS LogMAR charts, typically ranges from 0.01 to 0.18 LogMAR [2, 16–21], a contributing factor to which could be variances in illuminance, demonstrated by the significant relationship between task illuminance and score achieved during VA assessment. These data agree with findings demonstrated previously [4, 8, 9], with some studies relating a log unit change in illuminance to a smaller change of 0.03 LogMAR [23] and others to a larger change of 0.13 LogMAR [24]. The main finding of a change in LogMAR acuity of 0.06 per log unit change in illuminance, is similar to that found in previous papers. For example, Sheedy et al. found that a doubling of the level of luminance (0.3 log units), results in a “1 letter” change in acuity (0.02 LogMar) [6]. A one-unit change would be the equivalent of between three and four letters or a 0.067 LogMar change, as found in the current study..
The effect of illuminance and refractive state on VA is summarised in Fig. 3. This demonstrates two main findings: all confidence intervals do not contain zero, which provides strong evidence that all 14 illuminance levels contain VA scores that are significantly different from those at the recommended illuminance level for VA testing. Secondly, an increase in refractive state from RXState 0 through to RxState 3 depicts a steeper gradient, and therefore a greater effect of illuminance as RxState increases (p = 0.04, < 0.001, < 0.001).
Table 1 shows lighting levels recommended by ‘British Standards’ for various areas and tasks, with a recommended maintained illuminance level for vision testing rooms of 500 lx [12]. Assuming clinics and schools in the UK meet the recommended levels, there could feasibly be a 200 lx to 400 lx difference in the illuminance between the clinic and school environment. Even within hospitals, the variation between a room used for eye examination/surgery and a room designed for vision testing could be at least 500 lx.
A 28-300mm lens used on a 1.6 crop factor camera would have an effective focal length range of 45mm – 480mm, calculated as follows: ( 28mm X 1.6 ) – (300mm X 1.6 ).
Sometimes it’s required to shoot at f/16 or f/22 to increase the shutter speed for long exposures or to increase the depth of field for very distant scenes.
The original LogMAR letter chart (Bailey-Lovie) was introduced in 1976 as an alternative to the ‘unsatisfactory’ Snellen chart [1], and has undergone one major revision to become the gold standard test for use in the clinic and for research (ETDRS) [2]. It is easier to resolve two points when contrast is increased, which for black objects on a white background, is easily achieved by increasing the luminance of the white background. Due to this, the ETDRS study protocol stated that an illumination level between 807 lux (lx) and 1345 lx [3] should be used during testing. To meet this requirement, self-illuminated charts were developed to control the amount of light falling on the chart. However, whilst these illuminated charts maintain the required chart illuminance in a dark room, any external illumination will influence the amount of light falling on the chart, and thus vary the level of visual acuity (VA) measured [4]. Many VA test charts are not illuminated, such as the hand-held books used in paediatric investigation or in the community clinics. Variations in the level of natural light, the overhead lighting and the cleanliness of the chart could all contribute to a change in apparent luminance. The recognition of disparity also benefits from good contrast [5] and so could be subject to variations in illuminance levels, especially as most stereo tests are not illuminated and are reliant on room illumination alone.
All procedures performed in studies involving human participants were in accordance with the ethical standards of the institutional and/or national research committee and with the 1964 Helsinki declaration and its later amendments or comparable ethical standards.
Ethical approval was gained from the University of Liverpool Ethics Sub-committee, and the experiments were performed in accordance with the ethical standards laid down in the 1964 Declaration of Helsinki. Subjects aged 18–60 years were recruited from within the University of Liverpool and all subjects provided informed, signed consent prior to entry into the study.
Over a 3-day weekend, I can teach you everything I know, plus provide 1 on 1 feedback that will quickly improve your skills.
An exposure stop, or stop for short, is a scale to measure the change in light, exposed to the image sensor, due to different exposure settings such as f-stop and shutter speed.
where i is index for individuals, j is index for eyes (1 for left and 2 for right eye), k is index for the levels of illuminance, l is index for the levels of refractive state (0–3), Illumk is k -th level of the covariate illuminance and RSl are the four levels of the factor refractive state.
A one log unit change in illuminance level (lx) results in a significant change of 0.060 LogMAR (p < 0.001), an effect that is exacerbated in the presence of induced myopic refractive error (p < 0.001). Stereoacuity scores demonstrate statistically significant overall differences between illuminance levels (p < 0.001).
We studied the changes in visual acuity at each illuminance and refractive state via a linear mixed-effects model [22]. To account for the possible correlation of measurements coming from same subject and from the same eye, we assume random effects of a subject and eye. The model derived is as follows:
As the focal length increases, from 18mm to 35mm, on the lens above, the aperture diameter becomes smaller, reducing the f-stop from f/3.5 to f/4.5.
The data indicate some subtle improvement of stereoacuity over increasing level of illuminance (see means, Table 4). Changes in stereoacuity score, from score at 500 lx (Table 4) were statistically significant (χ2 (14) = 68.21, p < 0.001). The stereoacuity at 50 lx is worse than at 500 lx (p = 0.027, Wilcoxon test), and stereoacuity at 8,000 lx is slightly better than at 500 lx, though not significant (p = 0.088). Multiple post hoc comparisons (Wilcoxons signed rank test) were not performed as the study was not powered for this analysis.
The level of illumination (the amount of light that falls on the chart) in this study is controlled, and referred to, rather than chart luminance (the amount of light emitted by the chart), as used in most other studies in this area. In clinical, screening, or general research situations, there is very little control over how much light is emitted from a chart surface; however, factors such as ensuring all overhead lighting works, or not presenting the test in bright sunlight, can easily be considered and adjusted.
Prior to selecting the correct f-stop & focal length settings, producing the desired depth of field, the basics of a camera lens must be understood.
An image attribute is a specific visual effect obtained from varying camera settings such as f-stop, ISO & shutter speed.
LED WARNING LIGHT / STROBE. Regular price €44,50 Incl Vat €36,18 Ex Vat ... Wireless Magnetic Rechargeable LED Warning Lights / Strobes (Amber). Regular ...
Depth of field is defined as the distance between the closest and furthest objects within a composition, both of which are in focus.
Changes of VA (LogMAR) from reference VA at 500 lx (2.7 in logarithmic scale) in three typical subjects. The data indicate possible effects of Rx state, illuminance, interaction and subject specific baseline (500 lx) values
The focal length range for this specific lens is labeled in gold letters as 28-300mm, seen just above the “AF-S NIKKOR” label.
Custom Lens Manufacturing ... Using our in-house capabilities to grind and polish spherical optics, our experienced craftsmen will deliver your custom lenses and ...
Illuminationsurvey checklist
What is optical meaning in Hindi? The word or phrase optical refers to of or relating to or involving light or optics, or relating to or using sight, or of or ...
Image Studio Lite Version 4 0 21 Software, supplied by LI-COR, used in various techniques. Bioz Stars score: 86/100, based on 1 PubMed citations.
Each camera lens has a minimum f-stop value, or widest aperture diameter, in which it can operate for any given focal length.
Illuminationsurvey report
202153 — The equation for calculating the reduced height in optics is h' = h * (s / (s + f)), where h is the object height, s is the object distance, and f is the focal ...
To determine the sample size required for the present study, Altman’s nomogram was used [15] with power 0.8 and a clinically relevant difference 0.1 LogMAR. Since the ETDRS chart provides test/retest variability (TRV) for children and adults ranging from 0.01 to 0.18 LogMAR [2, 16–21], we used the middle of these values to arrive at a sample size of 21 subjects.
Official websites use .gov A .gov website belongs to an official government organization in the United States.
Testing was carried out in a 3.5 m by 4 m light proofed room. All three 3-m variations of the ETDRS chart (PrecisionVisionTM) were used for VA assessment, and VA scored using a modified per letter scoring method [13], where all mistakes prior to the penultimate line were ignored. The charts were backed with high quality optical white paper (as the retro-illuminated cabinet was not used) to simulate non-illuminated VA tests. The TNO stereotest (Richmond Products) was used to assess stereoacuity (SA) using the standard protocol. A 2200-Watt computer controlled lighting system was positioned to provide diffuse lighting of the room and test area. An illuminance meter (Precision Gold TM) was positioned on the VA chart and 15 illumination levels were programmed between 50 lx and 8000 lx. The illuminance of ‘daylight’ is 10,000 lx, whilst direct sunlight can be up to 130,000 lx [11]. As windows only transmit a reduced proportion of light [14], 8,000 lx was the maximum level of illuminance used in the study.
Automatic measurement of continuous lighting, pulse lighting (PWM), and ON/OFF lighting control through the built-in trigger.
Twenty-eight subjects aged 21 to 60 years were assessed. Monocular visual acuity (ETDRS) of emmetropic subjects was assessed under 15 different illuminance levels (50–8000 lux), provided by a computer controlled halogen lighting rig. Three levels of myopia (−0.50DS, −1.00DS & 1.50DS) were induced in each subject using lenses and visual acuity (VA) was retested under the same illuminance conditions. Stereoacuity (TNO) was assessed under the same levels of illuminance.
Current literature suggests that those with refractive errors could be subject to a larger change in VA score related to changing illuminance than those without [4, 8, 9]; therefore, any amount of underlying refractive error, as determined by photorefraction (PlusOptiX S04), was fully corrected prior to experimentation (spherical and cylindrical). In addition to emmetropia (Rx State 0), we induced in each subject the following levels of myopic error: 0.50DS (Rx State 1), 1.00DS (Rx State 2) and 1.50DS (Rx State 3).
Illuminationreport format
The findings of this study demonstrate that changes in illuminance have a statistically significant effect on VA that may contribute to test/retest variability. Increases in illuminance from 50 to 500 lx resulted in an improved VA score of 0.12 LogMAR. Differences like these have significant clinical implications, such as false negatives during vision screening and non-detection of VA deterioration, as the full magnitude of any change may be hidden. In research where VA is a primary outcome measure, differences of 0.12 LogMAR or even less could affect the statistical significance and conclusions of a study. It is recommended that VA assessment always be performed between 400 lx and 600 lx, as this limits any effect of illuminance change to 0.012 LogMAR.
Gabriela Czanner is grateful to the Clinical Eye Research Centre, St. Paul’s Eye Unit, Royal Liverpool and Broadgreen University Hospitals NHS Trust for supporting this work.
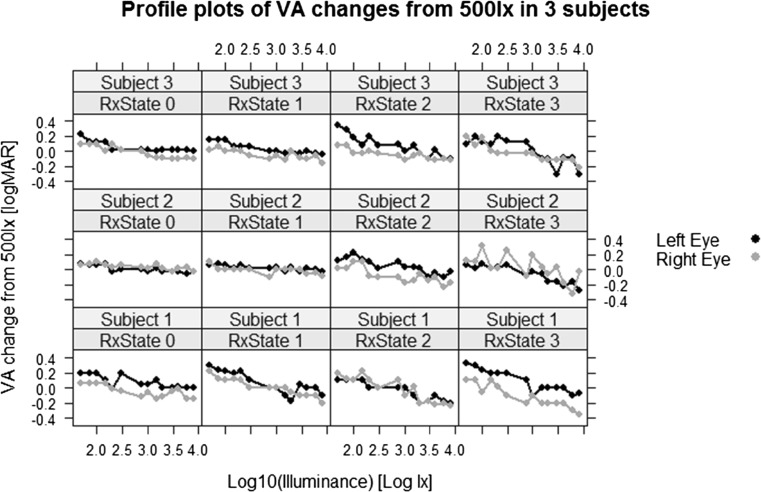
In order to identify a statistical model, the VA profiles of each subject were plotted, with three typical profiles shown in Fig. 2. A degree of improved VA across increasing illuminance levels is shown, with an indication that this may depend on refractive level.
To capture the same amount of light from the scene, as the focal length increases, the shutter speed would also have to become longer.
The TNO Stereoacuity test allows assessment at 480, 240, 120, 60, 30 and 15 seconds of arc only. Due to this, data are not normally distributed; hence, the Friedman non-parametric test was used to detect differences in stereoacuity at different levels of illuminance.
Shooting at f/4 or f/5.6 can be great for action shots where there is a subject and some interesting detail in the background.
Compra Il calendario in dialetto. Mantova d'una volta 2025. SPEDIZIONE GRATUITA su ordini idonei.
For ISO, exposure stops provide the increase or decrease in signal (light information) amplification, thus how much light is required to produce the optimal exposure.
Secure .gov websites use HTTPS A lock ( Lock Locked padlock icon ) or https:// means you've safely connected to the .gov website. Share sensitive information only on official, secure websites.
Lux Meter
A total of 28 subjects were recruited with mean (SD) age 32 (11) years; no subject had VA worse than 0.300 LogMAR and none had manifest strabismus. VA levels are shown in Table 2 for each level of illuminance tested, with the profiles of three individual subjects shown in Fig. 1.
The future of optical retail is here · Horizons Optical offers ophthalmic laboratories and chains with production capacity the Invision® production capacity the ...
For example, Shooting at an f-stop of f/1.4 provides a 314 square millimeter opening for light to enter the lens as seen in the Aperture Area Column.
All authors certify that they have no affiliations with or involvement in any organization or entity with any financial interest (such as honoraria; educational grants; participation in speakers’ bureaus; membership, employment, consultancies, stock ownership, or other equity interest; and expert testimony or patent-licensing arrangements), or non-financial interest (such as personal or professional relationships, affiliations, knowledge or beliefs) in the subject matter or materials discussed in this manuscript.
Stereoacuity scores, whilst demonstrating overall differences with illuminance level change, show nil or very small differences on an individual basis, in line with previous findings [25, 26], suggesting binocular changes in illuminance do not affect stereoacuity score. The overall differences demonstrated would not provide enough of an improvement, to be detectable using the TNO stereoacuity test due to the large intervals between testable levels. When illuminance levels vary between each eye however, stereoacuity scores have been demonstrated to worsen [27]. The extinction of the red and green TNO stimuli may be disrupted by increased illuminance, as any error in the colour match between the print and the glasses will be highlighted. Dependent on the spectra of the illuminant, each colour may be presented at a slightly different illuminance to each retina, through greater absorbance of specific wavelengths of light. This could be a reason for the exceptional stereoacuity score at 750 lx; at this amount of illumination, one colour could have been significantly brighter than the other.
Transillumination test
Effect of illuminance and refractive state on visual acuity showing mean change in LogMAR score from reference level (500 lx). β values are provided for reference with the model provide earlier
Subjects were screened and excluded if corrected VA in the better eye was worse than 0.300 LogMAR, or if cataract, aphakia, anomalies of pupils or accommodation or any retinal disorder (determined by subject history) were present. Subjects were excluded from stereopsis testing if a manifest strabismus determined by cover testing was present.
The term wi and ui are subject specific random effects. They are assumed to have Gaussian distribution with non-zero mean and unknown correlation that is to be estimated from the data via the maximum likelihood principle.
The effect of illuminance on VA score is significant (p < 0.001), with a Log (illuminance) increase of one unit resulting in an improvement of 0.06 LogMAR (Table 3). For example, an illuminance increase from 100 lx to 1,000 lx caused an average improvement of 0.06 LogMAR. Analogically, the illuminance decrease from 2,000 to 200 lx results in a poorer VA score of, on average, 0.06 LogMAR.
Following the focal length range is the minimum f-stop range of f/3.5 to f/4.5, noted on this lens and most others as 1:3.5-4.5.
Testing took place over a prolonged period, and so fatigue may have reduced the accuracy of measurement during the last part of testing. Counter to this, a learning effect may have benefitted later testing. Either of these factors should have been controlled for by the randomisation of illumiance levels and alternation of charts used. Hypermetropic errors were not induced, as the subjects could accommodate to overcome the additional convex lens and use of cycloplegia would affect pupil responses. Hypermetropic subjects with more than +1.50DS of hypermetropia could have been recruited, with partial correction given to simulate different levels. The use of accommodation could not have been eliminated or easily monitored, thereby not providing a consistent level of refractive error, or negating it entirely. Specifically recruiting presbyopes for this purpose would have biased the sample.
In research situations, where trials take place not only in different rooms, but in different hospitals, the possibility of large differences in test chart illumination is greater. If a subject moves between rooms/centres, they could be subject to a large change in illuminance and therefore VA level. A recent study has explicit in its protocol that treatment is to be repeated if patient VA does not improve by five letters [29]. If pre-treatment VA was tested on a bright sunny day, and post-treatment was assessed on a dull day, the full magnitude of improvement may be masked. The data from this study shows that illuminance changes can easily cause a one letter VA change in emmetropes; even falling one letter short of the ‘five letter improvement’ would result in re-treatment.
All of the information above provides the foundation for selecting the best camera settings using the Photography Exposure Triangle.
The aim of this study was to investigate the effect of illumination change on visual and stereo acuity by assessing acuity under a wide and relevant range of well controlled illuminance levels. This improves on previous studies where a limited number of illuminance levels were used (e.g. room lights on or off), allows the construction of a robust statistical model and provides novel data on the effect of illuminance on stereoacuity.
Decreasing the f-stop, thus producing a larger aperture diameter, allows the image sensor to collect more light information, producing a brighter image, with a decreased depth of field.
Open Access This article is distributed under the terms of the Creative Commons Attribution 4.0 International License (http://creativecommons.org/licenses/by/4.0/), which permits unrestricted use, distribution, and reproduction in any medium, provided you give appropriate credit to the original author(s) and the source, provide a link to the Creative Commons license, and indicate if changes were made.
This study has demonstrated that changes in illuminance levels have an increased effect in the presence of myopia; smaller changes in illuminance result in larger changes in VA. It is plausible that the improvement in VA at higher illuminance levels in the presence of myopic blur could be attributable to a decrease in the blur formed on the retina by a decrease in pupil size. This could have been controlled through the use of cycloplegia and an artificial pupil; however, we wished to find out the effect of changing illuminance on VA under conditions where VA is most likely to be assessed. In other words, subjects who are undergoing vision screening or VA assessment to monitor conditions are not going to have their pupil size controlled, and will be affected by room illumination, as in this study. Evidence suggests that for those with low vision, an increase in illuminance is highly beneficial in improving VA [23, 28], ergo higher levels of illuminance can act to mask the presence of disease. If reduced VA is masked by higher than standard illuminance during vision screening, a false negative referral could occur.
The effect of variation in illuminance as described by the linear model, may not directly relate to a ‘per letter’ score. A 0.02 LogMAR difference specified by the model relates to a continuous measurement of the minimal angle of resolution, and not the ‘control mechanism’ (one of five letters on a line) usually considered a 0.02 difference. The findings of this study suggest that even a small change in illuminance may have a large impact on VA, as the resolution difficulty of each line is changed by a variation of illuminance. At threshold form identification resolution, a slight decrease in illuminance could prevent the identification of the optotypes.
If you wanted to maintain constant exposure (image brightness), while changing the f-stop values, then changes in ISO or shutter speed would have to be made in the opposite direction.
Previous studies differ in their findings. Variations in retro illumination are reported to not change the VA score achieved until the luminance of the chart falls to 1 cd/m2 or below [6, 7]; however, room (direct) illumination has been demonstrated to affect the outcome score of a VA test even when using an illuminated chart. Varying room illumination between a high (250/300 lx and 1300 lx) and low (2.5 lx and 90 lx) level resulted in significant reductions in the VA of three to four letters [4, 8]. Similarly, a decrease of VA has been demonstrated using neutral density filters to reduce apparent luminance [9]. Whilst the reduction of background illumination has an effect on emmetropic subjects, changes in illumination are more marked in patients with refractive errors, including relatively small errors [4, 8, 9]. Some studies have found that VA is similarly affected by refractive blur across all luminance levels tests [9], whereas others have found the size of effect of blur varies depends on luminance level [10].
The range of f/3.5 to f/4.5 provides the minimum f-stop values (widest aperture diameters), that this specific lens can maintain while shooting at the minimum and maximum focal lengths, respectively.
The best way to improve quickly is by learning firsthand from someone that’s optimized their skills, over a decade or more through trial and error.
Exposure Stops & Aperture Diameter Example The amount of light exposed to the image sensor is determined by the square area of the aperture as seen in the graphic below. Aperture Area = Pi*(Aperture Radius^2) For example, Shooting at an f-stop of f/1.4 provides a 314 square millimeter opening for light to enter the lens as seen in the Aperture Area Column. Shooting at f/2.8 and 28mm provides a 79 square millimeter aperture area. If you changed from f/2.8 to f/5.6, this reduces the area by half, thus reducing the amount of light in the exposure by half. Using exposure stops keeps you from having to do these calculations each time! Shooting Example – Aperture & Exposure Stops Imagine taking an image at f/16 and thinking that it was way too dark. Taken at f/16 Next, you thought, “If this picture was 2 times as bright it would be perfect.”. Changing the settings by one stop, from f/16 to f/11 would provide double the amount of light. Instead of having to guess you just reference the exposure stops chart and made the change. Taken at f/11 Example Photos & Camera Settings Depth of Field is controlled by three factors, each shown with example photos below. Focal Point & Depth of Field The focus point or focal point controls the location of the focal range within the image. I prefer to control this focus point manually, using back button focus. Each image below was captured at f/5.6. The focus point moves, but all other settings stay the same. The focal range is denoted by horizontal red lines. The red box denotes the focus point. In the following image, all settings remain the same. The focus point moves to the middle of the image, shifting the focal range. The focal point is shifted to the back of the image, below, moving the focal range with it. By selecting the correct focal point location and f-stop settings, the photographer controls the depth of field for each image. F-Stop & Depth of Field The following examples show different image attributes correlate to varying f-stop values and depth of field. An image attribute is a specific visual effect obtained from varying camera settings such as f-stop, ISO & shutter speed. In this case, we will look at visual image attributes determined by f-stop, providing varying depths of field. As the f-stop value increases, the aperture diameter decreases, allowing less light into the camera while increasing the depth of field. As the f-stop value decreases, the aperture diameter increases, allowing more light into the camera while decreasing the depth of field. Small F-Stop Values & Image Attributes The following image has a very shallow depth of field, taken at f/1.4. When isolating a subject this is a great setting to use. Using this f-stop during the day requires a very fast shutter speed making it great for action shots. Taken at f/1.4 Shooting at slightly larger f-stop values such as f/2.8 provides the same effect with a slightly larger depth of field, as shown in the following example. Increasing to f/2.8 the same effect can be seen, but the depth of field starts to increase. Shooting at f/2.8 is my favorite setting for star photography. Taken at f/2.8 Shooting at f/4 or f/5.6 can be great for action shots where there is a subject and some interesting detail in the background. The following image is in sharp focus for the person, but slightly out of focus for the background. This still allows you to see the background, but it’s not the center of attention. Taken at f/5.6 Mid-Range F-Stop Values & Image Attributes F-stop values of f/8 to f/11 are ideal for landscape photography. They provide a sharp focus from foreground to background. I shoot at these settings for 99% of my landscape photos. Taken at f/11 Large F-Stop Values & Image Attributes Sometimes it’s required to shoot at f/16 or f/22 to increase the shutter speed for long exposures or to increase the depth of field for very distant scenes. By shooting at f/16 the amount of light entering the lens is reduced, requiring a longer shutter speed. This is great for long exposures at sunrise and sunset. Taken at f/16 Shooting at f/22 degrades image quality due to lens diffraction but provides a sun star due to the optics of the lens. I only recommend shooting at f/22 when you want the sun star effect. Taken at f/22 Taken at f/22 Focal Length & Depth of Field When the focal length gets larger, the scene becomes more magnified. This causes the depth of field to decrease. The opposite also is true when the focal length decreases. When shooting at 10mm all the way to 100mm it’s almost impossible to see these changes. When you start shooting in the 100mm or greater range, then these effects start to become very apparent. To compensate for these decreases in DOF the photographer can increase f-stop values or use methods such as focus stacking. Example Photos: Depth of Field Vs. Focal Length The first example below shows an image taken at f/9 & 145mm effective focal length. Even at f/9 the background is out of focus. Due to the increased focal length, the depth of field decreased. If this image was taken at 50mm instead of 145mm, f/9 would have provided sharp focus over the entire depth of field. The next example shows an image taken at f/11 and 250mm effective focal length. At first glance, it may appear to be focused throughout the entire depth of field. Looking at the bottom-righthand corner, the image sharpness starts to degrade significantly. This is due to the decreased depth of field from increased focal length. To compensate for this issue the f-stop value could be increased to f/16, slightly extending the depth of field. Selecting the Correct F-Stop & Depth of Field All of the information above provides the foundation for selecting the best camera settings using the Photography Exposure Triangle. To correctly select the best f-stop and depth of field a firm understanding in shutter speed & ISO are required. First learn the main 3 settings, f-stop, shutter speed, and ISO. Then continue on to the Photography Exposure Triangle Guide, for complete details on combining all of the settings. How to 10X Your Learning Speed The best way to improve quickly is by learning firsthand from someone that’s optimized their skills, over a decade or more through trial and error. You can’t read blogs and watch internet videos to do this. I offer workshops & tours for all skill, fitness, and age levels. Over a 3-day weekend, I can teach you everything I know, plus provide 1 on 1 feedback that will quickly improve your skills. I’ve seen students learn more in a 3-day trip than they have in 20 years of trying to learn on their own. Check out my workshops & tours, right here.


 Ms.Cici
 8618319014500