
Lighting, Light Bars & Kits - lighting bar
In dark field, front light illumination, reflected light is not collected by the optics. In this way, only scattered light is captured, enhancing the non-planar features of the surface as brighter characteristics on a dark background (the dark field - see Fig. 11 and 13.a - 13.b ).
An example of “combined” lighting is the Opto Engineering® LTDMLA series, featuring all-in-one dome and low angle ring lights which can be operated simultaneously or independently of each other.
The images below illustrate this effect visually using two images taken using the same lens with 1/2" and 1/3" format cameras. The image taken using the smaller 1/3" format camera produces an image that is cropped compared to the image taken using the 1/2" format camera. Note, however, that the objects in both images remain at the same magnification.
In the first case, we see the outline of the object (black object on white background - see Fig. 16 and 18). In the latter, the non-planar features of the transparent object show up dark on a white background; in this second case, contrast is usually low unless the transparent surfaces present sharp curvatures (e.g. air bubble inclusions in plastic).
If an object with a complex curved geometry must be inspected to detect specific surface features, front light illumination coming from different angles is the most appropriate choice in order to get rid of reflections that can lead to uneven illumination: Dome lights are the ideal solution for these type of applications because they are designed to provide illumination coming from virtually any direction (Fig. 23 e 24). In fact, dome lights are sometimes also referred to as cloudy day illuminators because they provide uniform light as on a cloudy day.
Thorlabs' Camera Lenses for Machine Vision each have a characteristic range of object distances. Objects placed within this range can be brought to a sharp focus on the sensor of the C-Mount camera. As seen in the image sequence below, the addition of an C-mount extension tube or spacer between the camera and the lens changes this range of object distances and allows the system to focus on objects closer to the lens. This increases the magnification of the image on the camera while decreasing the depth of field. The following table lists the range of possible object distances for various combinations of Thorlabs' C-Mount extension tubes and machine vision lenses.
Bright field, front light can be produced by LED barlights or ringlights, depending on the system symmetry. In both cases LED light can be direct or diffused by a medium (sometimes the latter is to prefer to avoid uneven illumination on reflective surfaces).
The aperture of the lens controls the amount of light that a lens can collect; the more light a lens collects, the brighter the image. Because of this, the aperture size affects the exposure time and therefore the speed of the camera. Thorlabs provides the maximum aperture size in the tables below for each lens in terms of the f-number, which is expressed using the symbol f/# (e.g., f/1.4). As the f-number increases, the aperture opening becomes smaller and less light is collected by the lens.
There are three general classifications for lenses related to the image field of view. A lens with a focal length close to the diagonal length of the sensor format produces an image with a near-human field of view and is considered a "normal" lens for that sensor format. A wide-angle lens has a focal length shorter than normal, which produces a wider field of view but has a tendency to exhibit barrel distortion effects towards the edge of the image. Finally, a lens with a focal length longer than normal is known as a telephoto lens, which has a smaller field of view and a greater magnification of objects in the image.
Additionally, thanks to the excellent light coupling, the distance between the object and the light source can be increased where needed without affecting image quality. This happens because the illuminator’s numerical aperture (NA) is lower than the telecentric lens NA.
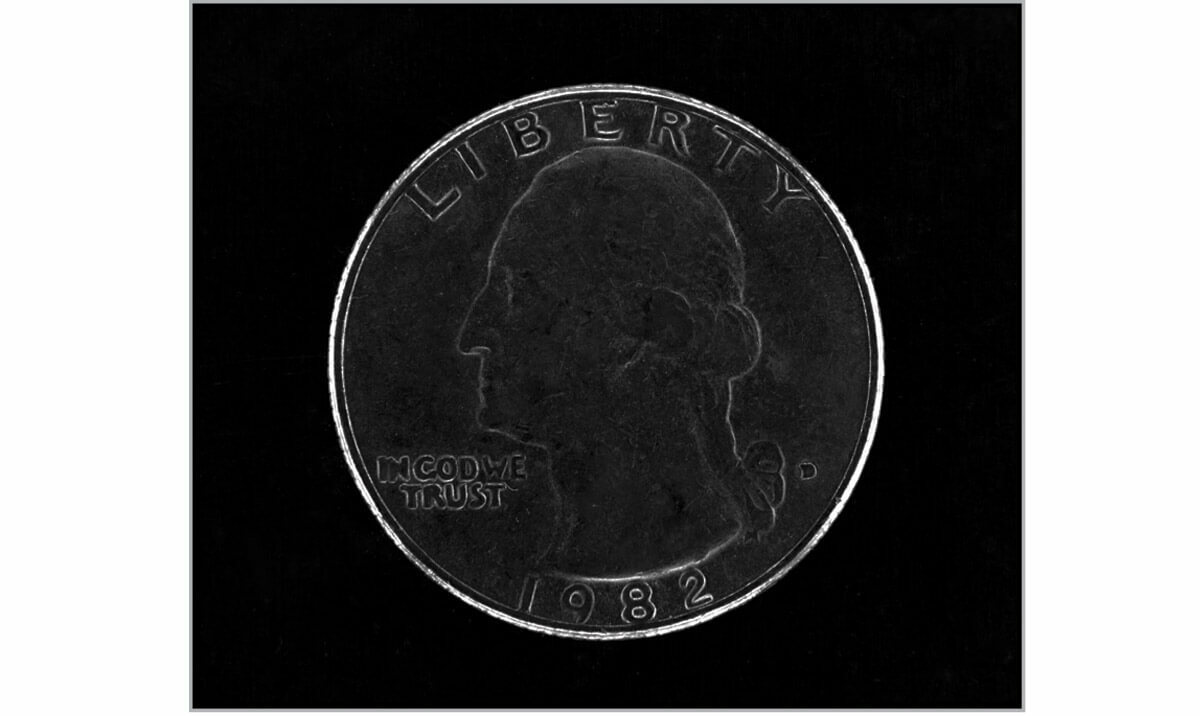
In bright field, front light illumination, light reflected by a flat surface is collected by the optics. This is the most common situation, in which non-flat features (e.g. defects, scratches etc.) can scatter light outside the maximum acceptance angle of the lens, showing dark characteristics on a bright background (the bright field - see pictures.
VignettingVignetting occurs when the lens format is smaller than the camera format. When this occurs, the area of the sensor is incompletely exposed, causing a dark ring to appear around the borders of the image. The vignetting effect is illustrated in the two images below, which were both captured using the same 4/3" format camera. In the image to the left, using a 12 mm focal length, 4/3" format lens produces a full image with slight dimming around the edges. This minor example of vignetting is due to the lens design which has decreased transmission at the edge of the lens. On the other hand, a 2/3" format lens at the same focal length produces a prominent dark ring around the photo edge. As the latter example is very visually apparent, we do not recommend using lenses with smaller formats than the camera sensor for imaging.
Combined and advanced illumination solutions. Sometimes in order to inspect very complex object geometries it is necessary to combine different types of lights to effectively reveal surface defects. For example, the combination of a dome and a low angle light is very effective in providing uniform illumination over the entire field of view.
CroppingWhen the lens format is larger than the camera format, the effect on the resultant image is known as cropping. In this case, a full image is produced but at a smaller size (i.e. cropped) because the sensor is only capturing a fraction of the complete image. A crop factor or focal length multiplier quantifies the amount of cropping and is defined as the ratio of the diagonal length of the lens' design format divided by the diagonal length of the sensor format. The crop factor for all possible 1/3", 1/2.9", 1/2", 1/1.8", 2/3", 1", and 4/3" format lens/sensor combinations are shown in the table to the right.
Camera lenses that can collect a lot of light (i.e., a low f-number) are known as fast lenses as they can be used with shorter exposure times and are ideal for low-light conditions. For example, a 50 mm focal length lens with a f/1.4 aperture has a bigger aperture and is therefore faster than a lens at the same focal length with a f/2.5 aperture. While using larger apertures increases light collection, doing so reduces the axial in-focus region of the image, known as the depth of field. To illustrate the effect of different aperture sizes visually, the table below shows a sequence of images taken with the same lens (MVL12M43 on a DCU224C 1/2" format camera) for increasing f-numbers. Because the images were taken at constant exposure, for each f/# increase (by a factor of ~1.4) the amount of light collected by the lens is reduced by half.
The use of a collimated light in combination with a telecentric lens increases the natural depth of field of the telecentric lens itself by approximately +20/30% (this however also depends on other factors such as the lens type, light wavelength and pixel size).
How to determine the best illumination for a specific machine vision task? There are in fact several aspects that must be taken into account to help you choose the right illumination for your vision system with a certain degree of confidence.
Modern cameras that use CCD or CMOS sensors are specified for a camera sensor format, and similarly, lenses are designed to provide optimal imaging for a specific camera format. This format designation (e.g., 1/2", 2/3", 4/3") is a hold-over convention from when video was recorded using cathode-ray tubes and refers to the outer diameter of the video tube required for a given image size. The diagram to the right illustrates the size difference between several standard camera formats. In the ideal imaging system, a camera and lens would be designed for the same format, however, it is also possible to use camera/lens combinations with different formats. Doing this will have an effect, either vignetting or cropping, on the resulting image.
If, on the other side, we plan to measure the diameter or the length of an object or we want to locate a through-hole, the best choice to maximize contrast at the edges is back illumination - i.e. light is blocked by the object on its way to the camera. The choice is not so obvious when dealing with more complex situations such as transparent materials and sometimes mixed solutions must be taken into account.
To obtain this illumination set up, coaxial boxes are available for use in combination with any type of lens (either fixed focal, macro or telecentric) or telecentric lenses with built-in coaxial illumination can be used (such as Opto Engineering® TCCX series). The difference lies in the degree of collimation which results in the amount of contrast that is possible to achieve searching for defects on highly reflective surfaces. See Fig. 21 and 22.

To illustrate this, the sequence of three images to the right were taken with the same camera with three different lenses. As focal length of the lens increases, magnification of the objects in the photos increases while the field of view decreases. The items in the image are each roughly spaced in 10" (254 mm) increments in the following order: Polaris™ Fixed Monolithic Mirror Mount (10" from camera), Ø1/2" post with KM100 mirror mount (20" from camera), and post-mounted RSP1 rotation mount (30" from camera). The MVL4WA used to shoot the first image is a wide angle lens which clearly distorts the door frame on the left edge of the image.
In bright field, backlight illumination, light is either stopped or transmitted by the surface if the material is opaque (Fig. 14)or transparent.
Coaxial illumination. When front light hits the object surface perpendicular to the object plane, we speak of coaxial illumination. Coaxial illumination can additionally be collimated, i.e. rays are parallel to the optical axis (within a certain degree).
In dark field, backlight illumination, only light transmitted by the sample and scattered by non-flat features will be collected, enhancing such features as bright on the dark background (Fig. 19). This can be obtained by means of ringlights or bar lights positioned behind a transparent sample.
An image that is cropped appears as if it was taken with a lens of higher focal length (i.e. a smaller field of view), but does not magnify the image. The cropping effect can be quantified using an adjusted focal length (defined as the crop factor multiplied by the lens focal length). For example, an image taken using a 1" format, 50 mm focal length lens with a 1/2" format sensor will produce an image with an adjusted focal length of 100 mm. While the field of view is reduced as if using a 100 mm lens, objects in the image will remain at the same size. The table to the right lists all of the lenses offered on this page with the adjusted focal length for different sensor formats.
This is by far the first point that must be clear. If we want to inspect the surface of an object to look for defects or features such as printed text, then front illumination is needed - i.e. light coming from the camera side. Selecting the proper light direction or angle of incidence on the target surface as well as other optical properties such as diffuse or direct light depends on the specific surface features that must be highlighted.
The focal length (FL) is roughly defined as the distance from principal plane to the focal plane. For a camera lens, the focal length determines the field of view of the camera system; the longer the focal length, the smaller the field of view. As a general guideline, a 50 mm focal length lens and 35 mm format camera combination produces roughly the same field of view as the human eye (~53° diagonal). The table below lists the focal lengths needed to achieve the same field of view as the human eye for different sensor formats.
Once we have established whether front or back illumination is more suitable, we must set the angle at which light hits the object surface. Although the angle may vary, there are two important subgroups of front and backlight illumination: bright field and dark field illumination. The four combinations that follow are described in the following sections.
VAT IT02011230204 Fiscal code and registration number at Mantova Business Register 02011230204 Nr. REA: MN-216669 - Share Capital: 205.258,00 € 沪ICP备12040578号-2

Another type of lighting geometry is tunnel illumination: these lights are designed to provide uniform illumination on long and thin cylindrical objects and they feature a circular aperture on top (as dome lights).
Collimated light is the best choice if you need to inspect objects with curved edges; for this reason, this illumination technique is widely used in measurement systems for shafts, tubes, screws, springs, o-rings and similar samples.
These lighting techniques can be achieved using diffuse backlights (Fig. 15a, 15b and 16) or telecentric illuminators, specifically designed for high accuracy applications (Fig. 17 and 18).
Specifically, f-number is defined as:where f/# is the f-number, f is the focal length and d is the entrance pupil diameter.
Therefore, the optical system behaves as if the lens had the same NA as the illuminator in terms of field depth, while maintaining the same image resolution given by the actual telecentric lens NA.
Note that Thorlabs' camera lenses are designed to correct for optical aberrations witin a specified range of object distances. The modification of the specified minimum object distance with an extension tube may reduce the ability of these lenses to eliminate aberrations.


 Ms.Cici
 8618319014500