
ELI5: Why does a thermal imaging camera show a body in ... - go light thermal
○ They offer a degree of customization. Configurable Height & Length light pipes and vertical light pipes offer the most customization options for height and lenght dimensions.
Calibrating a UST the first time can be finicky, as with most projectors. The biggest hurdle is a level surface-if what you’re resting it on isn’t level, it will be difficult to get your projector to project accurately. Usually I have to shove a folded bit of paper under one corner of mine to get it right, but the more stable and level the spot where it sits is, the faster/easier it will be to calibrate.
I love the solution that Tessa had for her smaller spaces—she mounted her projector in the laundry room and cut on her washer and dryer! We know how important it is for those machines to be level, and a board over them helped bridge the gap between the two for a nice, flat area for her cutting mat! So smart!
Yes, the installation scared me the most. Because I know me—if it requires more planning than plug and play, it’s probably NOT going to happen. I knew if I ordered a ceiling mounted projector, it would sit in the box and sit. And sit. And sit. And it would remain in its box until:
Optopipe® light pipes are a versatile solution to your front-panel indication needs. They come in a variety of configurations and lens options to meet the specific needs of your application, even after mechanical- and panel design layouts have already been completed.
Od of 1.25 blackPipe
See? There are set up situation solutions for EVERY kind of space. If you want a projector for sewing, you can make it happen!
Optopipe® light pipes are available in single and multiple position configurations and typically feature 1 to 4 indicator positions in either horizontal or vertical directions. There are straight, right-angle, and stacked options to accommodate various application requirements.
For panel mounts, they are pressed into the front panel and rest on the PCB, just above the LED(s). If the given application requires additional support, Epoxy gluing or heat-staking is recommended.
Backdrop frame (like for photography studios) with a camera mount. This creative setup was courtesy of Adriana Hernandez and would work great if you’ve got really high ceilings!
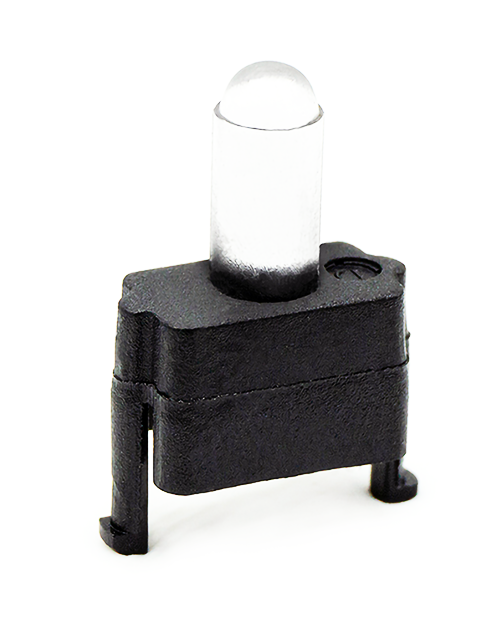
A LED light pipe is an engineered, precision molded optical component or optical fiber that transmits light from the light source, i.e. LED on a circuit board, to the outside of the housing or panel. They are typically produced from Polycarbonate or other optical grade material. To ensure high performance and durability, Dialight only uses fresh, high-quality polycarbonate in the production of its Optopipe® light pipes; never reused polycarbonate material!
1.5 in Schedule 40Pipedimensions
They can also be utilized when EMI/RFI concerns require the light source to be away from the front panel, or when indication needs arise after the mechanical design is completed.
A brief overview on what a LED light pipe is, why you would use one, the various configurations, and their general advantages.
This insertion technique, particularly for multi-element light pipes, is widely used across the industry and has been employed internally at Dialight when testing various crush pin designs.
Now, when I say “permanent” solutions, I don’t mean in a permanent way as you would install the projector normally. It’s in the sense of, “here’s a long term solution that should work as long as it’s needed”. And “temporary” situations can apply to any setting—for me, it’s cutting on my kitchen table instead of a separate sewing-only table [hopefully that’s not a permanent situation, at least!] For others, that might be setting up in a rental. Or a hotel room. Or on the road in an RV. Or maybe you just want the flexibility of using the projector for more than just sewing.
Today’s Feature Friday is one of my favorite Love Notions patterns, the Forte Top and Dress! It is jam packed with options, with multiple bodices, lengths and sleeves! You can make it as a top or dress and is definitely a versatile wardrobe staple. I just love how extra the bell sleeves are, but you can tone it down and keep it simple, too.
Why yes you do! Ultimately, you’ll need to figure out what works best for your space, as most projectors need at least a 5 foot clearance to project effectively. But some ideas I found in the Projectors for Sewing group include…
Other creative “seats” for USTs? I have one friend that uses a stack of books (at one point, I used old cookbooks, too! Ha!)
The mounting of an Optopipe® Light Pipe on a PCB requires an interference fit to maintain the integrity of the connection between the light pipe and the circuit board. The circuit board mounting hole is typically a few thousandths (0.00x) smaller than the overall diameter of the light pipe mounting pin's outer dimensions but larger than the solid core of the mounting pin. The outer diameter of the mounting pin is defined by the outer dimension of the crush pin details. As the light pipe is inserted, these crush pin details deform slightly, creating a snug fit between the light pipe and the circuit board. Most light pipes feature a flat stop detail where the pin connects to the light pipe. For consistent performance, this flat surface should be seated on the circuit board surface.
Tripod with a boom stick (like the kind they use in tv production to hold microphones above actors.) This will hold most smaller projectors high enough to project a usable image and is a very simple set up.
But as a plus size sewist, I HATED that every pattern I wanted to sew was So. Many. Pages. There HAD to be a way to make a projector work for ME!
Optopipe® light pipes are either PCB mounted or panel mounted. Light pipes designed for PCB applications have mounting pins and can be easily installed by pressing into holes drilled into the PCB.
If you really have no stable surface to project onto, you always have the option of just setting the projector on a table, projecting onto a wall and tracing your pattern on tracing paper, cheapo vinyl table cloths or shower curtains, whatever giant medium you can tape to the wall temporarily!
They are typically used for front-panel indication when traditional indicators are too large or other space constraints exist. Sometimes indication is required over, around, or beneath front-panel components, such as ports or switches, and light pipes provide the solution to this frequently encountered problem.
1.5 Schedule 40 SteelPipeweight

With Optopipe® light pipes, design engineers get the performance, design flexibility, and cost savings they are looking for; all in one visual status indicator product.
There are a vast number of configurations and features available to the end-user to achieve the desired visual status indication needs for most applications.
SteelPipe
Many folks use those mounts designed for tvs or computer monitors with great success! Some of these mounts just clamp to the table, others are on wheels and can be wheeled around as needed. Some sewists skip the mobile mount and use a shelf on the wall behind the table they’re cutting on. Or if you’re really pressed for space, you can always put it on a low chair and cut on the floor! Which leads me to my next “situation” that may cause hesitation:
These are just SOME ideas to hopefully get the creative juices flowing. I know some folks are perfectly happy with just printing/taping or gluing and cutting that way, and that’s totally fine! I was that girl for a while. But for those of you who have been on the fence or just worry it will be too difficult to find a solution to your situation, hopefully we’ve provided some ideas to encourage you!
Well, my friends, there was. And there is for most people. As projector sewing has become more common, sewists have had to come up with creative solutions to their less-than-ideal spaces. Very rarely will someone buy a projector and have the perfect space ready for it. More often, folks will have to use a bit of ingenuity to make it work for the space allotted, and I’m here to share some of those ideas with y’all! Hopefully once we’re done, you’ll feel more confident considering using a projector for your own projects!
1 1 4 blackPipedimensions
This one was the most mind blowing for me—Alli Phelps mounted her projector in her RV by attaching it to her ceiling vent with a bungie cord! Takes very little time to set up, highly effective. How cool is that!
When mounting the light pipe, even pressure must be applied uniformly across multiple mounting pins due to the interference fit. Any misalignment between pins can create unbalanced pressure, making installation difficult. A mounting tool facilitates this process by ensuring even insertion. The proper design of the mounting tool includes pins that match the number and placement of the light pipe's mounting pins. These tool pins must be centered over the light pipe's mounting pins to distribute force evenly. Additionally, the tool must have a cavity taller than the highest point of the light pipe to prevent damage to the optical surface.
My UST sits on top of a stool with a craft crate under it and that works for me. When I have to leave it up long term, I strap it to the stool to help it stabilize (and so I don’t have to worry about my kids yeeting it off when they sit to eat dinner.) But since we DO use the table I cut on regularly, my UST usually lives on the bench behind the table and I set it up as needed. Within 10-15 minutes, I’m re-calibrated and ready to go!
○ LED light pipes are available in numerous configurations and styles to accommodate even the most challenging indication needs.
A handlebar mount for Go-Pro cameras and a pet grooming stand. Isn’t this clever? Leah Boyan posted this set up in the Projectors for Sewing group.
20 SCH 40Pipethickness
○ Light pipes can be used with surface mount or through hole LEDs. *Dialight generally recommends a specific LED for use with a given light pipe.
3. I ran out of paper, ink and suddenly had a huge stack of pattern tests due (but HP Instant Ink has my back for that, keeping me stocked on ink before I ran out [and now they offer paper, too!] so unlikely, woot woot.)
This one can be a bit trickier, but not necessarily without options. As covered above, UST can work pretty much anywhere, but I get not wanting to cut on the floor. If you have any flat/level surface, you can make a projector work. I’ve seen folks install their projector above their kitchen counter and cut there. Or suspended between bookcases over a desk to cut on the desk.
In the projector world, the Epson Ultra Short Throw (or UST) is probably the most common solution to avoiding a permanent mount. They require very little distance between the cutting mat and projector lens to get a decent throw—mine sits about 8” above my table. Most models are stable enough to stand on their own, eliminating the need for a mount. They’re big but not so big that travel with them in impossible. And since they’re very popular for use in schools, the used market is regularly restocked with them, making it an affordable option for most users. Brand new, they run in the thousands, but used, you can usually find them in the $100+ range shipped (at least here in the United States, but not uncommon for a deal outside the country as well!)
Hello, sewing peeps! Today we are talking about Projector Sewing and making it work in the space you have– but before we dive in, let’s discuss the pattern I’m currently sewing using MY projector.
As you can tell from my impromptu Forte sewing, one of the things I love about using a projector for sewing is that I can be indecisive up until the minute I’m about to cut. Yes, I’m not super great at planning out sews, ha! I’ve always been intrigued by using a projector for that reason, but it took me a while to be a full-time projector adoptee. What was the hold up? FEAR. OF. INSTALL.
Optopipe® light pipes eliminate the need for costly PCB or panel layout redesigns and are generally more cost-efficient than alternative indicator technologies.
At Dialight, ray tracing is used to analyze the path the light takes through the light pipe. This modeling method is employed prior to actual production to ensure the maximum performance of light pipe designs by minimizing the light loss.
One sewist kept a piece of plywood under their bed and would lay it on the bed with the projector attached to a 2×4 piece of wood and a super basic foot bracket and project that way (I wouldn’t use a rotary cutter for that option though, scissors work best in that instance!)
Optopipe® light pipes are used for visual status indication and provide for safe and reliable operation of electrical equipment, instruments, electronic devices, and serve diagnostic purposes as well.
A few blocks of wood would also be sufficient. I’ve seen someone use an empty but sturdy box (like the dense, heavy produce boxes from the wholesale clubs!) My favorite solution that I’ve seen is giant cans of tomatoes. Two 28oz cans with a bit of folded printer paper to help it balance was high enough for most adult pattern pieces. Ha! Chances are, there is SOMETHING around your house that would be perfectly fine to support a UST, making it the most “plug and play” option out there.
When I was preparing for this blog, I pulled up the pattern on my laptop, turned on my projector and decided to give the top a try. I’ve sewn a couple of Fortes before and always done the dress. I had planned to make another but as I looked at the pattern, the top called to me… I really need more tops in my arsenal for day-to-day wear! But I had to add the bell sleeves to make it juuuuuust a bit more special and I am smitten with how it came out!
Shielding optimizes the light output of the light pipe by preventing light bleed and eliminating optical crosstalk between adjacent light sources.
Now, if you want something a lil more dedicated and sturdy, (for your UST or a regular ole’ short throw too!) you could consider a mount.
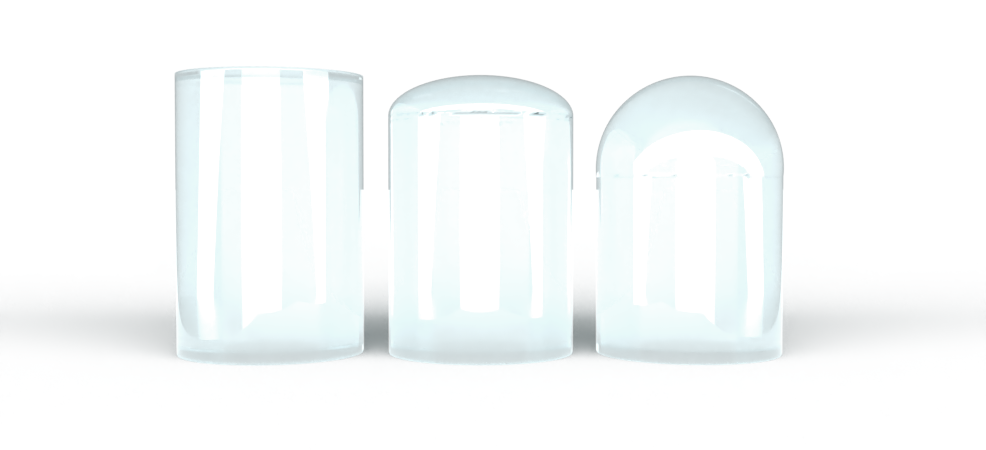
There are several available lens options depending on the application needs or desired panel looks such as protruding or flush mount lenses, viewing angles, direct view or back lighting needs. The basic lens shapes are round, square, and rectangular. The available lens tip configurations are flat, convex, or domed. Additionally, lenses can be either polished or textured.
Other variables that affect the light output of the light pipe are the type of LED used with the light pipe and the distance between the LED and the light pipe. Therefore, Dialight generally recommends a specific LED for use with a given Optopipe® light pipe.


 Ms.Cici
 8618319014500