
Best ring light in 2024: beautiful lighting for vlogging, video ... - camera ring light
The Flamingo features both linear stages as well as a rotational stage. Rotating the specimen can be useful in several scenarios. Often, you want to be able to image your sample from just the right angle (dorsal, ventral, lateral etc.) or want to image an organ that is only visible from certain angles (like the heart).
Köhler illumination is the alignment of the image-forming light path and the illumination light path of the microscope. In this process the condenser is centered and focused, thereby providing an evenly illuminated field of view and more importantly maximum resolution of the specimen
Magnificationofocular lens
Diopter: compensates for focusing differences between your eyes, it is very important this is set correctly, to prevent eye strain.
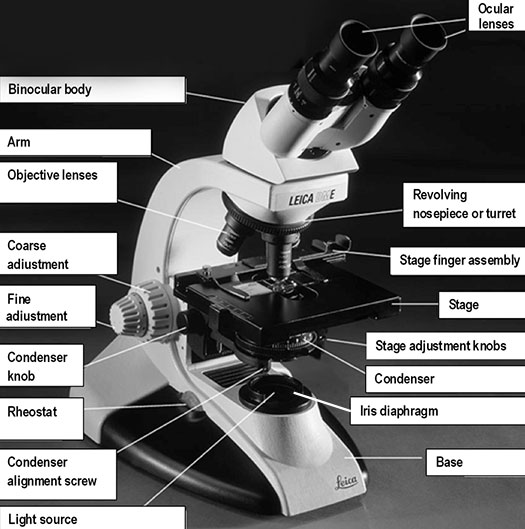
Base: the bottom of the microscope, which supports the entire instrument. The stage plate is located directly on the base surface upon which a specimen is placed. The stage can have a removable black or white tile (that can be removed and cleaned) or it will have a light that will transmit light through the specimen.
With a second illumination arm, the sample can be illuminated from the opposite side. The effects the sample imposes on the light sheet illumination are the same, but now you record the one half missing from the first image. The “good” parts of both images can be combined into one image covering both halves of the sample.
If you want to record fast 3D events, a linear stage will set a limit to the repetition rate, because it needs to reset/return after each z-stack. This is when faster solutions like a piezo are helpful, because you can constantly swipe back and forth through the sample. At this point the sample is often kept stationary, with the focal plane and the light sheet swiping through the sample instead.
What limits the maximummagnificationoflightmicroscopes
A compound microscope is a high-power microscope that uses a compound lens system. Higher magnification is achieved by using two lenses rather than just a single magnifying lens. While the eyepieces and the objective lenses create high magnification, a condenser beneath the stage focuses the light directly into the sample. A compound microscope has multiple lenses: the objective lens (typically 4x, 10x, 40x, or 100x) is compounded (multiplied) by the eyepiece lens (typically 10x) to obtain a high magnification of 40x, 100x, 400x, and 1000x. The objective lenses of a compound microscope cause the orientation of the image of the specimen to be inverted compared to the orientation of the actual specimen which means that a specimen viewed through a compound microscope will look upside down and backward compared to how the specimen is mounted on the slide.
Depth of Field: is determined by the distance from the nearest specimen plane in focus to that of the farthest plane also simultaneously in focus. The thickness of the optical section along the optical axis within which objects in the specimen plane are in focus. High-magnification objectives have a decreased depth of field. The reverse is true of low-magnification objectives Field of View: the visible area seen through the microscope when the specimen is in focus. The greater the magnification the smaller the view. Focus: a specimen is in focus at the desired magnification when the image seen through the ocular lens is sharp and clear.
Magnificationof objectivelens
Condenser: the lens located below the stage, which focuses light (from the illuminator) through the specimen being observed. Most microscopes have a movable condenser allowing its distance from the specimen to be adjusted using the condenser knob and condenser alignment screws.
Typically, a z-stack is recorded by moving the stage with the mounted sample at a constant velocity through the focal plane, while having the camera record at full speed. Scientific cameras record somewhere around 100 frames per second, with some slower (about 10 fps) and some much faster (>1000 fps). There needs to be enough time to collect fluorescence signal at each plane, but mostly the z-stack recording is limited by the speed of the camera. The linear stages used in the Flamingo are fast enough to keep up with those speeds, as we are are just looking at small volumes (~50-500 µm) and small distances between each plane (a few µm).
We integrated an additional technology in the Flamingo to increase the image quality even more. Constantly pivoting the light sheet at high speed drastically reduces stripes and shadows induced by the absorbing and scattering parts of the sample.
An illumination arm generates a light sheet that projected into the focal plane of the detection objective from one side. The specimen itself scatters, refracts and absorbs light, so the illumination quality will suffer the deeper the light sheet penetrates the sample. As a result, only one half of a larger sample can be imaged well.
What is themagnificationof the high powerlens
Coarse adjustment or coarse focusing knob: the large knob towards the back of the instrument that is used to significantly raise or lower the stage, when you first focus on a specimen at low power. It is never used when high-power objectives are in place.
Microscopes are used by the students in many lab exercises. Instructors also need to learn to use the instructor microscope with the Leica camera and required LAS EZ & Leica AirLab Icon Guide software which will allow them to project the microscope images in real time.
Iris diaphragm: a unit below the condenser that controls the amount of light directed to the specimen. The diameter of the diaphragm can be adjusted by turning it to increase or decrease the size of the hole that light passes through.
Maximummagnificationoflight microscopeand electronmicroscope
Note: The microscope is now set to maximize the resolution of the specimen. If you adjust the condenser height to gain contrast or adjust light intensity you will sacrifice the resolution capability. Use the aperture diaphragm and /or the illumination intensity to adjust contrast.
Illuminator or light source: the light source can be built into the base of the microscope, transmitting light through the specimen, and/or the light source may be above the specimen as incident light. The lights can be turned on using a rheostat (light) control knob on the front of the base.
Objective lenses: the primary optical system which produces a magnified image of the specimen. There are typically four objective lenses attached to the nosepiece with the magnification of each objective engraved on its side.
Fine adjustment or fine focusing knob: the smaller knob towards the back of the instrument that is used to make small adjustments in the height of the stage for final focusing on a specimen. It is the only focusing knob used with high-power objectives.
Illuminator or light source: the light source is usually built into the base of the microscope, and directs light through the condenser to the specimen. Alternatively, the light source may be separate, and be directed toward the condenser with a mirror. The intensity of the light can be adjusted using the rheostat (light) control knob. The microscope you are using has a rheostat on the front of the base and a switch on the left of the base.
Focusing knob: the knob that allows you to focus on the object at each magnification by moving the stereo head up or down.
Maximummagnificationofcompound light microscope
Compared to other illumination schemes in fluorescence microscopy, photo-bleaching is dramatically reduced in light sheet microscopy. Live specimen can be imaged over longer periods of time and/or with higher frequency, while being kept at a healthy state.
Magnification is the process of enlarging the apparent size, not the physical size, of something. In microscopy, it is the ratio between the size of an image produced by the microscope and its actual size. Microscopes magnify thin specimens mounted on microscope slides. They are ideal for observing unicellular or very small organisms, cells, and cell structures. We will use the compound and dissecting microscopes many times over the course of the semester. It is important to familiarize yourself with microscope use.
Maximummagnificationof electronmicroscope
The resolving power of a microscope is dependent on the numerical apertures of the optical lenses and the wavelength of light used to examine the specimen. It is the smallest distance between two points (measured in microns) that can be seen with the microscope. If two small objects close together can be seen clearly as two distinct objects, a microscope is said to have high resolving power.
Lateral Resolution: point-to-point resolving power in the plane perpendicular to the optical axis. It is usually defined as the shortest distance between two lateral points on the specimen plane that can still be distinguished as separate entities.
The other big application for sample rotation is so-called multi-view imaging, where you record z-stacks from multiple angles and then fuse the useful parts of each dataset to generate one 3D image that covers the entire sample. This is useful for larger samples, because both the illumination and the detection quality will suffer the deeper you image, and you cannot capture all the details from one angle.
Totalmagnificationofmicroscopeformula
The 100X objective lens is called an oil immersion lens because oil is placed between the lens and the microscope slide to increase resolution (i.e., the level of detail that can be observed in an image). Light bends when it passes from the glass slide to air because of differing refractive indices. A drop of immersion oil between the slide and lens eliminates this problem because the oil has the same refractive index as the glass slide. Never use the 100X objective lens without oil and do not get oil on the 4X, 10X, or 40X lenses.
The principle of light sheet microscopy – also known as selective plane illumination microscopy (SPIM) – is to illuminate the sample from the side in the focal plane of the detection objective. The illumination and the detection path are distinct and perpendicular to each other. The sample is placed at the intersection of the illumination and the detection axes. The light sheet excites the sample in a thin volume around the focal plane and the emitted fluorescence is collected by the detection optics.
Stereo microscopes have low magnifications that can range from 2 to 100x depending on the microscope and are designed for viewing whole objects like rocks, plants, flowers, and invertebrate organisms by reflecting light off the specimen, producing a 3-dimensional image. Sometimes there is a light located in the base of the microscope that will allow transmitted light.
Ocular lens or eyepiece: the secondary optical system that you look through. The ocular lens further magnifies (10x) the image and brings the light rays to a focal point. A binocular microscope has two ocular lenses and a monocular microscope has one ocular lens that sits on the adjustable binocular body. Binocular lenses can be adjusted to fit the distance between your eyes by gently pulling the oculars apart or by pushing them closer together.
Axial Resolution: point-to-point resolving power in the plane parallel to the optical axis. It is usually defined as the shortest distance between two longitudinal points on the specimen plane that can still be distinguished as separate entities.
Microscopes must be calibrated so accurate measurements can be made. To calibrate a microscope both an ocular and a stage micrometer are used.
Stage: the flat surface upon which the slide with your specimen is placed. Most microscopes have a stage finger assembly to hold the slide on the stage. The entire mechanism including the slide moves horizontally across the stationary stage (left/right and forward/back) using two-stage adjustment knobs situated under the stage (variably on the left or right side, in front of the focusing knobs).
The selective illumination of the focal plane in light sheet microscopy not only results in healthier samples, but also provides optical sectioning. Without out-of-focus fluorescence signal, image contrast is significantly improved and the specimen can be reconstructed in 3D.
In every implementation of fluorescence microscopy, we want to illuminate a specimen with light of a specific wavelength to excite fluorophores, and then collect the emitted photons by eye or with a detector. Typically, illumination and detection share a part of the microscope’s beam path – at least the objective lens. Hence, illumination occurs from the same direction as detection, resulting in a large part of the specimen being illuminated. Fluorescence microscopy requires powerful illumination, which can have detrimental impacts on specimens, namely photo-bleaching and photo-toxicity. Thus, it is much more effective to limit illumination to the parts of the sample that are actually being imaged. Light sheet microscopy is an elegant implementation of this idea.


 Ms.Cici
 8618319014500