
LED Beacons, Mini & Modular Light Bars - led strobe lights
Oblique lightexamination
A few weeks ago, I had the pleasure of moderating one of our webinars presented by Bill Chapin. The webinar was called “Meaningful Particle Analysis Begins with Light Microscopy.” At the beginning of Bill’s presentation he talks about the use of illumination techniques for the stereomicroscope and the polarized light microscope. Bill points out an inherent tendency of microscopists to neglect transferring the use of a good illumination technique from one instrument (the stereomicroscope) to another instrument (the polarized light microscope). In the webinar, Bill bounces between these two instruments making the point that if it’s good for one, why not employ it on the other.
Now go back to your lab and take a look at all of the illumination techniques you are using with your stereomicroscope. Are you using these same techniques with your polarized light microscope? Are there any illumination techniques you use with the polarized light microscope that would be beneficial to you on your stereomicroscope?
Obliqueillumination microscopy
A very common illumination technique used with the stereomicroscope is oblique illumination, usually achieved by using two fiber-optic light guides or “goosenecks.” The goosenecks are positioned on either side of the sample at varying angles to produce raking light, or oblique illumination. As Bill points out, this technique is ideal for producing contrast between two colorless materials such as fibers and a filter surface.
Obliquelighting Forensics
Let’s go through some of these frequently overlooked illumination techniques that Bill describes as invaluable to the microscopist.
These cookies collect information about how visitors use a website, for instance which pages visitors go to most often. We use them to improve how our website works. However, some of them might be third-party cookies and the data they collect can be put to purposes unknown by us as the site owner. Please refer to our third-party processors' privacy policy.
The polarized light microscope commonly uses transmitted light and Bill encourages microscopists to try using it with a stereomicroscope. Using transmitted light with the stereomicroscope, the sample is illuminated from below and light passes through the sample, which is helpful when looking through clear containers like intravenous bags or vials that contain floating particles.
Even though Engineering requires materials processed by other professions, it also produces some of the most useful tools and gadgets in the game. In this guide, we'll show you the ropes of how to efficiently level Engineering, so you can make your own tools and valuable items to sell at the Auction House in no time.
Oblique lightexample
Essential cookies help make a website usable by enabling basic functions like page navigation and access to secure areas of the website. The website cannot function properly without these cookies. They also help us comply with legal requirements like GDPR.
Transmittedlight
Obliquelighting eye exam
By simply taking the fiber-optic light guides and shining the light at an oblique angle onto the specimen on a stereomicroscope or a polarized light microscope will reveal the true color of the material. Some of our scientists at McCrone Associates have customized their microscopes so that the oblique light source is attached to the rear of the microscope, usually underneath the reflected light lamp housing.
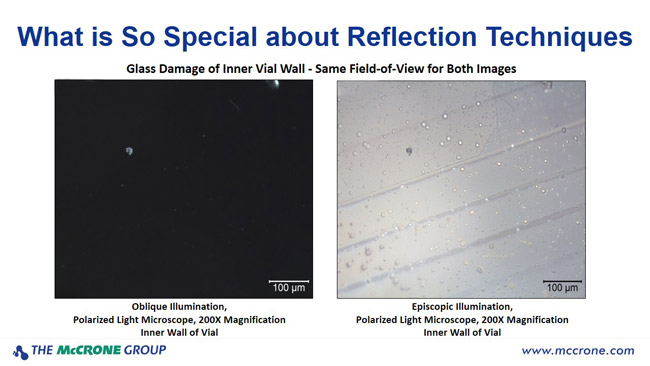
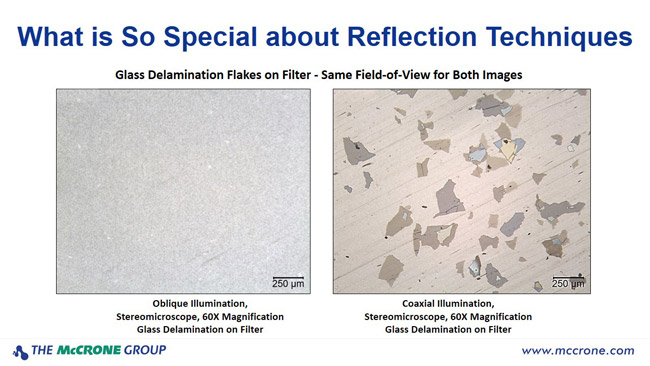
There are two reflected light illumination techniques that Bill says are the most powerful and most underutilized on both the stereomicroscope and the polarized light microscope. In the stereomicroscope, coaxial illumination is a reflection technique in which light comes down from within the body of the stereomicroscope, down through the objective, onto the sample, and then is reflected back up through the same objective, and then to the eyepieces. This type of illumination is essential for revealing extremely thin particles such as glass delamination through an optical phenomenon known as thin film interference. Glass delamination particles are on the order of 50 nanometers thick and would go undetected without using this important technique. As you can see from Bill’s photographs taken from the stereomicroscope, the field of view on the left, using oblique illumination, does not detect these very thin particles. Looking at the same field of view, but with coaxial illumination, particles that were once invisible now stand out dramatically.
Oblique lightphotography
If you want to customize things a bit, Bill suggests adding a polarizer under the clear glass stage plate in the transmitted light base of the stereomicroscope. This, coupled with a quarter-wave plate that can be attached to the stereomicroscope objective (required for coaxial illumination and may already be in place), achieves pseudo-transmitted crossed polarized light. This is great for visually separating isotropic from anisotropic particles.
This list of materials is everything you need to reach Level 525. As a rule of thumb, when crafting, be sure to save your components as they can be re-used for other gadgets. Be sure to stay close to your stash or bank while engineering, so you won’t have to run back and forth while transferring materials.
The counterpart to coaxial illumination on the stereomicroscope is reflected light, or episcopic illumination, on the polarized light microscope. Light comes from directly above the sample through the objective and is reflected back up through the eyepieces. Episcopic and coaxial illumination produces similar results.
Using coaxial or episcopic illumination can help to reveal surface textures, such as pitting or striations, that would otherwise go undetected with oblique lighting techniques. Bill tells us that there is virtually no sample where he doesn’t use these two reflected light techniques when he begins an analysis.
Try getting creative using different illumination techniques with your stereomicroscope and polarized light microscope—you may find new ways to see your sample more clearly. In some cases, without the proper lighting technique, portions or even entire particle populations of your sample can go undetected, leaving you and your client in the dark. Bill concludes that beyond these vitally important advantages, the right illumination technique also improves sample preparation, thus leading to better and more meaningful data.
Taking things one step further, other microscopists attach their fiber-optic illuminator to a momentary contact foot switch. Through this way of controlling the oblique light, you can “hit” the sample with reflected light to gain additional information quickly without removing your eyes from the sample, and still have your hands free for manipulating the sample.


 Ms.Cici
 8618319014500