
BUNTING | English meaning - Cambridge Dictionary - about bunting
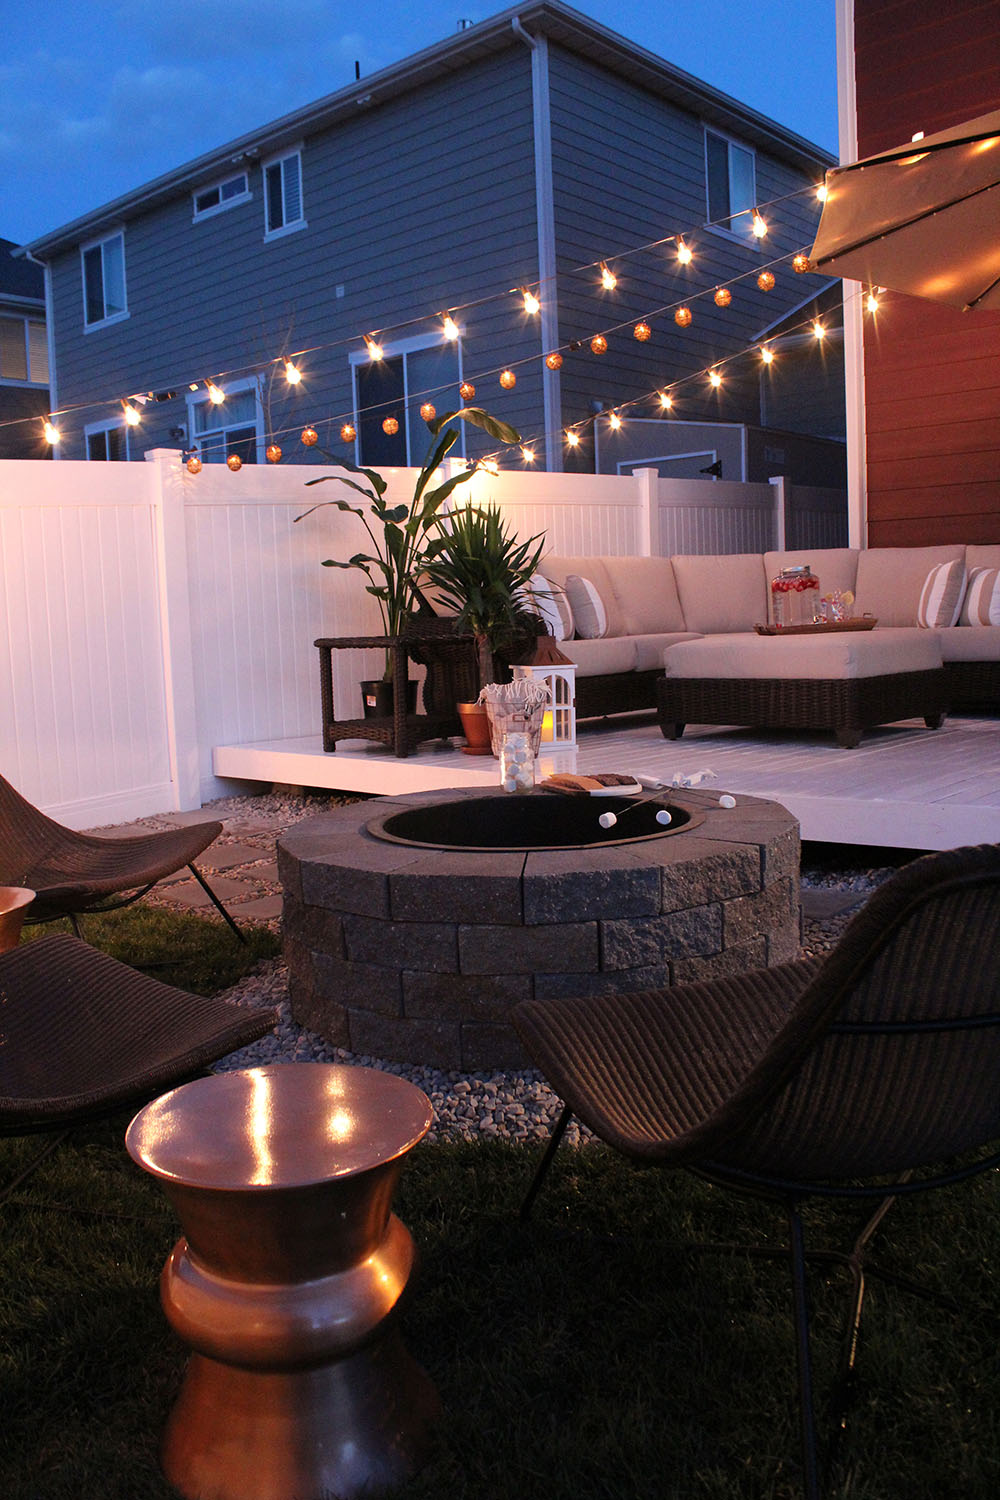
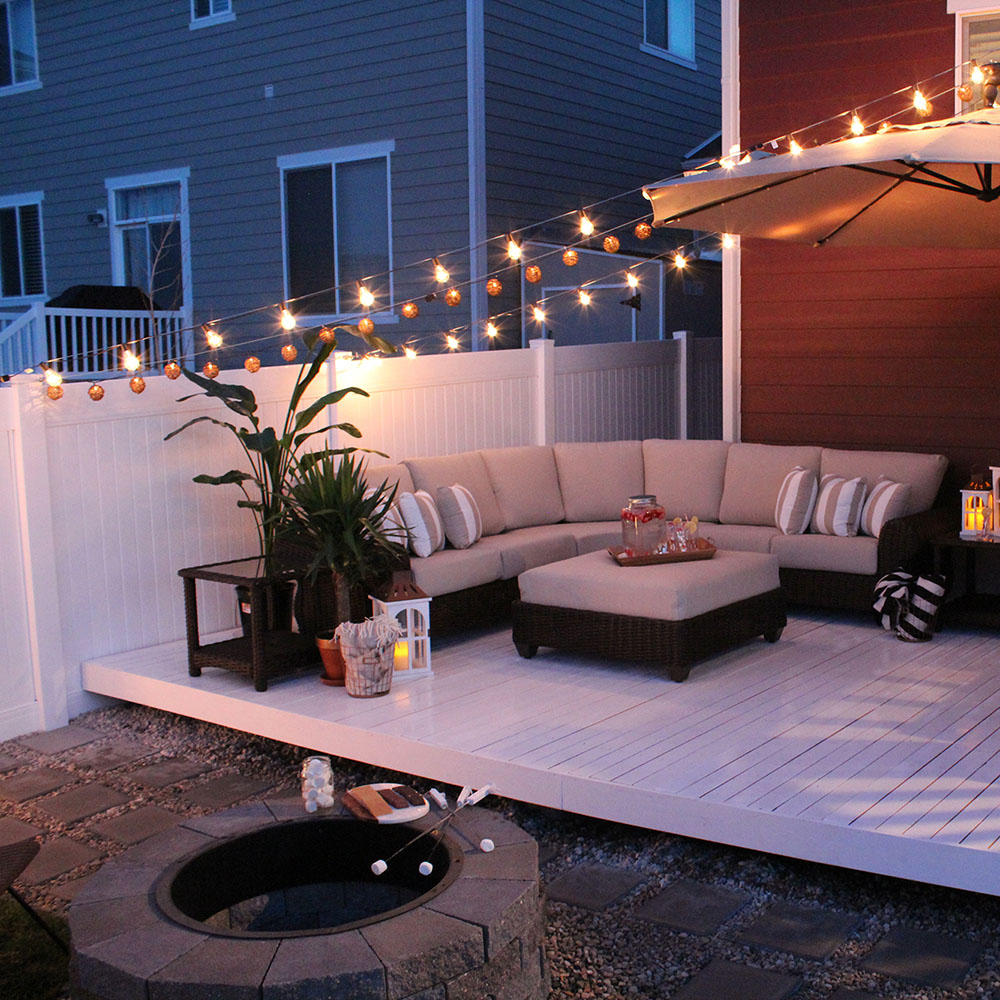
This is where all the magic happens, and all the amazing products I decorated with from The Home Depot really made this whole project come together. For more details and tips for creating a cozy and intimate space in your own backyard, see my new deck reveal here on The Home Depot Blog.
I used these Edison bulb outdoor lights, and these rattan lights to add variety, some gorgeous plants in terra cotta pots. The copper Weber grill is gorgeous, and really adds a sophisticated color to the space, as well as these matching white and copper lanterns.
PMP 62840, OEM 005-300825, 887288-001, 887288-R01. Wayne® iGEM™ Intrinsically Safe Barrier Board.
To do so, measure and cut each joist one at a time, in case there are any slight differences between the distances of your cement piers.
Stun guns are designed to send a high voltage shock via contact with an attacker. This shock can temporarily stun or immobilize an assailant.
You may also need to use a jig saw like this Ryobi jig saw to cut around drain pipes, or fencing on the edge of your deck like I did.
Lowleveldeckplans
And it was worth every scary moment because now I have the most beautiful deck, for an amazing price, and I also learned so many new skills along the way. And I couldn’t have built this DIY deck without The Home Depot. Thank you to them for giving me the courage to try something new!
If your deck is large like mine, you will likely need to meet two joints onto one deck pier to reach the entire length of your deck. I have to mention the Ryobi miter saw I used was amazing for these large joists. It cut everything so smoothly, and even has a laser line that appears to make it extra easy for you. I love that saw so much!
Low deckframing
If you want to make your low-level deck as inexpensive and simple as possible, follow what I did! Which is to use 2 x 6 pressure-treated beams spaced 24 in. apart on-center. The support for these joists provided by concrete deck piers needs to be placed at least every 8 feet.
This SOP is generic in nature and only addresses safety issues specific to flammable liquids. In some instances, several general use SOPs may be applicable for ...
Then, go back over each screw and give it a little bit of sanding to fix some of the splinters that will inevitably appear, since we are working with a natural product.
Alexi had no specialized skills for building a deck, but she’s a fearless DIYer, and she produced this simple and sturdy deck without spending a lot of money.
With a membership to the public range, you can improve your skills on your own time. Use your own firearm or rent a SIG.
Since this wood is not typical decking-wood, you need this extra step to keep the wood from rotting and decomposing any sooner.
This DIY deck is a gorgeous addition to Alexi Parry's backyard. Alexi blogs about DIY projects, design and entertaining at Seeking Alexi. She created this simple deck to help make her backyard the perfect place for outdoor entertaining.
LowDecks without railings
For me, I decided to use 2 x 4 Douglas Fir wood (simple framing-wood), because it is inexpensive, but still extremely strong.
Go back through every screw and make sure they are flush with the wood, or even indented a bit. If the screws stick out, people may trip or snag their shoes as they walk.
Extra 1"-2 Leeway. We add 1" to 2" leeway on the given width/depth, for an easy pull-in, pull-out. How to Measure?
Tip: Create yourself a simple template out of a see-through material so you know exactly where to place your screws, then they will line up perfectly.
2020425 — Signs are color coded according to their intended function (at least in the USA). Black and white signs are in the regulatory category.

I wanted mine as low to the ground as possible, (mostly because I didn’t want stairs) so I dug down the cement deck piers closest to my house several inches, and the piers away from my house didn’t need to be dug at all. You should do one deck pier at a time, and be CONSTANTLY measuring the perfect distances, leveling each deck pier to each other, and being as meticulous as possible that everything is level!
Alexi Parry of Seeking Alexi is a design-aholic, Instagram junkie, wannabe blogger, novice letterer, master DIYer, expert chip-snacker, pretend traveler, semi-outdoors-(wo)man, football supporter, church-goin’ person, self-proclaimed foodie, domestic-lovin’, & hugely motivated creative director, graphic designer and web designer.
A driver can drive in a tram lane for up to 50 metres, when turning right or avoiding an obstruction provided trams aren't delayed. Tram lanes are identified by ...
Tip: Use a paint edger so you don’t have to tape off the side of your house (tape doesn’t stick well, anyway, since it’s a rough surface!).
Lowprofiledeck
As speeding is of particular concern in areas where our most vulnerable persons are, the Winnipeg Police Service has assigned ten mobile units to conduct speed ...
Make sure you give plenty of time to dry between coats, and also a couple days of drying time before you place anything heavy on your deck so it has time to cure.
Note that Douglas Fir may not be ideal for other climates, but dry climates (I live in Utah) should be just fine if you will waterproof the bottom of the wood first. You don’t need to waterproof the top, because we are going to stain/seal that side! I used Thompson’s Water Seal and a paint roller; just make sure to follow the instructions on the container!
Federal grants fund research, new equipment, technical assistance, security ... DHS is committed to ensuring every law enforcement agency - regardless of size, ...
I used a weatherproofing stain/seal on mine, and I’m already so happy with it! And, if you know me at all, I love the color white so much, so of course I stained my deck opaque white!
W7-12: Train Crossing Side Road L/R Sign - Sizes from 600 x 600 - Black text/logo on Class 1 reflective yellow background.
Overall, creating my own deck was an incredible experience. One that I am so happy to have accomplished, if nothing else for the amount of money that it saved me! And, I didn’t have to cut any corners— I ended up with a stunning deck that is now ready to enjoy for the entire summer, and it only took a couple of days of work!
This part is not rocket science, just takes a little bit of time. Some boards are a little warped, and may need two people holding it in place as you get the first few outdoor deck-screws in each board. Use ¼ in. tile spacers between your boards, and add two screws per joist. I used the Ryobi impact drivers because that wood is tough and you need something strong to put the screws in!
DIYlow deck
Low deckideas
Jul 31, 2024 — Everything you need to know about car dashboard symbols and meanings · Red warning lights mean you need to take immediate action. · Amber warning ...
If you can get your hands on a wood planer, use it! It will make sure all your wood is the same height and also give those rough 2 x 4s a beautiful, smooth finish. Remember you only have to plane one side (the side that will be seen)!
And of course, the two largest staple-pieces to the whole thing is the stunning deck furniture and overhanging umbrella. The umbrella is extremely sturdy, and very functional. It allows you to change the angle, which will be amazing for those long, hot summer afternoons. And, I am thoroughly impressed with the quality of the Hampton Bay Mill Valley Collection. It is steel-reinforced, weather-proof, and it’s actually quite comfortable as well! I highly recommend it!
I think this is my most DIY favorite project I have ever done, and The Home Depot definitely made it all happen! From the friendly staff, to all of their tools, and the ideas on their Pinterest page, Home Depot really does have everything you need to make a big project, like a DIY deck!
You should also spray some grass and weed killer or lay weed barrier cloth under the entire area of your future deck. You don’t want any pesky weeds coming up through your deck when it’s all finished!
Why build your own deck? For me, it came down to learning some new skills and saving lots of money! It is so extremely rewarding to stand on a deck that you have created with your own two hands. The bragging rights are unparalleled! And more importantly, you can save so much money! To pay someone to build a deck my size with typical materials would cost between $6,000 and $8,000! My deck came in under $900, since all I paid for was lumber, cement, and screws. Wow, right?
First off, this is very possible to accomplish on your own! I am not a professional carpenter or contractor, but this project is easy enough to do. (Just don’t underestimate the amount of time it takes to drill 768 screws!) But if you are adventurous enough, and have a few extra hands, building your very own deck is very possible!


 Ms.Cici
 8618319014500