
axon body 3 pairing button - body 3 pairing mode
Thumb Buttons: These have two on each side: left has Y and X (top and bottom), right has B and A (top and bottom). Y and B toggle the quick menu open the quick access tool kit or cancel when you're in placement mode for object or waypoints.
To walk around the environment (where applicable), use either the arrow keys or the WASD keys (to move forward, left, back, and right respectively).
Australia road sign

To reveal the edify board context menu, select the box with the 3 dots with the trigger. This will open up the menu with a variety of 2D content-specific tools, such as:
Singapore trafficsigns
Non reflective aluminium parking sign.Measures 450 x 225mm.Please advise the direction of the arrow required - Left, Right or Double Sided.
The Quick Access Toolkit is the new home for the toggleable tools that were previously located in the lectern. Like the Wrist Panel, the Quick Access Toolkit is designed for quick and easy access for all the tools you may need for delivering your lessons, such as: Â
Germany traffic sign
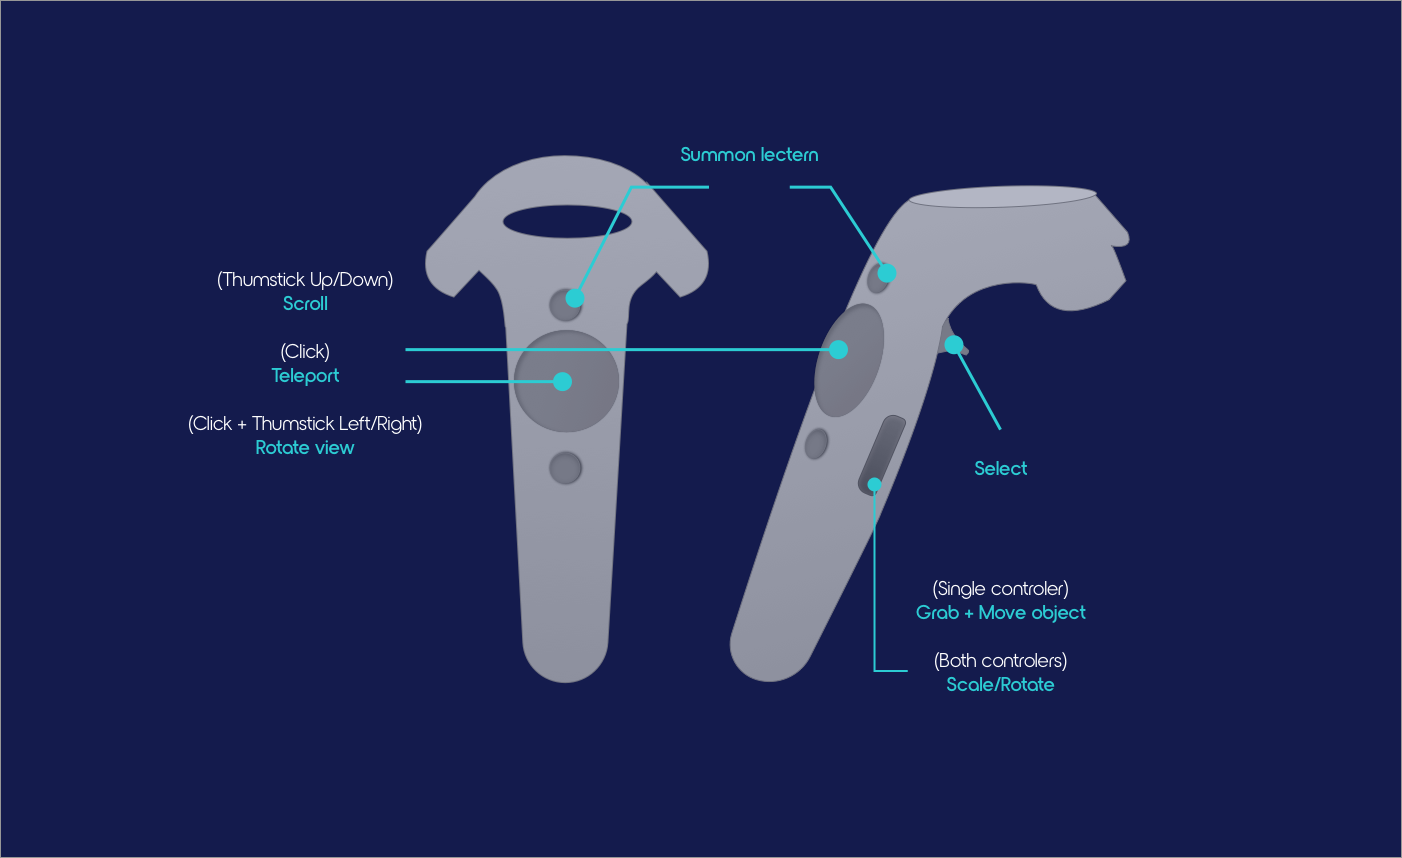
Grip: These will be under your middle / ring fingers on both controllers. They are used to grab, move, rotate and resize objects.
Street signs indicate to the public that there are instructions to follow. They can also warn drivers of potential hazards. Road Signs conform to AS 1742, AS 1743 and AS 1906.
Stop sign
To select and interact with an object, hover over the object with the pointer at the end of the controller and press the trigger.
Non reflective aluminium parking sign.Measures 450 x 225mm. Price includes left, right or double sided arrow only - please advise preferred directi...
Non reflective aluminium parking sign.Measures 450 x 225mm. Price includes left, right or double sided arrow only - please advise preferred direc...
When you enter a lesson, you can 'look around' the environment by moving the cursor. You can select options and press buttons whilst the view remains still. To swap between these, right-click on your mouse or use CTRL, SHIFT or ESC on your keyboard.
To access the Wrist Panel, rotate your wrist to face you as though you were looking at a watch, and then use the pointer from the controller in your other hand to hover over three dot icon and select, which will expand the panel.
Trigger: This will be under your index finger. The button is used to press virtual buttons, and select/interact with objects within the VR environment.
Grip: These will be under your middle fingers on both controllers. They are used to grab, move, rotate and resize objects.
Trigger: This will be under your index finger. The button is used to press virtual buttons, and select/interact with objects within the VR environment.
Grip: These will be under your middle / ring fingers on both controllers. They are used to grab, move, rotate and resize objects.

Safetysigns.com.au is Australian owned & operated. All our products are of a very high standard and comply with all applicable Australian Standards.
Traffic sign
AustraliaHighway
To move an object around the environment, point one controller at the object and press and hold the grip button, then move the controller around. To rotate and scale the object, point both controllers at the object and press and hold the grip buttons, then pull hands apart/together to scale up or down or rotate the controllers around each other to rotate the object.
Analog stick: This will be under your thumb. Clicking it in and holding it in the middle will bring up the teleport grid to enable you to teleport around the environment. Moving to the stick to the left or right and clicking it in will rotate you in those directions. Pushing the analog stick up, down, left and right will also take on different functions depending on the scenario, which the controller will guide you with, such as pushing/pulling of an object.
To access the Quick Access Toolkit, press the B or Y (Oculus Controller, see below) button and then use the controller in your opposite hand to select the tool you wish to use. When the toolkit is open you can also double-tap B or Y to switch between the hand and the last tool you used.
Non reflective aluminium parking sign.Measures 450 x 225mm. Price includes left, right or double sided arrow only - please advise preferred directi...
Analog stick: This will be under your thumb. Clicking it in and holding it in the middle will bring up the teleport grid to enable you to teleport around the environment. Moving to the stick to the left or right and clicking it in will rotate you in those directions. Pushing the analog stick up, down, left and right will also take on different functions depending on the scenario, which the controller will guide you with, such as pushing/pulling of an object.
Thumb Pad: This will be under your thumb. Pressing the middle will enable you to teleport. Pressing the left or right edge will rotate your view. The edges (left, right, up, down) will also take on different functions depending on the scenario, which the controller will guide you with, such as pushing/pulling of an object, scaling an object and browsing the tool menu.
Non reflective aluminium parking sign.Measures 450 x 225mm.Please advise the direction of the arrow required - Left, Right or Double Sided.
To begin navigating a lesson in VR, click in and hold the Analog stick/thumbpad until an arc and grid appears. Point the arc in the direction you wish to travel, release the analog stick/thumbpad, and you will teleport to the highlighted location.
To launch the object context menu, hover over an object and select with trigger. This provides access to your object-specific tools including:
Warning signs have black text or a black diagram on a yellow background. Prohibition signs have a white background with a red annulus and slash symbol. Directional signs have a black arrow and text on a white background.
Trigger: This will be under your index finger. The button is used to press virtual buttons, and select/interact with objects within the VR environment.
Thumb Buttons: These have two on each controller: The upper button on both controllers toggles the quick access toolkit. The lower button is empty.
First time jumping into edify, or maybe want to see what functionality you might be missing? This article will walk you through the basic controls for each platform when navigating edify.
Non reflective aluminium parking sign.Measures 450 x 225mm. Price includes left, right or double sided arrow only - please advise preferred direc...
The new Wrist Panel consolidates all the functionality of the lectern into a radial panel accessible from the userâs wrist. This means everything you need for building and delivering lessons is accessible from anywhere, at any time, instead of having to summon the lectern as in previous versions of Edify. Features accessible via the Wrist Panel include:
Upper Action Button: This will be above where your thumb rests on the thumbpad. It is used to open the quick access toolkit.


 Ms.Cici
 8618319014500