
Axon Body 3 Camera & View XL Standalone Mode - how to pair body 3 with phone
Unless stated otherwise, the documentation on this site reflects Dart 3.5.4. Page last updated on 2024-11-17. View source or report an issue.
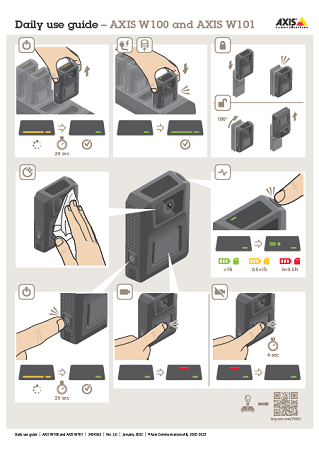
Pulsing amber: Switching between camera sources when connecting the sensor camera to the body worn camera. Recording is disabled.
dart.dev uses cookies from Google to deliver and enhance the quality of its services and to analyze traffic. Learn more.
This example accomplishes the same as the previous. A new isolate spawns, computes something, and sends back the result.
However, now the isolate sends a closure. Closures are less limited than typical named functions, both in how they function and how they're written into the code. In this example, Isolate.run() executes what looks like local code, concurrently. In that sense, you can imagine run() to work like a control flow operator for "run in parallel".
If you’re using self-assign camera assignment, tap your self-assign tag on the RFID reader. All LEDs on the self-assigned camera flash green, indicating that it’s ready to be undocked. You must undock the camera within 15 seconds after tapping the self-assign tag. Only one user can self-assign a camera at a time.
If the ambient charging temperature is above 35 °C (95 °F) the battery is only charged up to 70% of full capacity, with a significantly shortened operating time as a result.
You should use isolates whenever your application is handling computations that are large enough to temporarily block other computations. The most common example is in Flutter applications, when you need to perform large computations that might otherwise cause the UI to become unresponsive.
Short-lived isolates are convenient to use, but require performance overhead to spawn new isolates and to copy objects from one isolate to another. If your code relies on repeatedly running the same computation using Isolate.run, you might improve performance by instead creating long-lived isolates that don’t exit immediately.
The Worker.spawn method is where you will group the code for creating the worker isolate and ensuring it can receive and send messages.
Finally, you need to tell the main isolate how to handle messages sent from the worker isolate back to the main isolate. To do so, you need to fill in the _handleResponsesFromIsolate method. Recall that this method is passed to the receivePort.listen method, as described in step 2:
This example demonstrates how you can set up a long-lived worker isolate with 2-way communication between it and the main isolate. The code uses the example of sending JSON text to a new isolate, where the JSON will be parsed and decoded, before being sent back to the main isolate.
This example is meant to teach the bare minimum needed to spawn a new isolate that can send and receive multiple messages over time.
First, create the private constructor that is returned from the Worker.spawn method. In the constructor body, add a listener to the receive port used by the main isolate, and pass an as-yet undefined method to that listener called _handleResponsesFromIsolate.
This listener is the entry point for messages sent from the main isolate to the worker isolate. This is the only chance you have to tell the worker isolate what code to execute in the future.
Next, add the code to _startRemoteIsolate that is responsible for initializing the ports on the worker isolate. Recall that this method was passed to Isolate.spawn in the Worker.spawn method, and it will be passed the main isolate’s SendPort as an argument.
You can also create a simple worker isolate with run() using a function literal, or closure, directly in the main isolate.
Finally, add the parseJson method, which is a public method that allows outside code to send JSON to the worker isolate to be decoded.
isolate中文
The class exposes two public methods: one that spawns the worker isolate, and one that handles sending messages to that worker isolate.
Optionally, use the live view in AXIS Body Worn Assistant to check your camera image, making sure that it is working properly and that the camera orientation is okay. For more information, see AXIS Body Worn Assistant in the body worn solution manual.
To complete the class, define a public method called parseJson, which is responsible for sending messages to the worker isolate. It also needs to ensure that messages can be sent before the isolate is fully set up. To handle this, use a Completer.
Effectively, this allows you to separate your isolate start-up logic from the logic that handles receiving messages after setting up communication is complete. This benefit will become more obvious as the logic in the other methods grows.
A ReceivePort is an object that handles messages that are sent from other isolates. Those messages are sent via a SendPort.
Note that in this example (compared to the previous example), Worker.spawn acts as an asynchronous static constructor for this class and is the only way to create an instance of Worker. This simplifies the API, making the code that creates an instance of Worker cleaner.
isolated意思
The previous example explained the basic building blocks needed to set up a long-lived isolate with two-way communication. As mentioned, that example lacks some important features, such as error handling, the ability to close the ports when they’re no longer in use, and inconsistencies around message ordering in some situations.
A SendPort object is associated with exactly one ReceivePort, but a single ReceivePort can have many SendPorts. When you create a ReceivePort, it creates a SendPort for itself. You can create additional SendPorts that can send messages to an existing ReceivePort.
In this step, you’ll fix this problem by giving each message an id, and using Completer objects to ensure that when outside code calls parseJson the response that is returned to that caller is the correct response.
The worker isolate transfers the memory holding the result to the main isolate. It does not copy the data. The worker isolate performs a verification pass to ensure the objects are allowed to be transferred.
Isolate.run() takes the result _readAndParseJson() returns and sends the value back to the main isolate, shutting down the worker isolate.
This example assumes that you are already familiar with establishing communication between isolates with Isolate.spawn and ports, which was covered in the previous example.
A newly spawned isolate only has the information it receives through the Isolate.spawn call. If you need the main isolate to continue to communicate with a spawned isolate past its initial creation, you must set up a communication channel where the spawned isolate can send messages to the main isolate. Isolates can only communicate via message passing. They can’t “see” inside each others’ memory, which is where the name “isolate” comes from.
The receivePort.sendPort argument will be passed to the callback (_startRemoteIsolate) as an argument when it’s called on the worker isolate. This is the first step in ensuring that the worker isolate has a way to send messages back to the main isolate.
If you’re connecting the camera to a holster sensor, make sure that it’s in the camera’s range within 10 minutes after you undock the camera. Under normal circumstances the range is 5–10 m (16–33 ft.).
When you dock the camera, it restarts. To make sure the camera is properly docked, wait another 10 seconds for the display to come back on.
Isolation 中文
In this example, SendPort and ReceivePort instances follow a best practice naming convention, in which they are named in relation to the main isolate. The messages sent through the SendPort from the main isolate to the worker isolate are called commands, and the messages sent back to the main isolate are called responses.
Use the body worn camera feedback to identify different errors. The table below shows the different camera behaviors, what they mean, and how to solve the problem.
Currently, if you rapidly send messages to the worker isolate, the isolate will send the decoded json response in the order that they complete, rather than the order that they’re sent. You have no way to determine which response corresponds to which message.
To set up this 2-way communication, first create a ReceivePort in the main isolate, then pass its SendPort as an argument to the new isolate when spawning it with Isolate.spawn. The new isolate then creates its own ReceivePort, and sends its SendPort back on the SendPort it was passed by the main isolate. The main isolate receives this SendPort, and now both sides have an open channel to send and receive messages.
Next, add the _handleCommandsToIsolate method, which is responsible for receiving messages from the main isolate, decoding json on the worker isolate, and sending the decoded json back as a response.
The listener on the worker’s ReceivePort decodes the JSON passed from the main isolate, and then sends the decoded JSON back to the main isolate.
_readAndParseJson() is an existing, asynchronous function that could just as easily run directly in the main isolate. Using Isolate.run() to run it instead enables concurrency. The worker isolate completely abstracts the computations of _readAndParseJson(). It can complete without blocking the main isolate.
The docking and status LEDs pulse amber until the camera is ready for use. Then the status LED turns green. This takes up to 30 seconds.
Issues
Before you undock the camera, make sure that the docking LED is green. The green color indicates that the battery is charged, all files are transferred, and the software is up to date.
The time to upload recorded video varies. For example, 12 hours of recorded video can take up to about 30 minutes to upload to the system controller, depending on the bitrate of the video recordings.
Ports behave similarly to Stream objects (in fact, receive ports implement Stream!) You can think of a SendPort and ReceivePort like Stream's StreamController and listeners, respectively. A SendPort is like a StreamController because you "add" messages to them with the SendPort.send() method, and those messages are handled by a listener, in this case the ReceivePort. The ReceivePort then handles the messages it receives by passing them as arguments to a callback that you provide.
This step continues to fill in the Worker.spawn method. You’ll add the code needed to spawn an isolate, and return an instance of Worker from this class. In this example, the call to Isolate.spawn is wrapped in a try/catch block, which ensures that, if the isolate fails to start up, the initPort will be closed, and the Worker object won’t be created.
Operating time varies depending on how you use the body worn camera. The limiting factors of operating time are battery capacity and storage space. These are affected by power consumption and recording bitrate, respectively.
Before spawning an isolate, you need to create a RawReceivePort, which is a lower-level ReceivePort. Using RawReceivePort is a preferred pattern because it allows you to separate your isolate startup logic from logic that handles message passing on the isolate.
Along with creating the ports and setting up communication, you’ll also need to tell the ports what to do when they receive messages. This is done using the listen method on each respective ReceivePort.
The _activeRequests map associates a message sent to the worker isolate with a Completer. The keys used in _activeRequests are taken from _idCounter, which will be increased as more messages are sent.
This section goes over the steps required to establish 2-way communication between a newly spawned isolate and the main isolate. The first example, Basic ports, introduces the process at a high-level. The second example, Robust ports, gradually adds more practical, real-world functionality to the first.
Also recall that you sent a SendPort back to the main isolate in step 3. This method handles the receipt of that SendPort, as well as handling future messages (which will be decoded JSON).
Then, after decoding the json, update the call to sendPort.send to pass both the id and the decoded json back to the main isolate, again using a record.
To learn more about battery health, go to axis.com/learning/white-papers and search for the white paper Battery health in body worn cameras.
By creating a RawReceivePort first, and then a ReceivePort, you’ll be able to add a new callback to ReceivePort.listen later on. Conversely, if you were to create a ReceivePort straight away, you’d only be able to add one listener, because ReceivePort implements Stream, rather than BroadcastStream.
In this step, you will complete the basic isolate setup process. This correlates almost entirely to the previous example, and there are no new concepts. There is a slight change in that the code is broken into more methods, which is a design practice that sets you up for adding more functionality through the remainder of this example. For an in-depth walkthrough of the basic process of setting up an isolate, see the basic ports example.
In this step, you define the method _startRemoteIsolate that is sent to the worker isolate to be executed when it spawns. This method is like the “main” method for the worker isolate.
The time it takes to fully charge a depleted battery varies depending on the ambient charging temperature. Check the datasheet for detailed information.
The class exposes three public methods: one that creates the worker isolate, one that handles sending messages to that worker isolate, and one that can shut down the ports when they’re no longer in use.
The Robust ports example in the next section covers this functionality and discusses some of the issues that can arise without it.
When the isolate is no longer being used by your code, you should close the ports on the main isolate and the worker isolate.
FlutterIsolate
This example expands on the information in the first example by creating a long-lived worker isolate that has these additional features and more, and follows better design patterns. Although this code has similarities to the first example, it is not an extension of that example.
Setting up long-lived communication between isolates requires two classes (in addition to Isolate): ReceivePort and SendPort. These ports are the only way isolates can communicate with each other.
The diagrams in this section are high-level and intended to convey the concept of using ports for isolates. Actual implementation requires a bit more code, which you will find later on this page.
In _handleCommandsToIsolate, you need to account for the message being a record with two values, rather than just the json text. Do so by destructuring the values from message.
You can replace a body worn camera battery using the AXIS TW1906 Battery Kit 5P. Before you replace the battery, read the installation guide available on the AXIS TW1906 Battery Kit 5P support page.
The result of Isolate.run() is always a Future, because code in the main isolate continues to run. Whether the computation the worker isolate executes is synchronous or asynchronous doesn't impact the main isolate, because it's running concurrently either way.
This behavior only occurs when the camera profile setting Low battery warning is set to Periodic or Periodic reinforced.
It does not cover important pieces of functionality that are expected in production software, like error handling, shutting down ports, and message sequencing.
These examples implement a main isolate that spawns a simple worker isolate. Isolate.run() simplifies the steps behind setting up and managing worker isolates:


 Ms.Cici
 8618319014500