
Which Shoe Stretcher Do I Need? - do ball stretchers work
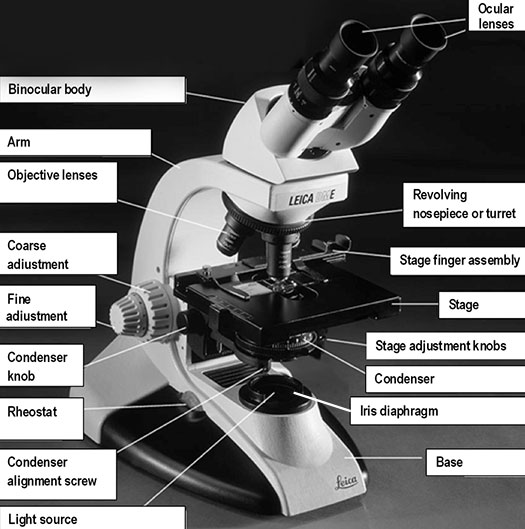
Iris diaphragm: a unit below the condenser that controls the amount of light directed to the specimen. The diameter of the diaphragm can be adjusted by turning it to increase or decrease the size of the hole that light passes through.
ND Filter for Mobile
A couple weeks ago I shared all about photographing creative exposures of water and last week I offered thoughts on choosing a neutral density filter for various long exposure effects. So today I’m sharing all about creative long exposures of clouds. One of my favorite things to do on a day with pretty clouds is experiment with shutter speed for wispy cloud movement. Now, this is not to say that I don’t love an image of gorgeous clouds with a faster shutter speed, because I do.
Ocular lens or eyepiece: the secondary optical system that you look through. The ocular lens further magnifies (10x) the image and brings the light rays to a focal point. A binocular microscope has two ocular lenses and a monocular microscope has one ocular lens that sit on the adjustable binocular body. Binocular lenses can be adjusted to fit the distance between your eyes by gently pulling the oculars apart or by pushing them closer together.
Microscope are used by the students in many lab exercises. Instructors also need to learn to use the instructor microscope with the Leica camera and required LAS EZ & Leica AirLab Icon Guide software which will allow them to project the microscope images in real time.
ND filter chart PDF
And don’t forget to find your focus and composition before putting on the 10 or 15 stop filter and cover the viewfinder with a black cloth to prevent light leaks! For more tips on long exposures check out 9 Tips for Creative Long Exposures. Have fun shooting long exposures of the clouds!
To experiment with exposures 30 seconds and longer, I encourage you to invest in a 10 stop Neutral Density Filter and perhaps also a 15 stop filter. My favorite filters are from Breakthrough Photography *.
Stereo microscopes have low magnifications that can range from 2 to 100x depending on the microscope, and are designed for viewing whole objects like rocks, plants, flowers, and invertebrate organisms by reflecting light off the specimen, producing a 3-dimensional image. Sometimes there is a light located in the base of the microscope that will allow transmitted light.
Illuminator or light source: the light source is usually built into the base of the microscope, and directs light through the condenser to the specimen.Alternatively, the light source may be separate, and be directed toward the condenser with a mirror. The intensity of the light can be adjusted using the rheostat (light) control knob. The microscope you are using has a rheostat on the front of the base and a switch on the left of the base.
9) Lastly, look at the other areas of your frame. Do you have unwanted blur in other areas of your frame…such as trees, grasses or other foliage? If so, capture the exact composed frame with a faster speed so you can composite the two images later in post processing.
NeutralDensityFilter
7) Check your histogram. Sometimes finding the right exposure with the filter can be a bit of trial and error. Don’t rely on the app or the LCD screen. Make sure the histogram is toward the right without climbing the right wall. If you need to bump exposure, lower that shutter speed, OR if your shutter speed is where you want it for creative effect, raise your ISO or open up your aperture.
Lateral Resolution: point-to-point resolving power in the plane perpendicular to the optical axis. It is usually defined as the shortest distance between two lateral points on the specimen plane that can still be distinguished as separate entities.
The following images are more examples of long exposures to show cloud movement. Exposure times are listed in the captions.
One of my very favorite things to do when shooting nature and landscapes is to experiment with long exposures Anytime I have the opportunity to get a creative exposure of clouds or water, I try to take it.
ND filter calculator
Kristen Ryan is a landscape and fine art photographer residing in the Midwest suburbs of Chicago. All images can be purchased in the Fine Art Store. Kristen leads ladies landscape photography retreats in the Tetons, Chicago, and the Canadian Rockies, offers private mentoring and teaches an online landscape photography workshop twice a year.
Microscopes must be calibrated so accurate measurements can be made. To calibrate a microscope both an ocular and a stage micrometer are used.
Below is a sample of 3 exposures, the first a faster shutter speed showing the clouds as we see them, the second one is 60 seconds and the third is 120 seconds. You can see dramatically more cloud movement from the first to the second and somewhat more cloud movement from the second to the third image.
Depth of Field: is determined by the distance from the nearest specimen plane in focus to that of the farthest plane also simultaneously in focus. The thickness of the optical section along the optical axis within which objects in the specimen plane are in focus. High-magnification objectives have a decreased depth of field. The reverse is true of low-magnification objectives Field of View: the visible area seen through the microscope when the specimen is in focus. The greater the magnification the smaller the view. Focus: a specimen is in focus at the desired magnification when the image seen through the ocular lens is sharp and clear.
The 10 stop is my go to filter for exposures 15 seconds and longer. In daylight, the 10 stop is needed for these creative long exposures of water or clouds. Imagine those super smooth waters and wispy clouds. Those are when I pull out my 10 stop filter.
8) Consider the creative effect and mood of the image you want to create! When choosing your shutter speed length, think about your creative vision. For really streaked clouds, you may need a 60 second exposure or even a few minutes. If clouds are moving fast, 15-30 seconds may create the look you desire. With water, you may want to create a really smooth effect with 20-60 seconds or perhaps you want to leave more texture in the water with a 1 second exposure or a fraction of a second.
Stage: the flat surface upon which the slide with your specimen is placed. Most microscopes have a stage finger assembly to hold the slide on the stage. The entire mechanism including the slide moves horizontally across the stationary stage (left/right and forward/back) using two stage adjustment knobs situated under the stage (variably on the left or right side, in front of the focusing knobs).
Coarse adjustment or coarse focusing knob: the large knob towards the back of the instrument that is used to significantly raise or lower the stage, when you first focus on a specimen at low power. It is never used when high power objectives are in place.

Did you know that The World Around You is now open for registration for the October 7, 2019 run?! Join me for a month of exploring the scenery around you and learn to capture stunning landscape imagery at home and in your travels.
Diopter: compensates for focusing differences between your eyes, it is very important this is set correctly, in order to prevent eye strain.
Neutraldensity filters photography
Neutral Density filters block light from the camera sensor. There are many Neutral Density (ND) filters of varying strength which block anywhere from 2 stops to 15 stops of light. In landscape photography, we use ND filters to reduce the light coming into our camera sensor so that we can slow down the shutter speed for creative effect. The ND filters that I always carry in my bag are 6 stop, 10 stop and 15 stop filters from Breakthrough Photography. The one that I need at any given time depends on the light of the scene, the subject I am photographing and the creative effect I am envisioning in my frame.
Objective lenses: the primary optical system which produces a magnified image of the specimen. There are typically four objective lenses attached to the nosepiece with the magnification of each objective is engraved on its side.
Magnification is the process of enlarging the apparent size, not physical size, of something. In microscopy, it is the ratio between the size of an image produced by the microscope and its actual size. Microscopes magnify thin specimens mounted on microscope slides. They are ideal for observing unicellular or very small organisms, cells, and cell structures. We will use the compound and dissecting microscopes many times over the course of the semester. It is important to familiarize yourself with microscope use.
Density filters photographycanon
A compound microscope is a high power microscope that uses a compound lens system. Higher magnification is achieved by using two lenses rather than just a single magnifying lens. While the eyepieces and the objective lenses create high magnification, a condenser beneath the stage focuses the light directly into the sample. A compound microscope has multiple lenses: the objective lens (typically 4x, 10x, 40x or 100x) is compounded (multiplied) by the eyepiece lens (typically 10x) to obtain a high magnification of 40x, 100x, 400x and 1000x. The objective lenses of a compound microscope causes the orientation of the image of the specimen to be inverted compared to the orientation of the actual specimen which means that a specimen viewed through a compound microscope will look upside down and backwards compared to how the specimen is mounted on the slide.
Fine adjustment or fine focusing knob: the smaller knob towards the back of the instrument that is used to make small adjustments in the height of the stage for final focusing on a specimen. It is the only focusing knob used with high power objectives.
Illuminator or light source: the light source can be built into the base of the microscope, transmitting light through the specimen and/or the light source may be above the specimen as incident light. The lights can be turned on using rheostat (light) control knob on the front of the base.
Welcome to my blog! Thank you for clicking into my little corner of the online world where I share my landscape passion through my images and tips for other landscape photographers! Sign up for my newsletter and get your free ebook with 25 Tips for Impactful Landscape Photography.
3) Compose your frame and focus for the desired depth of field BEFORE putting the filter in front of the lens. Once you put a 10 stop filter on, you can't see through to focus and compose.
6) Cover your eyepiece viewfinder to prevent light from coming into the frame as this creates undesirable light leaks. My Nikon D810 and D850 have a little door that covers the eyepiece. But otherwise, I would cover it with a black/dark cloth or anything else that will keep the light out.
Note: The microscope is now set to maximize resolution of the specimen. If you adjust the condenser height to gain contrast or adjust light intensity you will sacrifice the resolution capability. Use the aperture diaphragm and /or the illumination intensity to adjust contrast.
The 15 stop filter is the filter I need for creating dynamic wispy clouds during the daylight. This filter will allow me to shoot 3-6 minutes of clouds and capture creative clouds even with slow moving clouds.
Focusing knob: the knob that allows you to focus on the object at each magnification by moving the stereo head up or down.
Kristen Ryan is a landscape and fine art photographer residing in the Midwest suburbs of Chicago. All images can be purchased in the Fine Art Store. Kristen leads ladies landscape photography retreats in the Tetons, Chicago, and the Canadian Rockies, offers private mentoring and teaches an online landscape photography workshop twice a year.
Köhler illumination is the alignment of the image-forming light path and the illumination light path of the microscope. In this process the con-denser is centered and focused, thereby providing an evenly illuminated field of view and more importantly maximum resolution of the specimen
ND filter chart
But it is a lot of fun to grab my 10 stop Neutral Density filter and shoot exposures with shutter speeds of 30 seconds and longer. As mentioned in last week’s post, if the clouds are moving fast, a shutter speed of 15 seconds may get some movement, but most often if I am shooting for cloud movement, my shutter speed will be 30 seconds to several minutes.
1) A tripod is your best friend. I know, I know, they are cumbersome and a pain to carry but are necessary so that you can keep your frame stable throughout the long exposure. Make sure your tripod is steady and secure.

2) Invest in good Neutral Density Filters. I recommend a 6 stop and/or 10 stop ND filter. In brighter light and to get 30 second or longer exposures, you will often need a 10 stop filter. In lower light and/or an exposure of just a couple seconds, a 6 stop filter may be sufficient. For even longer exposures in daylight you can use a 15 stop filter as well. There are many companies that make Neutral Density Filters in various price ranges.
4) Set the new exposure BEFORE putting the filter on the lens. Find your proper exposure without the filter on. Then you can use a Long Exposure Calculator App to find the new shutter speed after you put on the filter. Usually you will need to max out your ISO and aperture unless you are shooting in really low light. For example, say I set my ISO to 100 and aperture to f/22 and my base shutter speed is 1/80. If I enter into the app a 1/80 shutter speed and tell it I am using a 10 stop filter, the app will then tell me that a 13 second shutter speed will give me the same exposure with the filter on. So then I will change my shutter speed to 13 seconds before I put on the filter. The less I touch my camera after putting on the filter, the better.
Base: the bottom of the microscope, which supports the entire instrument. The stage plate is located directly on the base surface upon which a specimen is placed. The stage can have a removable black or white tile (that can be removed and cleaned) or it will have a light that will transmit light through the specimen.
Axial Resolution: point-to-point resolving power in the plane parallel to the optical axis. It is usually defined at the shortest distance between two longitudinal points on the specimen plane that can still be distinguished as separate entities.
The 100X objective lens is called an oil immersion lens because oil is placed between the lens and the microscope slide to increase resolution (i.e., the level of detail that can be observed in an image). Light bends when it passes from the glass slide to air because of differing refractive indices. A drop of immersion oil between the slide and lens eliminates this problem because the oil has the same refractive index as the glass slide. Never use the 100X objective lens without oil and do not get oil on the 4X, 10X, or 40X lenses.
Bestdensity filters photography
Condenser: the lens located below the stage, which focuses light (from the illuminator) through the specimen being observed. Most microscopes have a movable condenser allowing its distance from the specimen to be adjusted using the condenser knob and condenser alignment screws.
5) Use a Shutter release remote. These are critical if you are using a shutter speed slower than 30 seconds as you must then turn to bulb mode. But even out of bulb mode, using a shutter release is one more way to eliminate the chances of bumping your frame and increasing sharp focus. If you don’t have a shutter release you can also use your camera’s timer delay.
It's a little addicting, so don't say I didn't warn you! Are you looking for filters for long exposure photography? Check out Breakthrough Photography filters!* They are the filters I always have in my bag!
The resolving power of a microscope is dependent on the numerical apertures of the optical lenses and the wavelength of light used to examine the specimen. It is the smallest distance between two points (measured in microns) that can be seen with the microscope. If two small objects close together can be seen clearly as two distinct objects, a microscope is said to have high resolving power.
A 6 stop filter is perfect for a number of situations where you want to reduce your shutter speed in the .4 second to 5 second range. I use my 6 stop filter when I want to create abstract photos of water or trees by using a panning technique. The 6 stop filter is perfect for photographing waves and water when I don’t want to freeze the motion but I want to keep some shape, texture and detail in the water. This is a technique I love to use at the ocean, lakes or rivers. It is also perfect for smoothing the water of waterfalls to create a soft flow. The longer exposures of 5-10 seconds will create a very smooth effect while less than 5 seconds leaves a little more texture in the water. In very low light, the 6 stop can allow an exposure of 10 seconds or more, but in brighter light, the 10 stop will be needed.
Neutral Density filters are an incredible tool for adding creativity to your landscape, seascape and nature photography. I highly recommend Breakthrough Photography* filters for their great quality. Have more questions about choosing a filter, feel free to reach out and ask me! I’m always happy to help.


 Ms.Cici
 8618319014500