
The USPOT - uspot
To create this frame length, the frame will be spliced. This is a diagonal middle cut joining two pieces together. See our example below for the final look.
Each product page provides dimensions of the frame. We also recommend ordering a sample to test the frame in your space.
Don’t worry, this happens all the time! Since the frame attaches directly to the mirror, no space is needed around the mirror. In the order process, when asked about space around your mirror, you will just select 0”. Your frame will be cut to fit your space.
The installation was much easier than I expected, and the frame quality is higher than I expected. I’m really delighted with the transformation
We were delightfully surprised with how fast our order arrived, how clear the instructions were, how easy it was to assemble, and how it instantly transformed our bathroom. Thank you for a top notch experience! Highly recommend!
Yes. MirrorMate frames are designed to be used with most plate glass mirrors, even if the mirror sits on a backsplash or runs into a wall. No space is needed around your mirror because the frame attaches directly to the glass.
Within 10 minutes of application, wipe off any excess glue from the front of the frame with a damp rag before glue sets. Let glue dry for 20 minutes. Prepare your mirror by cleaning the edges where the frame will apply with the alcohol wipe provided. Allow to dry for 5 minutes so the mounting tape will adhere properly.
Once you place your order, you’ll receive an email with instructions on how to complete the mirror measurement process. Note: your order will not be shipped until you have filled out the missing details.
All frames are made of MDF: an environmentally-responsible, strong, non-warping wood-base. They are then finished with a moisture-impervious decorative wrap and seal. If for any reason your frame warps we’ll replace it! We also use an industrial grade adhesive so you can be sure your frame won’t fall off your mirror.
In this case the changing intensity of the part of the beam that's not cut off is given by an integral like this, where x is the position of the blade. The theoretical curve given by this integral can be matched to the data points by a least-squares method like we used before. The result is the width w of the laser beam at some particular distance from the laser. 2. Setup and Procedure Figure 3 shows our setup. We initially used the same green laser pointer as before but unfortunately the characteristics of its beam suddenly changed when a new battery was used, possibly due to damage to its crystal. Therefore we switched to the very stable red HeNe laser shown. The photodetector was a Thorlabs DET110 whose current was read by a multimeter. We placed a converging lens ahead of the detector to ensure that none of the beam missed the detector. As shown the detector was intentionally placed away from the exact focus of the lens to avoid possibly damaging the detector. Figure 3a. A bird's eye view of the experimental setup Figure 3b. A picture of the setup The razor blade was taped to a right-angle bracket that was attached to a micrometer-driven translation stage. We moved in steps of either 1 or 2 mils. (One mil equals 0.001 inch or 25.4 microns.) We made these measurements at 31 different distances under 70 mm and also at 300 mm. In all, we wrote down and entered over 1000 data points by hand. In retrospect we took more data than we needed. Fewer width measurements over more evenly spaced distances would have been sufficient. 3. Analysis and Results Two types of analysis were done - (a) finding the beam width w(z) at each of the 32 distances and (b) constructing the beam profile from these results. Both used the least-squares method that was employed previously with the green laser pointer data. When finding the beam width by the least squares method one has the problem that the theoretical function (integral of a Gaussian) can not be written as a formula and thus cannot be directly compared to the data. The integral in fact defines a special function called the "error function," or erf(x). We dealt with this by numerically integrating the trial Gaussian functions and comparing these numerical integral curves to the data. The numerical integral is computed by simply summing all the Gaussian values up to some particular point x. The result of one such least squares analysis is shown in Figure 4. Figure 4. One of 32 sets of width data with its best-fit erf curve. When we plotted the 32 different beam width values, w(z), we found that the points formed a hyperbola. According to the reference below and others, the formula for the hyperbola is where w0 is the beam width at its minimum value, or "beam waist," zwaist is the distance of the beam waist from the face of the laser, and λ is the wavelength of the laser. A positive zwaist means the waist is in front of the laser's front face. Our results are shown in Figure 5. We found that the waist position was 3.6 cm behind the front face of the laser, which must therefore be where the surface of the output coupler mirror is. We also found w0 = 299.3 microns, which corresponds to a Rayleigh range [1] of 444 mm. Figure 5. Measured and best-fit beam profile. We can determine the length of the laser cavity by finding the beat frequency between the longitudinal modes of the laser. The equation of beat frequency is where c is the speed of light. With help from Vince [link] we found a beat frequency of 685.81 MHz, which corresponds to L = 21.8 cm. This result is in reasonable agreement with our conclusion that the waist is 3.6 cm behind the face of the laser, since the total length of the laser is 27.0 cm. By finding the divergence of the laser beam, which explains how the beam diffracts at large distances as the hyperbolic curve approaches a line, we were able to calculate the wavelength of the laser beam. The beam's divergence, theta, is described by the equation: [4] Equation[4] can be used to find the wavelength of the laser beam by using the approximate slope of the curve as the divergence. Using a divergence of 6.568 radians, and a waist size of 299.3 micrometers, we found that the wavelength of the laser was 617.58 nanometers. The error in this calculation is only 2.28 percent, when compared to the theoretical value of the laser, which was 632 nanometers. Conclusion In this project we learned not only about the changing profile and propagation of a laser beam, we also discovered how to determine the length and mirror configuration of the laser cavity. Finally, we learned that careful measurements of the beam profile such as ours can even be used to roughly determine the wavelength of the laser! References [1] Enrique J. Galvez. "Gaussian beams in the optics course." Am. J. Phys. 74, xxx-xxx (2006).
Yes. If the frame must come off we recommend using dental floss or fishing line to separate the foam tape from the mirror. We suggest you use Goof-Off, or a citrus-based cleaner to remove the rest of the tape from the surface of the mirror. Please understand that we cannot guarantee that your frame would be usable should you choose to remove it. E-mail info@mirrormate.com for removal instructions. It will be necessary for us to send you replacement tape and placement corners.
We can determine the length of the laser cavity by finding the beat frequency between the longitudinal modes of the laser. The equation of beat frequency is where c is the speed of light. With help from Vince [link] we found a beat frequency of 685.81 MHz, which corresponds to L = 21.8 cm. This result is in reasonable agreement with our conclusion that the waist is 3.6 cm behind the face of the laser, since the total length of the laser is 27.0 cm. By finding the divergence of the laser beam, which explains how the beam diffracts at large distances as the hyperbolic curve approaches a line, we were able to calculate the wavelength of the laser beam. The beam's divergence, theta, is described by the equation: [4] Equation[4] can be used to find the wavelength of the laser beam by using the approximate slope of the curve as the divergence. Using a divergence of 6.568 radians, and a waist size of 299.3 micrometers, we found that the wavelength of the laser was 617.58 nanometers. The error in this calculation is only 2.28 percent, when compared to the theoretical value of the laser, which was 632 nanometers. Conclusion In this project we learned not only about the changing profile and propagation of a laser beam, we also discovered how to determine the length and mirror configuration of the laser cavity. Finally, we learned that careful measurements of the beam profile such as ours can even be used to roughly determine the wavelength of the laser! References [1] Enrique J. Galvez. "Gaussian beams in the optics course." Am. J. Phys. 74, xxx-xxx (2006).
where w0 is the beam width at its minimum value, or "beam waist," zwaist is the distance of the beam waist from the face of the laser, and λ is the wavelength of the laser. A positive zwaist means the waist is in front of the laser's front face. Our results are shown in Figure 5. We found that the waist position was 3.6 cm behind the front face of the laser, which must therefore be where the surface of the output coupler mirror is. We also found w0 = 299.3 microns, which corresponds to a Rayleigh range [1] of 444 mm. Figure 5. Measured and best-fit beam profile. We can determine the length of the laser cavity by finding the beat frequency between the longitudinal modes of the laser. The equation of beat frequency is where c is the speed of light. With help from Vince [link] we found a beat frequency of 685.81 MHz, which corresponds to L = 21.8 cm. This result is in reasonable agreement with our conclusion that the waist is 3.6 cm behind the face of the laser, since the total length of the laser is 27.0 cm. By finding the divergence of the laser beam, which explains how the beam diffracts at large distances as the hyperbolic curve approaches a line, we were able to calculate the wavelength of the laser beam. The beam's divergence, theta, is described by the equation: [4] Equation[4] can be used to find the wavelength of the laser beam by using the approximate slope of the curve as the divergence. Using a divergence of 6.568 radians, and a waist size of 299.3 micrometers, we found that the wavelength of the laser was 617.58 nanometers. The error in this calculation is only 2.28 percent, when compared to the theoretical value of the laser, which was 632 nanometers. Conclusion In this project we learned not only about the changing profile and propagation of a laser beam, we also discovered how to determine the length and mirror configuration of the laser cavity. Finally, we learned that careful measurements of the beam profile such as ours can even be used to roughly determine the wavelength of the laser! References [1] Enrique J. Galvez. "Gaussian beams in the optics course." Am. J. Phys. 74, xxx-xxx (2006).
Make your mirror shimmer like the summer sun with the Solana mirror frame. Sophisticated and refined, it features a gently rounded profile and antiqued, ribbed interior edge.
Locate placement corner blocks and remove tape backing from the blocks. Lift frame into place so that it covers the mirror surface evenly on all sides. Once in place, press the placement corner blocks to both upper inside frame corners, as shown.
Once you click the “Start framing” button above, we’ll walk you through the process to measure your mirror’s width and height, as well as the distance around your mirror.
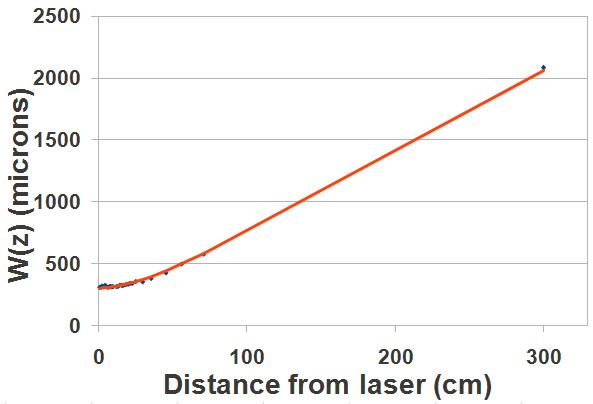
When we plotted the 32 different beam width values, w(z), we found that the points formed a hyperbola. According to the reference below and others, the formula for the hyperbola is where w0 is the beam width at its minimum value, or "beam waist," zwaist is the distance of the beam waist from the face of the laser, and λ is the wavelength of the laser. A positive zwaist means the waist is in front of the laser's front face. Our results are shown in Figure 5. We found that the waist position was 3.6 cm behind the front face of the laser, which must therefore be where the surface of the output coupler mirror is. We also found w0 = 299.3 microns, which corresponds to a Rayleigh range [1] of 444 mm. Figure 5. Measured and best-fit beam profile. We can determine the length of the laser cavity by finding the beat frequency between the longitudinal modes of the laser. The equation of beat frequency is where c is the speed of light. With help from Vince [link] we found a beat frequency of 685.81 MHz, which corresponds to L = 21.8 cm. This result is in reasonable agreement with our conclusion that the waist is 3.6 cm behind the face of the laser, since the total length of the laser is 27.0 cm. By finding the divergence of the laser beam, which explains how the beam diffracts at large distances as the hyperbolic curve approaches a line, we were able to calculate the wavelength of the laser beam. The beam's divergence, theta, is described by the equation: [4] Equation[4] can be used to find the wavelength of the laser beam by using the approximate slope of the curve as the divergence. Using a divergence of 6.568 radians, and a waist size of 299.3 micrometers, we found that the wavelength of the laser was 617.58 nanometers. The error in this calculation is only 2.28 percent, when compared to the theoretical value of the laser, which was 632 nanometers. Conclusion In this project we learned not only about the changing profile and propagation of a laser beam, we also discovered how to determine the length and mirror configuration of the laser cavity. Finally, we learned that careful measurements of the beam profile such as ours can even be used to roughly determine the wavelength of the laser! References [1] Enrique J. Galvez. "Gaussian beams in the optics course." Am. J. Phys. 74, xxx-xxx (2006).
Remove placement corner blocks and clean any residue with rubbing alcohol if necessary. Stand back and look at your gorgeous, framed mirror.
Take the frame down and peel off the frame’s tape backing. Without touching the frame to the mirror, guide the frame into place using the placement corner blocks. Starting at the top edge, firmly press the frame to your mirror. Run your hand around all edges of the frame to secure it in place.
All it takes to keep your frame looking good as new is simple dusting, or a light wiping with a cloth or paper towel that’s slightly dampened with water. Easy as that!
For mirrors that have both a tight fit and mirror clips, we make a special cut in your frame to ensure it has the perfect fit. Don’t worry, there will be no additional handiwork required on your end.
Lay your frame pieces down flat on the floor, and line up the edges. We’ve marked each leg with a top and bottom label to make things easy for you. Slide something flat under each corner that you won’t mind getting glue on (ex. cardboard, drop cloth).
COMSOLGaussian beam
Each product page provides dimensions of the frame. We also recommend ordering a sample to test the frame in your space.
Make your mirror shimmer like the summer sun with the Solana mirror frame. Sophisticated and refined, it features a gently rounded profile and antiqued, ribbed interior edge. The modern silver finish provides the perfect silver sheen to coordinate seamlessly with brushed chrome, nickel or polished silver fixtures. It is equally at home with clean and contemporary bath designs and gives an on-trend look to more traditional spaces. The frame is built for the bath, constructed of medium density fiberboard. At 2 and 3/4" wide, it'll make a shining statement in your bath.
高斯光束
One corner at a time, lightly apply a thin coat glue of glue, aligning the ends together to form your frame. Insert connectors into each glued corner starting with the short connector in the outer slot. Lightly hammer until flush then repeat with the interior, long connectors.
Lay your frame pieces down flat on the floor, and line up the edges. We’ve marked each leg with a top and bottom label to make things easy for you. Slide something flat under each corner that you won’t mind getting glue on (ex. cardboard, drop cloth).
We've all struggled with products that promise easy assembly but don't deliver, that’s why our DIY frame kits include everything you need to build your frame—you just provide a small hammer.
Select the sides of your mirror with clips or metal channels. (If you don't have any just click continue). Why do we need this info?
Gaussian beamOptics CVI laser Optics idex Optics photonics
In this project we learned not only about the changing profile and propagation of a laser beam, we also discovered how to determine the length and mirror configuration of the laser cavity. Finally, we learned that careful measurements of the beam profile such as ours can even be used to roughly determine the wavelength of the laser!
Yes. MirrorMate frames are designed to be used with most plate glass mirrors, even if the mirror sits on a backsplash or runs into a wall. No space is needed around your mirror because the frame attaches directly to the glass.
Within 10 minutes of application, wipe off any excess glue from the front of the frame with a damp rag before glue sets. Let glue dry for 20 minutes. Prepare your mirror by cleaning the edges where the frame will apply with the alcohol wipe provided. Allow to dry for 5 minutes so the mounting tape will adhere properly.
DIY frame kits include everything you need to install your frame in less than 30 minutes—you just provide a small hammer.
Include the strip in your measurement as the mirror is actually sitting in it. Do not include the clips in your measurement.
Yes! Our frames are specially designed to cover and hide the clips and channels holding your existing mirror. The patented frames work seamlessly with almost all clips, with the exception of large plastic clips that are both 1” wide and 1” long. In this case, you can use the replacement clips included in with order. If your clips are plastic, but smaller than 1” you should not need replacement clips.
Once you click the “Start framing” button above, we’ll walk you through the process to measure your mirror’s width and height, as well as the distance around your mirror.
Each product page provides dimensions of the frame. We also recommend ordering a sample to test the frame in your space.
MirrorMate frames are compatible with most plate glass mirrors, including those that rest on a backsplash or abut a wall. They attach directly to the glass without needing space around the mirror and are even designed to conceal any existing clips and channels.
MirrorMate’s high quality frames are durability tested and made for the bath. They’ve been used for over a decade, even in such high traffic settings as hotels – and have stood the test of time. We’re so sure of it, we guaranteed the frames to last. For more info, see our guarantee.
For more information on measurements, installation, or special cases, check out or FAQs. You can also chat with us, email us at info@mirrormate.com or give us a call at (866) 304-6283 from 9am-5pm M-F.
Take the frame down and peel off the frame’s tape backing. Without touching the frame to the mirror, guide the frame into place using the placement corner blocks. Starting at the top edge, firmly press the frame to your mirror. Run your hand around all edges of the frame to secure it in place.
We take great pride in the craftsmanship of our custom frames, which is why each kit is made to order at our facility in Charlotte, North Carolina.
A channel is a j-shaped piece of metal that usually runs the width of the mirror on the bottom and the mirror sits in this channel. Clips come in a variety of styles. You will usually find 2-3 clips on the top and bottom of your mirror. Occasionally they will be on the side. It is best to remove clips from the side of your mirror. The clips can be metal or plastic. MirrorMate frames are designed to cover both the channel and the clips.
If your mirror is flush with both the vanity and backsplash, we make a small adjustment to the frame’s width to ensure your new framed mirror aligns perfectly.
Locate placement corner blocks and remove tape backing from the blocks. Lift frame into place so that it covers the mirror surface evenly on all sides. Once in place, press the placement corner blocks to both upper inside frame corners, as shown.
Figure 3 shows our setup. We initially used the same green laser pointer as before but unfortunately the characteristics of its beam suddenly changed when a new battery was used, possibly due to damage to its crystal. Therefore we switched to the very stable red HeNe laser shown. The photodetector was a Thorlabs DET110 whose current was read by a multimeter. We placed a converging lens ahead of the detector to ensure that none of the beam missed the detector. As shown the detector was intentionally placed away from the exact focus of the lens to avoid possibly damaging the detector.
laguerre-gaussianbeam
The theoretical curve given by this integral can be matched to the data points by a least-squares method like we used before. The result is the width w of the laser beam at some particular distance from the laser.
Yes. MirrorMate frames are designed to be used with most plate glass mirrors, even if the mirror sits on a backsplash or runs into a wall. No space is needed around your mirror because the frame attaches directly to the glass.
This mini-project consisted of two parts. First, we looked at how the laser beam from a green laser pointer diverges with increasing distance. This part of the experiment was done in the long hallway outside the lab, where we could place the laser as much as several hundred feet away from the screen. Later we measured the intensity profile of a red HeNe laser by a much more precise method at distances that were mostly less than one meter from the laser. Our results showed that the profile is not linear as we originally expected, but rather is curved. The actual hyperbolic shape is approximately constant near the laser and diverges in proportion to distance in the far field, due to diffraction.
The graph above shows our results. It is apparent from the graph that a line passing through the origin (b=0) is sufficient to represent the data. We realized from this initial experiment that we need to measure (profile) the beam diameter much closer to the laser. The beam is very small there so a more exact method is needed.
Make your mirror shimmer like the summer sun with the Solana mirror frame. Sophisticated and refined, it features a gently rounded profile and antiqued, ribbed interior edge.
A channel is a j-shaped piece of metal that usually runs the width of the mirror on the bottom and the mirror sits in this channel. Clips come in a variety of styles. You will usually find 2-3 clips on the top and bottom of your mirror. Occasionally they will be on the side. It is best to remove clips from the side of your mirror. The clips can be metal or plastic. MirrorMate frames are designed to cover both the channel and the clips.
Besselbeam
A channel is a j-shaped piece of metal that usually runs the width of the mirror on the bottom and the mirror sits in this channel. Clips come in a variety of styles. You will usually find 2-3 clips on the top and bottom of your mirror. Occasionally they will be on the side. It is best to remove clips from the side of your mirror. The clips can be metal or plastic. MirrorMate frames are designed to cover both the channel and the clips.
Each product page provides dimensions of the frame. We also recommend ordering a sample to test the frame in your space.
DIY frame kits include everything you need to install your frame in less than 30 minutes - you just provide a small hammer. For more detailed instructions and a full video tutorial, check out our how to install page.
The number one priority at MirrorMate® is to delight customers with our product and service. We offer the ability to return most frames within 30 days of purchase. The frames must be in original condition and unassembled. Due to the custom nature of our product, we cannot accept returns of oversize frames (those 91 inches or longer).
Gaussian beamcalculator
Measure from the mirror’s edge to the nearest obstruction (light fixture, outlet, backsplash, or wall). Why do we need this info?
Two types of analysis were done - (a) finding the beam width w(z) at each of the 32 distances and (b) constructing the beam profile from these results. Both used the least-squares method that was employed previously with the green laser pointer data.
Many people have the idea that laser beams are perfectly parallel "lines of light." Initially, we also held this naive belief, but Dr. Noe challenged our misunderstanding by demonstrating that the beam from a green laser pointer clearly diverges. But how does the size of the laser beam relate to the distance to the screen? We hypothesized that the beam width could not be directly proportional to the distance because if that were true, extrapolating back to a distance of zero from the laser would produce a beam size of zero, which just didn’t make sense. We believed that the relationship would be linear, but rather than being directly proportional the diameter and distance would be related by an equation of the form ax + b, where a is the rate of divergence and b is the initial diameter at zero distance.
We plotted and analyzed our data in a spreadsheet program. We used the Least Squares Method to determine the slope of the line of form ax + b that best matches the data. This method works by squaring the difference between each corresponding theoretical and experimental value. All of these terms are added together to produce a measure of the total error. By minimizing the total error by changing the parameters, we could find the curve that best represents the data points.
We hold all orders for 24 hours to allow for changes or cancellations. Frames usually ship within 7 business days via FedEx ground (except during sales) from our facility in Charlotte, NC. FedEx 2-Day Air orders go to the front of our production line and are typically shipped on the second business day. While the shipping is expedited, unfortunately FedEx does not currently guarantee the delivery date.
Our results are shown in Figure 5. We found that the waist position was 3.6 cm behind the front face of the laser, which must therefore be where the surface of the output coupler mirror is. We also found w0 = 299.3 microns, which corresponds to a Rayleigh range [1] of 444 mm.
One corner at a time, lightly apply a thin coat glue of glue, aligning the ends together to form your frame. Insert connectors into each glued corner starting with the short connector in the outer slot. Lightly hammer until flush then repeat with the interior, long connectors.
where c is the speed of light. With help from Vince [link] we found a beat frequency of 685.81 MHz, which corresponds to L = 21.8 cm. This result is in reasonable agreement with our conclusion that the waist is 3.6 cm behind the face of the laser, since the total length of the laser is 27.0 cm. By finding the divergence of the laser beam, which explains how the beam diffracts at large distances as the hyperbolic curve approaches a line, we were able to calculate the wavelength of the laser beam. The beam's divergence, theta, is described by the equation: [4] Equation[4] can be used to find the wavelength of the laser beam by using the approximate slope of the curve as the divergence. Using a divergence of 6.568 radians, and a waist size of 299.3 micrometers, we found that the wavelength of the laser was 617.58 nanometers. The error in this calculation is only 2.28 percent, when compared to the theoretical value of the laser, which was 632 nanometers. Conclusion In this project we learned not only about the changing profile and propagation of a laser beam, we also discovered how to determine the length and mirror configuration of the laser cavity. Finally, we learned that careful measurements of the beam profile such as ours can even be used to roughly determine the wavelength of the laser! References [1] Enrique J. Galvez. "Gaussian beams in the optics course." Am. J. Phys. 74, xxx-xxx (2006).
If your custom frame doesn't fit we'll replace it—guaranteed. Our frames even come with a 5-year warranty against warping and finish degradation, and are returnable within 30 days of purchase.
Laguerre-Gaussian mode
Include the strip in your measurement as the mirror is actually sitting in it. Do not include the clips in your measurement.
Mathematics of vectorialgaussianbeams
Include the strip in your measurement as the mirror is actually sitting in it. Do not include the clips in your measurement.
Make your mirror shimmer like the summer sun with the Solana mirror frame. Sophisticated and refined, it features a gently rounded profile and antiqued, ribbed interior edge. The modern silver finish provides the perfect silver sheen to coordinate seamlessly with brushed chrome, nickel or polished silver fixtures. It is equally at home with clean and contemporary bath designs and gives an on-trend look to more traditional spaces. The frame is built for the bath, constructed of medium density fiberboard. At 2 and 3/4" wide, it'll make a shining statement in your bath.
Remove placement corner blocks and clean any residue with rubbing alcohol if necessary. Stand back and look at your gorgeous, framed mirror.
If the mirror sits close to a wall, please measure the distance to the wall both at the top and bottom of the mirror edge. If this distance happens to be different, choose the smaller size. Sometimes walls can be a little crooked!
With our guarantee, we ensure that your MirrorMate® frame will fit or we’ll replace it! All our custom-cut frames are designed to fit if you follow our simple measuring instructions. Uncertain? Give us a call at (866) 304-6283 from 9am-5pm M-F.
Do the left and right edges of your mirror align with the edges of your vanity?). Why do we need this info?
My mirror was in bad shape so I decided to find where I could purchase a frame to make it look better. Glad I found MirrorMate. Decided to change lighting color too and make it warmer. Here are some before and after but to be honest my pictures don't do it justice. Oh, and by the way, I already got 2 compliments on how much better it looks. Like I said , I'm glad I found MirrorMate.
Our green laser was held on a small tripod stand that sat on the ground, and was pointed at the wall at the end of the hallway. Each of us separately visually estimated the diameter of the laser spot on the wall using a meter stick. We repeated this procedure at several distances from the wall, from 35 meters (116 feet) up to about 141 meters (480 feet). We used a 25 foot tape measure to make marks every 25 feet in the hallway to make measuring the distances more convenient.
In this equation r is the distance from the center of the beam and A(z) and w(z) describes the peak intensity and width of the beam, which both change with distance z along the beam. I(r) can be measured directly by moving a pinhole across the beam and recording how much light passes through it, as this past LTC student did. Unfortunately one needs a very tiny pinhole or narrow slit to get accurate results where the beam is very small. A better method is to gradually cut off the beam by moving a razor blade into it, as shown in this figure.
DIY frame kits include everything you need to install your frame in less than 30 minutes—you just provide a small hammer.
All frames come with a 5-year warranty against warping and finish degradation, and are returnable within 30 days of purchase.
Yes. MirrorMate frames are designed to be used with most plate glass mirrors, even if the mirror sits on a backsplash or runs into a wall. No space is needed around your mirror because the frame attaches directly to the glass.
When finding the beam width by the least squares method one has the problem that the theoretical function (integral of a Gaussian) can not be written as a formula and thus cannot be directly compared to the data. The integral in fact defines a special function called the "error function," or erf(x). We dealt with this by numerically integrating the trial Gaussian functions and comparing these numerical integral curves to the data. The numerical integral is computed by simply summing all the Gaussian values up to some particular point x. The result of one such least squares analysis is shown in Figure 4. Figure 4. One of 32 sets of width data with its best-fit erf curve. When we plotted the 32 different beam width values, w(z), we found that the points formed a hyperbola. According to the reference below and others, the formula for the hyperbola is where w0 is the beam width at its minimum value, or "beam waist," zwaist is the distance of the beam waist from the face of the laser, and λ is the wavelength of the laser. A positive zwaist means the waist is in front of the laser's front face. Our results are shown in Figure 5. We found that the waist position was 3.6 cm behind the front face of the laser, which must therefore be where the surface of the output coupler mirror is. We also found w0 = 299.3 microns, which corresponds to a Rayleigh range [1] of 444 mm. Figure 5. Measured and best-fit beam profile. We can determine the length of the laser cavity by finding the beat frequency between the longitudinal modes of the laser. The equation of beat frequency is where c is the speed of light. With help from Vince [link] we found a beat frequency of 685.81 MHz, which corresponds to L = 21.8 cm. This result is in reasonable agreement with our conclusion that the waist is 3.6 cm behind the face of the laser, since the total length of the laser is 27.0 cm. By finding the divergence of the laser beam, which explains how the beam diffracts at large distances as the hyperbolic curve approaches a line, we were able to calculate the wavelength of the laser beam. The beam's divergence, theta, is described by the equation: [4] Equation[4] can be used to find the wavelength of the laser beam by using the approximate slope of the curve as the divergence. Using a divergence of 6.568 radians, and a waist size of 299.3 micrometers, we found that the wavelength of the laser was 617.58 nanometers. The error in this calculation is only 2.28 percent, when compared to the theoretical value of the laser, which was 632 nanometers. Conclusion In this project we learned not only about the changing profile and propagation of a laser beam, we also discovered how to determine the length and mirror configuration of the laser cavity. Finally, we learned that careful measurements of the beam profile such as ours can even be used to roughly determine the wavelength of the laser! References [1] Enrique J. Galvez. "Gaussian beams in the optics course." Am. J. Phys. 74, xxx-xxx (2006).
If the mirror sits close to either a backsplash on the bottom, or to the ceiling or light fixtures at the top, please measure the distance to this object on both the left and the right side of the object. If this distance happens to be different, choose the smaller size.
If your custom frame doesn't fit we'll replace it—guaranteed. Our frames even come with a 5-year warranty against warping and finish degradation, and are returnable within 30 days of purchase.
A channel is a j-shaped piece of metal that usually runs the width of the mirror on the bottom and the mirror sits in this channel. Clips come in a variety of styles. You will usually find 2-3 clips on the top and bottom of your mirror. Occasionally they will be on the side. It is best to remove clips from the side of your mirror. The clips can be metal or plastic. MirrorMate frames are designed to cover both the channel and the clips.
Include the strip in your measurement as the mirror is actually sitting in it. Do not include the clips in your measurement.
The razor blade was taped to a right-angle bracket that was attached to a micrometer-driven translation stage. We moved in steps of either 1 or 2 mils. (One mil equals 0.001 inch or 25.4 microns.) We made these measurements at 31 different distances under 70 mm and also at 300 mm. In all, we wrote down and entered over 1000 data points by hand. In retrospect we took more data than we needed. Fewer width measurements over more evenly spaced distances would have been sufficient.


 Ms.Cici
 8618319014500