
LOOK 495 AERO Seat Post $150.00 - lookr 495
7. Once you have brought the specimen into sharp focus with a low-powered lens, preparation may be made for visualizing the spec-imen under oil immersion. Place a drop of oil on the slide directly over the area to be viewed. Rotate the nosepiece until the oil-immersion objective locks into position. Care should be taken not to allow the high-power objective to touch the drop of oil.The slide is observed from the side as the objective is rotated slowly into position. This will ensure that the objective will be properly immersed in the oil. The fine-adjustment knob is readjusted to bring the image into sharp focus.
Fluorescentimagingradiology
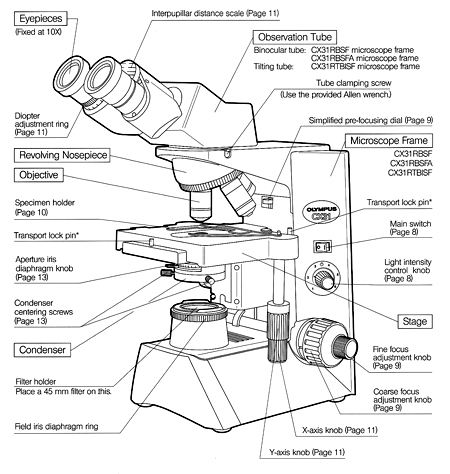
Enlargement or magnification of a specimen is the function of a two-lens system; the ocular lens is found in the eyepiece, and the objective lens is situated in a revolving nose-piece. These lenses are separated by the body tube. The objective lens is nearer the specimen and magnifies it, producing the real image that is projected up into the focal plane and then magnified by the ocular lens to produce the final image.
Above the stage and attached to the arm of the microscope is the body tube. This structure houses the lens system that magnifies the specimen. The upper end of the tube contains the ocular or eyepiece lens. The lower portion consists of a movable nosepiece containing the objective lenses. Rotation of the nosepiece posi-tions objectives above the stage opening. The body tube may be raised or lowered with the aid of coarse-adjustment and fine-adjustment knobs that are located above or below the stage, depending on the type and make of the instrument.
This instrument provides a revolutionary method of microscopy, with magnifications up to one million. This permits visualization of submicroscopic cel-lular particles as well as viral agents. In the electron microscope, the specimen is illu-minated by a beam of electrons rather than light, and the focusing is carried out by elec-tromagnets instead of a set of optics. These components are sealed in a tube in which a complete vacuum is established. Transmission electron microscopes require speci-mens that are thinly prepared, fixed, and dehydrated for the electron beam to pass freely through them. As the electrons pass through the specimen, images are formed by direct-ing the electrons onto photographic film, thus making internal cellular structures visi-ble. Scanning electron microscopes are used for visualizing surface characteristics rather than intracellular structures A narrow beam of electrons scans back and forth, producing a three-dimensional image as the electrons are reflected off the specimen's surface.
This is similar to the ordinary light microscope; however, the condenser system is modified so that the specimen is not illuminated directly. The con-denser directs the light obliquely so that the light is deflected or scattered from the spec-imen, which then appears bright against a dark background. Living specimens may be observed more readily with darkfield than with brightfield microscopy.
Fluorescent Widefield Microscopy is the most common and simplest form of fluorescent microscopy. Collimated (non-converging or diverging) excitation light exits the microscope objective evenly illuminating the entire (wide) field of view. Fluorescent light traveling back towards the objective is collected and focused onto a camera for visualization. Illuminating a sample in the opposite direction to fluorescence collection is referred to as “Epi” illumination. Therefore these are sometimes call Epi-fluorescence microscopes. (See left image above for an example image).
4. Axelrod D. Total internal reflection fluorescence microscopy in cell biology. Methods Enzymol 361, 1-33 (2003). PubMed PMID: 12624904.
2-Photon Microscopy attempts to solve two drawbacks of widefield and confocal microscopy. First, widefield and confocal microscopy project excitation light through the entire axial volume of a sample. Therefore, when a large number of optical slices are acquired all fluorophores throughout the sample are constantly exposed to light, not just those in the focal volume. This leads to more rapid photobleaching and a reduction in signal intensity. 2-Photon microscopes restrict excitation (and bleaching) to a single focal point. This is accomplished by using, for example, red light instead of blue to excite a molecule of GFP. Because red light has approximately half the energy of blue light, two photons of red light are needed to excite GFP compared to only one of blue. Only at the focal point of the objective can a a high enough density of red-photons be establish for this to happen.Using red light has a second advantage: red light penetrates deeper into biological tissue. To prove this, simply hold a flash light to the palm of your hand. Although white light is entering your hand, only orange/red light can be seen exiting through the tissue. Therefore, 2-photon allows for deeper imaging into thick tissues.
DDP Medical equipment wholesale has been partnering with the medical community within the USA for over 20 years. Areas of expertise include wholesale diabetic ...
An external light source, such as a lamp, is placed in front of the mirror to direct the light upward into the lens system. The flat side of the mirror is used for artificial light, and the concave side for sunlight.
Off-Axis Parabolic Mirror Factory Standard. An OAP mirror can harness collimated light by positioning a point source or spherical wave at its focal point.
No matter whether you are a sports photographer at the Super Bowl, a medical technologist taking an x-ray, or a biologist imaging the smallest structures of life; the key to a great image is contrast. The human visual system relies primarily on contrast to identify individual objects and perceive the world around us. Without contrast, objects simply vanish into noise.
Feb 12, 2014 — Schmidt prism, also referred to as Schmidt–Pechan prism, is a prism that reverts an image while deviating the line of sight by 45°.
Jul 18, 2022 — Advantages of CCD sensors include lower noise and higher sensitivity due to their higher fill factor, fewer defective pixels due to their simple ...

In vivofluorescence imaging
Observation of microorganisms in an unstained state is possible with this microscope. Its optics include special objectives and a condenser that make visible cellular components that differ only slightly in their refractive indexes. As light is transmitted through a specimen with a refractive index different from that of the surrounding medium, a portion of the light is refracted (bent) due to slight varia-tions in density and thickness of the cellular components. The special optics convert the difference between transmitted light and refracted rays, resulting in a significant vari-ation in the intensity of light and thereby producing a discernible image of the struc-ture under study. The image appears dark against a light background.
These samples do not necessarily require optical sectioning, but open the door to a number of other techniques that can improve contrast and resolution due to the lack of a requirement for high temporal imaging speeds. Standard fluorescence widefield microscopy can be combined with deconvolution, a mathematical software post-processing step that reassigns out of focus light to its respective focal plane. In sufficiently thin samples, deconvolution can outperform optical sectioning techniques due to a higher photon flux via the more efficient camera detector and lack of a light-reducing pinhole. By collecting more photons, a higher signal to noise ratio can be achieved (6).
7. Yang, Weijian, and Rafael Yuste. In vivo imaging of neural activity. Nature Methods 14.4 (2017): 349-359. PubMed PMID: 28362436.
Thsee are some of the most challenging samples to image as they require both optical sectioning, imaging over large distances and high temporal resolution. Traditionally, this type of sample is imaged with a parallelized confocal technique such as spinning disk confocal. However, due to the scattering nature of biological tissue, imaging more than 80-100 um in depth may not be possible. Therefore, 2-photon microscopy which relies on deeply penetrating infra-red excitation light can push imaging depths closer to 1 mm. Traditionally, 2-photon has been a very slow imaging technique but recent advances in scanner technology and parallelization (7) have allowed for real-time monitoring of neuronal activity across substantial 3D volumes.
The recent development of tissue clearing techniques (9) now allows researchers to image tissues that are over a cm3 in size. Point scanning confocal and 2-photon microscopes which rely on building an entire image pixel by pixel are unable to provide the frame-rates necessary for imaging tissues of this size. For example, it could take nearly two months to image an entire mouse brain with a 20x/1.0NA objective with proper sampling. Therefore, large, cleared tissues need to be imaged via Lightsheet microscopy. Although not all lightsheet microscopes can cover samples of this size, those that can will completely image large tissues in a few hours.
You will be responsible for the proper care and use of microscopes. Since microscopes are expensive, you must observe the following regu-lations and procedures.
The relationship between wavelength and numerical aperture is valid only for increased resolving power when light rays are parallel. Therefore, the resolving power is dependent on another factor, the refractive index. This is the bending power of light passing through air from the glass slide to the objective lens. The refractive index of air is lower than that of glass, and as light rays pass from the glass slide into the air, they are bent or refracted so that they do not pass into the objective lens. This would cause a loss of light, which would reduce the numerical aperture and diminish the resolving power of the objective lens. Loss of refracted light can be compensated for by interposing mineral oil, which has the same refractive index as glass, between the slide and the objective lens. In this way, decreased light refraction occurs and more light rays enter directly into the objective lens, producing a vivid image with high resolution.
3. Now, while looking through the ocular lens, turn the coarse focus knob carefully, and slowly move the stage away from the lens until the specimen comes into vague focus. Then, use the fine focus knob to bring the specimen into sharp focus.
Investments (1). I-Deal Optics's most recent deal was a Buyout/LBO with A&E. The deal was made on 23-Mar-2011.
Parallelized Confocal Microscopy (Spinning Disk) increases the speed at which a confocal image can be acquired. Assembling an image pixel by pixel is slow; therefore, certain confocal microscopes use parallelization to enhance performance. In spinning disk microscopy, a metal disk containing a number of holes rotates through the excitation light path. Each hole corresponds to a different location in the sample. As more than one hole is illuminated at a time, the image can be acquired more quickly.
Between the light source and the condenser is the iris diaphragm, which can be opened and closed by means of a lever; thereby regulating the amount of light entering the condenser. Excessive illumination may actually obscure the specimen because of lack of contrast. The amount of light entering the microscope differs with each objec-tive lens used. A rule of thumb is that as the mag-nification of the lens increases, the distance between the objective lens and slide, called working distance, decreases, whereas the numerical aperture of the objective lens increases.
On completion of the laboratory exercise, return the microscope to its cabinet in its original condition. The following steps are recommended:
8. During microscopic examination of microbial organisms, it is always necessary to observe several areas of the preparation. This is accomplished by scanning the slide with-out the application of additional immersion oil. This will require continuous, very fine adjustments by the slow, back-and-forth rotation of the fine adjustment knob only.
Fluorescence imagingprinciple
The eight SWIR bands capture unique information for agriculture, forestry, mining/geology, and other applications. False color composite of SWIR mineral indices ...
Based on this formula, the shorter the wave-length, the greater the resolving power of the lens. Thus, short wavelengths of the electromag-netic spectrum are better suited than longer wavelengths in terms of the numerical aperture.
3.Clean all lens svstems; the smallest bit of dust, oil, lint, or eyelash will decrease the efficiency ot the microscope. The ocular; scan-ning, low-power, and high-power lenses may be cleaned by wiping several times with acceptable lens tissue. Never use paper tow-eling or cloth on a lens surface. If the oil-immersion lens is gummy or tacky, a piece of lens paper moistened with methanol is used to wipe it clean. If the lens is very dirty it may be cleaned with xylol however the xylol cleansing procedure should be performed only by the instructor, and only if necessary. Consistent use of xylol may loosen the lens.
A fixed platform with an opening in the center allows for the passage of light from an illu-minating source below to the lens system above the stage. This platform provides a surface for the placement of a slide with its specimen over the central opening. In addition to the fixed stage, most microscopes have a mechanical stage that can be moved vertically or horizontally by means of adjustment controls. Less sophisticated micro-scopes have clips on the fixed stage, and the slide must be positioned manually over the central opening.
Effective illumination is required for efficient magnification and resolving power. Since the intensity of daylight is an uncontrolled variable, artificial light from a tungsten lamp is the most commonly used light source in microscopy. The light is passed through the con-denser located beneath the stage. The condenser contains two lenses that are necessary to produce a maximum numerical aperture. The height of the condenser can be adjusted with the con-denser knob. Always keep the condenser close to the stage, especially when using the oil-immersion objective.
Fluorescence imagingtechniques
Super-resolution techniques such as Structured Illumination (SIM), Single Molecule Localization (PALM/STORM), or Reversible Saturable Optical Linear Fluorescence Transitions (RESOLFT/STED) also excel on these types of samples. Prior to the advent of super-resolution imaging, the light microscope was limited in its capacity to resolve closely lying structures. This is because light that passes through the optics of a light microscope is diffracted. Even an infinitely small point of light – think of a single GFP molecule – will appear as a fuzzy 200-300 nm spot when imaged. Super-resolution microscopy uses a number of optical and chemical ‘tricks’ to turn subsets of fluorescent molecules on and off. This can provide a 2-10 fold increase in resolution, down to 10s of nanometers.
Total Internal Reflection Microscopy (TIRF) is a technique used to only excite a very thin layer of fluorescent molecules sitting right next to the coverslip. Light is projected through the coverslip at an angle such that when it reaches the interface between the glass coverslip and a sample in aqueous buffer it is completely reflected. This reflection occurs due to the refractive index mismatch between the glass and the water-like buffer the sample is immersed in. Although the excitation light is completely reflected, energy is propagated into the sample via an evanescent wave that only excites fluorophores within a few hundred nanometers of the glass/water interface.
Lightsheet microscopes that project ultra-thin sheets of excitation light through multiple focal planes of a sample may also be useful for providing fast imaging along with optical sectioning (5). One such example is the lattice lightsheet that projects a number of thin cone-shaped beams into the sample. These beams interfere to form a single plane of excitation light that is thinner than the portion of the sample that is in focus. This technique can be used to provide high 3D spatial resolution while also avoiding the toxic effects of high light doses to the cells.
Fluorescence imagingmicroscope
2. Rotate the scanning lens or the low power lens into position. While watching from the side to insure that the lens doesn't touch the specimen, turn the coarse focus knob to move the stage as close as it can get to the lens without touching the lens. (Always watch from the side whenever you move a specimen towards any objective lens to make sure the lens doesn't crash through the specimen and get damaged!)
However; as with magnification, resolving power also has limits. You might rationalize that merely decreasing the wavelength will automati-cally increase the resolving power of a lens. Such is not the case, because the visible portion of the electromagnetic spectrum is very narrow and borders on the very short wavelengths found in the ultraviolet portion of the spectrum.
Although the modern explosion in light microscopy techniques has provided biologists with a host of tools and opened doors to many great insights, it can be overwhelming to a novice microscopist. Hopefully this brief synopsis can help point you in the right direction. You certainly shouldn’t be afraid to seek out expertise from a well-established microscopist at your institution when heading into a new set of experiments.
Fluorescence imagingsystem
Super Resolution Microscopy allows for imaging below the diffraction (resolution) limit of a light microscope. Due to the wave nature of light, an infinitely small point of light will blur to a 200-300nm sized spot while passing through the optics of a microscope before it reaches the detector. This means that two or more objects lying within the diffraction limit will appear as one object in the final image. Over the past two decades a number of techniques have been developed that allow for sub-diffraction limit imaging. Most often, these techniques provide a 2-10x improvement in the resolution of a light microscope (see Figure 1).
Jim Gaynor, president and CEO of LightPath, commented: 'We believe that the acquisition of ISP Optics Corporation, which was completed last quarter, better ...
The light source is positioned in the base of the instrument. Some microscopes are equipped with a built-in light source to pro-vide direct illumination. Others are provided with a mirror; one side flat and the other concave.
4. If this is the first specimen of the day, you should Kohler your microscope at this point (while it is in focus). Otherwise, if your microscope has already been Kohlered you won't need to do it again
While scientists have a variety of optical instruments with which to perform routine laboratory procedures and sophisticated research, the compound brightfield micro-scope is the "workhorse" and is commonly found in all biological laboratories. Although you should be familiar with the basic principles of microscopy, you probably have not been exposed to this diverse array of complex and expensive equipment. Therefore, only the compound brightfield microscope will be discussed in depth and used to examine specimens.
5. Power RM, Huisken J. A guide to light-sheet fluorescence microscopy for multiscale imaging. Nature methods 14, 360-373 (2017). PubMed PMID: 28362435.
The instruments are housed in special cabinets and must be moved by users to their laboratory benches. The correct and only acceptable way to do this is to grip the microscope arm firmly with the right hand and the base with the left hand, and lift the instrument from the cabinet shelf. Carry it close to the body and gently place it on the laboratory bench. This will prevent collision with furniture or co-workers and will protect the instrument against damage.
Point Scanning Confocal Microscopy was the first fluorescence microscopy technique to incorporate optical sectioning. Optical sectioning refers to the ability to extract light from a single, thin plane within a relatively thicker three dimensional sample (see Figure 1); similar to an MRI or CT scanner. This is accomplished by focusing excitation light to a point in the sample and raster scanning the point to build up a final image pixel by pixel. The collected fluorescent light passes through a pinhole before reaching the detector. The pinhole is specifically placed to only allow light from the focal plane to reach the detector and all light from above or below is excluded.
3. Eggeling C, Willig KI, Sahl SJ, Hell SW. Lens-based fluorescence nanoscopy. Quarterly reviews of biophysics 48, 178-243 (2015). PubMed PMID: 25998828.
In addition to 2-photon microscopy, lightsheet microscopy is rapidly becoming the preferred technique for many of these samples due to its fast temporal resolution and decreased phototoxicity. Lightsheet designs that allow for multi-view imaging can image thick scattering samples in their entirety, something that is not possible via traditional confocal due to limitations in light penetration mentioned above (5).
Although magnification is important, you must be aware that unlimited enlargement is not possible by merely increasing the magnifying power of the lenses or by using additional lenses, because lenses are limited by a property called resolving power. By definition, resolving power is the ability of a lens to show two adjacent objects as discrete entities. When a lens cannot discriminate, that is, when the two objects appear as one, it has lost resolu-tion. Increased magnification will not rectify the loss, and will, in fact, blur the object. The resolv-ing power of a lens is dependent on the wave-length of light used and the numerical aperture, which is a characteristic of each lens and imprinted on each objective. The numerical aper-ture is defined as a function of the diameter of the objective lens in relation to its focal length. It is doubled by use of the substage condenser; which illuminates the object with rays of light that pass through the specimen obliquely as well as directly. Thus, resolving power is expressed mathematically, as follows:
Fluorescence imagingdevice
Doug Richardson is the Director of the Harvard Center for Biological Imaging and a Lecturer on Molecular and Cellular Biology at Harvard University.
These questions will place each sample into one of four categories that are each suited to different types of modern day fluorescence microscopes (see Table 1).
Ray-Ban sunglasses have been recognized as stylish eyewear that can protect your eyes from the harshest rays of light. Ray-Ban glasses ...
(This passage was adapted from Microbiology: A Laboratory Manual, 5th edition, Cappuccino, J.S. and Sherman, N., Benjamin/Cummings Science Publishing.)
Due to its unrivaled contrast, fluorescence imaging has emerged as the dominant light microscopy contrast technique in modern biology (1). When performed correctly, fluorescence microscopy provides a high contrast image in which a bright signal overlays a perfectly black background. In addition to this, the use of multiple fluorophores can add a second layer of contrast, color contrast, to an image and thereby provide molecular or structural specificity to the viewer. Finally, modern microscope designs may further exploit the unique characteristics of fluorophores to block out of focus fluorescence from reaching a detector or restricting fluorescence to specific excitation volumes to enhance spatial contrast (i.e. optical sectioning (2) or super-resolution (3).
These samples always require some form of optical sectioning. Point scanning confocal microscopes (see above) often provide the highest quality images for this type of sample as they are most efficient at excluding out of focus light. However, they also continually dose the sample from top to bottom with excitation light which can lead to photobleaching when acquiring multiple images over a large axial range. 2-photon imaging, which restricts excitation and photobleaching to the focal plane can be used to overcome this (8).
[8.5 cm = 85 mm] How many mm in a 8.5 cm – Using this centimeter to mm converter tool to find the corresponding mm value for 8.5 cm, 8.5 cm = how many mm, ...
These samples are thin enough to sit within the depth of field of the objective (the distance in the axial dimension that will appear in focus). This means that the images will appear sharp without interference from blurry out-of-focus light. The most difficult characteristic to capture in these types of samples is their fast movements. Depending on the sample, a temporal resolution on the millisecond scale may be needed. Most commonly these experiments are performed on a fluorescent widefield microscope. Here, excitation light is projected from the objective so that the entire field of view is bathed with an even illumination. The emitted fluorescence from all dye molecules in the sample is then collected and projected back to a fast, sensitive detector such as a scientific CMOS camera.
This post was contributed by Doug Richardson, Director of the Harvard Center for Biological Imaging and a Lecturer on Molecular and Cellular Biology at Harvard University.
If plasma membrane dynamics are the main focus of the experiment, a Total Internal Reflection Fluorescence (TIRF) microscope can be used. TIRF only excites fluorophores within a few hundred nanometers of the coverslip (4). Essentially, an optical section is achieved that boosts contrast by filtering out emission light from fluorophores higher in the sample. TIRF is also very gentle on the sample as the majority of the laser light is reflected away from the sample and excitation occurs through the fluorophore’s interaction with an evanescent energy field.
This component is found directly under the stage and contains two sets of lenses that collect and concentrate light passing upward from the light source into the lens sys-tems. The condenser is equipped with an iris diaphragm, a shutter controlled by a lever that is used to regulate the amount of light entering the lens system.
This instrument contains two lens systems for magnifying specimens: the ocular lens in the eyepiece and the objective lens located in the nose-piece. The specimen is illuminated by a beam of tungsten light focused on it by a sub-stage lens called a condenser, and the result is that the specimen appears dark against a bright background. A major limitation of this system is the absence of contrast between the specimen and the surrounding medium, which makes it difficult to observe living cells. Therefore, most brightfield observations are performed on nonviable, stained preparations.
To use the microscope efficiently and with minimal frustration, you should understand the basic principles of microscopy: magnification, resolution, numerical aperture, illumination, and focusing.
This microscope is used most frequently to visualize speci-mens that are chemically tagged with a fluorescent dye. The source of illumination is an ultraviolet (UV) light obtained from a high-pressure mercury lamp or hydrogen quartz lamp. The ocular lens is fitted with a filter that permits the longer ultraviolet wavelengths to pass, while the shorter wavelengths are blocked or eliminated. Ultraviolet radiations are absorbed by the fluorescent label and the energy is re-emitted in the form of a different wavelength in the visible light range. The fluorescent dyes absorb at wavelengths between 230 and 350 nanometers (nm) and emit orange, yellow, or greenish light. This microscope is used primarily for the detection of antigen-antibody reactions. Antibodies are conjugated with a fluorescent dye that becomes excited in the presence of ultraviolet light, and the fluorescent portion of the dye becomes visible against a black background.
Buy Cube Sugar online for only 3.49/ea at No Frills. Rogers. Refined in Canada since 1890.
Microbiology, the branch of science that has so vastly extended and expanded our knowledge of the living world, owes its existence to Antony van Leeuwenhoek. In 1673, with the aid of a crude microscope consisting of a biconcave lens enclosed in two metal plates, Leeuwenhoek introduced the world to the existence of microbial forms of life. Over the years, microscopes have evolved from the simple, single-lens instrument of Leeuwenhoek, with a magnification of 300, to the present-day electron microscopes capable of magnifications greater than 250,000. Microscopes are designated as either light microscopes or electron microscopes. The former use visible light or ultraviolet rays to illuminate specimens. They include brightfield, darkfield, phase-contrast, and fluorescent instruments. Fluorescent micro-scopes use ultraviolet radiations whose wavelengths are shorter than those of visible light and are not directly perceptible to the human eye. Electron microscopes use elec-tron beams instead of light rays, and magnets instead of lenses to observe submicro-scopic particles.
6. Our microscopes are parfocal, which means that when one lens is in focus, other lenses will also have the same focal length and can be rotated into position without further major adjustment. In practice, however; usually a half-turn of the fine-adjustment knob in either direction is necessary for sharp focus.

5. Routinely adjust the light source by means of the light source transformer setting, and/or the iris diaphragm, for optimum illumination for each new slide and for each change in magnification.
The most commonly used microscopes are equipped with a revolving nosepiece containing four objective lenses possessing different degrees of magnification. When these are combined with the magnification of the ocular lens, the total or overall linear magnification of the specimen is obtained.
Fluorescence imagingcamera
Microbiology is a science that studies living organisms that are too small to be seen with the naked eye. Needless to say, such a study must involve the use of a good compound microscope. Although there are many types and variations, they all fundamentally consist of a two-lens system, a variable but controllable light source, and mechanical adjustable parts for determining focal length between the lenses and specimen.
Light Sheet Microscopy typically utilizes a configuration of two or more objectives to create a thin sheet of excitation light that propagates perpendicular to an imaging objective that collects fluorescence. Like 2-photon microscopy, only a single focal plane of the sample is excited at one time, limiting photobleaching. Similar to widefield, the entire field of view is excited at one time and captured in a single camera exposure. This is much faster than relying on raster scanning as is done in confocal or 2-photon microscopes.


 Ms.Cici
 8618319014500