
How to use a magnifying glass - magnifying glass is
With the right accessories, you can take your astronomy and astrophotography experience to the next level. Accessories like diagonals, finder scopes, and dovetails make it easy to upgrade your visual telescope. Others, like guide scopes, spacers, reducers, extenders, and more can have a positive effect on your astrophotography images.
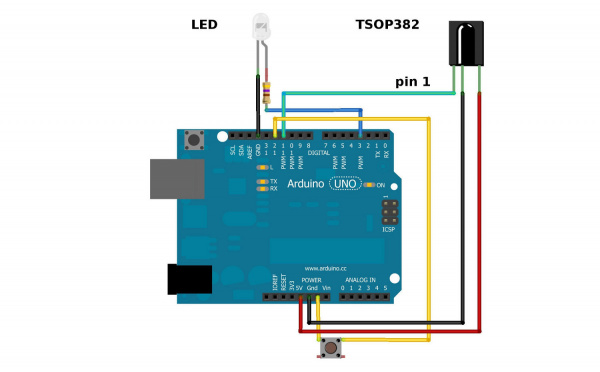
In this example, all you need is the TSOP382 IR receiver connected to an Arduino and a common remote control. The IR LED and button can stay connected, but you will not use it until the next example.
A common modulation scheme for IR communication is something called 38kHz modulation. There are very few natural sources that have the regularity of a 38kHz signal, so an IR transmitter sending data at that frequency would stand out among the ambient IR. 38kHz modulated IR data is the most common, but other frequencies can be used.
To quickly and easily add IR control to your Arduino, we recommend you download Ken Shirriff's IRremote library. Shirriff has written a library for IR remote. You can obtain this library through the Arduino Library Manager. Search for IRremote by shirriff and you should be able to install the latest version. If you prefer downloading the libraries manually you can grab them from the GitHub repository:
We know how hard it can be to narrow down the right accessories for your telescope. On this page, you'll find some of the more popular categories of accessories along with explanations of what they're used for to help you find the right accessories for your needs. While these categories are far from all of the accessories we sell, they are the most popular. If you still need help after looking for the right accessory, don't hesitate to contact our helpful Sales Team for assistance if you need it!
IR, or infrared, communication is a common, inexpensive, and easy to use wireless communication technology. IR light is very similar to visible light, except that it has a slightly longer wavelength. This means IR is undetectable to the human eye - perfect for wireless communication. For example, when you hit a button on your TV remote, an IR LED repeatedly turns on and off, 38,000 time a second, to transmit information (like volume or channel control) to an IR photo sensor on your TV.
If you own a reflector or catadioptric telescope like a Newtonian, Dobsonian, Ritchey-Chretién, or Schmidt-Cassegrain, you'll need to collimate it from time to time. Collimation is the process of ensuring all of the optical components in your telescope are centered respective to each other, which improves optical performance. It can be thought of as calibrating your telescope. Just like a guitar needs to be tuned often, some telescopes like Newtonians and Dobsonians need to be collimated every time they are used.
Now you should be prepared to create an IR communication system of your own. What are you going to control with this extravisible, modulated light source? Need some inspiration? Check out some of these tutorials:
Description. This is the 8mm 12MP Portrait Lens, an essential for the M12 Raspberry Pi High-Quality Camera. With its narrow angle-of-view and focal length, this ...
Refracting telescope partslist
If you don’t have the appliance’s remote or if you are lucky enough to have a remote that uses a common protocol, then you can try the pre-loaded manufacturer codes from the IRSendDemo.ino example in the IRremote library.
The IRremote library is a powerful tool for adding IR to your project. Whether you want to send IR codes out to an appliance, or transmit IR codes from a remote to your Arduino (or both!). We'll go over some of the simple stuff you can do with the library. For more help using it, check out Ken Shirriff's blog.
Streamline your astronomy setup with the perfect accessories so you can focus on what matters: observing and capturing the cosmos.
When you hit a key on your remote, the transmitting IR LED will blink very quickly for a fraction of a second, transmitting encoded data to your appliance.
Reflectingtelescopediagram
For example, the transmitting IR example circuit received an unknown code when the volume up button on my Panasonic remote was hit. The data bytes on the second line are the raw codes displayed as mark and space timings for the volume up command.
IR remote controls are as ubiquitous as their appliance counterparts. What if you could put all of those old remote controls to use in your next project? This example will show you how to read IR remote codes from any IR remote using the TSOP382 IR receiver and an Arduino. Once you can receive codes from individual button presses, your remote control and Arduino become a general purpose, short range, communication interface!
The item must be the identical item, brand name, size, weight, color, quantity and model number. It must be in stock at the time of Price Match for us to make a guarantee.
You will need to fill in the data and nbits fields with a information specific to the protocol you are using. More information on how use this feature can be found in the IR Arduino library blog post (see the "Details of the sending library" section).
FOV is an abbreviation that stands for field of view or field of vision. Field of view is essentially how much a player's camera captures.
By controlling the spacing between the transmitted modulated signals, the waveform can be read by an input pin on a microcontroller and decoded as a serial bit stream.
Assuming that you have the IR library, go to your Arduino project directory: Arduino/libraries/IRremote/examples/IRrecvDemo and open the IRrecvDemo.ino. Upload the sketch to your Arduino.
Dew heaters, on the other hand, do require external power and can be thought of as active dew prevention tools. Dew heaters will generally be better at preventing dew than dew shields will because they actively heat the refractive elements on your telescope, keeping dew away. We sell a variety of dew heaters here at OPT. Many of them require an additional dew heater controller, which allows you to set the temperature of multiple dew straps individually.
IR radiation is simply light that we cannot see, which makes it great for communication. IR sources are all around us. The sun, light bulbs, or any anything with heat is very bright in the IR spectrum. When you use your TV remote, an IR LED is used to transmit information to your TV. So, how does the IR receiver in your TV pick out signals from your remote among all of the ambient IR? The answer is that the IR signal is modulated. Modulating a signal is like assigning a pattern to your data, so that the receiver knows to listen.
Item Details: Welcome to the next generation of adult furniture in Second Life. The Let's Cum Couch not only features over 200 of the latest Bento Physics adult ...
For the hardware in this tutorial, you will need the following materials. You may not need everything though depending on what you have. Add it to your cart, read through the guide, and adjust the cart as necessary.
Different appliance manufacturers use different protocols to send commands. This is why you have to define the manufacturer of the appliance to use this library. Also, note that the Sony command needs to be sent three times using a for() loop. Every protocol will have its own intricacies. A good reference for un-official commands to common IR protocols can be found on San Bergmans' website:
Refracting telescope partsdiagram
Swapping out your telescope's focuser is a very common upgrade for many amateur astronomers and astrophotographers. Many stock focusers suffer from slip, when the focuser cannot support the weight of your camera and accessories. You may also find that some stock focusers lack the ability to dial in focus as accurately as you need it to, especially for astrophotography. By upgrading your focuser, you can ensure that these issues become a thing of the past.
All of the gritty signal processing is handled by a great Arduino library written by Ken Shirriff and allows you to easily send and receive IR data. For additional details on how the IR Arduino library works, see Ken Shirriff's blog: A Multi-Protocol Infrared remote Library for the Arduino. Also, the code examples used in this tutorial are found in the examples directory in the library.
The sketch will automatically decode the type of remote you are using and identify which button on your remote is pressed. Open the serial port in the Arduino IDE at 9600 bps and hit different buttons on your remote.
For many astronomers and astrophotographers, dew can be one of the biggest enemies. Dew usually forms on refractive elements like lenses and corrector plates, so for refractors and Schmidt-Cassegrains, having dew prevention tools is essential. There are two main ways to fend off dew from forming during the night: dew shields and dew heaters. While many refractors come with dew shields built in to the telescope, most Schmidt-Cassegrains do not. Therefore, if you plan to use a Schmidt-Cassegrain especially for astrophotography, make sure you buy a dew shield sized for your telescope. Dew shields can be thought of as passive dew prevention tools — they do not require power.
Be sure to connect your LED correctly! The long leg is positive and connects to the resistor, then to the Arduino’s output pin. The short leg is negative and is connected to ground (GND).
Many beginners don't realize that if your view through the eyepiece or camera is too wide or narrow that you can usually do something to change that. With Barlows and focal extenders, you can double your focal length or even more to get the best planetary views and images. With focal reducers, you can widen your field-of-view to fit that entire galaxy you were hoping to observe.
Oceanside Photo & Telescope wants our customers to shop with confidence knowing that you will always get the best deal available. We will match any online price that we confirm as valid. Details:
Schmidt Prism(103+) ; Optical Glass Schmidt Prism Conglutinant Prism · $80.00 - $220.00 ; Optical Glass Schmidt Prism and Schmidt-Pechan prism (Pechan prism pair) ...
Without the correct power supply for your telescope setup, you can be left stranded and unable to use your gear. Some telescope mounts may not come with the right type of power supply you're hoping to use. For example, if you want to plug in your telescope gear into an outlet at home, you may need to purchase an AC adapter separately. If you need help finding the right one, our Sales team is always here to help.
You will be setting up two separate circuits both using an Arduino. The first example circuit uses a TSOP382 IR photo sensor to receive and demodulate the IR signal from a common remote control. The second example circuit uses a 950nm IR LED and current limiting resistor to transmit IR codes to a common appliance, for example a home stereo or TV.
Refracting telescope partsand functions
Now if you point the LED at your appliance and hit the push button that is connected to your Arduino, the code for the button press on your remote will be sent. Once you know which codes correspond to each button, you can create your own remote with the Arduino and IR LED.
With so many telescope parts out there, you may not even realize what you're missing for your telescope setup. Click Learn More to find out what your options are.
On some telescopes, collimation can be the difference between sharp stars and stars that look misshapen, especially if you're using your telescope for astrophotography. Collimation can be difficult if you don't have the right equipment to do it. To help, we sell a wide variety of collimation tools, such as laser collimators, artificial stars, mirror adjustment knobs, and much more to let you make sure you're getting the best possible views and images from your telescope.
In this example, your Arduino and an IR LED imitate an IR remote to control an appliance (TV, stereo, etc.). In order to control your appliance with the LED, you need to know what type of IR protocol your appliance uses. The easiest way to find this out is to have the remote that comes with the appliance. This example receives a remote key press with the TSOP382 IR receiver, copies the data, then sends it out of the IR LED.
An Arduino or other microcontroller can be connected to either end of the system to transmit data (left side) or receive data (right side).
Refracting telescopeexamples
Without a sturdy tripod or pier, your telescope's mount can suffer from instability, leading to shaky views and blurry images. Many amateur astronomers choose to replace or upgrade the stock tripod that came with their mount for a more rock-solid option. You can stick with a tripod or tri-pier design for portability, or for a more permanent setup, a pier can be a highly reliable option.
A small triangular prism, a pen light, and a mirror is what is needed for helping kids understand how a lighthouse lens works. Prior to the mid-nineteenth ...
Separate from focusers themselves, automatic focusers or autofocusers are an accessory that attaches to your existing focuser and enables you to adjust focus via computer software, so you don't have to touch the telescope. In addition, they can focus automatically by finding the focus point where stars are the smallest, and adjust this over time. This can be essential for astrophotographers where temperature changes throughout the night can alter focus slightly. Last but not least, focusing masks or Bahtinov masks are a simple device that you place over the front of your telescope and they will allow you to precisely dial in perfect focus every time.
Side-looking Infrared Emitters and IR Detectors. These simple devices operate at 940nm and work well for generic IR systems i…
Also, you cannot see IR LED light with your eyes, since IR radiation is outside of the visible spectrum. However, most cellphone cameras can detect short wave IR and can see the LED faintly glowing.
When specific buttons are pressed, you can use the incoming values to do something else in your code, for example turn on and off a motor or LED.
Lens Formula: The focal length calculation is based on the lens formula, which states that the reciprocal of the focal length. is equal to the sum of the ...
What's the Deal with Prism Lenses? · Prisms work by moving the image to correct alignment for one eye or both eyes. · As a result, prisms can facilitate ...
This tutorial will first explain the inner workings of common IR communication protocols. Then we will go over two examples that will allow you to transmit and receive IR data using an Arduino. In the first example, we will read incoming IR data from a common remote control using the TSOP382 IR photo sensor. The next example will show you how to transmit data from an IR LED to control a common appliance, for example your home stereo.
After you have loaded the sketch, open the Arduino serial monitor to 9600bps. Point your remote directly at the TSOP382 and hit a button. You should see specific codes in the terminal window, corresponding to the button you hit on the remote.
For astrophotographers, having round stars across your entire image is desirable. To help you get that, you may need to use an optical corrector. Some types of correctors include reducer/flatteners, which are most common for refractors, coma correctors for Newtonians, and field flatteners for refractors, Ritchey-Chretiéns, and other types of telescopes. If you're planning on using one of these correctors for imaging, just know that some of these are designed for specific telescopes, so be sure to check for that first. Barlows and focal extenders are usually able to be used with almost any telescope.
Use this simple IR receiver for infrared remote control of your next project. With low power consumption and an easy to use p…
Additionally, we also sell portable power supplies to help power your telescope when you're observing or imaging out in the field. These portable batteries can usually power your telescope setup for a night or two of use before needing to be recharged. Be sure to look into how much power you will be using and buy the appropriate-sized portable power supply for your needs.
This is a very simple, clear infrared LED. These devices operate between 940-950nm and work well for generic IR systems inclu…
Assuming that you have the IRremote library, go to your Arduino project directory: Arduino/libraries/IRremote/examples/IRrecord and open the IRrecord.ino. Upload the sketch to your Arduino.
The price for an item/offer must be listed and valid at the time of match. We reserve the right to verify a competitor's advertised price and the availability of the item.
No rainchecks will be issued for items out of stock at OPTcorp.com to match a competitor's price. We do not price match competitors if they are out of stock.
Streamline your astronomy setup with the perfect accessories so you can focus on what matters: observing and capturing the cosmos.
Refracting telescopediagram
UV Curing Chambers & Ovens UV Curing Chambers and Ovens are Curing Systems designed to efficently cure UV Products in short periods of times.
How does arefracting telescopework
The current limiting resistor attached to the LED can have values down to 100Ω (40mA) for full power and longest range. If you use a larger value resistor, the LED won't light as bright and your range will suffer. With a 330Ω resistor, you should be able to operate the IR LED across a dimly lit room.
Aspherical lenses are curved outwards on their rear element so that they can better direct light rays into a single focal point. These counter-curves help ...
Apodizing ND Filter. Unmounted Ø25 mm Apodizing Reflective ND Filter, OD: 0.04 - 1. Product code. NDY10B. Price. $ 218.58. Availability. 3 - 5 days.
Infrared LEDs are awesome. Along with an IR receiver they can be used for remote control and even basic remote data communica…
There are a few common protocols the IR Arduino library supports. They are: NEC, Sony SIRC, Philips RC5, Philips RC6, and raw formats. Here are the methods you can use in your Arduino code for different manufacturers:
If you were to hook an oscilloscope up to your TV remote's IR LED, you would see a signal similar to the one above. This modulated signal is exactly what the receiving system sees. However, the point of the receiving device is to demodulate the signal and output a binary waveform that can be read by a microcontroller. When you read the OUT pin of the TSOP382 with the wave from above, you will see something like this:


 Ms.Cici
 8618319014500