
How to Define Refractive Index of a Glass? Check ... - refractive index of glass
Field of viewcalculator
The Huygens eyepiece, illustrated on the left in Figure 1, is designed with the field lens positioned before the intermediate image plane, which coincides with the field diaphragm. Unlike the Ramsden eyepiece, the Huygens design has a focal point (at the intermediate image plane) residing between the eye and field lenses. In this case, the eye lens acts as a loupe to magnify the intermediate image.
Whereas if you want to freeze a subject in your scene, you will need to use very fast shutter speeds that are a very small fraction of a second:
Field of viewmicroscope
This is the sort of article that is likely to help most of the people who read your blog. Of course if your target is professional photographers I am in the wrong place.
Field of viewin games
I found it varies a bit. The D7100 shoots brighter than the D3200. I’m not entirely sure why, but I get more blown highlights in the JPG preview in the D7100 than I did on the D3200. Perhaps it was more conservatively metered on the assumption that more users would be shooting JPG alone.
Humanfield of viewSketchUp
Great easy to read article, thanks. What would be really helpful is details of the camera setting of your various images – e.g. the field with flowers and the rainbow; what settings were used to capture that? thanks in advance Chris
In all modern eyepiece designs, the field lens is placed a sufficient distance away from the intermediate image plane to ensure that dust or other surface debris and defects on the lens surface are not visualized along with the specimen. The top lens in both eyepiece designs is referred to as the eye lens because it is closest to the eye of the observer.
You should always make sure that you are shooting in the best autofocus mode depending on what you are photographing. For example, if you photograph a still subject, you might want to use Single Area Focus Mode (also known as “Single Area AF”, “One Shot AF” or simply “AF-S”), whereas if the subject you are photographing is continuously moving, you would want to switch to Continuous / AI Servo Focus Mode, since you would probably want your camera to actively track your subject.
PL provides various digital photography news, reviews, articles, tips, tutorials and guides to photographers of all levels
If you have a modern digital camera, it most likely comes with an Auto ISO feature, which can be a very handy tool for a beginner photographer. Once you have the Auto ISO enabled, your camera will automatically adjust your camera’s ISO depending on how bright your subject and the environment are, trying to keep the shutter speed at the same or higher level than the minimum shutter speed you set within the Auto ISO menu. Take a look at the sample Auto ISO menus from a few different cameras that Elizabeth Gray put together for our readers in her excellent Understanding Auto ISO for Beginners article:
Hi Nasim, Thanks for this very useful guide. I bought a canon EOS 2000D in July and your work has helped me set it up. I’m a returner and grew up in the 60s with my dads light meters etc – so making the transition from iPhones (sorry) A couple of quick questions -I’m currently on RAW but the canon offers me RAW+symbol L – so what’s the benefits. 2nd Q – I got pointed towards the Nifty 50 lens – but not sure of the the benefits. Help please? Best Mark
In most cases, the eyepiece field diaphragm opening diameter determines the view field size. The field size in the specimen plane is then defined as the field number divided by the magnification of the objective:
Nasim Mansurov is the author and founder of Photography Life, based out of Denver, Colorado. He is recognized as one of the leading educators in the photography industry, conducting workshops, producing educational videos and frequently writing content for Photography Life. You can follow him on Instagram and Facebook. Read more about Nasim here.
The diameter of the field in an optical microscope is expressed by the field-of-view number, or simply the field number, which is the diameter of the view field in millimeters measured at the intermediate image plane.
To make it easier for beginners, camera manufacturers sometimes include a hybrid mode that automatically switches between Single Area Focus Mode and Continous / AI Servo Focus Mode depending on whether your subject is still or moving. This hybrid mode, which is known as “AF-A” on Nikon and “AI Focus AF” on Canon cameras, can be a great autofocus mode to default to if you find it difficult to constantly switch between AF-S and AF-C camera modes.
The field number of typical eyepieces varies between 6 and 28 millimeters and (in general) decreases with the magnification of the eyepiece. For example, an eyepiece having a magnification of 10x typically has a field number ranging between 16 and 18 millimeters, while a lower magnification eyepiece (5x) has a field number of about 20 millimeters. Presented in Figure 2 is a comparison between the view fields available with similar eyepieces, one having a field number of 20 and the other a field number of 26. Note the greater range of specimen features visible through the eyepiece having the larger field number.
In modern microscope eyepieces, the field diaphragm either precedes the optical system or is located between the lens element groups, as illustrated in Figure 1. This figure presents cutaway diagrams of a Ramsden and Huygens eyepiece showing ray traces through the field lens, eye lens, and field diaphragm. The Ramsden eyepiece (illustrated on the right in Figure 1) has an optical system consisting of two plano-convex lenses having a fixed separation distance according to their focal lengths. The first lens is termed the field lens because it is closer to the plane where the intermediate image is formed in the microscope. The field diaphragm is located between the tube opening and the field lens in the Ramsden eyepiece design.
Field of viewhuman eye
Nikon offers a range of eyepiece options featuring magnification and field of view combinations tailored towards a variety of applications.
Field of viewexample
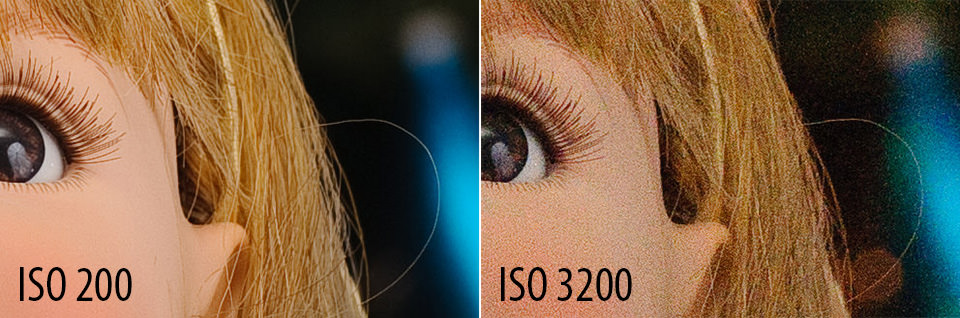
When it comes to camera ISO, you are always better off shooting with the lowest ISO, because it produces the least amount of noise / grain in your images. The last thing you want is every image looking too noisy because you set your ISO too high. While using noise reduction techniques might help, it is better to avoid noise in the first place.
If an auxiliary lens is inserted between the objective and eyepiece, the magnification factor of this lens should also be employed in the equation by multiplication with the objective magnification (prior to the division operation). Although the field number is usually limited by the magnification and field diaphragm (stop) size of the eyepiece, there is clearly a limit that is also imposed by the design of the objective lens system. In early microscope objectives, the maximum usable field diameter tended to be about 18 millimeters or considerably less, but with modern plan apochromats and other specialized flat-field objectives, the maximum usable field can sometimes exceed 28 millimeters.
Field of viewformula
Remember, photography is always a balancing act between Aperture, Shutter Speed and ISO, also known as the Exposure Triangle. I would recommend to spend some time to understand how the three work and how they are related to each other.
While your camera might have a number of different Metering Modes such as Spot Metering, Center-Weighted Metering and Matrix / Evaluative Metering, for most situations it is best to default to Matrix / Evaluative Metering, because it takes the whole scene into account and typically does a better job at exposing your subjects.
I’m a historian by profession. Presently I’m working on digitization of archival materials with DSLR. I have Nikon D5300 and a Nikkor 50mm f/1.8 G lens. I’m a beginner in handling DSLR. What should be the ideal camera setting and shooting mode for me?
Some cameras also come with an “Auto AF” mode, which looks at the whole scene and tries to focus on either the nearest subject, or a subject the camera thinks is important. I would recommend to avoid using such modes for most beginners, because it is better to have control over exactly where your camera focuses by moving your focus point to the spot your camera should focus on. You can achieve this by switching to the Single-Point AF-Area Mode, as explained in the autofocus modes explained article. Once you have a single point to move around in your viewfinder, you can either move that focus point within your frame on your subject / area of interest, or move your subject to the focus point:
First, let’s go over some of the camera settings that should apply to any modern digital camera. You should be able to find all the settings specified below, since they are more or less universal across different camera brands and models:
Lastly, don’t forget to take advantage of image stabilization (also known as SteadyShot, Vibration Reduction or Vibration Compensation) that is offered either by your camera (in-body image stabilization) or your lens. Don’t forget to turn it on when shooting hand-held and turn it off when shooting from a stable tripod. Also, it is always a good idea to half-press the shutter release for a few seconds and let your camera or lens stabilize first, before taking a picture. This will reduce the potential for having blurry images.
Note also that Active D-Lighting doesn’t affect the raw data per se, but it does change the calibration of the meter therefore it indirectly changes the exposure.
Thank you Nasim. Photos on this link are taken mostly with either scene or automatic mode (Nikon D5600/18-300mm lens) !AkOUoZj4d5Mmg7JI8J7qAiG4cLPbFA Would appreciate to get advice to improve my photography
Some cameras from Nikon, Canon and other manufacturers have advanced Auto ISO menus that can take into account the reciprocal rule and allow for an “Auto” configuration for minimum shutter speed, which will take into account the focal length of the lens being used. Such options can be very useful for beginners, because they take away the pain of constantly adjusting camera settings.
While some photographers argue that it is best to always shoot in Manual Mode to have full control over your camera, I would strongly disagree with that. Considering how amazing modern cameras have gotten when it comes to properly metering a scene and exposing a subject, there is very little reason to actually shoot in Manual Mode, so why not use one of the semi-automated camera modes instead?
Many Nikon DSLRs have a tendency to overexpose their in-camera JPEGs by 0.3 to 0.7 EV, depending on the model. However, Nikon Matrix metering seems to produce reliable raw files because, at low ISO values, the raw clipping level is circa 2.5 EV above JPEG clipping level. The JPEG clipping level is influence by the Picture Control settings whereas the raw data clipping level is not.
Field of viewcamera
It is important to understand the impact of aperture and what it can do to your photographs, so I highly recommend that you read the linked articles above.
Brilliant Informative article. I am probably what you’d call an advanced beginner and am very keen to learn more about photography. I refer to your site a lot to help me understand things.
Lens aperture not only affects how your subject is isolated from the foreground and background, but also impacts how much light actually goes through your lens, so you have to be careful about what aperture you pick in a given situation. In addition, aperture can impact things like image sharpness and depth of field, so it is all about choosing the best aperture for your subject and your shooting environment. If you are taking pictures in low light and you want to avoid introducing camera shake to your images when shooting hand-held, it is best to take pictures with the widest possible aperture your lens can provide, so that your camera can receive as much light as possible. For example, if you shoot with a 35mm f/1.8 lens, you might want to keep that aperture at f/1.8 in such conditions. However, if you are standing at a beautiful overlook and you want to capture a sharp photograph of the whole landscape, stopping down the aperture of your lens to something like f/5.6 will be optimal.
The same with color space and white balance – you do not have to worry about them when shooting RAW, since you can change them later. Unless you know what you are doing, I would keep “long exposure noise reduction” turned on, since it does affect your RAW images when shooting long exposures – it works by reducing the amount of noise you will see in your images (although it will also double the amount of time it normally takes to capture an image). All other in-camera lens corrections, dynamic range optimizations and noise reduction options should be turned off as well, since they do nothing to improve your RAW images.
Michael W. Davidson - National High Magnetic Field Laboratory, 1800 East Paul Dirac Dr., The Florida State University, Tallahassee, Florida, 32310.
Many beginner photographers often wonder what camera settings they should use to get the best possible results with their current camera gear. While there is no set rule for camera settings that work well in every shooting environment, I noticed that there are some settings that I personally set on every camera I use, which are universal across all brands of cameras on the market. These are the “base” settings I set initially – once they are done, I rarely ever revisit them. In addition, there are particular camera modes that make the process of capturing images easier or quicker, especially for someone who is just starting out. Let’s go through these common camera settings in more detail!
For most situations, however, you are better off using shutter speeds that are fast enough to capture images without introducing camera shake. For that reason, I would recommend that you read our article on reciprocal rule and enable Auto ISO (more on ISO and Auto ISO below).
Just like aperture, the choice of the best shutter speed will highly depend on what you are trying to capture. For example, if your goal is to capture a dreamy photograph of a waterfall, you will need to use a slow shutter speed that might last several seconds to make the running water appear blurry:
Dolphin- I saved it and Windows 10/Explorer/View/Details Pane gives F-stop f/5.6 Exposure time 1/1600 sec ISO 320 Focal Length 420mm
If you are wondering whether it is good to shoot in any of the “Scene” modes of your camera (such as Macro, Sports, Fireworks, etc), I would discourage the use of these modes for a number of reasons. The main reason is that such modes vary greatly not just between different camera manufacturers, but also different models. So if you learn to always rely on a particular scene mode on one camera and decide to upgrade to a new one in the future, you might not be able to find the same scene mode on a different camera model. It is also important to highlight that most higher-end and professional camera models don’t even come with scene modes in the first place.
Aperture is often associated with how separated your subject appears from the background, but that’s only one of its many functions. In the example above, you can see how different an image can appear when photographed at a wide aperture like f/2.8 versus a small aperture like f/8.0.
The size of the eyepiece field diaphragm opening is also dependent upon the correction for off-axial aberrations (coma, astigmatism, and lateral chromatic) of the objective. Recent eyepieces feature highly corrected glass that enables wide-field designs having field numbers of 26 millimeters and greater.
On Photography Life, you already get world-class articles with no advertising every day for free. As a Member, you'll get even more:
The above are the most important camera settings. First, you always start out by selecting the proper file format, which is RAW. If there is a setting for selecting RAW compression, always select Lossless Compressed, as explained here, since it reduces the amount of space your RAW files consume. While things like Picture Controls don’t matter for RAW images (they only impact the way the image appears on your camera’s LCD), it is best to stick with a standard profile without tweaking any other settings like Sharpening, Contrast, Saturation, etc, as such settings only matter if you shoot in JPEG format.
Once you have the above settings set up in your camera, it is time to move on to things that matter when taking pictures.
Hi, I am also thinking of using Light Room(LR) to post process some of these photos. I am a beginner with LR. My understanding is that with LR presets I can post process them quickly.
Hi , I’m using a bridge camera Fujifilm s7000. I’ve found it difficult to take photos indoors in low light conditions. The exposure looks right but blurred. I’m trying to take photos of our baby. aperture priority mode f 2.8. Any advice would be greatly appreciated. Thank you.
However, shooting at the lowest ISO is not always practical, especially when photographing in low light environments. In those situations, you will need to increase your camera ISO in order to keep your shutter speed fast enough to avoid blur due to unintentional camera shake.
Thanks for the wonderful article Nasim. The information you have provided will be very helpful as I am going on a safari in Botswana soon. If you have any tips for photographing on a safari I would be most appreciative. Thanks for an article that is directed at beginners!
For example, I personally rely on the Aperture Priority mode of my camera 90% of the time, because it does a great job and I have full control not just over my camera aperture, but also over how bright or dark I want an image to appear. If my camera takes a brighter image than I would like it to be, I simply use the Exposure Compensation button to adjust my exposure and I am set:


 Ms.Cici
 8618319014500