
Grid (TV Mini Series 2022 - movie grid
Machine vision storeonline
The split beams pass through the specimen. The specimen’s varying thickness and refractive indices alter the wave paths of the beams. They then enter the objective, where they are focussed above the rear focal plane. The two beams enter a second prism, in the nosepiece, which combines them. Because the beams passed through different parts of the specimen, they have different lengths.
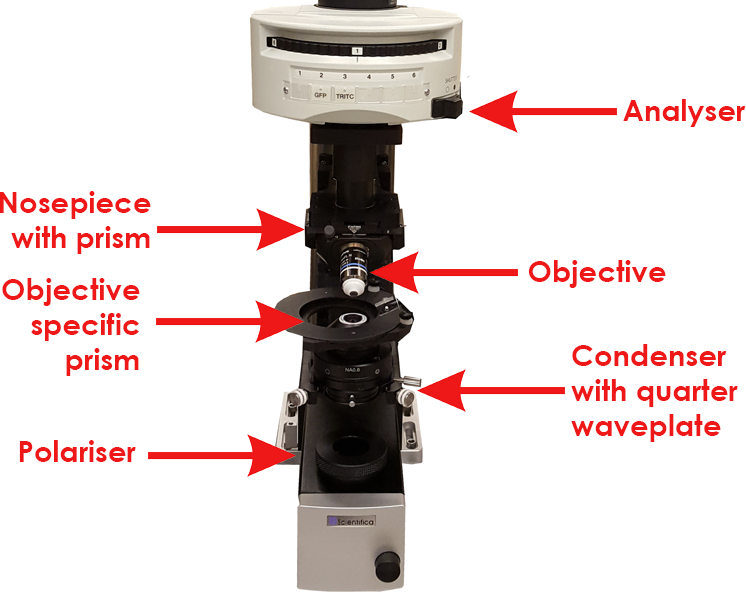
6. The second DIC prism (WI-DICT or WI-DICTHRA) is in a fixed mount which is inserted into the nosepiece above the objective. Loosen the grub screw on the right-hand side of the nosepiece arm and slide the nosepiece (WI-SRE) forward. Insert the second DIC prism into the nosepiece and secure it using the small screw at the rear-right corner of the nosepiece.
Machine visionlighting
4. a. When using eyepieces: rotate the polariser until there is a dark stripe through the centre of the field of view. This indicates that the polariser and analyser are aligned at 90 degrees to each other.
An advantage of using DIC over other contrast techniques, such as phase contrast or oblique contrast is that in DIC the full aperture of the microscope is used. For example, in phase contrast, the annulus of the condenser restricts the aperture, reducing the resolution of the image. Unlike phase contrast, DIC images are not disturbed by halo artefacts.
SmartVision
You should now have a clear DIC image! An example of a DIC image is below; the image has good contrast and the C.elegan has a 3D effect.
11. DIC is a function of specimen orientation. Therefore, rotating the sample can improve or change the contrast of the image.
5. If the condenser and objectives were removed, put them back at this point. Double-check that your condenser is still set-up for Koehler illumination.
9. The polariser and analyser need to be aligned so that their transmission pathways cross at a 90 degree angle to one another. This can be achieved by rotating the polariser in the filter wheel. As this can be rotated 360 degrees, the analyser and U-KPA can be mounted in any orientation.
The analyser, which is a second polariser, brings the vibrations of the beams into the same plane and axis, causing destructive and constructive interference to occur between the two wavefronts. The light then travels to the eyepiece or camera, where a DIC image with differences in intensity and colour, can be seen.
As an Infrared (IR) light source is usually used, DIC is ideal for imaging thick specimens such as brain slices, as IR light penetrates deeper into tissues than visible light, due to its longer wavelength.
Using DIC produces high resolution images with good contrast. It is best for visualising unstained samples. When viewing fluorescently labelled compounds, using DIC reduces the fluorescence intensity slightly and so decreases the quality of fluorescence images. However, this decrease is not significant.
In DIC, light emitted from the source is linearly polarised by passing through a polariser. The linearly polarised beam of light enters an objective-specific prism, which splits it into two rays that vibrate perpendicular to each other. The rays are parallel as they pass through a condenser, but as they are vibrating perpendicular to each other, they are unable to cause interference.
Differential Interference Contrast (DIC) is a microscopy technique that introduces contrast to images of specimens which have little or no contrast when viewed using brightfield microscopy. The images produced using DIC have a pseudo 3D-effect, making the technique ideal for electrophysiology experiments.
Machine vision storelocations
10. For DIC microscopy to be performed, Koehler illumination must be first set-up. Read our 6 step guide to Koehler illumination to help you set this up.
Bestmachine vision store
5. Loosen the grub screw on the side of the condenser and remove the spacer ring from the top half, as this is not needed. Insert the objective-specific prism, lining up the metal pin on the prism with the slot in the condenser. Tighten the grub screw and put the condenser back together. Each objective requires a different objective-specific prism, based on the magnification of the objective, for example a 40x objective requires a WI-DIC40HR objective specific prism. Usually, a prism is only required for the high magnification objective you are using.
Find out about Scientifica's latest product releases, company news, and developments through a range of news articles, customer interviews and product demonstration videos.
Machine VisionDirect
DIC can be utilised on virtually any upright or inverted microscope, including the Scientifica SliceScope, as long as the polariser, condenser and prisms can be installed.
A stable and compact upright microscope designed to meet the demands of complex electrophysiology studies and related techniques - including two-photon imaging and optogenetics.

Machine vision storereviews
7. If fluorescence is being used, insert the analyser (U-AN) into the fluorescence turret, as shown below. If fluorescence isn’t being used, insert the analyser (U-ANT) into the U-KPA.
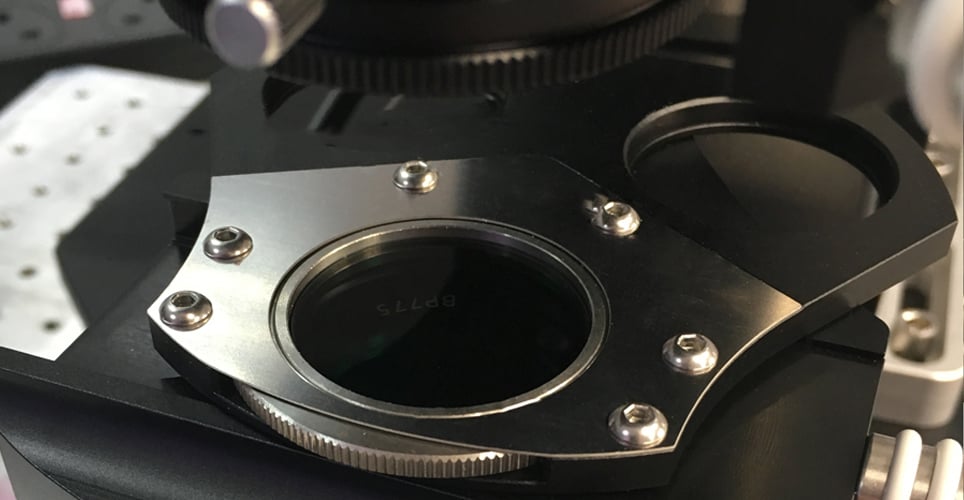
8. As the SliceScope uses de Sénarmont DIC, a quarter waveplate is required, shown in the image below. The quarter waveplate introduces a bias retardation. Adjusting this changes whether structures appear concave or convex. Unscrew the locking knob and adjust the quarter wave plate as desired.
Machine visionlens calculator
4. Keeping the condenser facing upwards, use a hex key to unscrew the two screws either side of the condenser to open it up. Turn the top section only upside down.
1. If using a white light source, insert an infrared bandpass filter into the slider on the SliceScope filter wheel and secure in place with a locking screw, this ensures only infrared light passes through to the polariser. If using an IR-LED, a bandpass filter is not needed.
Before setting up DIC on a microscope, ensure all components are free of dust and debris, as dirty objective, condenser and lens elements can reduce image quality.
10. The lever in the image above controls the condenser iris aperture. If using eyepieces, remove one eyepiece and look down so you can see the internal condenser iris. Adjust the lever until the condenser iris just disappears from the field of view. When using a camera, adjust the lever until the image is at its sharpest.
This guide provides an overview of Differential Interference Contrast (DIC), how DIC works and how to set DIC up on an upright microscope - Scientifica SliceScope.
2. Move the DIC slider with the U-AN analyser into the light path. The U-ANT is not on a slider and is in a fixed position which is always in the light path.
2. Insert the polariser into the silver-plated section of the filter wheel, underneath the condenser, shown in the image below. The polariser is on a rotatable mount, enabling it to be rotated when aligning DIC.


 Ms.Cici
 8618319014500