
Copper busbar 274A, 20x5mm, 2m - Online Shop - Schrack - 2m online
Krones glassbottlefiller
hi Cross polarization removes specular reflectance from a photo, making it ideal for texture acquisition. When taking pictures of human skin, you can shoot cross-polarized photos from multiple angles, and then combine them together in Photoshop using masking and the "lighten only" blending mode. This removes any shadowing in the images so they merge seamlessly, as opposed to using the clone stamp tool to combine them which can lead to splotchy uneven surfaces. This "unwrapped" map can then be used as a good starting point source image for the texture map on a face. Deriving a spec pass from a photo An additional benefit is that when a cross polarized photo is subtracted from a parallel polarized photo in a compositing program like Nuke, we can see what the specular highlights look like on an actual photo. This allows texture artists to see what a real world specular pass looks like, giving them a photographic reference for to base their CG spec pass on. This technique is also relatively simple. The only trick is to use a tripod and have your subject stand perfectly still while you take the two photos so they will align properly. The first photo is taken with the polarizer filter on the camera rotated to be parallel to the polarizer on the light (A), and a second photo with the polarizer rotated 90 degrees to be perpendicular, and thus cross-polarized (B). Then in Nuke, subtract the two images (A-B) giving you the specular difference. You will need to desaturate this as well for dielectric materials. The final image shows the result of adding the cross-polarized "diffuse only" image with the derived specular image (B+C). Separating the spec from an image like this can give us great insights into the details of how dielectric materials are working. For example, in the image below, notice that the powdery film (known as grape "bloom") that characteristically appears on the red grapes is visually composed of rough specular highlights. Being able to see these kinds of things in a photo separated into its diffuse and specular components helps an artist to know how to recreate this in a CG material. It is worth noting that the cross polarization process is not perfect. The derived spec images contain color, even though dielectric specular should be colorless. This is in part due to the the limitations of 8-bit images. If an image has a pixel value range of zero to one (black to white) and a color is removed (the color of the cross-polarized image), the result will be the inverse color, rather than white. The way around this mathematical problem is to use HDR images which have a value range that is above 1, meaning that a color can be subtracted and still result in a white spec. This is done by taking multiple images at bracketed exposures and combining them in a program such as HDR Lab's Picturenaut (Photoshop's HDR feature is less accurate). This alleviates the issue in the case of bright highlights that are above 1, but on dimmer highlights there is still some degree of color spill. The ICT labs postulate that this may in part be due to the effects of single scattering, where the light enters the surface but scatters exactly once off some element of the material before reflecting to the camera. This picks up some of the surface's pigmentation, adding a little color to the image. The take away is that, even when shooting multiple bracketed exposure HDR images, it is still quite difficult to obtain an image without color in the specular highlights. Additionally, taking multiple bracketed exposure images slows the process considerably, making it problematic for capture of human subjects (since it's hard to stand still for so long). Considering all of the above, in practice it is much simpler to just take regular non-HDR RAW images and, understanding that dielectric materials should have colorless spec, simply desaturate the resulting polarization-difference image (i.e. the derived "spec only" image) in post. Another issue to be aware of is that the proportional amounts of the diffuse and spec will be off slightly. This is because the parallel polarized image lets 100% of the spec through, but blocks 50% of the diffuse, meaning that the spec will be 2x brighter, in relation to the diffuse, than it would in a photo without any polarizing filters. You can observe in the images above that the skin looks oilier than it normally would. Once aware of this, it is easy to adjust for it in your comp by either brightening the diffuse or darkening the spec a bit. In the animated image below, you can see the effects of brightening the cross polarized "diffuse" pass and the resulting composited image. Equipment and Setup Here's a list of all the equipment you'll need: A windowless room with no light Light source covered in linear polarizing film Camera with a circular polarizing filter A tripod A windowless room with no light Ideally, you will want to be in a room with no light, so the only light source is the one with polarizer. This gives you true cross polarization. It is sometimes possible to get decent results outside, but even if there is no direct sunlight, there will always be specular highlights from the sky that are unpolarized. What you get outside, therefore, is not cross polarization, but simply the effects of the camera's polarizer filter. When working with the camera's polarizer alone the trick is shooting flat objects (the ground, a fence, a wall) so that there is only one plane for the reflections which can then be polarized. With rounded objects (a rock, a tree trunk, etc.) you will only be able to eliminate some of the reflections (for example the reflection from the front, but on on the sides). Light source covered in linear polarizing film. A mounted LED light panel is recommended (pictured below). You can buy linear polarizer film here. You want the laminated type. The biggest issue you will face is that polarization filters make things a lot darker. That can cause the images to be out of focus (because the shutter speed is too slow) or grainy (because the ISO is too high). To account for this you need a bright light source and a tripod. I like to use an LED light panel mounted to my camera. This allows me to be mobile and fast, as opposed to needing to lug around a light on a stand. The fact that the light is coming from behind the camera, while typically undesirable for regular photos, is actually perfect for texture acquisition where we want flat, even lighting. In addition to the linear polarizer, a diffuser is placed over the light to create soft light and shadows on the subject. DSLR camera with circular polarizer, and mounted LED light panel with diffuser and linear polarizer Camera with a circular polarizing filter You will want to shoot in RAW. A digital camera tries to compensate for the lack of light in the cross polarized image using sharpening filters. That means you end up losing a lot of texture detail in your images. This makes the cross polarized image look saturated, contrasty, and blurred. Shooting in RAW avoids this since those camera filtering algorithms are not applied. Note the difference below comparing the same image shot in JPG and RAW (slide the bar on the image to see the difference). Slide the bar on the image to see the RAW image quality compared to a JPG. Here's my workflow for using RAW images: Read the RAW image in Photoshop, keeping everything linear. In Photoshop, set the mode the 32bit, and save the image as an EXR. Open the EXR in Nuke and save this as a 16bit with ZIP compression. You may also want to use the denoiser in Nuke if your image is grainy. This should be done before any color corrections. A tripod A tripod is essential when extracting specular to align the images, and useful for cross-polarization to help with the lack of light from the polarizers. The Shoot With everything set up, you're ready to go.The process of taking a cross polarized photo is as follows: Adjust the exposure to compensate for the darkening effect of the polarizer Now that you can see, focus the camera. I always use manual focus Turn the camera polarizer until spec disappears to take a cross polarized photo Turn it 90 degrees further, so the spec reappears, to take a parallel polarized photo
Here's a list of all the equipment you'll need: A windowless room with no light Light source covered in linear polarizing film Camera with a circular polarizing filter A tripod A windowless room with no light Ideally, you will want to be in a room with no light, so the only light source is the one with polarizer. This gives you true cross polarization. It is sometimes possible to get decent results outside, but even if there is no direct sunlight, there will always be specular highlights from the sky that are unpolarized. What you get outside, therefore, is not cross polarization, but simply the effects of the camera's polarizer filter. When working with the camera's polarizer alone the trick is shooting flat objects (the ground, a fence, a wall) so that there is only one plane for the reflections which can then be polarized. With rounded objects (a rock, a tree trunk, etc.) you will only be able to eliminate some of the reflections (for example the reflection from the front, but on on the sides). Light source covered in linear polarizing film. A mounted LED light panel is recommended (pictured below). You can buy linear polarizer film here. You want the laminated type. The biggest issue you will face is that polarization filters make things a lot darker. That can cause the images to be out of focus (because the shutter speed is too slow) or grainy (because the ISO is too high). To account for this you need a bright light source and a tripod. I like to use an LED light panel mounted to my camera. This allows me to be mobile and fast, as opposed to needing to lug around a light on a stand. The fact that the light is coming from behind the camera, while typically undesirable for regular photos, is actually perfect for texture acquisition where we want flat, even lighting. In addition to the linear polarizer, a diffuser is placed over the light to create soft light and shadows on the subject. DSLR camera with circular polarizer, and mounted LED light panel with diffuser and linear polarizer Camera with a circular polarizing filter You will want to shoot in RAW. A digital camera tries to compensate for the lack of light in the cross polarized image using sharpening filters. That means you end up losing a lot of texture detail in your images. This makes the cross polarized image look saturated, contrasty, and blurred. Shooting in RAW avoids this since those camera filtering algorithms are not applied. Note the difference below comparing the same image shot in JPG and RAW (slide the bar on the image to see the difference). Slide the bar on the image to see the RAW image quality compared to a JPG. Here's my workflow for using RAW images: Read the RAW image in Photoshop, keeping everything linear. In Photoshop, set the mode the 32bit, and save the image as an EXR. Open the EXR in Nuke and save this as a 16bit with ZIP compression. You may also want to use the denoiser in Nuke if your image is grainy. This should be done before any color corrections. A tripod A tripod is essential when extracting specular to align the images, and useful for cross-polarization to help with the lack of light from the polarizers. The Shoot With everything set up, you're ready to go.The process of taking a cross polarized photo is as follows: Adjust the exposure to compensate for the darkening effect of the polarizer Now that you can see, focus the camera. I always use manual focus Turn the camera polarizer until spec disappears to take a cross polarized photo Turn it 90 degrees further, so the spec reappears, to take a parallel polarized photo
This technique is also relatively simple. The only trick is to use a tripod and have your subject stand perfectly still while you take the two photos so they will align properly. The first photo is taken with the polarizer filter on the camera rotated to be parallel to the polarizer on the light (A), and a second photo with the polarizer rotated 90 degrees to be perpendicular, and thus cross-polarized (B). Then in Nuke, subtract the two images (A-B) giving you the specular difference. You will need to desaturate this as well for dielectric materials. The final image shows the result of adding the cross-polarized "diffuse only" image with the derived specular image (B+C). Separating the spec from an image like this can give us great insights into the details of how dielectric materials are working. For example, in the image below, notice that the powdery film (known as grape "bloom") that characteristically appears on the red grapes is visually composed of rough specular highlights. Being able to see these kinds of things in a photo separated into its diffuse and specular components helps an artist to know how to recreate this in a CG material. It is worth noting that the cross polarization process is not perfect. The derived spec images contain color, even though dielectric specular should be colorless. This is in part due to the the limitations of 8-bit images. If an image has a pixel value range of zero to one (black to white) and a color is removed (the color of the cross-polarized image), the result will be the inverse color, rather than white. The way around this mathematical problem is to use HDR images which have a value range that is above 1, meaning that a color can be subtracted and still result in a white spec. This is done by taking multiple images at bracketed exposures and combining them in a program such as HDR Lab's Picturenaut (Photoshop's HDR feature is less accurate). This alleviates the issue in the case of bright highlights that are above 1, but on dimmer highlights there is still some degree of color spill. The ICT labs postulate that this may in part be due to the effects of single scattering, where the light enters the surface but scatters exactly once off some element of the material before reflecting to the camera. This picks up some of the surface's pigmentation, adding a little color to the image. The take away is that, even when shooting multiple bracketed exposure HDR images, it is still quite difficult to obtain an image without color in the specular highlights. Additionally, taking multiple bracketed exposure images slows the process considerably, making it problematic for capture of human subjects (since it's hard to stand still for so long). Considering all of the above, in practice it is much simpler to just take regular non-HDR RAW images and, understanding that dielectric materials should have colorless spec, simply desaturate the resulting polarization-difference image (i.e. the derived "spec only" image) in post. Another issue to be aware of is that the proportional amounts of the diffuse and spec will be off slightly. This is because the parallel polarized image lets 100% of the spec through, but blocks 50% of the diffuse, meaning that the spec will be 2x brighter, in relation to the diffuse, than it would in a photo without any polarizing filters. You can observe in the images above that the skin looks oilier than it normally would. Once aware of this, it is easy to adjust for it in your comp by either brightening the diffuse or darkening the spec a bit. In the animated image below, you can see the effects of brightening the cross polarized "diffuse" pass and the resulting composited image. Equipment and Setup Here's a list of all the equipment you'll need: A windowless room with no light Light source covered in linear polarizing film Camera with a circular polarizing filter A tripod A windowless room with no light Ideally, you will want to be in a room with no light, so the only light source is the one with polarizer. This gives you true cross polarization. It is sometimes possible to get decent results outside, but even if there is no direct sunlight, there will always be specular highlights from the sky that are unpolarized. What you get outside, therefore, is not cross polarization, but simply the effects of the camera's polarizer filter. When working with the camera's polarizer alone the trick is shooting flat objects (the ground, a fence, a wall) so that there is only one plane for the reflections which can then be polarized. With rounded objects (a rock, a tree trunk, etc.) you will only be able to eliminate some of the reflections (for example the reflection from the front, but on on the sides). Light source covered in linear polarizing film. A mounted LED light panel is recommended (pictured below). You can buy linear polarizer film here. You want the laminated type. The biggest issue you will face is that polarization filters make things a lot darker. That can cause the images to be out of focus (because the shutter speed is too slow) or grainy (because the ISO is too high). To account for this you need a bright light source and a tripod. I like to use an LED light panel mounted to my camera. This allows me to be mobile and fast, as opposed to needing to lug around a light on a stand. The fact that the light is coming from behind the camera, while typically undesirable for regular photos, is actually perfect for texture acquisition where we want flat, even lighting. In addition to the linear polarizer, a diffuser is placed over the light to create soft light and shadows on the subject. DSLR camera with circular polarizer, and mounted LED light panel with diffuser and linear polarizer Camera with a circular polarizing filter You will want to shoot in RAW. A digital camera tries to compensate for the lack of light in the cross polarized image using sharpening filters. That means you end up losing a lot of texture detail in your images. This makes the cross polarized image look saturated, contrasty, and blurred. Shooting in RAW avoids this since those camera filtering algorithms are not applied. Note the difference below comparing the same image shot in JPG and RAW (slide the bar on the image to see the difference). Slide the bar on the image to see the RAW image quality compared to a JPG. Here's my workflow for using RAW images: Read the RAW image in Photoshop, keeping everything linear. In Photoshop, set the mode the 32bit, and save the image as an EXR. Open the EXR in Nuke and save this as a 16bit with ZIP compression. You may also want to use the denoiser in Nuke if your image is grainy. This should be done before any color corrections. A tripod A tripod is essential when extracting specular to align the images, and useful for cross-polarization to help with the lack of light from the polarizers. The Shoot With everything set up, you're ready to go.The process of taking a cross polarized photo is as follows: Adjust the exposure to compensate for the darkening effect of the polarizer Now that you can see, focus the camera. I always use manual focus Turn the camera polarizer until spec disappears to take a cross polarized photo Turn it 90 degrees further, so the spec reappears, to take a parallel polarized photo
Kronesmachine
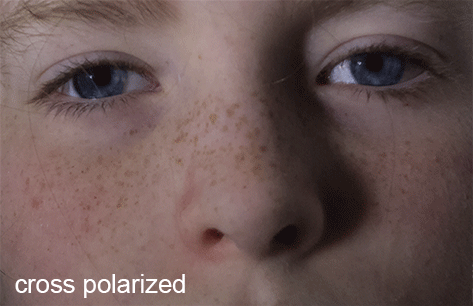
Cross-polarization photography is a technique that removes specular reflectance from photographs. Linear polarizer film is placed over a light or flash, and a polarizer filter is likewise placed on the camera lens. The polarizer filter is then rotated until it is perpendicular to the polarizer film -- hence the name "cross-polarization" or "perpendicular polarization" or as the cool kids call it "x-pol." Removing spec from a photo for texture maps This technique has an immediate benefit for taking photographs for use in texture maps since it removes unwanted specular highlights and reflections in the photo (slide the bar on the image below). hi Cross polarization removes specular reflectance from a photo, making it ideal for texture acquisition. When taking pictures of human skin, you can shoot cross-polarized photos from multiple angles, and then combine them together in Photoshop using masking and the "lighten only" blending mode. This removes any shadowing in the images so they merge seamlessly, as opposed to using the clone stamp tool to combine them which can lead to splotchy uneven surfaces. This "unwrapped" map can then be used as a good starting point source image for the texture map on a face. Deriving a spec pass from a photo An additional benefit is that when a cross polarized photo is subtracted from a parallel polarized photo in a compositing program like Nuke, we can see what the specular highlights look like on an actual photo. This allows texture artists to see what a real world specular pass looks like, giving them a photographic reference for to base their CG spec pass on. This technique is also relatively simple. The only trick is to use a tripod and have your subject stand perfectly still while you take the two photos so they will align properly. The first photo is taken with the polarizer filter on the camera rotated to be parallel to the polarizer on the light (A), and a second photo with the polarizer rotated 90 degrees to be perpendicular, and thus cross-polarized (B). Then in Nuke, subtract the two images (A-B) giving you the specular difference. You will need to desaturate this as well for dielectric materials. The final image shows the result of adding the cross-polarized "diffuse only" image with the derived specular image (B+C). Separating the spec from an image like this can give us great insights into the details of how dielectric materials are working. For example, in the image below, notice that the powdery film (known as grape "bloom") that characteristically appears on the red grapes is visually composed of rough specular highlights. Being able to see these kinds of things in a photo separated into its diffuse and specular components helps an artist to know how to recreate this in a CG material. It is worth noting that the cross polarization process is not perfect. The derived spec images contain color, even though dielectric specular should be colorless. This is in part due to the the limitations of 8-bit images. If an image has a pixel value range of zero to one (black to white) and a color is removed (the color of the cross-polarized image), the result will be the inverse color, rather than white. The way around this mathematical problem is to use HDR images which have a value range that is above 1, meaning that a color can be subtracted and still result in a white spec. This is done by taking multiple images at bracketed exposures and combining them in a program such as HDR Lab's Picturenaut (Photoshop's HDR feature is less accurate). This alleviates the issue in the case of bright highlights that are above 1, but on dimmer highlights there is still some degree of color spill. The ICT labs postulate that this may in part be due to the effects of single scattering, where the light enters the surface but scatters exactly once off some element of the material before reflecting to the camera. This picks up some of the surface's pigmentation, adding a little color to the image. The take away is that, even when shooting multiple bracketed exposure HDR images, it is still quite difficult to obtain an image without color in the specular highlights. Additionally, taking multiple bracketed exposure images slows the process considerably, making it problematic for capture of human subjects (since it's hard to stand still for so long). Considering all of the above, in practice it is much simpler to just take regular non-HDR RAW images and, understanding that dielectric materials should have colorless spec, simply desaturate the resulting polarization-difference image (i.e. the derived "spec only" image) in post. Another issue to be aware of is that the proportional amounts of the diffuse and spec will be off slightly. This is because the parallel polarized image lets 100% of the spec through, but blocks 50% of the diffuse, meaning that the spec will be 2x brighter, in relation to the diffuse, than it would in a photo without any polarizing filters. You can observe in the images above that the skin looks oilier than it normally would. Once aware of this, it is easy to adjust for it in your comp by either brightening the diffuse or darkening the spec a bit. In the animated image below, you can see the effects of brightening the cross polarized "diffuse" pass and the resulting composited image. Equipment and Setup Here's a list of all the equipment you'll need: A windowless room with no light Light source covered in linear polarizing film Camera with a circular polarizing filter A tripod A windowless room with no light Ideally, you will want to be in a room with no light, so the only light source is the one with polarizer. This gives you true cross polarization. It is sometimes possible to get decent results outside, but even if there is no direct sunlight, there will always be specular highlights from the sky that are unpolarized. What you get outside, therefore, is not cross polarization, but simply the effects of the camera's polarizer filter. When working with the camera's polarizer alone the trick is shooting flat objects (the ground, a fence, a wall) so that there is only one plane for the reflections which can then be polarized. With rounded objects (a rock, a tree trunk, etc.) you will only be able to eliminate some of the reflections (for example the reflection from the front, but on on the sides). Light source covered in linear polarizing film. A mounted LED light panel is recommended (pictured below). You can buy linear polarizer film here. You want the laminated type. The biggest issue you will face is that polarization filters make things a lot darker. That can cause the images to be out of focus (because the shutter speed is too slow) or grainy (because the ISO is too high). To account for this you need a bright light source and a tripod. I like to use an LED light panel mounted to my camera. This allows me to be mobile and fast, as opposed to needing to lug around a light on a stand. The fact that the light is coming from behind the camera, while typically undesirable for regular photos, is actually perfect for texture acquisition where we want flat, even lighting. In addition to the linear polarizer, a diffuser is placed over the light to create soft light and shadows on the subject. DSLR camera with circular polarizer, and mounted LED light panel with diffuser and linear polarizer Camera with a circular polarizing filter You will want to shoot in RAW. A digital camera tries to compensate for the lack of light in the cross polarized image using sharpening filters. That means you end up losing a lot of texture detail in your images. This makes the cross polarized image look saturated, contrasty, and blurred. Shooting in RAW avoids this since those camera filtering algorithms are not applied. Note the difference below comparing the same image shot in JPG and RAW (slide the bar on the image to see the difference). Slide the bar on the image to see the RAW image quality compared to a JPG. Here's my workflow for using RAW images: Read the RAW image in Photoshop, keeping everything linear. In Photoshop, set the mode the 32bit, and save the image as an EXR. Open the EXR in Nuke and save this as a 16bit with ZIP compression. You may also want to use the denoiser in Nuke if your image is grainy. This should be done before any color corrections. A tripod A tripod is essential when extracting specular to align the images, and useful for cross-polarization to help with the lack of light from the polarizers. The Shoot With everything set up, you're ready to go.The process of taking a cross polarized photo is as follows: Adjust the exposure to compensate for the darkening effect of the polarizer Now that you can see, focus the camera. I always use manual focus Turn the camera polarizer until spec disappears to take a cross polarized photo Turn it 90 degrees further, so the spec reappears, to take a parallel polarized photo
A mounted LED light panel is recommended (pictured below). You can buy linear polarizer film here. You want the laminated type. The biggest issue you will face is that polarization filters make things a lot darker. That can cause the images to be out of focus (because the shutter speed is too slow) or grainy (because the ISO is too high). To account for this you need a bright light source and a tripod. I like to use an LED light panel mounted to my camera. This allows me to be mobile and fast, as opposed to needing to lug around a light on a stand. The fact that the light is coming from behind the camera, while typically undesirable for regular photos, is actually perfect for texture acquisition where we want flat, even lighting. In addition to the linear polarizer, a diffuser is placed over the light to create soft light and shadows on the subject. DSLR camera with circular polarizer, and mounted LED light panel with diffuser and linear polarizer Camera with a circular polarizing filter You will want to shoot in RAW. A digital camera tries to compensate for the lack of light in the cross polarized image using sharpening filters. That means you end up losing a lot of texture detail in your images. This makes the cross polarized image look saturated, contrasty, and blurred. Shooting in RAW avoids this since those camera filtering algorithms are not applied. Note the difference below comparing the same image shot in JPG and RAW (slide the bar on the image to see the difference). Slide the bar on the image to see the RAW image quality compared to a JPG. Here's my workflow for using RAW images: Read the RAW image in Photoshop, keeping everything linear. In Photoshop, set the mode the 32bit, and save the image as an EXR. Open the EXR in Nuke and save this as a 16bit with ZIP compression. You may also want to use the denoiser in Nuke if your image is grainy. This should be done before any color corrections. A tripod A tripod is essential when extracting specular to align the images, and useful for cross-polarization to help with the lack of light from the polarizers.
Smooth surfaces and a reduced number of machine supports ensure that a low amount of dirt clings to them and the machine is easy to clean.
EBImachine
Equipment and Setup Here's a list of all the equipment you'll need: A windowless room with no light Light source covered in linear polarizing film Camera with a circular polarizing filter A tripod A windowless room with no light Ideally, you will want to be in a room with no light, so the only light source is the one with polarizer. This gives you true cross polarization. It is sometimes possible to get decent results outside, but even if there is no direct sunlight, there will always be specular highlights from the sky that are unpolarized. What you get outside, therefore, is not cross polarization, but simply the effects of the camera's polarizer filter. When working with the camera's polarizer alone the trick is shooting flat objects (the ground, a fence, a wall) so that there is only one plane for the reflections which can then be polarized. With rounded objects (a rock, a tree trunk, etc.) you will only be able to eliminate some of the reflections (for example the reflection from the front, but on on the sides). Light source covered in linear polarizing film. A mounted LED light panel is recommended (pictured below). You can buy linear polarizer film here. You want the laminated type. The biggest issue you will face is that polarization filters make things a lot darker. That can cause the images to be out of focus (because the shutter speed is too slow) or grainy (because the ISO is too high). To account for this you need a bright light source and a tripod. I like to use an LED light panel mounted to my camera. This allows me to be mobile and fast, as opposed to needing to lug around a light on a stand. The fact that the light is coming from behind the camera, while typically undesirable for regular photos, is actually perfect for texture acquisition where we want flat, even lighting. In addition to the linear polarizer, a diffuser is placed over the light to create soft light and shadows on the subject. DSLR camera with circular polarizer, and mounted LED light panel with diffuser and linear polarizer Camera with a circular polarizing filter You will want to shoot in RAW. A digital camera tries to compensate for the lack of light in the cross polarized image using sharpening filters. That means you end up losing a lot of texture detail in your images. This makes the cross polarized image look saturated, contrasty, and blurred. Shooting in RAW avoids this since those camera filtering algorithms are not applied. Note the difference below comparing the same image shot in JPG and RAW (slide the bar on the image to see the difference). Slide the bar on the image to see the RAW image quality compared to a JPG. Here's my workflow for using RAW images: Read the RAW image in Photoshop, keeping everything linear. In Photoshop, set the mode the 32bit, and save the image as an EXR. Open the EXR in Nuke and save this as a 16bit with ZIP compression. You may also want to use the denoiser in Nuke if your image is grainy. This should be done before any color corrections. A tripod A tripod is essential when extracting specular to align the images, and useful for cross-polarization to help with the lack of light from the polarizers. The Shoot With everything set up, you're ready to go.The process of taking a cross polarized photo is as follows: Adjust the exposure to compensate for the darkening effect of the polarizer Now that you can see, focus the camera. I always use manual focus Turn the camera polarizer until spec disappears to take a cross polarized photo Turn it 90 degrees further, so the spec reappears, to take a parallel polarized photo
Here's my workflow for using RAW images: Read the RAW image in Photoshop, keeping everything linear. In Photoshop, set the mode the 32bit, and save the image as an EXR. Open the EXR in Nuke and save this as a 16bit with ZIP compression. You may also want to use the denoiser in Nuke if your image is grainy. This should be done before any color corrections.
Adjust the exposure to compensate for the darkening effect of the polarizer Now that you can see, focus the camera. I always use manual focus Turn the camera polarizer until spec disappears to take a cross polarized photo Turn it 90 degrees further, so the spec reappears, to take a parallel polarized photo
Separating the spec from an image like this can give us great insights into the details of how dielectric materials are working. For example, in the image below, notice that the powdery film (known as grape "bloom") that characteristically appears on the red grapes is visually composed of rough specular highlights. Being able to see these kinds of things in a photo separated into its diffuse and specular components helps an artist to know how to recreate this in a CG material. It is worth noting that the cross polarization process is not perfect. The derived spec images contain color, even though dielectric specular should be colorless. This is in part due to the the limitations of 8-bit images. If an image has a pixel value range of zero to one (black to white) and a color is removed (the color of the cross-polarized image), the result will be the inverse color, rather than white. The way around this mathematical problem is to use HDR images which have a value range that is above 1, meaning that a color can be subtracted and still result in a white spec. This is done by taking multiple images at bracketed exposures and combining them in a program such as HDR Lab's Picturenaut (Photoshop's HDR feature is less accurate). This alleviates the issue in the case of bright highlights that are above 1, but on dimmer highlights there is still some degree of color spill. The ICT labs postulate that this may in part be due to the effects of single scattering, where the light enters the surface but scatters exactly once off some element of the material before reflecting to the camera. This picks up some of the surface's pigmentation, adding a little color to the image. The take away is that, even when shooting multiple bracketed exposure HDR images, it is still quite difficult to obtain an image without color in the specular highlights. Additionally, taking multiple bracketed exposure images slows the process considerably, making it problematic for capture of human subjects (since it's hard to stand still for so long). Considering all of the above, in practice it is much simpler to just take regular non-HDR RAW images and, understanding that dielectric materials should have colorless spec, simply desaturate the resulting polarization-difference image (i.e. the derived "spec only" image) in post. Another issue to be aware of is that the proportional amounts of the diffuse and spec will be off slightly. This is because the parallel polarized image lets 100% of the spec through, but blocks 50% of the diffuse, meaning that the spec will be 2x brighter, in relation to the diffuse, than it would in a photo without any polarizing filters. You can observe in the images above that the skin looks oilier than it normally would. Once aware of this, it is easy to adjust for it in your comp by either brightening the diffuse or darkening the spec a bit. In the animated image below, you can see the effects of brightening the cross polarized "diffuse" pass and the resulting composited image. Equipment and Setup Here's a list of all the equipment you'll need: A windowless room with no light Light source covered in linear polarizing film Camera with a circular polarizing filter A tripod A windowless room with no light Ideally, you will want to be in a room with no light, so the only light source is the one with polarizer. This gives you true cross polarization. It is sometimes possible to get decent results outside, but even if there is no direct sunlight, there will always be specular highlights from the sky that are unpolarized. What you get outside, therefore, is not cross polarization, but simply the effects of the camera's polarizer filter. When working with the camera's polarizer alone the trick is shooting flat objects (the ground, a fence, a wall) so that there is only one plane for the reflections which can then be polarized. With rounded objects (a rock, a tree trunk, etc.) you will only be able to eliminate some of the reflections (for example the reflection from the front, but on on the sides). Light source covered in linear polarizing film. A mounted LED light panel is recommended (pictured below). You can buy linear polarizer film here. You want the laminated type. The biggest issue you will face is that polarization filters make things a lot darker. That can cause the images to be out of focus (because the shutter speed is too slow) or grainy (because the ISO is too high). To account for this you need a bright light source and a tripod. I like to use an LED light panel mounted to my camera. This allows me to be mobile and fast, as opposed to needing to lug around a light on a stand. The fact that the light is coming from behind the camera, while typically undesirable for regular photos, is actually perfect for texture acquisition where we want flat, even lighting. In addition to the linear polarizer, a diffuser is placed over the light to create soft light and shadows on the subject. DSLR camera with circular polarizer, and mounted LED light panel with diffuser and linear polarizer Camera with a circular polarizing filter You will want to shoot in RAW. A digital camera tries to compensate for the lack of light in the cross polarized image using sharpening filters. That means you end up losing a lot of texture detail in your images. This makes the cross polarized image look saturated, contrasty, and blurred. Shooting in RAW avoids this since those camera filtering algorithms are not applied. Note the difference below comparing the same image shot in JPG and RAW (slide the bar on the image to see the difference). Slide the bar on the image to see the RAW image quality compared to a JPG. Here's my workflow for using RAW images: Read the RAW image in Photoshop, keeping everything linear. In Photoshop, set the mode the 32bit, and save the image as an EXR. Open the EXR in Nuke and save this as a 16bit with ZIP compression. You may also want to use the denoiser in Nuke if your image is grainy. This should be done before any color corrections. A tripod A tripod is essential when extracting specular to align the images, and useful for cross-polarization to help with the lack of light from the polarizers. The Shoot With everything set up, you're ready to go.The process of taking a cross polarized photo is as follows: Adjust the exposure to compensate for the darkening effect of the polarizer Now that you can see, focus the camera. I always use manual focus Turn the camera polarizer until spec disappears to take a cross polarized photo Turn it 90 degrees further, so the spec reappears, to take a parallel polarized photo
Deriving a spec pass from a photo An additional benefit is that when a cross polarized photo is subtracted from a parallel polarized photo in a compositing program like Nuke, we can see what the specular highlights look like on an actual photo. This allows texture artists to see what a real world specular pass looks like, giving them a photographic reference for to base their CG spec pass on. This technique is also relatively simple. The only trick is to use a tripod and have your subject stand perfectly still while you take the two photos so they will align properly. The first photo is taken with the polarizer filter on the camera rotated to be parallel to the polarizer on the light (A), and a second photo with the polarizer rotated 90 degrees to be perpendicular, and thus cross-polarized (B). Then in Nuke, subtract the two images (A-B) giving you the specular difference. You will need to desaturate this as well for dielectric materials. The final image shows the result of adding the cross-polarized "diffuse only" image with the derived specular image (B+C). Separating the spec from an image like this can give us great insights into the details of how dielectric materials are working. For example, in the image below, notice that the powdery film (known as grape "bloom") that characteristically appears on the red grapes is visually composed of rough specular highlights. Being able to see these kinds of things in a photo separated into its diffuse and specular components helps an artist to know how to recreate this in a CG material. It is worth noting that the cross polarization process is not perfect. The derived spec images contain color, even though dielectric specular should be colorless. This is in part due to the the limitations of 8-bit images. If an image has a pixel value range of zero to one (black to white) and a color is removed (the color of the cross-polarized image), the result will be the inverse color, rather than white. The way around this mathematical problem is to use HDR images which have a value range that is above 1, meaning that a color can be subtracted and still result in a white spec. This is done by taking multiple images at bracketed exposures and combining them in a program such as HDR Lab's Picturenaut (Photoshop's HDR feature is less accurate). This alleviates the issue in the case of bright highlights that are above 1, but on dimmer highlights there is still some degree of color spill. The ICT labs postulate that this may in part be due to the effects of single scattering, where the light enters the surface but scatters exactly once off some element of the material before reflecting to the camera. This picks up some of the surface's pigmentation, adding a little color to the image. The take away is that, even when shooting multiple bracketed exposure HDR images, it is still quite difficult to obtain an image without color in the specular highlights. Additionally, taking multiple bracketed exposure images slows the process considerably, making it problematic for capture of human subjects (since it's hard to stand still for so long). Considering all of the above, in practice it is much simpler to just take regular non-HDR RAW images and, understanding that dielectric materials should have colorless spec, simply desaturate the resulting polarization-difference image (i.e. the derived "spec only" image) in post. Another issue to be aware of is that the proportional amounts of the diffuse and spec will be off slightly. This is because the parallel polarized image lets 100% of the spec through, but blocks 50% of the diffuse, meaning that the spec will be 2x brighter, in relation to the diffuse, than it would in a photo without any polarizing filters. You can observe in the images above that the skin looks oilier than it normally would. Once aware of this, it is easy to adjust for it in your comp by either brightening the diffuse or darkening the spec a bit. In the animated image below, you can see the effects of brightening the cross polarized "diffuse" pass and the resulting composited image. Equipment and Setup Here's a list of all the equipment you'll need: A windowless room with no light Light source covered in linear polarizing film Camera with a circular polarizing filter A tripod A windowless room with no light Ideally, you will want to be in a room with no light, so the only light source is the one with polarizer. This gives you true cross polarization. It is sometimes possible to get decent results outside, but even if there is no direct sunlight, there will always be specular highlights from the sky that are unpolarized. What you get outside, therefore, is not cross polarization, but simply the effects of the camera's polarizer filter. When working with the camera's polarizer alone the trick is shooting flat objects (the ground, a fence, a wall) so that there is only one plane for the reflections which can then be polarized. With rounded objects (a rock, a tree trunk, etc.) you will only be able to eliminate some of the reflections (for example the reflection from the front, but on on the sides). Light source covered in linear polarizing film. A mounted LED light panel is recommended (pictured below). You can buy linear polarizer film here. You want the laminated type. The biggest issue you will face is that polarization filters make things a lot darker. That can cause the images to be out of focus (because the shutter speed is too slow) or grainy (because the ISO is too high). To account for this you need a bright light source and a tripod. I like to use an LED light panel mounted to my camera. This allows me to be mobile and fast, as opposed to needing to lug around a light on a stand. The fact that the light is coming from behind the camera, while typically undesirable for regular photos, is actually perfect for texture acquisition where we want flat, even lighting. In addition to the linear polarizer, a diffuser is placed over the light to create soft light and shadows on the subject. DSLR camera with circular polarizer, and mounted LED light panel with diffuser and linear polarizer Camera with a circular polarizing filter You will want to shoot in RAW. A digital camera tries to compensate for the lack of light in the cross polarized image using sharpening filters. That means you end up losing a lot of texture detail in your images. This makes the cross polarized image look saturated, contrasty, and blurred. Shooting in RAW avoids this since those camera filtering algorithms are not applied. Note the difference below comparing the same image shot in JPG and RAW (slide the bar on the image to see the difference). Slide the bar on the image to see the RAW image quality compared to a JPG. Here's my workflow for using RAW images: Read the RAW image in Photoshop, keeping everything linear. In Photoshop, set the mode the 32bit, and save the image as an EXR. Open the EXR in Nuke and save this as a 16bit with ZIP compression. You may also want to use the denoiser in Nuke if your image is grainy. This should be done before any color corrections. A tripod A tripod is essential when extracting specular to align the images, and useful for cross-polarization to help with the lack of light from the polarizers. The Shoot With everything set up, you're ready to go.The process of taking a cross polarized photo is as follows: Adjust the exposure to compensate for the darkening effect of the polarizer Now that you can see, focus the camera. I always use manual focus Turn the camera polarizer until spec disappears to take a cross polarized photo Turn it 90 degrees further, so the spec reappears, to take a parallel polarized photo
The take away is that, even when shooting multiple bracketed exposure HDR images, it is still quite difficult to obtain an image without color in the specular highlights. Additionally, taking multiple bracketed exposure images slows the process considerably, making it problematic for capture of human subjects (since it's hard to stand still for so long). Considering all of the above, in practice it is much simpler to just take regular non-HDR RAW images and, understanding that dielectric materials should have colorless spec, simply desaturate the resulting polarization-difference image (i.e. the derived "spec only" image) in post. Another issue to be aware of is that the proportional amounts of the diffuse and spec will be off slightly. This is because the parallel polarized image lets 100% of the spec through, but blocks 50% of the diffuse, meaning that the spec will be 2x brighter, in relation to the diffuse, than it would in a photo without any polarizing filters. You can observe in the images above that the skin looks oilier than it normally would. Once aware of this, it is easy to adjust for it in your comp by either brightening the diffuse or darkening the spec a bit. In the animated image below, you can see the effects of brightening the cross polarized "diffuse" pass and the resulting composited image. Equipment and Setup Here's a list of all the equipment you'll need: A windowless room with no light Light source covered in linear polarizing film Camera with a circular polarizing filter A tripod A windowless room with no light Ideally, you will want to be in a room with no light, so the only light source is the one with polarizer. This gives you true cross polarization. It is sometimes possible to get decent results outside, but even if there is no direct sunlight, there will always be specular highlights from the sky that are unpolarized. What you get outside, therefore, is not cross polarization, but simply the effects of the camera's polarizer filter. When working with the camera's polarizer alone the trick is shooting flat objects (the ground, a fence, a wall) so that there is only one plane for the reflections which can then be polarized. With rounded objects (a rock, a tree trunk, etc.) you will only be able to eliminate some of the reflections (for example the reflection from the front, but on on the sides). Light source covered in linear polarizing film. A mounted LED light panel is recommended (pictured below). You can buy linear polarizer film here. You want the laminated type. The biggest issue you will face is that polarization filters make things a lot darker. That can cause the images to be out of focus (because the shutter speed is too slow) or grainy (because the ISO is too high). To account for this you need a bright light source and a tripod. I like to use an LED light panel mounted to my camera. This allows me to be mobile and fast, as opposed to needing to lug around a light on a stand. The fact that the light is coming from behind the camera, while typically undesirable for regular photos, is actually perfect for texture acquisition where we want flat, even lighting. In addition to the linear polarizer, a diffuser is placed over the light to create soft light and shadows on the subject. DSLR camera with circular polarizer, and mounted LED light panel with diffuser and linear polarizer Camera with a circular polarizing filter You will want to shoot in RAW. A digital camera tries to compensate for the lack of light in the cross polarized image using sharpening filters. That means you end up losing a lot of texture detail in your images. This makes the cross polarized image look saturated, contrasty, and blurred. Shooting in RAW avoids this since those camera filtering algorithms are not applied. Note the difference below comparing the same image shot in JPG and RAW (slide the bar on the image to see the difference). Slide the bar on the image to see the RAW image quality compared to a JPG. Here's my workflow for using RAW images: Read the RAW image in Photoshop, keeping everything linear. In Photoshop, set the mode the 32bit, and save the image as an EXR. Open the EXR in Nuke and save this as a 16bit with ZIP compression. You may also want to use the denoiser in Nuke if your image is grainy. This should be done before any color corrections. A tripod A tripod is essential when extracting specular to align the images, and useful for cross-polarization to help with the lack of light from the polarizers. The Shoot With everything set up, you're ready to go.The process of taking a cross polarized photo is as follows: Adjust the exposure to compensate for the darkening effect of the polarizer Now that you can see, focus the camera. I always use manual focus Turn the camera polarizer until spec disappears to take a cross polarized photo Turn it 90 degrees further, so the spec reappears, to take a parallel polarized photo
With everything set up, you're ready to go.The process of taking a cross polarized photo is as follows: Adjust the exposure to compensate for the darkening effect of the polarizer Now that you can see, focus the camera. I always use manual focus Turn the camera polarizer until spec disappears to take a cross polarized photo Turn it 90 degrees further, so the spec reappears, to take a parallel polarized photo
Whether it be material damage, contamination or the most minuscule particles of residual caustic: nothing can hide from the Linatronic. With its highly sensitive inspection modules it sees through each individual container – and only lets fault-free items pass through. Proof of its high precision sorting ability is not least apparent in its minimum false rejection rate of just 0.3 percent. How is this possible? Through the standard use of DART 4.0, the latest generation of Krones inspection software.
Inspection modules capable of multitasking, energy-saving components and a false rejection rate of just 0.3 percent prove that it is also possible to create maximum production reliability with a low total cost of ownership.
A tripod is essential when extracting specular to align the images, and useful for cross-polarization to help with the lack of light from the polarizers.
A windowless room with no light Ideally, you will want to be in a room with no light, so the only light source is the one with polarizer. This gives you true cross polarization. It is sometimes possible to get decent results outside, but even if there is no direct sunlight, there will always be specular highlights from the sky that are unpolarized. What you get outside, therefore, is not cross polarization, but simply the effects of the camera's polarizer filter. When working with the camera's polarizer alone the trick is shooting flat objects (the ground, a fence, a wall) so that there is only one plane for the reflections which can then be polarized. With rounded objects (a rock, a tree trunk, etc.) you will only be able to eliminate some of the reflections (for example the reflection from the front, but on on the sides). Light source covered in linear polarizing film. A mounted LED light panel is recommended (pictured below). You can buy linear polarizer film here. You want the laminated type. The biggest issue you will face is that polarization filters make things a lot darker. That can cause the images to be out of focus (because the shutter speed is too slow) or grainy (because the ISO is too high). To account for this you need a bright light source and a tripod. I like to use an LED light panel mounted to my camera. This allows me to be mobile and fast, as opposed to needing to lug around a light on a stand. The fact that the light is coming from behind the camera, while typically undesirable for regular photos, is actually perfect for texture acquisition where we want flat, even lighting. In addition to the linear polarizer, a diffuser is placed over the light to create soft light and shadows on the subject. DSLR camera with circular polarizer, and mounted LED light panel with diffuser and linear polarizer Camera with a circular polarizing filter You will want to shoot in RAW. A digital camera tries to compensate for the lack of light in the cross polarized image using sharpening filters. That means you end up losing a lot of texture detail in your images. This makes the cross polarized image look saturated, contrasty, and blurred. Shooting in RAW avoids this since those camera filtering algorithms are not applied. Note the difference below comparing the same image shot in JPG and RAW (slide the bar on the image to see the difference). Slide the bar on the image to see the RAW image quality compared to a JPG. Here's my workflow for using RAW images: Read the RAW image in Photoshop, keeping everything linear. In Photoshop, set the mode the 32bit, and save the image as an EXR. Open the EXR in Nuke and save this as a 16bit with ZIP compression. You may also want to use the denoiser in Nuke if your image is grainy. This should be done before any color corrections. A tripod A tripod is essential when extracting specular to align the images, and useful for cross-polarization to help with the lack of light from the polarizers. The Shoot With everything set up, you're ready to go.The process of taking a cross polarized photo is as follows: Adjust the exposure to compensate for the darkening effect of the polarizer Now that you can see, focus the camera. I always use manual focus Turn the camera polarizer until spec disappears to take a cross polarized photo Turn it 90 degrees further, so the spec reappears, to take a parallel polarized photo
You will want to shoot in RAW. A digital camera tries to compensate for the lack of light in the cross polarized image using sharpening filters. That means you end up losing a lot of texture detail in your images. This makes the cross polarized image look saturated, contrasty, and blurred. Shooting in RAW avoids this since those camera filtering algorithms are not applied. Note the difference below comparing the same image shot in JPG and RAW (slide the bar on the image to see the difference). Slide the bar on the image to see the RAW image quality compared to a JPG. Here's my workflow for using RAW images: Read the RAW image in Photoshop, keeping everything linear. In Photoshop, set the mode the 32bit, and save the image as an EXR. Open the EXR in Nuke and save this as a 16bit with ZIP compression. You may also want to use the denoiser in Nuke if your image is grainy. This should be done before any color corrections. A tripod A tripod is essential when extracting specular to align the images, and useful for cross-polarization to help with the lack of light from the polarizers.
Particular care was taken when selecting the surface of the conveyor belts. It is more resilient to glass and prevents the absorption of lubricants and liquids.
KRONES Checkmat manual PDF
Equipment and Setup Here's a list of all the equipment you'll need: A windowless room with no light Light source covered in linear polarizing film Camera with a circular polarizing filter A tripod A windowless room with no light Ideally, you will want to be in a room with no light, so the only light source is the one with polarizer. This gives you true cross polarization. It is sometimes possible to get decent results outside, but even if there is no direct sunlight, there will always be specular highlights from the sky that are unpolarized. What you get outside, therefore, is not cross polarization, but simply the effects of the camera's polarizer filter. When working with the camera's polarizer alone the trick is shooting flat objects (the ground, a fence, a wall) so that there is only one plane for the reflections which can then be polarized. With rounded objects (a rock, a tree trunk, etc.) you will only be able to eliminate some of the reflections (for example the reflection from the front, but on on the sides). Light source covered in linear polarizing film. A mounted LED light panel is recommended (pictured below). You can buy linear polarizer film here. You want the laminated type. The biggest issue you will face is that polarization filters make things a lot darker. That can cause the images to be out of focus (because the shutter speed is too slow) or grainy (because the ISO is too high). To account for this you need a bright light source and a tripod. I like to use an LED light panel mounted to my camera. This allows me to be mobile and fast, as opposed to needing to lug around a light on a stand. The fact that the light is coming from behind the camera, while typically undesirable for regular photos, is actually perfect for texture acquisition where we want flat, even lighting. In addition to the linear polarizer, a diffuser is placed over the light to create soft light and shadows on the subject. DSLR camera with circular polarizer, and mounted LED light panel with diffuser and linear polarizer Camera with a circular polarizing filter You will want to shoot in RAW. A digital camera tries to compensate for the lack of light in the cross polarized image using sharpening filters. That means you end up losing a lot of texture detail in your images. This makes the cross polarized image look saturated, contrasty, and blurred. Shooting in RAW avoids this since those camera filtering algorithms are not applied. Note the difference below comparing the same image shot in JPG and RAW (slide the bar on the image to see the difference). Slide the bar on the image to see the RAW image quality compared to a JPG. Here's my workflow for using RAW images: Read the RAW image in Photoshop, keeping everything linear. In Photoshop, set the mode the 32bit, and save the image as an EXR. Open the EXR in Nuke and save this as a 16bit with ZIP compression. You may also want to use the denoiser in Nuke if your image is grainy. This should be done before any color corrections. A tripod A tripod is essential when extracting specular to align the images, and useful for cross-polarization to help with the lack of light from the polarizers. The Shoot With everything set up, you're ready to go.The process of taking a cross polarized photo is as follows: Adjust the exposure to compensate for the darkening effect of the polarizer Now that you can see, focus the camera. I always use manual focus Turn the camera polarizer until spec disappears to take a cross polarized photo Turn it 90 degrees further, so the spec reappears, to take a parallel polarized photo
Deriving a spec pass from a photo An additional benefit is that when a cross polarized photo is subtracted from a parallel polarized photo in a compositing program like Nuke, we can see what the specular highlights look like on an actual photo. This allows texture artists to see what a real world specular pass looks like, giving them a photographic reference for to base their CG spec pass on. This technique is also relatively simple. The only trick is to use a tripod and have your subject stand perfectly still while you take the two photos so they will align properly. The first photo is taken with the polarizer filter on the camera rotated to be parallel to the polarizer on the light (A), and a second photo with the polarizer rotated 90 degrees to be perpendicular, and thus cross-polarized (B). Then in Nuke, subtract the two images (A-B) giving you the specular difference. You will need to desaturate this as well for dielectric materials. The final image shows the result of adding the cross-polarized "diffuse only" image with the derived specular image (B+C). Separating the spec from an image like this can give us great insights into the details of how dielectric materials are working. For example, in the image below, notice that the powdery film (known as grape "bloom") that characteristically appears on the red grapes is visually composed of rough specular highlights. Being able to see these kinds of things in a photo separated into its diffuse and specular components helps an artist to know how to recreate this in a CG material. It is worth noting that the cross polarization process is not perfect. The derived spec images contain color, even though dielectric specular should be colorless. This is in part due to the the limitations of 8-bit images. If an image has a pixel value range of zero to one (black to white) and a color is removed (the color of the cross-polarized image), the result will be the inverse color, rather than white. The way around this mathematical problem is to use HDR images which have a value range that is above 1, meaning that a color can be subtracted and still result in a white spec. This is done by taking multiple images at bracketed exposures and combining them in a program such as HDR Lab's Picturenaut (Photoshop's HDR feature is less accurate). This alleviates the issue in the case of bright highlights that are above 1, but on dimmer highlights there is still some degree of color spill. The ICT labs postulate that this may in part be due to the effects of single scattering, where the light enters the surface but scatters exactly once off some element of the material before reflecting to the camera. This picks up some of the surface's pigmentation, adding a little color to the image. The take away is that, even when shooting multiple bracketed exposure HDR images, it is still quite difficult to obtain an image without color in the specular highlights. Additionally, taking multiple bracketed exposure images slows the process considerably, making it problematic for capture of human subjects (since it's hard to stand still for so long). Considering all of the above, in practice it is much simpler to just take regular non-HDR RAW images and, understanding that dielectric materials should have colorless spec, simply desaturate the resulting polarization-difference image (i.e. the derived "spec only" image) in post. Another issue to be aware of is that the proportional amounts of the diffuse and spec will be off slightly. This is because the parallel polarized image lets 100% of the spec through, but blocks 50% of the diffuse, meaning that the spec will be 2x brighter, in relation to the diffuse, than it would in a photo without any polarizing filters. You can observe in the images above that the skin looks oilier than it normally would. Once aware of this, it is easy to adjust for it in your comp by either brightening the diffuse or darkening the spec a bit. In the animated image below, you can see the effects of brightening the cross polarized "diffuse" pass and the resulting composited image. Equipment and Setup Here's a list of all the equipment you'll need: A windowless room with no light Light source covered in linear polarizing film Camera with a circular polarizing filter A tripod A windowless room with no light Ideally, you will want to be in a room with no light, so the only light source is the one with polarizer. This gives you true cross polarization. It is sometimes possible to get decent results outside, but even if there is no direct sunlight, there will always be specular highlights from the sky that are unpolarized. What you get outside, therefore, is not cross polarization, but simply the effects of the camera's polarizer filter. When working with the camera's polarizer alone the trick is shooting flat objects (the ground, a fence, a wall) so that there is only one plane for the reflections which can then be polarized. With rounded objects (a rock, a tree trunk, etc.) you will only be able to eliminate some of the reflections (for example the reflection from the front, but on on the sides). Light source covered in linear polarizing film. A mounted LED light panel is recommended (pictured below). You can buy linear polarizer film here. You want the laminated type. The biggest issue you will face is that polarization filters make things a lot darker. That can cause the images to be out of focus (because the shutter speed is too slow) or grainy (because the ISO is too high). To account for this you need a bright light source and a tripod. I like to use an LED light panel mounted to my camera. This allows me to be mobile and fast, as opposed to needing to lug around a light on a stand. The fact that the light is coming from behind the camera, while typically undesirable for regular photos, is actually perfect for texture acquisition where we want flat, even lighting. In addition to the linear polarizer, a diffuser is placed over the light to create soft light and shadows on the subject. DSLR camera with circular polarizer, and mounted LED light panel with diffuser and linear polarizer Camera with a circular polarizing filter You will want to shoot in RAW. A digital camera tries to compensate for the lack of light in the cross polarized image using sharpening filters. That means you end up losing a lot of texture detail in your images. This makes the cross polarized image look saturated, contrasty, and blurred. Shooting in RAW avoids this since those camera filtering algorithms are not applied. Note the difference below comparing the same image shot in JPG and RAW (slide the bar on the image to see the difference). Slide the bar on the image to see the RAW image quality compared to a JPG. Here's my workflow for using RAW images: Read the RAW image in Photoshop, keeping everything linear. In Photoshop, set the mode the 32bit, and save the image as an EXR. Open the EXR in Nuke and save this as a 16bit with ZIP compression. You may also want to use the denoiser in Nuke if your image is grainy. This should be done before any color corrections. A tripod A tripod is essential when extracting specular to align the images, and useful for cross-polarization to help with the lack of light from the polarizers. The Shoot With everything set up, you're ready to go.The process of taking a cross polarized photo is as follows: Adjust the exposure to compensate for the darkening effect of the polarizer Now that you can see, focus the camera. I always use manual focus Turn the camera polarizer until spec disappears to take a cross polarized photo Turn it 90 degrees further, so the spec reappears, to take a parallel polarized photo
Removing spec from a photo for texture maps This technique has an immediate benefit for taking photographs for use in texture maps since it removes unwanted specular highlights and reflections in the photo (slide the bar on the image below). hi Cross polarization removes specular reflectance from a photo, making it ideal for texture acquisition. When taking pictures of human skin, you can shoot cross-polarized photos from multiple angles, and then combine them together in Photoshop using masking and the "lighten only" blending mode. This removes any shadowing in the images so they merge seamlessly, as opposed to using the clone stamp tool to combine them which can lead to splotchy uneven surfaces. This "unwrapped" map can then be used as a good starting point source image for the texture map on a face. Deriving a spec pass from a photo An additional benefit is that when a cross polarized photo is subtracted from a parallel polarized photo in a compositing program like Nuke, we can see what the specular highlights look like on an actual photo. This allows texture artists to see what a real world specular pass looks like, giving them a photographic reference for to base their CG spec pass on. This technique is also relatively simple. The only trick is to use a tripod and have your subject stand perfectly still while you take the two photos so they will align properly. The first photo is taken with the polarizer filter on the camera rotated to be parallel to the polarizer on the light (A), and a second photo with the polarizer rotated 90 degrees to be perpendicular, and thus cross-polarized (B). Then in Nuke, subtract the two images (A-B) giving you the specular difference. You will need to desaturate this as well for dielectric materials. The final image shows the result of adding the cross-polarized "diffuse only" image with the derived specular image (B+C). Separating the spec from an image like this can give us great insights into the details of how dielectric materials are working. For example, in the image below, notice that the powdery film (known as grape "bloom") that characteristically appears on the red grapes is visually composed of rough specular highlights. Being able to see these kinds of things in a photo separated into its diffuse and specular components helps an artist to know how to recreate this in a CG material. It is worth noting that the cross polarization process is not perfect. The derived spec images contain color, even though dielectric specular should be colorless. This is in part due to the the limitations of 8-bit images. If an image has a pixel value range of zero to one (black to white) and a color is removed (the color of the cross-polarized image), the result will be the inverse color, rather than white. The way around this mathematical problem is to use HDR images which have a value range that is above 1, meaning that a color can be subtracted and still result in a white spec. This is done by taking multiple images at bracketed exposures and combining them in a program such as HDR Lab's Picturenaut (Photoshop's HDR feature is less accurate). This alleviates the issue in the case of bright highlights that are above 1, but on dimmer highlights there is still some degree of color spill. The ICT labs postulate that this may in part be due to the effects of single scattering, where the light enters the surface but scatters exactly once off some element of the material before reflecting to the camera. This picks up some of the surface's pigmentation, adding a little color to the image. The take away is that, even when shooting multiple bracketed exposure HDR images, it is still quite difficult to obtain an image without color in the specular highlights. Additionally, taking multiple bracketed exposure images slows the process considerably, making it problematic for capture of human subjects (since it's hard to stand still for so long). Considering all of the above, in practice it is much simpler to just take regular non-HDR RAW images and, understanding that dielectric materials should have colorless spec, simply desaturate the resulting polarization-difference image (i.e. the derived "spec only" image) in post. Another issue to be aware of is that the proportional amounts of the diffuse and spec will be off slightly. This is because the parallel polarized image lets 100% of the spec through, but blocks 50% of the diffuse, meaning that the spec will be 2x brighter, in relation to the diffuse, than it would in a photo without any polarizing filters. You can observe in the images above that the skin looks oilier than it normally would. Once aware of this, it is easy to adjust for it in your comp by either brightening the diffuse or darkening the spec a bit. In the animated image below, you can see the effects of brightening the cross polarized "diffuse" pass and the resulting composited image. Equipment and Setup Here's a list of all the equipment you'll need: A windowless room with no light Light source covered in linear polarizing film Camera with a circular polarizing filter A tripod A windowless room with no light Ideally, you will want to be in a room with no light, so the only light source is the one with polarizer. This gives you true cross polarization. It is sometimes possible to get decent results outside, but even if there is no direct sunlight, there will always be specular highlights from the sky that are unpolarized. What you get outside, therefore, is not cross polarization, but simply the effects of the camera's polarizer filter. When working with the camera's polarizer alone the trick is shooting flat objects (the ground, a fence, a wall) so that there is only one plane for the reflections which can then be polarized. With rounded objects (a rock, a tree trunk, etc.) you will only be able to eliminate some of the reflections (for example the reflection from the front, but on on the sides). Light source covered in linear polarizing film. A mounted LED light panel is recommended (pictured below). You can buy linear polarizer film here. You want the laminated type. The biggest issue you will face is that polarization filters make things a lot darker. That can cause the images to be out of focus (because the shutter speed is too slow) or grainy (because the ISO is too high). To account for this you need a bright light source and a tripod. I like to use an LED light panel mounted to my camera. This allows me to be mobile and fast, as opposed to needing to lug around a light on a stand. The fact that the light is coming from behind the camera, while typically undesirable for regular photos, is actually perfect for texture acquisition where we want flat, even lighting. In addition to the linear polarizer, a diffuser is placed over the light to create soft light and shadows on the subject. DSLR camera with circular polarizer, and mounted LED light panel with diffuser and linear polarizer Camera with a circular polarizing filter You will want to shoot in RAW. A digital camera tries to compensate for the lack of light in the cross polarized image using sharpening filters. That means you end up losing a lot of texture detail in your images. This makes the cross polarized image look saturated, contrasty, and blurred. Shooting in RAW avoids this since those camera filtering algorithms are not applied. Note the difference below comparing the same image shot in JPG and RAW (slide the bar on the image to see the difference). Slide the bar on the image to see the RAW image quality compared to a JPG. Here's my workflow for using RAW images: Read the RAW image in Photoshop, keeping everything linear. In Photoshop, set the mode the 32bit, and save the image as an EXR. Open the EXR in Nuke and save this as a 16bit with ZIP compression. You may also want to use the denoiser in Nuke if your image is grainy. This should be done before any color corrections. A tripod A tripod is essential when extracting specular to align the images, and useful for cross-polarization to help with the lack of light from the polarizers. The Shoot With everything set up, you're ready to go.The process of taking a cross polarized photo is as follows: Adjust the exposure to compensate for the darkening effect of the polarizer Now that you can see, focus the camera. I always use manual focus Turn the camera polarizer until spec disappears to take a cross polarized photo Turn it 90 degrees further, so the spec reappears, to take a parallel polarized photo
Krones ebimachine
The Linatronic protects your consumers against unpleasant surprises. For its inspection modules scrutinise every container and detect event the smallest defects or irregularities.
The Linatronic AI is the first of its kind in the world - and ushers in a new era of the empty-container inspection technology. How is that? Because it is equipped with a neural network trained with Deep Learning for maximum precision. After 40 years of experience in inspection technology, we are daring to take the plunge into a new technology, and thus open up a whole world of previously untapped possibilities!
It is worth noting that the cross polarization process is not perfect. The derived spec images contain color, even though dielectric specular should be colorless. This is in part due to the the limitations of 8-bit images. If an image has a pixel value range of zero to one (black to white) and a color is removed (the color of the cross-polarized image), the result will be the inverse color, rather than white. The way around this mathematical problem is to use HDR images which have a value range that is above 1, meaning that a color can be subtracted and still result in a white spec. This is done by taking multiple images at bracketed exposures and combining them in a program such as HDR Lab's Picturenaut (Photoshop's HDR feature is less accurate). This alleviates the issue in the case of bright highlights that are above 1, but on dimmer highlights there is still some degree of color spill. The ICT labs postulate that this may in part be due to the effects of single scattering, where the light enters the surface but scatters exactly once off some element of the material before reflecting to the camera. This picks up some of the surface's pigmentation, adding a little color to the image. The take away is that, even when shooting multiple bracketed exposure HDR images, it is still quite difficult to obtain an image without color in the specular highlights. Additionally, taking multiple bracketed exposure images slows the process considerably, making it problematic for capture of human subjects (since it's hard to stand still for so long). Considering all of the above, in practice it is much simpler to just take regular non-HDR RAW images and, understanding that dielectric materials should have colorless spec, simply desaturate the resulting polarization-difference image (i.e. the derived "spec only" image) in post. Another issue to be aware of is that the proportional amounts of the diffuse and spec will be off slightly. This is because the parallel polarized image lets 100% of the spec through, but blocks 50% of the diffuse, meaning that the spec will be 2x brighter, in relation to the diffuse, than it would in a photo without any polarizing filters. You can observe in the images above that the skin looks oilier than it normally would. Once aware of this, it is easy to adjust for it in your comp by either brightening the diffuse or darkening the spec a bit. In the animated image below, you can see the effects of brightening the cross polarized "diffuse" pass and the resulting composited image. Equipment and Setup Here's a list of all the equipment you'll need: A windowless room with no light Light source covered in linear polarizing film Camera with a circular polarizing filter A tripod A windowless room with no light Ideally, you will want to be in a room with no light, so the only light source is the one with polarizer. This gives you true cross polarization. It is sometimes possible to get decent results outside, but even if there is no direct sunlight, there will always be specular highlights from the sky that are unpolarized. What you get outside, therefore, is not cross polarization, but simply the effects of the camera's polarizer filter. When working with the camera's polarizer alone the trick is shooting flat objects (the ground, a fence, a wall) so that there is only one plane for the reflections which can then be polarized. With rounded objects (a rock, a tree trunk, etc.) you will only be able to eliminate some of the reflections (for example the reflection from the front, but on on the sides). Light source covered in linear polarizing film. A mounted LED light panel is recommended (pictured below). You can buy linear polarizer film here. You want the laminated type. The biggest issue you will face is that polarization filters make things a lot darker. That can cause the images to be out of focus (because the shutter speed is too slow) or grainy (because the ISO is too high). To account for this you need a bright light source and a tripod. I like to use an LED light panel mounted to my camera. This allows me to be mobile and fast, as opposed to needing to lug around a light on a stand. The fact that the light is coming from behind the camera, while typically undesirable for regular photos, is actually perfect for texture acquisition where we want flat, even lighting. In addition to the linear polarizer, a diffuser is placed over the light to create soft light and shadows on the subject. DSLR camera with circular polarizer, and mounted LED light panel with diffuser and linear polarizer Camera with a circular polarizing filter You will want to shoot in RAW. A digital camera tries to compensate for the lack of light in the cross polarized image using sharpening filters. That means you end up losing a lot of texture detail in your images. This makes the cross polarized image look saturated, contrasty, and blurred. Shooting in RAW avoids this since those camera filtering algorithms are not applied. Note the difference below comparing the same image shot in JPG and RAW (slide the bar on the image to see the difference). Slide the bar on the image to see the RAW image quality compared to a JPG. Here's my workflow for using RAW images: Read the RAW image in Photoshop, keeping everything linear. In Photoshop, set the mode the 32bit, and save the image as an EXR. Open the EXR in Nuke and save this as a 16bit with ZIP compression. You may also want to use the denoiser in Nuke if your image is grainy. This should be done before any color corrections. A tripod A tripod is essential when extracting specular to align the images, and useful for cross-polarization to help with the lack of light from the polarizers. The Shoot With everything set up, you're ready to go.The process of taking a cross polarized photo is as follows: Adjust the exposure to compensate for the darkening effect of the polarizer Now that you can see, focus the camera. I always use manual focus Turn the camera polarizer until spec disappears to take a cross polarized photo Turn it 90 degrees further, so the spec reappears, to take a parallel polarized photo
With the GRS remote service platform your machine is directly linked with the Krones service department: If you require assistance, an inspection expert from Krones simply accesses the Linatronic online and immediately performs the task in hand – without having to travel to your company, at any time of the day or night.
It is worth noting that the cross polarization process is not perfect. The derived spec images contain color, even though dielectric specular should be colorless. This is in part due to the the limitations of 8-bit images. If an image has a pixel value range of zero to one (black to white) and a color is removed (the color of the cross-polarized image), the result will be the inverse color, rather than white. The way around this mathematical problem is to use HDR images which have a value range that is above 1, meaning that a color can be subtracted and still result in a white spec. This is done by taking multiple images at bracketed exposures and combining them in a program such as HDR Lab's Picturenaut (Photoshop's HDR feature is less accurate). This alleviates the issue in the case of bright highlights that are above 1, but on dimmer highlights there is still some degree of color spill. The ICT labs postulate that this may in part be due to the effects of single scattering, where the light enters the surface but scatters exactly once off some element of the material before reflecting to the camera. This picks up some of the surface's pigmentation, adding a little color to the image. The take away is that, even when shooting multiple bracketed exposure HDR images, it is still quite difficult to obtain an image without color in the specular highlights. Additionally, taking multiple bracketed exposure images slows the process considerably, making it problematic for capture of human subjects (since it's hard to stand still for so long). Considering all of the above, in practice it is much simpler to just take regular non-HDR RAW images and, understanding that dielectric materials should have colorless spec, simply desaturate the resulting polarization-difference image (i.e. the derived "spec only" image) in post. Another issue to be aware of is that the proportional amounts of the diffuse and spec will be off slightly. This is because the parallel polarized image lets 100% of the spec through, but blocks 50% of the diffuse, meaning that the spec will be 2x brighter, in relation to the diffuse, than it would in a photo without any polarizing filters. You can observe in the images above that the skin looks oilier than it normally would. Once aware of this, it is easy to adjust for it in your comp by either brightening the diffuse or darkening the spec a bit. In the animated image below, you can see the effects of brightening the cross polarized "diffuse" pass and the resulting composited image. Equipment and Setup Here's a list of all the equipment you'll need: A windowless room with no light Light source covered in linear polarizing film Camera with a circular polarizing filter A tripod A windowless room with no light Ideally, you will want to be in a room with no light, so the only light source is the one with polarizer. This gives you true cross polarization. It is sometimes possible to get decent results outside, but even if there is no direct sunlight, there will always be specular highlights from the sky that are unpolarized. What you get outside, therefore, is not cross polarization, but simply the effects of the camera's polarizer filter. When working with the camera's polarizer alone the trick is shooting flat objects (the ground, a fence, a wall) so that there is only one plane for the reflections which can then be polarized. With rounded objects (a rock, a tree trunk, etc.) you will only be able to eliminate some of the reflections (for example the reflection from the front, but on on the sides). Light source covered in linear polarizing film. A mounted LED light panel is recommended (pictured below). You can buy linear polarizer film here. You want the laminated type. The biggest issue you will face is that polarization filters make things a lot darker. That can cause the images to be out of focus (because the shutter speed is too slow) or grainy (because the ISO is too high). To account for this you need a bright light source and a tripod. I like to use an LED light panel mounted to my camera. This allows me to be mobile and fast, as opposed to needing to lug around a light on a stand. The fact that the light is coming from behind the camera, while typically undesirable for regular photos, is actually perfect for texture acquisition where we want flat, even lighting. In addition to the linear polarizer, a diffuser is placed over the light to create soft light and shadows on the subject. DSLR camera with circular polarizer, and mounted LED light panel with diffuser and linear polarizer Camera with a circular polarizing filter You will want to shoot in RAW. A digital camera tries to compensate for the lack of light in the cross polarized image using sharpening filters. That means you end up losing a lot of texture detail in your images. This makes the cross polarized image look saturated, contrasty, and blurred. Shooting in RAW avoids this since those camera filtering algorithms are not applied. Note the difference below comparing the same image shot in JPG and RAW (slide the bar on the image to see the difference). Slide the bar on the image to see the RAW image quality compared to a JPG. Here's my workflow for using RAW images: Read the RAW image in Photoshop, keeping everything linear. In Photoshop, set the mode the 32bit, and save the image as an EXR. Open the EXR in Nuke and save this as a 16bit with ZIP compression. You may also want to use the denoiser in Nuke if your image is grainy. This should be done before any color corrections. A tripod A tripod is essential when extracting specular to align the images, and useful for cross-polarization to help with the lack of light from the polarizers. The Shoot With everything set up, you're ready to go.The process of taking a cross polarized photo is as follows: Adjust the exposure to compensate for the darkening effect of the polarizer Now that you can see, focus the camera. I always use manual focus Turn the camera polarizer until spec disappears to take a cross polarized photo Turn it 90 degrees further, so the spec reappears, to take a parallel polarized photo
Slide the bar on the image to see the RAW image quality compared to a JPG. Here's my workflow for using RAW images: Read the RAW image in Photoshop, keeping everything linear. In Photoshop, set the mode the 32bit, and save the image as an EXR. Open the EXR in Nuke and save this as a 16bit with ZIP compression. You may also want to use the denoiser in Nuke if your image is grainy. This should be done before any color corrections.
Separating the spec from an image like this can give us great insights into the details of how dielectric materials are working. For example, in the image below, notice that the powdery film (known as grape "bloom") that characteristically appears on the red grapes is visually composed of rough specular highlights. Being able to see these kinds of things in a photo separated into its diffuse and specular components helps an artist to know how to recreate this in a CG material. It is worth noting that the cross polarization process is not perfect. The derived spec images contain color, even though dielectric specular should be colorless. This is in part due to the the limitations of 8-bit images. If an image has a pixel value range of zero to one (black to white) and a color is removed (the color of the cross-polarized image), the result will be the inverse color, rather than white. The way around this mathematical problem is to use HDR images which have a value range that is above 1, meaning that a color can be subtracted and still result in a white spec. This is done by taking multiple images at bracketed exposures and combining them in a program such as HDR Lab's Picturenaut (Photoshop's HDR feature is less accurate). This alleviates the issue in the case of bright highlights that are above 1, but on dimmer highlights there is still some degree of color spill. The ICT labs postulate that this may in part be due to the effects of single scattering, where the light enters the surface but scatters exactly once off some element of the material before reflecting to the camera. This picks up some of the surface's pigmentation, adding a little color to the image. The take away is that, even when shooting multiple bracketed exposure HDR images, it is still quite difficult to obtain an image without color in the specular highlights. Additionally, taking multiple bracketed exposure images slows the process considerably, making it problematic for capture of human subjects (since it's hard to stand still for so long). Considering all of the above, in practice it is much simpler to just take regular non-HDR RAW images and, understanding that dielectric materials should have colorless spec, simply desaturate the resulting polarization-difference image (i.e. the derived "spec only" image) in post. Another issue to be aware of is that the proportional amounts of the diffuse and spec will be off slightly. This is because the parallel polarized image lets 100% of the spec through, but blocks 50% of the diffuse, meaning that the spec will be 2x brighter, in relation to the diffuse, than it would in a photo without any polarizing filters. You can observe in the images above that the skin looks oilier than it normally would. Once aware of this, it is easy to adjust for it in your comp by either brightening the diffuse or darkening the spec a bit. In the animated image below, you can see the effects of brightening the cross polarized "diffuse" pass and the resulting composited image. Equipment and Setup Here's a list of all the equipment you'll need: A windowless room with no light Light source covered in linear polarizing film Camera with a circular polarizing filter A tripod A windowless room with no light Ideally, you will want to be in a room with no light, so the only light source is the one with polarizer. This gives you true cross polarization. It is sometimes possible to get decent results outside, but even if there is no direct sunlight, there will always be specular highlights from the sky that are unpolarized. What you get outside, therefore, is not cross polarization, but simply the effects of the camera's polarizer filter. When working with the camera's polarizer alone the trick is shooting flat objects (the ground, a fence, a wall) so that there is only one plane for the reflections which can then be polarized. With rounded objects (a rock, a tree trunk, etc.) you will only be able to eliminate some of the reflections (for example the reflection from the front, but on on the sides). Light source covered in linear polarizing film. A mounted LED light panel is recommended (pictured below). You can buy linear polarizer film here. You want the laminated type. The biggest issue you will face is that polarization filters make things a lot darker. That can cause the images to be out of focus (because the shutter speed is too slow) or grainy (because the ISO is too high). To account for this you need a bright light source and a tripod. I like to use an LED light panel mounted to my camera. This allows me to be mobile and fast, as opposed to needing to lug around a light on a stand. The fact that the light is coming from behind the camera, while typically undesirable for regular photos, is actually perfect for texture acquisition where we want flat, even lighting. In addition to the linear polarizer, a diffuser is placed over the light to create soft light and shadows on the subject. DSLR camera with circular polarizer, and mounted LED light panel with diffuser and linear polarizer Camera with a circular polarizing filter You will want to shoot in RAW. A digital camera tries to compensate for the lack of light in the cross polarized image using sharpening filters. That means you end up losing a lot of texture detail in your images. This makes the cross polarized image look saturated, contrasty, and blurred. Shooting in RAW avoids this since those camera filtering algorithms are not applied. Note the difference below comparing the same image shot in JPG and RAW (slide the bar on the image to see the difference). Slide the bar on the image to see the RAW image quality compared to a JPG. Here's my workflow for using RAW images: Read the RAW image in Photoshop, keeping everything linear. In Photoshop, set the mode the 32bit, and save the image as an EXR. Open the EXR in Nuke and save this as a 16bit with ZIP compression. You may also want to use the denoiser in Nuke if your image is grainy. This should be done before any color corrections. A tripod A tripod is essential when extracting specular to align the images, and useful for cross-polarization to help with the lack of light from the polarizers. The Shoot With everything set up, you're ready to go.The process of taking a cross polarized photo is as follows: Adjust the exposure to compensate for the darkening effect of the polarizer Now that you can see, focus the camera. I always use manual focus Turn the camera polarizer until spec disappears to take a cross polarized photo Turn it 90 degrees further, so the spec reappears, to take a parallel polarized photo
This technique is also relatively simple. The only trick is to use a tripod and have your subject stand perfectly still while you take the two photos so they will align properly. The first photo is taken with the polarizer filter on the camera rotated to be parallel to the polarizer on the light (A), and a second photo with the polarizer rotated 90 degrees to be perpendicular, and thus cross-polarized (B). Then in Nuke, subtract the two images (A-B) giving you the specular difference. You will need to desaturate this as well for dielectric materials. The final image shows the result of adding the cross-polarized "diffuse only" image with the derived specular image (B+C). Separating the spec from an image like this can give us great insights into the details of how dielectric materials are working. For example, in the image below, notice that the powdery film (known as grape "bloom") that characteristically appears on the red grapes is visually composed of rough specular highlights. Being able to see these kinds of things in a photo separated into its diffuse and specular components helps an artist to know how to recreate this in a CG material. It is worth noting that the cross polarization process is not perfect. The derived spec images contain color, even though dielectric specular should be colorless. This is in part due to the the limitations of 8-bit images. If an image has a pixel value range of zero to one (black to white) and a color is removed (the color of the cross-polarized image), the result will be the inverse color, rather than white. The way around this mathematical problem is to use HDR images which have a value range that is above 1, meaning that a color can be subtracted and still result in a white spec. This is done by taking multiple images at bracketed exposures and combining them in a program such as HDR Lab's Picturenaut (Photoshop's HDR feature is less accurate). This alleviates the issue in the case of bright highlights that are above 1, but on dimmer highlights there is still some degree of color spill. The ICT labs postulate that this may in part be due to the effects of single scattering, where the light enters the surface but scatters exactly once off some element of the material before reflecting to the camera. This picks up some of the surface's pigmentation, adding a little color to the image. The take away is that, even when shooting multiple bracketed exposure HDR images, it is still quite difficult to obtain an image without color in the specular highlights. Additionally, taking multiple bracketed exposure images slows the process considerably, making it problematic for capture of human subjects (since it's hard to stand still for so long). Considering all of the above, in practice it is much simpler to just take regular non-HDR RAW images and, understanding that dielectric materials should have colorless spec, simply desaturate the resulting polarization-difference image (i.e. the derived "spec only" image) in post. Another issue to be aware of is that the proportional amounts of the diffuse and spec will be off slightly. This is because the parallel polarized image lets 100% of the spec through, but blocks 50% of the diffuse, meaning that the spec will be 2x brighter, in relation to the diffuse, than it would in a photo without any polarizing filters. You can observe in the images above that the skin looks oilier than it normally would. Once aware of this, it is easy to adjust for it in your comp by either brightening the diffuse or darkening the spec a bit. In the animated image below, you can see the effects of brightening the cross polarized "diffuse" pass and the resulting composited image. Equipment and Setup Here's a list of all the equipment you'll need: A windowless room with no light Light source covered in linear polarizing film Camera with a circular polarizing filter A tripod A windowless room with no light Ideally, you will want to be in a room with no light, so the only light source is the one with polarizer. This gives you true cross polarization. It is sometimes possible to get decent results outside, but even if there is no direct sunlight, there will always be specular highlights from the sky that are unpolarized. What you get outside, therefore, is not cross polarization, but simply the effects of the camera's polarizer filter. When working with the camera's polarizer alone the trick is shooting flat objects (the ground, a fence, a wall) so that there is only one plane for the reflections which can then be polarized. With rounded objects (a rock, a tree trunk, etc.) you will only be able to eliminate some of the reflections (for example the reflection from the front, but on on the sides). Light source covered in linear polarizing film. A mounted LED light panel is recommended (pictured below). You can buy linear polarizer film here. You want the laminated type. The biggest issue you will face is that polarization filters make things a lot darker. That can cause the images to be out of focus (because the shutter speed is too slow) or grainy (because the ISO is too high). To account for this you need a bright light source and a tripod. I like to use an LED light panel mounted to my camera. This allows me to be mobile and fast, as opposed to needing to lug around a light on a stand. The fact that the light is coming from behind the camera, while typically undesirable for regular photos, is actually perfect for texture acquisition where we want flat, even lighting. In addition to the linear polarizer, a diffuser is placed over the light to create soft light and shadows on the subject. DSLR camera with circular polarizer, and mounted LED light panel with diffuser and linear polarizer Camera with a circular polarizing filter You will want to shoot in RAW. A digital camera tries to compensate for the lack of light in the cross polarized image using sharpening filters. That means you end up losing a lot of texture detail in your images. This makes the cross polarized image look saturated, contrasty, and blurred. Shooting in RAW avoids this since those camera filtering algorithms are not applied. Note the difference below comparing the same image shot in JPG and RAW (slide the bar on the image to see the difference). Slide the bar on the image to see the RAW image quality compared to a JPG. Here's my workflow for using RAW images: Read the RAW image in Photoshop, keeping everything linear. In Photoshop, set the mode the 32bit, and save the image as an EXR. Open the EXR in Nuke and save this as a 16bit with ZIP compression. You may also want to use the denoiser in Nuke if your image is grainy. This should be done before any color corrections. A tripod A tripod is essential when extracting specular to align the images, and useful for cross-polarization to help with the lack of light from the polarizers. The Shoot With everything set up, you're ready to go.The process of taking a cross polarized photo is as follows: Adjust the exposure to compensate for the darkening effect of the polarizer Now that you can see, focus the camera. I always use manual focus Turn the camera polarizer until spec disappears to take a cross polarized photo Turn it 90 degrees further, so the spec reappears, to take a parallel polarized photo
Kronesinspection machine

Ideally, you will want to be in a room with no light, so the only light source is the one with polarizer. This gives you true cross polarization. It is sometimes possible to get decent results outside, but even if there is no direct sunlight, there will always be specular highlights from the sky that are unpolarized. What you get outside, therefore, is not cross polarization, but simply the effects of the camera's polarizer filter. When working with the camera's polarizer alone the trick is shooting flat objects (the ground, a fence, a wall) so that there is only one plane for the reflections which can then be polarized. With rounded objects (a rock, a tree trunk, etc.) you will only be able to eliminate some of the reflections (for example the reflection from the front, but on on the sides). Light source covered in linear polarizing film. A mounted LED light panel is recommended (pictured below). You can buy linear polarizer film here. You want the laminated type. The biggest issue you will face is that polarization filters make things a lot darker. That can cause the images to be out of focus (because the shutter speed is too slow) or grainy (because the ISO is too high). To account for this you need a bright light source and a tripod. I like to use an LED light panel mounted to my camera. This allows me to be mobile and fast, as opposed to needing to lug around a light on a stand. The fact that the light is coming from behind the camera, while typically undesirable for regular photos, is actually perfect for texture acquisition where we want flat, even lighting. In addition to the linear polarizer, a diffuser is placed over the light to create soft light and shadows on the subject. DSLR camera with circular polarizer, and mounted LED light panel with diffuser and linear polarizer Camera with a circular polarizing filter You will want to shoot in RAW. A digital camera tries to compensate for the lack of light in the cross polarized image using sharpening filters. That means you end up losing a lot of texture detail in your images. This makes the cross polarized image look saturated, contrasty, and blurred. Shooting in RAW avoids this since those camera filtering algorithms are not applied. Note the difference below comparing the same image shot in JPG and RAW (slide the bar on the image to see the difference). Slide the bar on the image to see the RAW image quality compared to a JPG. Here's my workflow for using RAW images: Read the RAW image in Photoshop, keeping everything linear. In Photoshop, set the mode the 32bit, and save the image as an EXR. Open the EXR in Nuke and save this as a 16bit with ZIP compression. You may also want to use the denoiser in Nuke if your image is grainy. This should be done before any color corrections. A tripod A tripod is essential when extracting specular to align the images, and useful for cross-polarization to help with the lack of light from the polarizers.
Another issue to be aware of is that the proportional amounts of the diffuse and spec will be off slightly. This is because the parallel polarized image lets 100% of the spec through, but blocks 50% of the diffuse, meaning that the spec will be 2x brighter, in relation to the diffuse, than it would in a photo without any polarizing filters. You can observe in the images above that the skin looks oilier than it normally would. Once aware of this, it is easy to adjust for it in your comp by either brightening the diffuse or darkening the spec a bit. In the animated image below, you can see the effects of brightening the cross polarized "diffuse" pass and the resulting composited image. Equipment and Setup Here's a list of all the equipment you'll need: A windowless room with no light Light source covered in linear polarizing film Camera with a circular polarizing filter A tripod A windowless room with no light Ideally, you will want to be in a room with no light, so the only light source is the one with polarizer. This gives you true cross polarization. It is sometimes possible to get decent results outside, but even if there is no direct sunlight, there will always be specular highlights from the sky that are unpolarized. What you get outside, therefore, is not cross polarization, but simply the effects of the camera's polarizer filter. When working with the camera's polarizer alone the trick is shooting flat objects (the ground, a fence, a wall) so that there is only one plane for the reflections which can then be polarized. With rounded objects (a rock, a tree trunk, etc.) you will only be able to eliminate some of the reflections (for example the reflection from the front, but on on the sides). Light source covered in linear polarizing film. A mounted LED light panel is recommended (pictured below). You can buy linear polarizer film here. You want the laminated type. The biggest issue you will face is that polarization filters make things a lot darker. That can cause the images to be out of focus (because the shutter speed is too slow) or grainy (because the ISO is too high). To account for this you need a bright light source and a tripod. I like to use an LED light panel mounted to my camera. This allows me to be mobile and fast, as opposed to needing to lug around a light on a stand. The fact that the light is coming from behind the camera, while typically undesirable for regular photos, is actually perfect for texture acquisition where we want flat, even lighting. In addition to the linear polarizer, a diffuser is placed over the light to create soft light and shadows on the subject. DSLR camera with circular polarizer, and mounted LED light panel with diffuser and linear polarizer Camera with a circular polarizing filter You will want to shoot in RAW. A digital camera tries to compensate for the lack of light in the cross polarized image using sharpening filters. That means you end up losing a lot of texture detail in your images. This makes the cross polarized image look saturated, contrasty, and blurred. Shooting in RAW avoids this since those camera filtering algorithms are not applied. Note the difference below comparing the same image shot in JPG and RAW (slide the bar on the image to see the difference). Slide the bar on the image to see the RAW image quality compared to a JPG. Here's my workflow for using RAW images: Read the RAW image in Photoshop, keeping everything linear. In Photoshop, set the mode the 32bit, and save the image as an EXR. Open the EXR in Nuke and save this as a 16bit with ZIP compression. You may also want to use the denoiser in Nuke if your image is grainy. This should be done before any color corrections. A tripod A tripod is essential when extracting specular to align the images, and useful for cross-polarization to help with the lack of light from the polarizers. The Shoot With everything set up, you're ready to go.The process of taking a cross polarized photo is as follows: Adjust the exposure to compensate for the darkening effect of the polarizer Now that you can see, focus the camera. I always use manual focus Turn the camera polarizer until spec disappears to take a cross polarized photo Turn it 90 degrees further, so the spec reappears, to take a parallel polarized photo
A windowless room with no light Light source covered in linear polarizing film Camera with a circular polarizing filter A tripod A windowless room with no light Ideally, you will want to be in a room with no light, so the only light source is the one with polarizer. This gives you true cross polarization. It is sometimes possible to get decent results outside, but even if there is no direct sunlight, there will always be specular highlights from the sky that are unpolarized. What you get outside, therefore, is not cross polarization, but simply the effects of the camera's polarizer filter. When working with the camera's polarizer alone the trick is shooting flat objects (the ground, a fence, a wall) so that there is only one plane for the reflections which can then be polarized. With rounded objects (a rock, a tree trunk, etc.) you will only be able to eliminate some of the reflections (for example the reflection from the front, but on on the sides). Light source covered in linear polarizing film. A mounted LED light panel is recommended (pictured below). You can buy linear polarizer film here. You want the laminated type. The biggest issue you will face is that polarization filters make things a lot darker. That can cause the images to be out of focus (because the shutter speed is too slow) or grainy (because the ISO is too high). To account for this you need a bright light source and a tripod. I like to use an LED light panel mounted to my camera. This allows me to be mobile and fast, as opposed to needing to lug around a light on a stand. The fact that the light is coming from behind the camera, while typically undesirable for regular photos, is actually perfect for texture acquisition where we want flat, even lighting. In addition to the linear polarizer, a diffuser is placed over the light to create soft light and shadows on the subject. DSLR camera with circular polarizer, and mounted LED light panel with diffuser and linear polarizer Camera with a circular polarizing filter You will want to shoot in RAW. A digital camera tries to compensate for the lack of light in the cross polarized image using sharpening filters. That means you end up losing a lot of texture detail in your images. This makes the cross polarized image look saturated, contrasty, and blurred. Shooting in RAW avoids this since those camera filtering algorithms are not applied. Note the difference below comparing the same image shot in JPG and RAW (slide the bar on the image to see the difference). Slide the bar on the image to see the RAW image quality compared to a JPG. Here's my workflow for using RAW images: Read the RAW image in Photoshop, keeping everything linear. In Photoshop, set the mode the 32bit, and save the image as an EXR. Open the EXR in Nuke and save this as a 16bit with ZIP compression. You may also want to use the denoiser in Nuke if your image is grainy. This should be done before any color corrections. A tripod A tripod is essential when extracting specular to align the images, and useful for cross-polarization to help with the lack of light from the polarizers. The Shoot With everything set up, you're ready to go.The process of taking a cross polarized photo is as follows: Adjust the exposure to compensate for the darkening effect of the polarizer Now that you can see, focus the camera. I always use manual focus Turn the camera polarizer until spec disappears to take a cross polarized photo Turn it 90 degrees further, so the spec reappears, to take a parallel polarized photo
When taking pictures of human skin, you can shoot cross-polarized photos from multiple angles, and then combine them together in Photoshop using masking and the "lighten only" blending mode. This removes any shadowing in the images so they merge seamlessly, as opposed to using the clone stamp tool to combine them which can lead to splotchy uneven surfaces. This "unwrapped" map can then be used as a good starting point source image for the texture map on a face. Deriving a spec pass from a photo An additional benefit is that when a cross polarized photo is subtracted from a parallel polarized photo in a compositing program like Nuke, we can see what the specular highlights look like on an actual photo. This allows texture artists to see what a real world specular pass looks like, giving them a photographic reference for to base their CG spec pass on. This technique is also relatively simple. The only trick is to use a tripod and have your subject stand perfectly still while you take the two photos so they will align properly. The first photo is taken with the polarizer filter on the camera rotated to be parallel to the polarizer on the light (A), and a second photo with the polarizer rotated 90 degrees to be perpendicular, and thus cross-polarized (B). Then in Nuke, subtract the two images (A-B) giving you the specular difference. You will need to desaturate this as well for dielectric materials. The final image shows the result of adding the cross-polarized "diffuse only" image with the derived specular image (B+C). Separating the spec from an image like this can give us great insights into the details of how dielectric materials are working. For example, in the image below, notice that the powdery film (known as grape "bloom") that characteristically appears on the red grapes is visually composed of rough specular highlights. Being able to see these kinds of things in a photo separated into its diffuse and specular components helps an artist to know how to recreate this in a CG material. It is worth noting that the cross polarization process is not perfect. The derived spec images contain color, even though dielectric specular should be colorless. This is in part due to the the limitations of 8-bit images. If an image has a pixel value range of zero to one (black to white) and a color is removed (the color of the cross-polarized image), the result will be the inverse color, rather than white. The way around this mathematical problem is to use HDR images which have a value range that is above 1, meaning that a color can be subtracted and still result in a white spec. This is done by taking multiple images at bracketed exposures and combining them in a program such as HDR Lab's Picturenaut (Photoshop's HDR feature is less accurate). This alleviates the issue in the case of bright highlights that are above 1, but on dimmer highlights there is still some degree of color spill. The ICT labs postulate that this may in part be due to the effects of single scattering, where the light enters the surface but scatters exactly once off some element of the material before reflecting to the camera. This picks up some of the surface's pigmentation, adding a little color to the image. The take away is that, even when shooting multiple bracketed exposure HDR images, it is still quite difficult to obtain an image without color in the specular highlights. Additionally, taking multiple bracketed exposure images slows the process considerably, making it problematic for capture of human subjects (since it's hard to stand still for so long). Considering all of the above, in practice it is much simpler to just take regular non-HDR RAW images and, understanding that dielectric materials should have colorless spec, simply desaturate the resulting polarization-difference image (i.e. the derived "spec only" image) in post. Another issue to be aware of is that the proportional amounts of the diffuse and spec will be off slightly. This is because the parallel polarized image lets 100% of the spec through, but blocks 50% of the diffuse, meaning that the spec will be 2x brighter, in relation to the diffuse, than it would in a photo without any polarizing filters. You can observe in the images above that the skin looks oilier than it normally would. Once aware of this, it is easy to adjust for it in your comp by either brightening the diffuse or darkening the spec a bit. In the animated image below, you can see the effects of brightening the cross polarized "diffuse" pass and the resulting composited image. Equipment and Setup Here's a list of all the equipment you'll need: A windowless room with no light Light source covered in linear polarizing film Camera with a circular polarizing filter A tripod A windowless room with no light Ideally, you will want to be in a room with no light, so the only light source is the one with polarizer. This gives you true cross polarization. It is sometimes possible to get decent results outside, but even if there is no direct sunlight, there will always be specular highlights from the sky that are unpolarized. What you get outside, therefore, is not cross polarization, but simply the effects of the camera's polarizer filter. When working with the camera's polarizer alone the trick is shooting flat objects (the ground, a fence, a wall) so that there is only one plane for the reflections which can then be polarized. With rounded objects (a rock, a tree trunk, etc.) you will only be able to eliminate some of the reflections (for example the reflection from the front, but on on the sides). Light source covered in linear polarizing film. A mounted LED light panel is recommended (pictured below). You can buy linear polarizer film here. You want the laminated type. The biggest issue you will face is that polarization filters make things a lot darker. That can cause the images to be out of focus (because the shutter speed is too slow) or grainy (because the ISO is too high). To account for this you need a bright light source and a tripod. I like to use an LED light panel mounted to my camera. This allows me to be mobile and fast, as opposed to needing to lug around a light on a stand. The fact that the light is coming from behind the camera, while typically undesirable for regular photos, is actually perfect for texture acquisition where we want flat, even lighting. In addition to the linear polarizer, a diffuser is placed over the light to create soft light and shadows on the subject. DSLR camera with circular polarizer, and mounted LED light panel with diffuser and linear polarizer Camera with a circular polarizing filter You will want to shoot in RAW. A digital camera tries to compensate for the lack of light in the cross polarized image using sharpening filters. That means you end up losing a lot of texture detail in your images. This makes the cross polarized image look saturated, contrasty, and blurred. Shooting in RAW avoids this since those camera filtering algorithms are not applied. Note the difference below comparing the same image shot in JPG and RAW (slide the bar on the image to see the difference). Slide the bar on the image to see the RAW image quality compared to a JPG. Here's my workflow for using RAW images: Read the RAW image in Photoshop, keeping everything linear. In Photoshop, set the mode the 32bit, and save the image as an EXR. Open the EXR in Nuke and save this as a 16bit with ZIP compression. You may also want to use the denoiser in Nuke if your image is grainy. This should be done before any color corrections. A tripod A tripod is essential when extracting specular to align the images, and useful for cross-polarization to help with the lack of light from the polarizers. The Shoot With everything set up, you're ready to go.The process of taking a cross polarized photo is as follows: Adjust the exposure to compensate for the darkening effect of the polarizer Now that you can see, focus the camera. I always use manual focus Turn the camera polarizer until spec disappears to take a cross polarized photo Turn it 90 degrees further, so the spec reappears, to take a parallel polarized photo
The automatic adjustment of conveyors and the camera position ensure that the Linatronic is adjusted to new container types within just a few minutes.
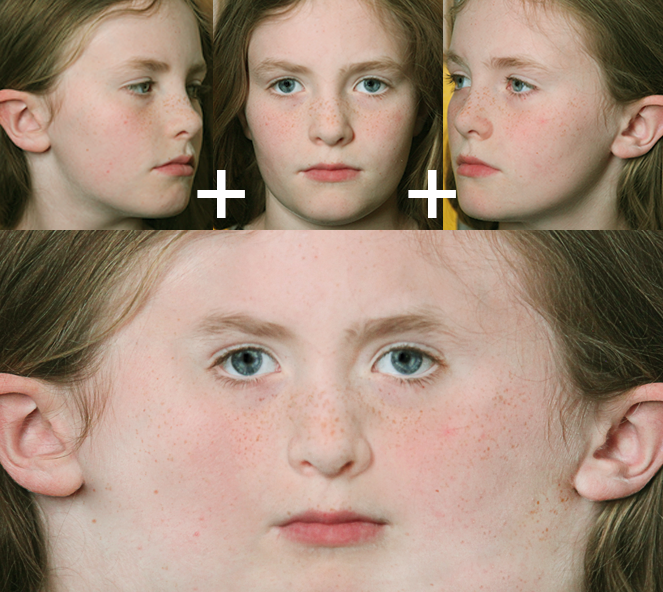


 Ms.Cici
 8618319014500