
Advanced Propulsion Centre: APC - arvanced
Squeeze the crimpers all the way. Now release the crimpers, and pull the wire and pin out. This is what it should now look like. Notice that the insulation is squeezed by the back of the pin, and the wire is squeezed by a different part in the center of the pin. This is to insure a good hold on the wire, and good electrical contact as well. Some people like to then add a bit of solder, but this is not required. Now push the pin into the housing as shown. Make sure the tab end of the pin goes the correct way into the housing. Notice how the tab locks into that open square hole in the housing. This is an example of sticking the connector onto a circuit. You are now finished! There are also male pins that you can use. But wait! What if you made a mistake? Or want to reuse the housing for something else? Simple, take a sharp object such as wire snips and push the tab in as shown. Simultaneously pull the wire out. Be careful not to over-bend the tab (if you do, manually bend it back after you remove the wire).
This is an example of sticking the connector onto a circuit. You are now finished! There are also male pins that you can use. But wait! What if you made a mistake? Or want to reuse the housing for something else? Simple, take a sharp object such as wire snips and push the tab in as shown. Simultaneously pull the wire out. Be careful not to over-bend the tab (if you do, manually bend it back after you remove the wire).
Wire PinConnectors Kit
A closeup. Then stick each of the three wires into the molex connector. Step-by-Step First, using wire strippers, strip off about half a centimeter of insulation off the wire. Next, get a pair of crimpers. This is a close-up of the crimping part. You will notice numbers that represent the gauge of wires they were designed for. Typically, you want between 18 and 24 gauge. Next, you will need a pin that looks like this. Place the pin into the correct setting as shown. You will want to squeeze the crimpers partly to hold the pin in place (but not all the way yet!!!). Now stick your stripped wire into the pin. You want about 3 millimeters of insulation to also go in. Squeeze the crimpers all the way. Now release the crimpers, and pull the wire and pin out. This is what it should now look like. Notice that the insulation is squeezed by the back of the pin, and the wire is squeezed by a different part in the center of the pin. This is to insure a good hold on the wire, and good electrical contact as well. Some people like to then add a bit of solder, but this is not required. Now push the pin into the housing as shown. Make sure the tab end of the pin goes the correct way into the housing. Notice how the tab locks into that open square hole in the housing. This is an example of sticking the connector onto a circuit. You are now finished! There are also male pins that you can use. But wait! What if you made a mistake? Or want to reuse the housing for something else? Simple, take a sharp object such as wire snips and push the tab in as shown. Simultaneously pull the wire out. Be careful not to over-bend the tab (if you do, manually bend it back after you remove the wire).
You are now finished! There are also male pins that you can use. But wait! What if you made a mistake? Or want to reuse the housing for something else? Simple, take a sharp object such as wire snips and push the tab in as shown. Simultaneously pull the wire out. Be careful not to over-bend the tab (if you do, manually bend it back after you remove the wire).
Other connectors can be found by searching for 'molex' and 'housing'. As for crimpers, this forum post is useful. The tool I use is the Pro-Crimper III. Servocity.com sells pins and crimpers too. Basic Summary of Steps As also demonstrated on my photoresistor tutorial, get a crimper (~$100) or use cheap pliers to attach the pins to the wires. Basically just stick a pin in the crimper hole with the right setting, stick your wire in the pin, then squeeze. A closeup. Then stick each of the three wires into the molex connector. Step-by-Step First, using wire strippers, strip off about half a centimeter of insulation off the wire. Next, get a pair of crimpers. This is a close-up of the crimping part. You will notice numbers that represent the gauge of wires they were designed for. Typically, you want between 18 and 24 gauge. Next, you will need a pin that looks like this. Place the pin into the correct setting as shown. You will want to squeeze the crimpers partly to hold the pin in place (but not all the way yet!!!). Now stick your stripped wire into the pin. You want about 3 millimeters of insulation to also go in. Squeeze the crimpers all the way. Now release the crimpers, and pull the wire and pin out. This is what it should now look like. Notice that the insulation is squeezed by the back of the pin, and the wire is squeezed by a different part in the center of the pin. This is to insure a good hold on the wire, and good electrical contact as well. Some people like to then add a bit of solder, but this is not required. Now push the pin into the housing as shown. Make sure the tab end of the pin goes the correct way into the housing. Notice how the tab locks into that open square hole in the housing. This is an example of sticking the connector onto a circuit. You are now finished! There are also male pins that you can use. But wait! What if you made a mistake? Or want to reuse the housing for something else? Simple, take a sharp object such as wire snips and push the tab in as shown. Simultaneously pull the wire out. Be careful not to over-bend the tab (if you do, manually bend it back after you remove the wire).
A closeup. Then stick each of the three wires into the molex connector. Step-by-Step First, using wire strippers, strip off about half a centimeter of insulation off the wire. Next, get a pair of crimpers. This is a close-up of the crimping part. You will notice numbers that represent the gauge of wires they were designed for. Typically, you want between 18 and 24 gauge. Next, you will need a pin that looks like this. Place the pin into the correct setting as shown. You will want to squeeze the crimpers partly to hold the pin in place (but not all the way yet!!!). Now stick your stripped wire into the pin. You want about 3 millimeters of insulation to also go in. Squeeze the crimpers all the way. Now release the crimpers, and pull the wire and pin out. This is what it should now look like. Notice that the insulation is squeezed by the back of the pin, and the wire is squeezed by a different part in the center of the pin. This is to insure a good hold on the wire, and good electrical contact as well. Some people like to then add a bit of solder, but this is not required. Now push the pin into the housing as shown. Make sure the tab end of the pin goes the correct way into the housing. Notice how the tab locks into that open square hole in the housing. This is an example of sticking the connector onto a circuit. You are now finished! There are also male pins that you can use. But wait! What if you made a mistake? Or want to reuse the housing for something else? Simple, take a sharp object such as wire snips and push the tab in as shown. Simultaneously pull the wire out. Be careful not to over-bend the tab (if you do, manually bend it back after you remove the wire).
Now stick your stripped wire into the pin. You want about 3 millimeters of insulation to also go in. Squeeze the crimpers all the way. Now release the crimpers, and pull the wire and pin out. This is what it should now look like. Notice that the insulation is squeezed by the back of the pin, and the wire is squeezed by a different part in the center of the pin. This is to insure a good hold on the wire, and good electrical contact as well. Some people like to then add a bit of solder, but this is not required. Now push the pin into the housing as shown. Make sure the tab end of the pin goes the correct way into the housing. Notice how the tab locks into that open square hole in the housing. This is an example of sticking the connector onto a circuit. You are now finished! There are also male pins that you can use. But wait! What if you made a mistake? Or want to reuse the housing for something else? Simple, take a sharp object such as wire snips and push the tab in as shown. Simultaneously pull the wire out. Be careful not to over-bend the tab (if you do, manually bend it back after you remove the wire).
Required Parts This method involves these parts from DigiKey.com or Mouser.com: WM2512-ND pins WM2800-ND 2 pin housing WM2801-ND 3 pin housing WM2802-ND 4 pin housing 22 or 24 guage wire Other connectors can be found by searching for 'molex' and 'housing'. As for crimpers, this forum post is useful. The tool I use is the Pro-Crimper III. Servocity.com sells pins and crimpers too. Basic Summary of Steps As also demonstrated on my photoresistor tutorial, get a crimper (~$100) or use cheap pliers to attach the pins to the wires. Basically just stick a pin in the crimper hole with the right setting, stick your wire in the pin, then squeeze. A closeup. Then stick each of the three wires into the molex connector. Step-by-Step First, using wire strippers, strip off about half a centimeter of insulation off the wire. Next, get a pair of crimpers. This is a close-up of the crimping part. You will notice numbers that represent the gauge of wires they were designed for. Typically, you want between 18 and 24 gauge. Next, you will need a pin that looks like this. Place the pin into the correct setting as shown. You will want to squeeze the crimpers partly to hold the pin in place (but not all the way yet!!!). Now stick your stripped wire into the pin. You want about 3 millimeters of insulation to also go in. Squeeze the crimpers all the way. Now release the crimpers, and pull the wire and pin out. This is what it should now look like. Notice that the insulation is squeezed by the back of the pin, and the wire is squeezed by a different part in the center of the pin. This is to insure a good hold on the wire, and good electrical contact as well. Some people like to then add a bit of solder, but this is not required. Now push the pin into the housing as shown. Make sure the tab end of the pin goes the correct way into the housing. Notice how the tab locks into that open square hole in the housing. This is an example of sticking the connector onto a circuit. You are now finished! There are also male pins that you can use. But wait! What if you made a mistake? Or want to reuse the housing for something else? Simple, take a sharp object such as wire snips and push the tab in as shown. Simultaneously pull the wire out. Be careful not to over-bend the tab (if you do, manually bend it back after you remove the wire).
Then stick each of the three wires into the molex connector. Step-by-Step First, using wire strippers, strip off about half a centimeter of insulation off the wire. Next, get a pair of crimpers. This is a close-up of the crimping part. You will notice numbers that represent the gauge of wires they were designed for. Typically, you want between 18 and 24 gauge. Next, you will need a pin that looks like this. Place the pin into the correct setting as shown. You will want to squeeze the crimpers partly to hold the pin in place (but not all the way yet!!!). Now stick your stripped wire into the pin. You want about 3 millimeters of insulation to also go in. Squeeze the crimpers all the way. Now release the crimpers, and pull the wire and pin out. This is what it should now look like. Notice that the insulation is squeezed by the back of the pin, and the wire is squeezed by a different part in the center of the pin. This is to insure a good hold on the wire, and good electrical contact as well. Some people like to then add a bit of solder, but this is not required. Now push the pin into the housing as shown. Make sure the tab end of the pin goes the correct way into the housing. Notice how the tab locks into that open square hole in the housing. This is an example of sticking the connector onto a circuit. You are now finished! There are also male pins that you can use. But wait! What if you made a mistake? Or want to reuse the housing for something else? Simple, take a sharp object such as wire snips and push the tab in as shown. Simultaneously pull the wire out. Be careful not to over-bend the tab (if you do, manually bend it back after you remove the wire).
Now release the crimpers, and pull the wire and pin out. This is what it should now look like. Notice that the insulation is squeezed by the back of the pin, and the wire is squeezed by a different part in the center of the pin. This is to insure a good hold on the wire, and good electrical contact as well. Some people like to then add a bit of solder, but this is not required. Now push the pin into the housing as shown. Make sure the tab end of the pin goes the correct way into the housing. Notice how the tab locks into that open square hole in the housing. This is an example of sticking the connector onto a circuit. You are now finished! There are also male pins that you can use. But wait! What if you made a mistake? Or want to reuse the housing for something else? Simple, take a sharp object such as wire snips and push the tab in as shown. Simultaneously pull the wire out. Be careful not to over-bend the tab (if you do, manually bend it back after you remove the wire).
Required Parts This method involves these parts from DigiKey.com or Mouser.com: WM2512-ND pins WM2800-ND 2 pin housing WM2801-ND 3 pin housing WM2802-ND 4 pin housing 22 or 24 guage wire Other connectors can be found by searching for 'molex' and 'housing'. As for crimpers, this forum post is useful. The tool I use is the Pro-Crimper III. Servocity.com sells pins and crimpers too. Basic Summary of Steps As also demonstrated on my photoresistor tutorial, get a crimper (~$100) or use cheap pliers to attach the pins to the wires. Basically just stick a pin in the crimper hole with the right setting, stick your wire in the pin, then squeeze. A closeup. Then stick each of the three wires into the molex connector. Step-by-Step First, using wire strippers, strip off about half a centimeter of insulation off the wire. Next, get a pair of crimpers. This is a close-up of the crimping part. You will notice numbers that represent the gauge of wires they were designed for. Typically, you want between 18 and 24 gauge. Next, you will need a pin that looks like this. Place the pin into the correct setting as shown. You will want to squeeze the crimpers partly to hold the pin in place (but not all the way yet!!!). Now stick your stripped wire into the pin. You want about 3 millimeters of insulation to also go in. Squeeze the crimpers all the way. Now release the crimpers, and pull the wire and pin out. This is what it should now look like. Notice that the insulation is squeezed by the back of the pin, and the wire is squeezed by a different part in the center of the pin. This is to insure a good hold on the wire, and good electrical contact as well. Some people like to then add a bit of solder, but this is not required. Now push the pin into the housing as shown. Make sure the tab end of the pin goes the correct way into the housing. Notice how the tab locks into that open square hole in the housing. This is an example of sticking the connector onto a circuit. You are now finished! There are also male pins that you can use. But wait! What if you made a mistake? Or want to reuse the housing for something else? Simple, take a sharp object such as wire snips and push the tab in as shown. Simultaneously pull the wire out. Be careful not to over-bend the tab (if you do, manually bend it back after you remove the wire).
But wait! What if you made a mistake? Or want to reuse the housing for something else? Simple, take a sharp object such as wire snips and push the tab in as shown. Simultaneously pull the wire out. Be careful not to over-bend the tab (if you do, manually bend it back after you remove the wire).
Then stick each of the three wires into the molex connector. Step-by-Step First, using wire strippers, strip off about half a centimeter of insulation off the wire. Next, get a pair of crimpers. This is a close-up of the crimping part. You will notice numbers that represent the gauge of wires they were designed for. Typically, you want between 18 and 24 gauge. Next, you will need a pin that looks like this. Place the pin into the correct setting as shown. You will want to squeeze the crimpers partly to hold the pin in place (but not all the way yet!!!). Now stick your stripped wire into the pin. You want about 3 millimeters of insulation to also go in. Squeeze the crimpers all the way. Now release the crimpers, and pull the wire and pin out. This is what it should now look like. Notice that the insulation is squeezed by the back of the pin, and the wire is squeezed by a different part in the center of the pin. This is to insure a good hold on the wire, and good electrical contact as well. Some people like to then add a bit of solder, but this is not required. Now push the pin into the housing as shown. Make sure the tab end of the pin goes the correct way into the housing. Notice how the tab locks into that open square hole in the housing. This is an example of sticking the connector onto a circuit. You are now finished! There are also male pins that you can use. But wait! What if you made a mistake? Or want to reuse the housing for something else? Simple, take a sharp object such as wire snips and push the tab in as shown. Simultaneously pull the wire out. Be careful not to over-bend the tab (if you do, manually bend it back after you remove the wire).
Now release the crimpers, and pull the wire and pin out. This is what it should now look like. Notice that the insulation is squeezed by the back of the pin, and the wire is squeezed by a different part in the center of the pin. This is to insure a good hold on the wire, and good electrical contact as well. Some people like to then add a bit of solder, but this is not required. Now push the pin into the housing as shown. Make sure the tab end of the pin goes the correct way into the housing. Notice how the tab locks into that open square hole in the housing. This is an example of sticking the connector onto a circuit. You are now finished! There are also male pins that you can use. But wait! What if you made a mistake? Or want to reuse the housing for something else? Simple, take a sharp object such as wire snips and push the tab in as shown. Simultaneously pull the wire out. Be careful not to over-bend the tab (if you do, manually bend it back after you remove the wire).
HARDWARE Actuators Batteries Electronics Materials Microcontrollers Sensors SCIENCE Robot Journals Robot Theory Conferences
You will want to squeeze the crimpers partly to hold the pin in place (but not all the way yet!!!). Now stick your stripped wire into the pin. You want about 3 millimeters of insulation to also go in. Squeeze the crimpers all the way. Now release the crimpers, and pull the wire and pin out. This is what it should now look like. Notice that the insulation is squeezed by the back of the pin, and the wire is squeezed by a different part in the center of the pin. This is to insure a good hold on the wire, and good electrical contact as well. Some people like to then add a bit of solder, but this is not required. Now push the pin into the housing as shown. Make sure the tab end of the pin goes the correct way into the housing. Notice how the tab locks into that open square hole in the housing. This is an example of sticking the connector onto a circuit. You are now finished! There are also male pins that you can use. But wait! What if you made a mistake? Or want to reuse the housing for something else? Simple, take a sharp object such as wire snips and push the tab in as shown. Simultaneously pull the wire out. Be careful not to over-bend the tab (if you do, manually bend it back after you remove the wire).
This is an example of sticking the connector onto a circuit. You are now finished! There are also male pins that you can use. But wait! What if you made a mistake? Or want to reuse the housing for something else? Simple, take a sharp object such as wire snips and push the tab in as shown. Simultaneously pull the wire out. Be careful not to over-bend the tab (if you do, manually bend it back after you remove the wire).
Next, get a pair of crimpers. This is a close-up of the crimping part. You will notice numbers that represent the gauge of wires they were designed for. Typically, you want between 18 and 24 gauge. Next, you will need a pin that looks like this. Place the pin into the correct setting as shown. You will want to squeeze the crimpers partly to hold the pin in place (but not all the way yet!!!). Now stick your stripped wire into the pin. You want about 3 millimeters of insulation to also go in. Squeeze the crimpers all the way. Now release the crimpers, and pull the wire and pin out. This is what it should now look like. Notice that the insulation is squeezed by the back of the pin, and the wire is squeezed by a different part in the center of the pin. This is to insure a good hold on the wire, and good electrical contact as well. Some people like to then add a bit of solder, but this is not required. Now push the pin into the housing as shown. Make sure the tab end of the pin goes the correct way into the housing. Notice how the tab locks into that open square hole in the housing. This is an example of sticking the connector onto a circuit. You are now finished! There are also male pins that you can use. But wait! What if you made a mistake? Or want to reuse the housing for something else? Simple, take a sharp object such as wire snips and push the tab in as shown. Simultaneously pull the wire out. Be careful not to over-bend the tab (if you do, manually bend it back after you remove the wire).
Now stick your stripped wire into the pin. You want about 3 millimeters of insulation to also go in. Squeeze the crimpers all the way. Now release the crimpers, and pull the wire and pin out. This is what it should now look like. Notice that the insulation is squeezed by the back of the pin, and the wire is squeezed by a different part in the center of the pin. This is to insure a good hold on the wire, and good electrical contact as well. Some people like to then add a bit of solder, but this is not required. Now push the pin into the housing as shown. Make sure the tab end of the pin goes the correct way into the housing. Notice how the tab locks into that open square hole in the housing. This is an example of sticking the connector onto a circuit. You are now finished! There are also male pins that you can use. But wait! What if you made a mistake? Or want to reuse the housing for something else? Simple, take a sharp object such as wire snips and push the tab in as shown. Simultaneously pull the wire out. Be careful not to over-bend the tab (if you do, manually bend it back after you remove the wire).
Next, you will need a pin that looks like this. Place the pin into the correct setting as shown. You will want to squeeze the crimpers partly to hold the pin in place (but not all the way yet!!!). Now stick your stripped wire into the pin. You want about 3 millimeters of insulation to also go in. Squeeze the crimpers all the way. Now release the crimpers, and pull the wire and pin out. This is what it should now look like. Notice that the insulation is squeezed by the back of the pin, and the wire is squeezed by a different part in the center of the pin. This is to insure a good hold on the wire, and good electrical contact as well. Some people like to then add a bit of solder, but this is not required. Now push the pin into the housing as shown. Make sure the tab end of the pin goes the correct way into the housing. Notice how the tab locks into that open square hole in the housing. This is an example of sticking the connector onto a circuit. You are now finished! There are also male pins that you can use. But wait! What if you made a mistake? Or want to reuse the housing for something else? Simple, take a sharp object such as wire snips and push the tab in as shown. Simultaneously pull the wire out. Be careful not to over-bend the tab (if you do, manually bend it back after you remove the wire).
Step-by-Step First, using wire strippers, strip off about half a centimeter of insulation off the wire. Next, get a pair of crimpers. This is a close-up of the crimping part. You will notice numbers that represent the gauge of wires they were designed for. Typically, you want between 18 and 24 gauge. Next, you will need a pin that looks like this. Place the pin into the correct setting as shown. You will want to squeeze the crimpers partly to hold the pin in place (but not all the way yet!!!). Now stick your stripped wire into the pin. You want about 3 millimeters of insulation to also go in. Squeeze the crimpers all the way. Now release the crimpers, and pull the wire and pin out. This is what it should now look like. Notice that the insulation is squeezed by the back of the pin, and the wire is squeezed by a different part in the center of the pin. This is to insure a good hold on the wire, and good electrical contact as well. Some people like to then add a bit of solder, but this is not required. Now push the pin into the housing as shown. Make sure the tab end of the pin goes the correct way into the housing. Notice how the tab locks into that open square hole in the housing. This is an example of sticking the connector onto a circuit. You are now finished! There are also male pins that you can use. But wait! What if you made a mistake? Or want to reuse the housing for something else? Simple, take a sharp object such as wire snips and push the tab in as shown. Simultaneously pull the wire out. Be careful not to over-bend the tab (if you do, manually bend it back after you remove the wire).
Next, get a pair of crimpers. This is a close-up of the crimping part. You will notice numbers that represent the gauge of wires they were designed for. Typically, you want between 18 and 24 gauge. Next, you will need a pin that looks like this. Place the pin into the correct setting as shown. You will want to squeeze the crimpers partly to hold the pin in place (but not all the way yet!!!). Now stick your stripped wire into the pin. You want about 3 millimeters of insulation to also go in. Squeeze the crimpers all the way. Now release the crimpers, and pull the wire and pin out. This is what it should now look like. Notice that the insulation is squeezed by the back of the pin, and the wire is squeezed by a different part in the center of the pin. This is to insure a good hold on the wire, and good electrical contact as well. Some people like to then add a bit of solder, but this is not required. Now push the pin into the housing as shown. Make sure the tab end of the pin goes the correct way into the housing. Notice how the tab locks into that open square hole in the housing. This is an example of sticking the connector onto a circuit. You are now finished! There are also male pins that you can use. But wait! What if you made a mistake? Or want to reuse the housing for something else? Simple, take a sharp object such as wire snips and push the tab in as shown. Simultaneously pull the wire out. Be careful not to over-bend the tab (if you do, manually bend it back after you remove the wire).
Make sure the tab end of the pin goes the correct way into the housing. Notice how the tab locks into that open square hole in the housing. This is an example of sticking the connector onto a circuit. You are now finished! There are also male pins that you can use. But wait! What if you made a mistake? Or want to reuse the housing for something else? Simple, take a sharp object such as wire snips and push the tab in as shown. Simultaneously pull the wire out. Be careful not to over-bend the tab (if you do, manually bend it back after you remove the wire).
But wait! What if you made a mistake? Or want to reuse the housing for something else? Simple, take a sharp object such as wire snips and push the tab in as shown. Simultaneously pull the wire out. Be careful not to over-bend the tab (if you do, manually bend it back after you remove the wire).
Next, get a pair of crimpers. This is a close-up of the crimping part. You will notice numbers that represent the gauge of wires they were designed for. Typically, you want between 18 and 24 gauge. Next, you will need a pin that looks like this. Place the pin into the correct setting as shown. You will want to squeeze the crimpers partly to hold the pin in place (but not all the way yet!!!). Now stick your stripped wire into the pin. You want about 3 millimeters of insulation to also go in. Squeeze the crimpers all the way. Now release the crimpers, and pull the wire and pin out. This is what it should now look like. Notice that the insulation is squeezed by the back of the pin, and the wire is squeezed by a different part in the center of the pin. This is to insure a good hold on the wire, and good electrical contact as well. Some people like to then add a bit of solder, but this is not required. Now push the pin into the housing as shown. Make sure the tab end of the pin goes the correct way into the housing. Notice how the tab locks into that open square hole in the housing. This is an example of sticking the connector onto a circuit. You are now finished! There are also male pins that you can use. But wait! What if you made a mistake? Or want to reuse the housing for something else? Simple, take a sharp object such as wire snips and push the tab in as shown. Simultaneously pull the wire out. Be careful not to over-bend the tab (if you do, manually bend it back after you remove the wire).
Wiring harnessconnectorpins
Now push the pin into the housing as shown. Make sure the tab end of the pin goes the correct way into the housing. Notice how the tab locks into that open square hole in the housing. This is an example of sticking the connector onto a circuit. You are now finished! There are also male pins that you can use. But wait! What if you made a mistake? Or want to reuse the housing for something else? Simple, take a sharp object such as wire snips and push the tab in as shown. Simultaneously pull the wire out. Be careful not to over-bend the tab (if you do, manually bend it back after you remove the wire).
WM2512-ND pins WM2800-ND 2 pin housing WM2801-ND 3 pin housing WM2802-ND 4 pin housing 22 or 24 guage wire Other connectors can be found by searching for 'molex' and 'housing'. As for crimpers, this forum post is useful. The tool I use is the Pro-Crimper III. Servocity.com sells pins and crimpers too. Basic Summary of Steps As also demonstrated on my photoresistor tutorial, get a crimper (~$100) or use cheap pliers to attach the pins to the wires. Basically just stick a pin in the crimper hole with the right setting, stick your wire in the pin, then squeeze. A closeup. Then stick each of the three wires into the molex connector. Step-by-Step First, using wire strippers, strip off about half a centimeter of insulation off the wire. Next, get a pair of crimpers. This is a close-up of the crimping part. You will notice numbers that represent the gauge of wires they were designed for. Typically, you want between 18 and 24 gauge. Next, you will need a pin that looks like this. Place the pin into the correct setting as shown. You will want to squeeze the crimpers partly to hold the pin in place (but not all the way yet!!!). Now stick your stripped wire into the pin. You want about 3 millimeters of insulation to also go in. Squeeze the crimpers all the way. Now release the crimpers, and pull the wire and pin out. This is what it should now look like. Notice that the insulation is squeezed by the back of the pin, and the wire is squeezed by a different part in the center of the pin. This is to insure a good hold on the wire, and good electrical contact as well. Some people like to then add a bit of solder, but this is not required. Now push the pin into the housing as shown. Make sure the tab end of the pin goes the correct way into the housing. Notice how the tab locks into that open square hole in the housing. This is an example of sticking the connector onto a circuit. You are now finished! There are also male pins that you can use. But wait! What if you made a mistake? Or want to reuse the housing for something else? Simple, take a sharp object such as wire snips and push the tab in as shown. Simultaneously pull the wire out. Be careful not to over-bend the tab (if you do, manually bend it back after you remove the wire).

You will want to squeeze the crimpers partly to hold the pin in place (but not all the way yet!!!). Now stick your stripped wire into the pin. You want about 3 millimeters of insulation to also go in. Squeeze the crimpers all the way. Now release the crimpers, and pull the wire and pin out. This is what it should now look like. Notice that the insulation is squeezed by the back of the pin, and the wire is squeezed by a different part in the center of the pin. This is to insure a good hold on the wire, and good electrical contact as well. Some people like to then add a bit of solder, but this is not required. Now push the pin into the housing as shown. Make sure the tab end of the pin goes the correct way into the housing. Notice how the tab locks into that open square hole in the housing. This is an example of sticking the connector onto a circuit. You are now finished! There are also male pins that you can use. But wait! What if you made a mistake? Or want to reuse the housing for something else? Simple, take a sharp object such as wire snips and push the tab in as shown. Simultaneously pull the wire out. Be careful not to over-bend the tab (if you do, manually bend it back after you remove the wire).
Pin ConnectorSocket
Squeeze the crimpers all the way. Now release the crimpers, and pull the wire and pin out. This is what it should now look like. Notice that the insulation is squeezed by the back of the pin, and the wire is squeezed by a different part in the center of the pin. This is to insure a good hold on the wire, and good electrical contact as well. Some people like to then add a bit of solder, but this is not required. Now push the pin into the housing as shown. Make sure the tab end of the pin goes the correct way into the housing. Notice how the tab locks into that open square hole in the housing. This is an example of sticking the connector onto a circuit. You are now finished! There are also male pins that you can use. But wait! What if you made a mistake? Or want to reuse the housing for something else? Simple, take a sharp object such as wire snips and push the tab in as shown. Simultaneously pull the wire out. Be careful not to over-bend the tab (if you do, manually bend it back after you remove the wire).
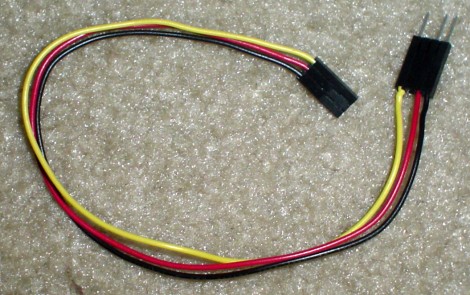
Wire Connector Tutorial There are many ways to connect wiring with your robots. But if you do it badly, you could end up with a hard to debug intermittent connection. Or even worse, wires that short! But fear not, I will show you a 'professional' way of connecting wires. For a quick rundown and demonstration, check out my video: Required Parts This method involves these parts from DigiKey.com or Mouser.com: WM2512-ND pins WM2800-ND 2 pin housing WM2801-ND 3 pin housing WM2802-ND 4 pin housing 22 or 24 guage wire Other connectors can be found by searching for 'molex' and 'housing'. As for crimpers, this forum post is useful. The tool I use is the Pro-Crimper III. Servocity.com sells pins and crimpers too. Basic Summary of Steps As also demonstrated on my photoresistor tutorial, get a crimper (~$100) or use cheap pliers to attach the pins to the wires. Basically just stick a pin in the crimper hole with the right setting, stick your wire in the pin, then squeeze. A closeup. Then stick each of the three wires into the molex connector. Step-by-Step First, using wire strippers, strip off about half a centimeter of insulation off the wire. Next, get a pair of crimpers. This is a close-up of the crimping part. You will notice numbers that represent the gauge of wires they were designed for. Typically, you want between 18 and 24 gauge. Next, you will need a pin that looks like this. Place the pin into the correct setting as shown. You will want to squeeze the crimpers partly to hold the pin in place (but not all the way yet!!!). Now stick your stripped wire into the pin. You want about 3 millimeters of insulation to also go in. Squeeze the crimpers all the way. Now release the crimpers, and pull the wire and pin out. This is what it should now look like. Notice that the insulation is squeezed by the back of the pin, and the wire is squeezed by a different part in the center of the pin. This is to insure a good hold on the wire, and good electrical contact as well. Some people like to then add a bit of solder, but this is not required. Now push the pin into the housing as shown. Make sure the tab end of the pin goes the correct way into the housing. Notice how the tab locks into that open square hole in the housing. This is an example of sticking the connector onto a circuit. You are now finished! There are also male pins that you can use. But wait! What if you made a mistake? Or want to reuse the housing for something else? Simple, take a sharp object such as wire snips and push the tab in as shown. Simultaneously pull the wire out. Be careful not to over-bend the tab (if you do, manually bend it back after you remove the wire).
Wire pinconnectors nearby
Make sure the tab end of the pin goes the correct way into the housing. Notice how the tab locks into that open square hole in the housing. This is an example of sticking the connector onto a circuit. You are now finished! There are also male pins that you can use. But wait! What if you made a mistake? Or want to reuse the housing for something else? Simple, take a sharp object such as wire snips and push the tab in as shown. Simultaneously pull the wire out. Be careful not to over-bend the tab (if you do, manually bend it back after you remove the wire).
Step-by-Step First, using wire strippers, strip off about half a centimeter of insulation off the wire. Next, get a pair of crimpers. This is a close-up of the crimping part. You will notice numbers that represent the gauge of wires they were designed for. Typically, you want between 18 and 24 gauge. Next, you will need a pin that looks like this. Place the pin into the correct setting as shown. You will want to squeeze the crimpers partly to hold the pin in place (but not all the way yet!!!). Now stick your stripped wire into the pin. You want about 3 millimeters of insulation to also go in. Squeeze the crimpers all the way. Now release the crimpers, and pull the wire and pin out. This is what it should now look like. Notice that the insulation is squeezed by the back of the pin, and the wire is squeezed by a different part in the center of the pin. This is to insure a good hold on the wire, and good electrical contact as well. Some people like to then add a bit of solder, but this is not required. Now push the pin into the housing as shown. Make sure the tab end of the pin goes the correct way into the housing. Notice how the tab locks into that open square hole in the housing. This is an example of sticking the connector onto a circuit. You are now finished! There are also male pins that you can use. But wait! What if you made a mistake? Or want to reuse the housing for something else? Simple, take a sharp object such as wire snips and push the tab in as shown. Simultaneously pull the wire out. Be careful not to over-bend the tab (if you do, manually bend it back after you remove the wire).
This is a close-up of the crimping part. You will notice numbers that represent the gauge of wires they were designed for. Typically, you want between 18 and 24 gauge. Next, you will need a pin that looks like this. Place the pin into the correct setting as shown. You will want to squeeze the crimpers partly to hold the pin in place (but not all the way yet!!!). Now stick your stripped wire into the pin. You want about 3 millimeters of insulation to also go in. Squeeze the crimpers all the way. Now release the crimpers, and pull the wire and pin out. This is what it should now look like. Notice that the insulation is squeezed by the back of the pin, and the wire is squeezed by a different part in the center of the pin. This is to insure a good hold on the wire, and good electrical contact as well. Some people like to then add a bit of solder, but this is not required. Now push the pin into the housing as shown. Make sure the tab end of the pin goes the correct way into the housing. Notice how the tab locks into that open square hole in the housing. This is an example of sticking the connector onto a circuit. You are now finished! There are also male pins that you can use. But wait! What if you made a mistake? Or want to reuse the housing for something else? Simple, take a sharp object such as wire snips and push the tab in as shown. Simultaneously pull the wire out. Be careful not to over-bend the tab (if you do, manually bend it back after you remove the wire).
MISC Parts List Robot Forum Chat Member Pages Axon MCU Robot Books Shop Contact SKILLS How To Build A Robot Tutorial Calculators Mechanics Programming Miscellaneous Robots Space HARDWARE Actuators Batteries Electronics Materials Microcontrollers Sensors SCIENCE Robot Journals Robot Theory Conferences
Wire Connector Tutorial There are many ways to connect wiring with your robots. But if you do it badly, you could end up with a hard to debug intermittent connection. Or even worse, wires that short! But fear not, I will show you a 'professional' way of connecting wires. For a quick rundown and demonstration, check out my video: Required Parts This method involves these parts from DigiKey.com or Mouser.com: WM2512-ND pins WM2800-ND 2 pin housing WM2801-ND 3 pin housing WM2802-ND 4 pin housing 22 or 24 guage wire Other connectors can be found by searching for 'molex' and 'housing'. As for crimpers, this forum post is useful. The tool I use is the Pro-Crimper III. Servocity.com sells pins and crimpers too. Basic Summary of Steps As also demonstrated on my photoresistor tutorial, get a crimper (~$100) or use cheap pliers to attach the pins to the wires. Basically just stick a pin in the crimper hole with the right setting, stick your wire in the pin, then squeeze. A closeup. Then stick each of the three wires into the molex connector. Step-by-Step First, using wire strippers, strip off about half a centimeter of insulation off the wire. Next, get a pair of crimpers. This is a close-up of the crimping part. You will notice numbers that represent the gauge of wires they were designed for. Typically, you want between 18 and 24 gauge. Next, you will need a pin that looks like this. Place the pin into the correct setting as shown. You will want to squeeze the crimpers partly to hold the pin in place (but not all the way yet!!!). Now stick your stripped wire into the pin. You want about 3 millimeters of insulation to also go in. Squeeze the crimpers all the way. Now release the crimpers, and pull the wire and pin out. This is what it should now look like. Notice that the insulation is squeezed by the back of the pin, and the wire is squeezed by a different part in the center of the pin. This is to insure a good hold on the wire, and good electrical contact as well. Some people like to then add a bit of solder, but this is not required. Now push the pin into the housing as shown. Make sure the tab end of the pin goes the correct way into the housing. Notice how the tab locks into that open square hole in the housing. This is an example of sticking the connector onto a circuit. You are now finished! There are also male pins that you can use. But wait! What if you made a mistake? Or want to reuse the housing for something else? Simple, take a sharp object such as wire snips and push the tab in as shown. Simultaneously pull the wire out. Be careful not to over-bend the tab (if you do, manually bend it back after you remove the wire).
Electricalpin connectortypes
For a quick rundown and demonstration, check out my video: Required Parts This method involves these parts from DigiKey.com or Mouser.com: WM2512-ND pins WM2800-ND 2 pin housing WM2801-ND 3 pin housing WM2802-ND 4 pin housing 22 or 24 guage wire Other connectors can be found by searching for 'molex' and 'housing'. As for crimpers, this forum post is useful. The tool I use is the Pro-Crimper III. Servocity.com sells pins and crimpers too. Basic Summary of Steps As also demonstrated on my photoresistor tutorial, get a crimper (~$100) or use cheap pliers to attach the pins to the wires. Basically just stick a pin in the crimper hole with the right setting, stick your wire in the pin, then squeeze. A closeup. Then stick each of the three wires into the molex connector. Step-by-Step First, using wire strippers, strip off about half a centimeter of insulation off the wire. Next, get a pair of crimpers. This is a close-up of the crimping part. You will notice numbers that represent the gauge of wires they were designed for. Typically, you want between 18 and 24 gauge. Next, you will need a pin that looks like this. Place the pin into the correct setting as shown. You will want to squeeze the crimpers partly to hold the pin in place (but not all the way yet!!!). Now stick your stripped wire into the pin. You want about 3 millimeters of insulation to also go in. Squeeze the crimpers all the way. Now release the crimpers, and pull the wire and pin out. This is what it should now look like. Notice that the insulation is squeezed by the back of the pin, and the wire is squeezed by a different part in the center of the pin. This is to insure a good hold on the wire, and good electrical contact as well. Some people like to then add a bit of solder, but this is not required. Now push the pin into the housing as shown. Make sure the tab end of the pin goes the correct way into the housing. Notice how the tab locks into that open square hole in the housing. This is an example of sticking the connector onto a circuit. You are now finished! There are also male pins that you can use. But wait! What if you made a mistake? Or want to reuse the housing for something else? Simple, take a sharp object such as wire snips and push the tab in as shown. Simultaneously pull the wire out. Be careful not to over-bend the tab (if you do, manually bend it back after you remove the wire).
SKILLS How To Build A Robot Tutorial Calculators Mechanics Programming Miscellaneous Robots Space HARDWARE Actuators Batteries Electronics Materials Microcontrollers Sensors SCIENCE Robot Journals Robot Theory Conferences
Basic Summary of Steps As also demonstrated on my photoresistor tutorial, get a crimper (~$100) or use cheap pliers to attach the pins to the wires. Basically just stick a pin in the crimper hole with the right setting, stick your wire in the pin, then squeeze. A closeup. Then stick each of the three wires into the molex connector. Step-by-Step First, using wire strippers, strip off about half a centimeter of insulation off the wire. Next, get a pair of crimpers. This is a close-up of the crimping part. You will notice numbers that represent the gauge of wires they were designed for. Typically, you want between 18 and 24 gauge. Next, you will need a pin that looks like this. Place the pin into the correct setting as shown. You will want to squeeze the crimpers partly to hold the pin in place (but not all the way yet!!!). Now stick your stripped wire into the pin. You want about 3 millimeters of insulation to also go in. Squeeze the crimpers all the way. Now release the crimpers, and pull the wire and pin out. This is what it should now look like. Notice that the insulation is squeezed by the back of the pin, and the wire is squeezed by a different part in the center of the pin. This is to insure a good hold on the wire, and good electrical contact as well. Some people like to then add a bit of solder, but this is not required. Now push the pin into the housing as shown. Make sure the tab end of the pin goes the correct way into the housing. Notice how the tab locks into that open square hole in the housing. This is an example of sticking the connector onto a circuit. You are now finished! There are also male pins that you can use. But wait! What if you made a mistake? Or want to reuse the housing for something else? Simple, take a sharp object such as wire snips and push the tab in as shown. Simultaneously pull the wire out. Be careful not to over-bend the tab (if you do, manually bend it back after you remove the wire).
Servocity.com sells pins and crimpers too. Basic Summary of Steps As also demonstrated on my photoresistor tutorial, get a crimper (~$100) or use cheap pliers to attach the pins to the wires. Basically just stick a pin in the crimper hole with the right setting, stick your wire in the pin, then squeeze. A closeup. Then stick each of the three wires into the molex connector. Step-by-Step First, using wire strippers, strip off about half a centimeter of insulation off the wire. Next, get a pair of crimpers. This is a close-up of the crimping part. You will notice numbers that represent the gauge of wires they were designed for. Typically, you want between 18 and 24 gauge. Next, you will need a pin that looks like this. Place the pin into the correct setting as shown. You will want to squeeze the crimpers partly to hold the pin in place (but not all the way yet!!!). Now stick your stripped wire into the pin. You want about 3 millimeters of insulation to also go in. Squeeze the crimpers all the way. Now release the crimpers, and pull the wire and pin out. This is what it should now look like. Notice that the insulation is squeezed by the back of the pin, and the wire is squeezed by a different part in the center of the pin. This is to insure a good hold on the wire, and good electrical contact as well. Some people like to then add a bit of solder, but this is not required. Now push the pin into the housing as shown. Make sure the tab end of the pin goes the correct way into the housing. Notice how the tab locks into that open square hole in the housing. This is an example of sticking the connector onto a circuit. You are now finished! There are also male pins that you can use. But wait! What if you made a mistake? Or want to reuse the housing for something else? Simple, take a sharp object such as wire snips and push the tab in as shown. Simultaneously pull the wire out. Be careful not to over-bend the tab (if you do, manually bend it back after you remove the wire).
Next, you will need a pin that looks like this. Place the pin into the correct setting as shown. You will want to squeeze the crimpers partly to hold the pin in place (but not all the way yet!!!). Now stick your stripped wire into the pin. You want about 3 millimeters of insulation to also go in. Squeeze the crimpers all the way. Now release the crimpers, and pull the wire and pin out. This is what it should now look like. Notice that the insulation is squeezed by the back of the pin, and the wire is squeezed by a different part in the center of the pin. This is to insure a good hold on the wire, and good electrical contact as well. Some people like to then add a bit of solder, but this is not required. Now push the pin into the housing as shown. Make sure the tab end of the pin goes the correct way into the housing. Notice how the tab locks into that open square hole in the housing. This is an example of sticking the connector onto a circuit. You are now finished! There are also male pins that you can use. But wait! What if you made a mistake? Or want to reuse the housing for something else? Simple, take a sharp object such as wire snips and push the tab in as shown. Simultaneously pull the wire out. Be careful not to over-bend the tab (if you do, manually bend it back after you remove the wire).

There are also male pins that you can use. But wait! What if you made a mistake? Or want to reuse the housing for something else? Simple, take a sharp object such as wire snips and push the tab in as shown. Simultaneously pull the wire out. Be careful not to over-bend the tab (if you do, manually bend it back after you remove the wire).
This is what it should now look like. Notice that the insulation is squeezed by the back of the pin, and the wire is squeezed by a different part in the center of the pin. This is to insure a good hold on the wire, and good electrical contact as well. Some people like to then add a bit of solder, but this is not required. Now push the pin into the housing as shown. Make sure the tab end of the pin goes the correct way into the housing. Notice how the tab locks into that open square hole in the housing. This is an example of sticking the connector onto a circuit. You are now finished! There are also male pins that you can use. But wait! What if you made a mistake? Or want to reuse the housing for something else? Simple, take a sharp object such as wire snips and push the tab in as shown. Simultaneously pull the wire out. Be careful not to over-bend the tab (if you do, manually bend it back after you remove the wire).
This is what it should now look like. Notice that the insulation is squeezed by the back of the pin, and the wire is squeezed by a different part in the center of the pin. This is to insure a good hold on the wire, and good electrical contact as well. Some people like to then add a bit of solder, but this is not required. Now push the pin into the housing as shown. Make sure the tab end of the pin goes the correct way into the housing. Notice how the tab locks into that open square hole in the housing. This is an example of sticking the connector onto a circuit. You are now finished! There are also male pins that you can use. But wait! What if you made a mistake? Or want to reuse the housing for something else? Simple, take a sharp object such as wire snips and push the tab in as shown. Simultaneously pull the wire out. Be careful not to over-bend the tab (if you do, manually bend it back after you remove the wire).
You are now finished! There are also male pins that you can use. But wait! What if you made a mistake? Or want to reuse the housing for something else? Simple, take a sharp object such as wire snips and push the tab in as shown. Simultaneously pull the wire out. Be careful not to over-bend the tab (if you do, manually bend it back after you remove the wire).
Electricalconnectorpins automotive
Now stick your stripped wire into the pin. You want about 3 millimeters of insulation to also go in. Squeeze the crimpers all the way. Now release the crimpers, and pull the wire and pin out. This is what it should now look like. Notice that the insulation is squeezed by the back of the pin, and the wire is squeezed by a different part in the center of the pin. This is to insure a good hold on the wire, and good electrical contact as well. Some people like to then add a bit of solder, but this is not required. Now push the pin into the housing as shown. Make sure the tab end of the pin goes the correct way into the housing. Notice how the tab locks into that open square hole in the housing. This is an example of sticking the connector onto a circuit. You are now finished! There are also male pins that you can use. But wait! What if you made a mistake? Or want to reuse the housing for something else? Simple, take a sharp object such as wire snips and push the tab in as shown. Simultaneously pull the wire out. Be careful not to over-bend the tab (if you do, manually bend it back after you remove the wire).
Place the pin into the correct setting as shown. You will want to squeeze the crimpers partly to hold the pin in place (but not all the way yet!!!). Now stick your stripped wire into the pin. You want about 3 millimeters of insulation to also go in. Squeeze the crimpers all the way. Now release the crimpers, and pull the wire and pin out. This is what it should now look like. Notice that the insulation is squeezed by the back of the pin, and the wire is squeezed by a different part in the center of the pin. This is to insure a good hold on the wire, and good electrical contact as well. Some people like to then add a bit of solder, but this is not required. Now push the pin into the housing as shown. Make sure the tab end of the pin goes the correct way into the housing. Notice how the tab locks into that open square hole in the housing. This is an example of sticking the connector onto a circuit. You are now finished! There are also male pins that you can use. But wait! What if you made a mistake? Or want to reuse the housing for something else? Simple, take a sharp object such as wire snips and push the tab in as shown. Simultaneously pull the wire out. Be careful not to over-bend the tab (if you do, manually bend it back after you remove the wire).
This is a close-up of the crimping part. You will notice numbers that represent the gauge of wires they were designed for. Typically, you want between 18 and 24 gauge. Next, you will need a pin that looks like this. Place the pin into the correct setting as shown. You will want to squeeze the crimpers partly to hold the pin in place (but not all the way yet!!!). Now stick your stripped wire into the pin. You want about 3 millimeters of insulation to also go in. Squeeze the crimpers all the way. Now release the crimpers, and pull the wire and pin out. This is what it should now look like. Notice that the insulation is squeezed by the back of the pin, and the wire is squeezed by a different part in the center of the pin. This is to insure a good hold on the wire, and good electrical contact as well. Some people like to then add a bit of solder, but this is not required. Now push the pin into the housing as shown. Make sure the tab end of the pin goes the correct way into the housing. Notice how the tab locks into that open square hole in the housing. This is an example of sticking the connector onto a circuit. You are now finished! There are also male pins that you can use. But wait! What if you made a mistake? Or want to reuse the housing for something else? Simple, take a sharp object such as wire snips and push the tab in as shown. Simultaneously pull the wire out. Be careful not to over-bend the tab (if you do, manually bend it back after you remove the wire).
Now push the pin into the housing as shown. Make sure the tab end of the pin goes the correct way into the housing. Notice how the tab locks into that open square hole in the housing. This is an example of sticking the connector onto a circuit. You are now finished! There are also male pins that you can use. But wait! What if you made a mistake? Or want to reuse the housing for something else? Simple, take a sharp object such as wire snips and push the tab in as shown. Simultaneously pull the wire out. Be careful not to over-bend the tab (if you do, manually bend it back after you remove the wire).
But wait! What if you made a mistake? Or want to reuse the housing for something else? Simple, take a sharp object such as wire snips and push the tab in as shown. Simultaneously pull the wire out. Be careful not to over-bend the tab (if you do, manually bend it back after you remove the wire).
But fear not, I will show you a 'professional' way of connecting wires. For a quick rundown and demonstration, check out my video: Required Parts This method involves these parts from DigiKey.com or Mouser.com: WM2512-ND pins WM2800-ND 2 pin housing WM2801-ND 3 pin housing WM2802-ND 4 pin housing 22 or 24 guage wire Other connectors can be found by searching for 'molex' and 'housing'. As for crimpers, this forum post is useful. The tool I use is the Pro-Crimper III. Servocity.com sells pins and crimpers too. Basic Summary of Steps As also demonstrated on my photoresistor tutorial, get a crimper (~$100) or use cheap pliers to attach the pins to the wires. Basically just stick a pin in the crimper hole with the right setting, stick your wire in the pin, then squeeze. A closeup. Then stick each of the three wires into the molex connector. Step-by-Step First, using wire strippers, strip off about half a centimeter of insulation off the wire. Next, get a pair of crimpers. This is a close-up of the crimping part. You will notice numbers that represent the gauge of wires they were designed for. Typically, you want between 18 and 24 gauge. Next, you will need a pin that looks like this. Place the pin into the correct setting as shown. You will want to squeeze the crimpers partly to hold the pin in place (but not all the way yet!!!). Now stick your stripped wire into the pin. You want about 3 millimeters of insulation to also go in. Squeeze the crimpers all the way. Now release the crimpers, and pull the wire and pin out. This is what it should now look like. Notice that the insulation is squeezed by the back of the pin, and the wire is squeezed by a different part in the center of the pin. This is to insure a good hold on the wire, and good electrical contact as well. Some people like to then add a bit of solder, but this is not required. Now push the pin into the housing as shown. Make sure the tab end of the pin goes the correct way into the housing. Notice how the tab locks into that open square hole in the housing. This is an example of sticking the connector onto a circuit. You are now finished! There are also male pins that you can use. But wait! What if you made a mistake? Or want to reuse the housing for something else? Simple, take a sharp object such as wire snips and push the tab in as shown. Simultaneously pull the wire out. Be careful not to over-bend the tab (if you do, manually bend it back after you remove the wire).
Place the pin into the correct setting as shown. You will want to squeeze the crimpers partly to hold the pin in place (but not all the way yet!!!). Now stick your stripped wire into the pin. You want about 3 millimeters of insulation to also go in. Squeeze the crimpers all the way. Now release the crimpers, and pull the wire and pin out. This is what it should now look like. Notice that the insulation is squeezed by the back of the pin, and the wire is squeezed by a different part in the center of the pin. This is to insure a good hold on the wire, and good electrical contact as well. Some people like to then add a bit of solder, but this is not required. Now push the pin into the housing as shown. Make sure the tab end of the pin goes the correct way into the housing. Notice how the tab locks into that open square hole in the housing. This is an example of sticking the connector onto a circuit. You are now finished! There are also male pins that you can use. But wait! What if you made a mistake? Or want to reuse the housing for something else? Simple, take a sharp object such as wire snips and push the tab in as shown. Simultaneously pull the wire out. Be careful not to over-bend the tab (if you do, manually bend it back after you remove the wire).


 Ms.Cici
 8618319014500