
Visual Quality Inspection of Bottle Packaging - bottling inspection with vision ai
Reflected light meters measure the intensity of the light that is reflected off the subject. For that reason, you usually point a reflected light meter at the subject. The meter in your camera is a reflected light meter.
Reflectedmetering
Evening, St. Joseph Lighthouse, Michigan Experiment with exposure compensation. Play with the light! Don't worry. The exposure police won't come and take you away. Get out there and have fun! Be sure and read Part Two of this article, Choosing the Right Tone to Meter. Exposure Articles Why Is Exposure So Important? Speaking Your Camera's Exposure Language: Aperture, Shutter Speed, and ISO Using Reflected Light Meters, Part One Using Reflected Light Meters, Part Two Simplify Your Life with an Incident Light Meter Turn Your Camera Meter Into An Incident Light Meter: Using an ExpoDisc Using a Gray Card, Incident Light Metering on the Cheap The RAW versus Jpeg Exposure Advantage More Information The most detailed information about metering, camera meters, and other metering tools is in my book, Digital Photography Exposure for Dummies. December 22, 2010Updated June 17, 2013
In auto exposure modes, your camera meter is perfectly designed to give you "average" exposures in average situations, but it can't give you the "ideal" exposure for subjects of all colors and tones in every situation. If you want to get the best possible exposure, you have to take the camera off "autopilot" and control the metering yourself.
Field of Light, Manhattan, New York City, USA. Spanning more than six-acres on Manhattan's East Side from 38th to 41st Street east of First Avenue, Field of ...
3. If you meter something lighter than a middle gray, everything looks darker in the photo than it does in real life. The lighter the subject you meter, the darker the tones will be in your photo.
Most cameras have a built in reflected light meter. By changing the metering pattern you can meter most of the scene in your viewfinder (center-weighted average), the central area in your viewfinder (partial area metering), or just a tiny spot in the center of your viewfinder (spot metering - just like a hand held spot meter used by large format photographers).
Your camera should have an exposure compensation dial which will tell you how many stops you have subtracted or added to the recommended exposure). You may have an LCD screen that looks something like this.
Cyth Systems is a leading integration and engineering firm headquartered in Southern California with pioneering success in designing and building automated test ...
In the top photo just above, the photographer is pointing her lens at a row of sunlit buildings and using the camera's reflected light meter to measure the intensity of the light that is reflected off the buildings. In the bottom photo the photographer is using an incident light meter with the white dome pointed at the sun to measure the intensity of the sunlight falling on (incident to) the buildings.
Your camera meter's desire to make everything middle gray (or "medium toned" in the world of color) leads it astray when your subject isn't medium toned, or if all the tones in a scene don't average out to a medium tone.
Long's Peak and Nymph Lake, Rocky Mountain National ParkCanon 20D, 28-135mm lens at 28mm. f/16, 1.6 sec, ISO 100 As expected, the meter did its best to make the large, central area of the frame average out to a medium tone, but the mountains and sky are now three stops overexposed and seriously washed out ("burned out" in photo terms). I could digitally combine the two photos so I have some tonality in the trees (which is another reason I took more than one exposure), but I rather like the dramatic, high contrast lighting of the original image. Exposure Compensation Due to your meter's fascination with creating medium toned subjects, you need to do some exposure compensation when photographing subjects that are lighter or darker than a medium tone. Exposure compensation simply means adding or taking away light from what the camera meter tells you. For light subjects, you add light to what the meter tells you. For dark subjects, you take away light. Just repeat this phrase a few times: "Add light to make light". This may seem counterintuitive. Your pupils stop down in really bright light so it is tempting to say "Wow, that's really bright snow, I should stop down my lens." But we are talking photography, so "Add light to make light." How much light do you add or subtract? That is a judgment call on your part that gets better with experience. If your subject is medium toned, do what the meter tells you. don't add or subtract any light. If your subject is light in tone, add a stop of light to what the meter tells you by opening your lens up one stop, or using a shutter speed one stop longer. If you are photographing a very light tone, add two stops of light. The standard advice If you are photographing a dark tone, is to subtract one stop of light from what the meter tells you. If you are photographing a very dark tone, subtract two stops of light. For example, if you are photographing a field of wheat that is ready to harvest (which is about one stop lighter than a medium tone), and the meter says f/11 at 1/250 second, add one stop of light by changing the f-stop to f/8 or by changing the shutter speed to 1/125 second. If you are photographing evergreen trees (which are darker than middle gray) and the meter says f/11 at 1/60 second, subtract one stop of light by changing the f-stop to f/16 or the shutter speed to 1/125 second. If you aren't exactly clear on which apertures and shutter speeds to use to add or subtract a given amount of light, go back and read Speaking Your Camera's Exposure Language. Here's the standard exposure compensation advice when metering subjects with a reflected light meter: Subject Tonality Compensation in Stops Very Light + 2 Light + 1 Medium Toned 0 Dark - 1 Very Dark - 2 But in my experience, subtracting that much light for Dark and Very Dark subjects results in subjects that are usually too dark for my personal taste. So here is the exposure compensation that I recommend: Subject Tonality Compensation in Stops Very Light + 2 Light + 1 Medium Toned 0 Dark - 1/2 Very Dark - 1 As you gain more experience, at some point you will begin to use half stop increments. You might look at a light sandy beach and say "This sand is lighter than "Light" (+1 on exposure compensation chart above) but not as light as "Very Light" (+2) so I will add one and a half stops of light (+1 1/2) to what the camera meter is telling me. Tonality Exercise The best way to get a feel for subject tonality and exposure compensation is to experiment. Pick a bright sunny day with clear blue northern skies (southern skies if you are south of the equator) and green grass. If you have an 18% gray card (and having one is a very good idea), bring it along since it is a good standard of reference for medium gray. Find something red and something yellow. That way you will have the basic red, yellow, green, and blue colors covered, plus a gray card. Fill the frame with each subject, being careful not to cast your shadow on the smaller subjects when you get close. Take 5 pictures of each subject in one stop increments from 2 stops less than the camera's recommendations up to 2 stops more. The exposure series will be as follows: -2, -1, 0, +1, +2. Your camera should have an exposure compensation dial which will tell you how many stops you have subtracted or added to the recommended exposure). You may have an LCD screen that looks something like this. Electronic Camera LCD Screen The shutter speed is at the upper left (1/500 second), the aperture at upper right (f/8), the white balance at center left (AWB = Auto White Balance), the ISO setting at center right, and the exposure compensation scale is across the bottom. In this illustration, the exposure compensation is +1, one stop more than the exposure recommended by the camera meter which will result in a subject one stop lighter than a medium tone. After you have taken 5 photos of each subject, you should end up with a group of photos that looks like this. Exposure Compensation Tonality Test Chart For my tonality test, I photographed a gray card (top row), red cloth, blue sky, yellow bowl, and green grass. The left hand column is all of the -2 exposure compensation photos, no compensation in the middle column photos, and +2 compensation in the right column. Compare your subjects to the photos and decide which exposure of each subject looks the most like the real life subject. For my photos, it came out like this: Gray Card: 0 compensationRed Cloth: -1Blue Sky: +1Yellow Bowl: +2Green Grass: -1 Take note that blue sky, depending on elevation, atmospheric conditions, and particulate matter in the sky can easily range from 2 tops darker to two stops lighter than a medium tone. Green grass, depending on the time of year and direction of the sun can vary from -2 to +1 or even lighter. The more you experiment with exposure compensation, the better you will get at deciding how much compensation each subject needs to create a photo that looks like the subject in real life. Breaking Loose, Creative Exposure Compensation Once you have a good handle on exposure compensation, mix things up a bit. Sometimes the best photos come from making the subject look lighter or darker in the photo than it looked in real life. Pros do it all the time. You can make any subject as light or dark as you want. Fashion photographers make dramatic changes in the tonality of a model's skin. Landscape photographers make sunsets lighter or darker all the time. Consider these two photos, taken the same evening from the same location with different focal length lenses. The second photo was taken much later than the first photo and it was much darker out. I tried a variety of exposures for both photos. The exposure I liked for the first photo is much darker and more dramatic than it was in real life. The exposure I liked for the second photo is just the opposite, much lighter than the original scene. Sunset, St. Joseph Lighthouse, Michigan Evening, St. Joseph Lighthouse, Michigan Experiment with exposure compensation. Play with the light! Don't worry. The exposure police won't come and take you away. Get out there and have fun! Be sure and read Part Two of this article, Choosing the Right Tone to Meter. Exposure Articles Why Is Exposure So Important? Speaking Your Camera's Exposure Language: Aperture, Shutter Speed, and ISO Using Reflected Light Meters, Part One Using Reflected Light Meters, Part Two Simplify Your Life with an Incident Light Meter Turn Your Camera Meter Into An Incident Light Meter: Using an ExpoDisc Using a Gray Card, Incident Light Metering on the Cheap The RAW versus Jpeg Exposure Advantage More Information The most detailed information about metering, camera meters, and other metering tools is in my book, Digital Photography Exposure for Dummies. December 22, 2010Updated June 17, 2013
For my tonality test, I photographed a gray card (top row), red cloth, blue sky, yellow bowl, and green grass. The left hand column is all of the -2 exposure compensation photos, no compensation in the middle column photos, and +2 compensation in the right column.
You can prove this to yourself with gray, black, and white subjects. Just be sure when you meter your subject that the meter sees only the subject, and not any other tones in the scene.
Incident lightmeter app
While I was taking the picture, the camera meter was screaming at me: "Too Dark! Too Dark!!" (I'm sure your meter talks to you too!) The meter was seeing all of the dark tones in the center of the image and it wanted to make them medium toned. I decided to let the camera meter have its way. The photo would look awful, but it would be a nice demonstration of what happens when camera meters go astray. So I turned the shutter speed dial until the meter was happy (1.6 seconds, 3 stops more light than the above photo) and took this picture.
The shutter speed is at the upper left (1/500 second), the aperture at upper right (f/8), the white balance at center left (AWB = Auto White Balance), the ISO setting at center right, and the exposure compensation scale is across the bottom. In this illustration, the exposure compensation is +1, one stop more than the exposure recommended by the camera meter which will result in a subject one stop lighter than a medium tone.
Exposure Compensation Tonality Test Chart For my tonality test, I photographed a gray card (top row), red cloth, blue sky, yellow bowl, and green grass. The left hand column is all of the -2 exposure compensation photos, no compensation in the middle column photos, and +2 compensation in the right column. Compare your subjects to the photos and decide which exposure of each subject looks the most like the real life subject. For my photos, it came out like this: Gray Card: 0 compensationRed Cloth: -1Blue Sky: +1Yellow Bowl: +2Green Grass: -1 Take note that blue sky, depending on elevation, atmospheric conditions, and particulate matter in the sky can easily range from 2 tops darker to two stops lighter than a medium tone. Green grass, depending on the time of year and direction of the sun can vary from -2 to +1 or even lighter. The more you experiment with exposure compensation, the better you will get at deciding how much compensation each subject needs to create a photo that looks like the subject in real life. Breaking Loose, Creative Exposure Compensation Once you have a good handle on exposure compensation, mix things up a bit. Sometimes the best photos come from making the subject look lighter or darker in the photo than it looked in real life. Pros do it all the time. You can make any subject as light or dark as you want. Fashion photographers make dramatic changes in the tonality of a model's skin. Landscape photographers make sunsets lighter or darker all the time. Consider these two photos, taken the same evening from the same location with different focal length lenses. The second photo was taken much later than the first photo and it was much darker out. I tried a variety of exposures for both photos. The exposure I liked for the first photo is much darker and more dramatic than it was in real life. The exposure I liked for the second photo is just the opposite, much lighter than the original scene. Sunset, St. Joseph Lighthouse, Michigan Evening, St. Joseph Lighthouse, Michigan Experiment with exposure compensation. Play with the light! Don't worry. The exposure police won't come and take you away. Get out there and have fun! Be sure and read Part Two of this article, Choosing the Right Tone to Meter. Exposure Articles Why Is Exposure So Important? Speaking Your Camera's Exposure Language: Aperture, Shutter Speed, and ISO Using Reflected Light Meters, Part One Using Reflected Light Meters, Part Two Simplify Your Life with an Incident Light Meter Turn Your Camera Meter Into An Incident Light Meter: Using an ExpoDisc Using a Gray Card, Incident Light Metering on the Cheap The RAW versus Jpeg Exposure Advantage More Information The most detailed information about metering, camera meters, and other metering tools is in my book, Digital Photography Exposure for Dummies. December 22, 2010Updated June 17, 2013
Reflectivelightmetering
The photo came out just like I wanted it to with the warm light on the peaks, the reflection in the water, and the contrast of the very dark evergreens in the shade.
Grayscale from a Gretag Macbeth ColorChecker Reflected light meters do a terrific job if your subject is "middle gray" in tone, or if all of the tones in your scene happen to average out to a middle gray. The problem is, most subjects aren't exactly a middle gray, so when a light meter gives you a suggested exposure, it is not giving you an ideal exposure that will work for all subjects of all colors and tones. If your light meter says "f/16, and 1/100 second at ISO 100", what it is really telling you is this: "f/16 and 1/100 second at ISO 100 is a good exposure in these lighting conditions if your subject is middle gray in tone." If your subject is lighter or darker than middle gray, you will need to make some adjustments from this recommendation to get the best possible exposure. "In Camera" Reflected Light Meters vs Hand Held Reflected Light Meters Reflected light meters are found in your camera and are also available as a separate , hand held meter. Most photographers use an "in camera" reflected light meter. It is rare that you will see a photographer using a hand held reflected light meter. Large format landscape photographers are the exception. They don't have a meter in their camera, so many of them use a spot-meter, a hand held reflected light meter that measures a very small area in a scene so the photographer can meter individual tones in the larger scene. Most cameras have a built in reflected light meter. By changing the metering pattern you can meter most of the scene in your viewfinder (center-weighted average), the central area in your viewfinder (partial area metering), or just a tiny spot in the center of your viewfinder (spot metering - just like a hand held spot meter used by large format photographers). In camera reflected light meters have the advantage over hand held reflected light meters because they meter "through the lens" (TTL) and any light robbing accessories you might be using in front of or behind your lens. Teleconverters, extensions tubes, filters, and other other accessories used with the lens reduce the amount of light that reaches the digital sensor or film. Not only that, some lenses get longer (lens extension) as they focus closer so they lose light in the process. Some macro lenses lose as much as two stops of light as they reach maximum magnification (closest point of focus). A hand held reflected light meter is oblivious to these accessories (and lens extension) so they will give you an incorrect meter reading unless you allow for the amount of light that each accessory is costing you. If your 1.4x teleconverter is costing you one stop of light, you need to add one stop of light to what the hand held reflected light meter is telling you. Your TTL in camera meter measures the light after it has gone through your lens and accessories, so no changes need to be made to allow for any accessories you happen to be using. You DO need to make changes to allow for different subject tonalities. Your Reflected Light Meter's Love Affair with Middle Gray Tones Your reflected light meter is in love with middle gray. It does its best to turn anything you meter into a middle gray tone. You can prove this to yourself with gray, black, and white subjects. Just be sure when you meter your subject that the meter sees only the subject, and not any other tones in the scene. In the following photo of a black, gray, and white calibration target, I moved in close and metered just the gray center section and locked in that exposure so it wouldn't change. Then I backed up and photographed the whole calibration target and included some of the background. As a result, the calibration target looks just like it does in real life. Calibration Target #1, Metered for the Gray Center Section In the following photo, I did exactly the same thing, except I moved in close and metered the black section on the left, locked in the exposure, and backed up to take the picture. Calibration Target #2, Metered for the Black (Left) Section As you can see. the meter did its best to turn the black section (in real life) into a middle gray tone (in the photo) and everything else ends up lighter in tone. In the following photo, I did exactly the same thing, except I moved in close and metered the white section on the right. Calibration Target #3, Metered for the White (Right) Section The meter did its best to turn the white section (in real life) into a middle gray tone (in the photo) and everything else ends up darker than in real life. To see how well the meter did it's job, look at these "color patches". The left patch is part of the gray section of the calibration target from the first photo. The center patch is part of the black section from the second photo. The right patch is part of the white section from the third photo. The meter did a pretty good job of making all three a "middle gray" in tone. Three things are obvious from these above photos. 1. If you meter something middle gray in tone, everything in the photo ends up looking pretty much like it does in real life. That's why a lot of photographers will meter an 18% gray card or the gray section of a calibration target (like the one above), and use that meter reading as the basis of their exposure when they photograph their scene. 2. If you meter something darker than middle gray, everything looks lighter in the photo than it does in real life. The darker the subject you meter, the lighter the tones will be in the photograph. 3. If you meter something lighter than a middle gray, everything looks darker in the photo than it does in real life. The lighter the subject you meter, the darker the tones will be in your photo. Why Your Meter Gets Fooled How does this apply to the real world when you aren't photographing calibration targets? Your camera meter's desire to make everything middle gray (or "medium toned" in the world of color) leads it astray when your subject isn't medium toned, or if all the tones in a scene don't average out to a medium tone. In the following photo, my camera was set to manual metering mode, and the aperture to f/16 to give me enough depth of field to keep everything sharp from the foreground rocks to the distant mountains. I set the metering pattern to partial area metering so the camera would only meter the central 10-15 percent of the frame. I zoomed in on the blue sky and sunlight peaks and set my shutter for a good exposure. Then I zoomed back to include the whole scene and took the picture. The ISO was set to 100 for maximum image quality, and the camera was on a tripod so the photo wouldn't be blurred during the 1/5 second exposure. Long's Peak and Nymph Lake, Rocky Mountain National ParkCanon 20D, 28-135mm lens at 28mm. f/16, 1/5 sec, ISO 100 The photo came out just like I wanted it to with the warm light on the peaks, the reflection in the water, and the contrast of the very dark evergreens in the shade. While I was taking the picture, the camera meter was screaming at me: "Too Dark! Too Dark!!" (I'm sure your meter talks to you too!) The meter was seeing all of the dark tones in the center of the image and it wanted to make them medium toned. I decided to let the camera meter have its way. The photo would look awful, but it would be a nice demonstration of what happens when camera meters go astray. So I turned the shutter speed dial until the meter was happy (1.6 seconds, 3 stops more light than the above photo) and took this picture. Long's Peak and Nymph Lake, Rocky Mountain National ParkCanon 20D, 28-135mm lens at 28mm. f/16, 1.6 sec, ISO 100 As expected, the meter did its best to make the large, central area of the frame average out to a medium tone, but the mountains and sky are now three stops overexposed and seriously washed out ("burned out" in photo terms). I could digitally combine the two photos so I have some tonality in the trees (which is another reason I took more than one exposure), but I rather like the dramatic, high contrast lighting of the original image. Exposure Compensation Due to your meter's fascination with creating medium toned subjects, you need to do some exposure compensation when photographing subjects that are lighter or darker than a medium tone. Exposure compensation simply means adding or taking away light from what the camera meter tells you. For light subjects, you add light to what the meter tells you. For dark subjects, you take away light. Just repeat this phrase a few times: "Add light to make light". This may seem counterintuitive. Your pupils stop down in really bright light so it is tempting to say "Wow, that's really bright snow, I should stop down my lens." But we are talking photography, so "Add light to make light." How much light do you add or subtract? That is a judgment call on your part that gets better with experience. If your subject is medium toned, do what the meter tells you. don't add or subtract any light. If your subject is light in tone, add a stop of light to what the meter tells you by opening your lens up one stop, or using a shutter speed one stop longer. If you are photographing a very light tone, add two stops of light. The standard advice If you are photographing a dark tone, is to subtract one stop of light from what the meter tells you. If you are photographing a very dark tone, subtract two stops of light. For example, if you are photographing a field of wheat that is ready to harvest (which is about one stop lighter than a medium tone), and the meter says f/11 at 1/250 second, add one stop of light by changing the f-stop to f/8 or by changing the shutter speed to 1/125 second. If you are photographing evergreen trees (which are darker than middle gray) and the meter says f/11 at 1/60 second, subtract one stop of light by changing the f-stop to f/16 or the shutter speed to 1/125 second. If you aren't exactly clear on which apertures and shutter speeds to use to add or subtract a given amount of light, go back and read Speaking Your Camera's Exposure Language. Here's the standard exposure compensation advice when metering subjects with a reflected light meter: Subject Tonality Compensation in Stops Very Light + 2 Light + 1 Medium Toned 0 Dark - 1 Very Dark - 2 But in my experience, subtracting that much light for Dark and Very Dark subjects results in subjects that are usually too dark for my personal taste. So here is the exposure compensation that I recommend: Subject Tonality Compensation in Stops Very Light + 2 Light + 1 Medium Toned 0 Dark - 1/2 Very Dark - 1 As you gain more experience, at some point you will begin to use half stop increments. You might look at a light sandy beach and say "This sand is lighter than "Light" (+1 on exposure compensation chart above) but not as light as "Very Light" (+2) so I will add one and a half stops of light (+1 1/2) to what the camera meter is telling me. Tonality Exercise The best way to get a feel for subject tonality and exposure compensation is to experiment. Pick a bright sunny day with clear blue northern skies (southern skies if you are south of the equator) and green grass. If you have an 18% gray card (and having one is a very good idea), bring it along since it is a good standard of reference for medium gray. Find something red and something yellow. That way you will have the basic red, yellow, green, and blue colors covered, plus a gray card. Fill the frame with each subject, being careful not to cast your shadow on the smaller subjects when you get close. Take 5 pictures of each subject in one stop increments from 2 stops less than the camera's recommendations up to 2 stops more. The exposure series will be as follows: -2, -1, 0, +1, +2. Your camera should have an exposure compensation dial which will tell you how many stops you have subtracted or added to the recommended exposure). You may have an LCD screen that looks something like this. Electronic Camera LCD Screen The shutter speed is at the upper left (1/500 second), the aperture at upper right (f/8), the white balance at center left (AWB = Auto White Balance), the ISO setting at center right, and the exposure compensation scale is across the bottom. In this illustration, the exposure compensation is +1, one stop more than the exposure recommended by the camera meter which will result in a subject one stop lighter than a medium tone. After you have taken 5 photos of each subject, you should end up with a group of photos that looks like this. Exposure Compensation Tonality Test Chart For my tonality test, I photographed a gray card (top row), red cloth, blue sky, yellow bowl, and green grass. The left hand column is all of the -2 exposure compensation photos, no compensation in the middle column photos, and +2 compensation in the right column. Compare your subjects to the photos and decide which exposure of each subject looks the most like the real life subject. For my photos, it came out like this: Gray Card: 0 compensationRed Cloth: -1Blue Sky: +1Yellow Bowl: +2Green Grass: -1 Take note that blue sky, depending on elevation, atmospheric conditions, and particulate matter in the sky can easily range from 2 tops darker to two stops lighter than a medium tone. Green grass, depending on the time of year and direction of the sun can vary from -2 to +1 or even lighter. The more you experiment with exposure compensation, the better you will get at deciding how much compensation each subject needs to create a photo that looks like the subject in real life. Breaking Loose, Creative Exposure Compensation Once you have a good handle on exposure compensation, mix things up a bit. Sometimes the best photos come from making the subject look lighter or darker in the photo than it looked in real life. Pros do it all the time. You can make any subject as light or dark as you want. Fashion photographers make dramatic changes in the tonality of a model's skin. Landscape photographers make sunsets lighter or darker all the time. Consider these two photos, taken the same evening from the same location with different focal length lenses. The second photo was taken much later than the first photo and it was much darker out. I tried a variety of exposures for both photos. The exposure I liked for the first photo is much darker and more dramatic than it was in real life. The exposure I liked for the second photo is just the opposite, much lighter than the original scene. Sunset, St. Joseph Lighthouse, Michigan Evening, St. Joseph Lighthouse, Michigan Experiment with exposure compensation. Play with the light! Don't worry. The exposure police won't come and take you away. Get out there and have fun! Be sure and read Part Two of this article, Choosing the Right Tone to Meter. Exposure Articles Why Is Exposure So Important? Speaking Your Camera's Exposure Language: Aperture, Shutter Speed, and ISO Using Reflected Light Meters, Part One Using Reflected Light Meters, Part Two Simplify Your Life with an Incident Light Meter Turn Your Camera Meter Into An Incident Light Meter: Using an ExpoDisc Using a Gray Card, Incident Light Metering on the Cheap The RAW versus Jpeg Exposure Advantage More Information The most detailed information about metering, camera meters, and other metering tools is in my book, Digital Photography Exposure for Dummies. December 22, 2010Updated June 17, 2013
202155 — When you have a subject and background that are similar in tonality, exposure, colors, or even patterns, an effective backlight can help to ...
2. If you meter something darker than middle gray, everything looks lighter in the photo than it does in real life. The darker the subject you meter, the lighter the tones will be in the photograph.
Incidentmetering
Calibration Target #3, Metered for the White (Right) Section The meter did its best to turn the white section (in real life) into a middle gray tone (in the photo) and everything else ends up darker than in real life. To see how well the meter did it's job, look at these "color patches". The left patch is part of the gray section of the calibration target from the first photo. The center patch is part of the black section from the second photo. The right patch is part of the white section from the third photo. The meter did a pretty good job of making all three a "middle gray" in tone. Three things are obvious from these above photos. 1. If you meter something middle gray in tone, everything in the photo ends up looking pretty much like it does in real life. That's why a lot of photographers will meter an 18% gray card or the gray section of a calibration target (like the one above), and use that meter reading as the basis of their exposure when they photograph their scene. 2. If you meter something darker than middle gray, everything looks lighter in the photo than it does in real life. The darker the subject you meter, the lighter the tones will be in the photograph. 3. If you meter something lighter than a middle gray, everything looks darker in the photo than it does in real life. The lighter the subject you meter, the darker the tones will be in your photo. Why Your Meter Gets Fooled How does this apply to the real world when you aren't photographing calibration targets? Your camera meter's desire to make everything middle gray (or "medium toned" in the world of color) leads it astray when your subject isn't medium toned, or if all the tones in a scene don't average out to a medium tone. In the following photo, my camera was set to manual metering mode, and the aperture to f/16 to give me enough depth of field to keep everything sharp from the foreground rocks to the distant mountains. I set the metering pattern to partial area metering so the camera would only meter the central 10-15 percent of the frame. I zoomed in on the blue sky and sunlight peaks and set my shutter for a good exposure. Then I zoomed back to include the whole scene and took the picture. The ISO was set to 100 for maximum image quality, and the camera was on a tripod so the photo wouldn't be blurred during the 1/5 second exposure. Long's Peak and Nymph Lake, Rocky Mountain National ParkCanon 20D, 28-135mm lens at 28mm. f/16, 1/5 sec, ISO 100 The photo came out just like I wanted it to with the warm light on the peaks, the reflection in the water, and the contrast of the very dark evergreens in the shade. While I was taking the picture, the camera meter was screaming at me: "Too Dark! Too Dark!!" (I'm sure your meter talks to you too!) The meter was seeing all of the dark tones in the center of the image and it wanted to make them medium toned. I decided to let the camera meter have its way. The photo would look awful, but it would be a nice demonstration of what happens when camera meters go astray. So I turned the shutter speed dial until the meter was happy (1.6 seconds, 3 stops more light than the above photo) and took this picture. Long's Peak and Nymph Lake, Rocky Mountain National ParkCanon 20D, 28-135mm lens at 28mm. f/16, 1.6 sec, ISO 100 As expected, the meter did its best to make the large, central area of the frame average out to a medium tone, but the mountains and sky are now three stops overexposed and seriously washed out ("burned out" in photo terms). I could digitally combine the two photos so I have some tonality in the trees (which is another reason I took more than one exposure), but I rather like the dramatic, high contrast lighting of the original image. Exposure Compensation Due to your meter's fascination with creating medium toned subjects, you need to do some exposure compensation when photographing subjects that are lighter or darker than a medium tone. Exposure compensation simply means adding or taking away light from what the camera meter tells you. For light subjects, you add light to what the meter tells you. For dark subjects, you take away light. Just repeat this phrase a few times: "Add light to make light". This may seem counterintuitive. Your pupils stop down in really bright light so it is tempting to say "Wow, that's really bright snow, I should stop down my lens." But we are talking photography, so "Add light to make light." How much light do you add or subtract? That is a judgment call on your part that gets better with experience. If your subject is medium toned, do what the meter tells you. don't add or subtract any light. If your subject is light in tone, add a stop of light to what the meter tells you by opening your lens up one stop, or using a shutter speed one stop longer. If you are photographing a very light tone, add two stops of light. The standard advice If you are photographing a dark tone, is to subtract one stop of light from what the meter tells you. If you are photographing a very dark tone, subtract two stops of light. For example, if you are photographing a field of wheat that is ready to harvest (which is about one stop lighter than a medium tone), and the meter says f/11 at 1/250 second, add one stop of light by changing the f-stop to f/8 or by changing the shutter speed to 1/125 second. If you are photographing evergreen trees (which are darker than middle gray) and the meter says f/11 at 1/60 second, subtract one stop of light by changing the f-stop to f/16 or the shutter speed to 1/125 second. If you aren't exactly clear on which apertures and shutter speeds to use to add or subtract a given amount of light, go back and read Speaking Your Camera's Exposure Language. Here's the standard exposure compensation advice when metering subjects with a reflected light meter: Subject Tonality Compensation in Stops Very Light + 2 Light + 1 Medium Toned 0 Dark - 1 Very Dark - 2 But in my experience, subtracting that much light for Dark and Very Dark subjects results in subjects that are usually too dark for my personal taste. So here is the exposure compensation that I recommend: Subject Tonality Compensation in Stops Very Light + 2 Light + 1 Medium Toned 0 Dark - 1/2 Very Dark - 1 As you gain more experience, at some point you will begin to use half stop increments. You might look at a light sandy beach and say "This sand is lighter than "Light" (+1 on exposure compensation chart above) but not as light as "Very Light" (+2) so I will add one and a half stops of light (+1 1/2) to what the camera meter is telling me. Tonality Exercise The best way to get a feel for subject tonality and exposure compensation is to experiment. Pick a bright sunny day with clear blue northern skies (southern skies if you are south of the equator) and green grass. If you have an 18% gray card (and having one is a very good idea), bring it along since it is a good standard of reference for medium gray. Find something red and something yellow. That way you will have the basic red, yellow, green, and blue colors covered, plus a gray card. Fill the frame with each subject, being careful not to cast your shadow on the smaller subjects when you get close. Take 5 pictures of each subject in one stop increments from 2 stops less than the camera's recommendations up to 2 stops more. The exposure series will be as follows: -2, -1, 0, +1, +2. Your camera should have an exposure compensation dial which will tell you how many stops you have subtracted or added to the recommended exposure). You may have an LCD screen that looks something like this. Electronic Camera LCD Screen The shutter speed is at the upper left (1/500 second), the aperture at upper right (f/8), the white balance at center left (AWB = Auto White Balance), the ISO setting at center right, and the exposure compensation scale is across the bottom. In this illustration, the exposure compensation is +1, one stop more than the exposure recommended by the camera meter which will result in a subject one stop lighter than a medium tone. After you have taken 5 photos of each subject, you should end up with a group of photos that looks like this. Exposure Compensation Tonality Test Chart For my tonality test, I photographed a gray card (top row), red cloth, blue sky, yellow bowl, and green grass. The left hand column is all of the -2 exposure compensation photos, no compensation in the middle column photos, and +2 compensation in the right column. Compare your subjects to the photos and decide which exposure of each subject looks the most like the real life subject. For my photos, it came out like this: Gray Card: 0 compensationRed Cloth: -1Blue Sky: +1Yellow Bowl: +2Green Grass: -1 Take note that blue sky, depending on elevation, atmospheric conditions, and particulate matter in the sky can easily range from 2 tops darker to two stops lighter than a medium tone. Green grass, depending on the time of year and direction of the sun can vary from -2 to +1 or even lighter. The more you experiment with exposure compensation, the better you will get at deciding how much compensation each subject needs to create a photo that looks like the subject in real life. Breaking Loose, Creative Exposure Compensation Once you have a good handle on exposure compensation, mix things up a bit. Sometimes the best photos come from making the subject look lighter or darker in the photo than it looked in real life. Pros do it all the time. You can make any subject as light or dark as you want. Fashion photographers make dramatic changes in the tonality of a model's skin. Landscape photographers make sunsets lighter or darker all the time. Consider these two photos, taken the same evening from the same location with different focal length lenses. The second photo was taken much later than the first photo and it was much darker out. I tried a variety of exposures for both photos. The exposure I liked for the first photo is much darker and more dramatic than it was in real life. The exposure I liked for the second photo is just the opposite, much lighter than the original scene. Sunset, St. Joseph Lighthouse, Michigan Evening, St. Joseph Lighthouse, Michigan Experiment with exposure compensation. Play with the light! Don't worry. The exposure police won't come and take you away. Get out there and have fun! Be sure and read Part Two of this article, Choosing the Right Tone to Meter. Exposure Articles Why Is Exposure So Important? Speaking Your Camera's Exposure Language: Aperture, Shutter Speed, and ISO Using Reflected Light Meters, Part One Using Reflected Light Meters, Part Two Simplify Your Life with an Incident Light Meter Turn Your Camera Meter Into An Incident Light Meter: Using an ExpoDisc Using a Gray Card, Incident Light Metering on the Cheap The RAW versus Jpeg Exposure Advantage More Information The most detailed information about metering, camera meters, and other metering tools is in my book, Digital Photography Exposure for Dummies. December 22, 2010Updated June 17, 2013
Electronic Camera LCD Screen The shutter speed is at the upper left (1/500 second), the aperture at upper right (f/8), the white balance at center left (AWB = Auto White Balance), the ISO setting at center right, and the exposure compensation scale is across the bottom. In this illustration, the exposure compensation is +1, one stop more than the exposure recommended by the camera meter which will result in a subject one stop lighter than a medium tone. After you have taken 5 photos of each subject, you should end up with a group of photos that looks like this. Exposure Compensation Tonality Test Chart For my tonality test, I photographed a gray card (top row), red cloth, blue sky, yellow bowl, and green grass. The left hand column is all of the -2 exposure compensation photos, no compensation in the middle column photos, and +2 compensation in the right column. Compare your subjects to the photos and decide which exposure of each subject looks the most like the real life subject. For my photos, it came out like this: Gray Card: 0 compensationRed Cloth: -1Blue Sky: +1Yellow Bowl: +2Green Grass: -1 Take note that blue sky, depending on elevation, atmospheric conditions, and particulate matter in the sky can easily range from 2 tops darker to two stops lighter than a medium tone. Green grass, depending on the time of year and direction of the sun can vary from -2 to +1 or even lighter. The more you experiment with exposure compensation, the better you will get at deciding how much compensation each subject needs to create a photo that looks like the subject in real life. Breaking Loose, Creative Exposure Compensation Once you have a good handle on exposure compensation, mix things up a bit. Sometimes the best photos come from making the subject look lighter or darker in the photo than it looked in real life. Pros do it all the time. You can make any subject as light or dark as you want. Fashion photographers make dramatic changes in the tonality of a model's skin. Landscape photographers make sunsets lighter or darker all the time. Consider these two photos, taken the same evening from the same location with different focal length lenses. The second photo was taken much later than the first photo and it was much darker out. I tried a variety of exposures for both photos. The exposure I liked for the first photo is much darker and more dramatic than it was in real life. The exposure I liked for the second photo is just the opposite, much lighter than the original scene. Sunset, St. Joseph Lighthouse, Michigan Evening, St. Joseph Lighthouse, Michigan Experiment with exposure compensation. Play with the light! Don't worry. The exposure police won't come and take you away. Get out there and have fun! Be sure and read Part Two of this article, Choosing the Right Tone to Meter. Exposure Articles Why Is Exposure So Important? Speaking Your Camera's Exposure Language: Aperture, Shutter Speed, and ISO Using Reflected Light Meters, Part One Using Reflected Light Meters, Part Two Simplify Your Life with an Incident Light Meter Turn Your Camera Meter Into An Incident Light Meter: Using an ExpoDisc Using a Gray Card, Incident Light Metering on the Cheap The RAW versus Jpeg Exposure Advantage More Information The most detailed information about metering, camera meters, and other metering tools is in my book, Digital Photography Exposure for Dummies. December 22, 2010Updated June 17, 2013
The more you experiment with exposure compensation, the better you will get at deciding how much compensation each subject needs to create a photo that looks like the subject in real life.
Subject Tonality Compensation in Stops Very Light + 2 Light + 1 Medium Toned 0 Dark - 1/2 Very Dark - 1 As you gain more experience, at some point you will begin to use half stop increments. You might look at a light sandy beach and say "This sand is lighter than "Light" (+1 on exposure compensation chart above) but not as light as "Very Light" (+2) so I will add one and a half stops of light (+1 1/2) to what the camera meter is telling me. Tonality Exercise The best way to get a feel for subject tonality and exposure compensation is to experiment. Pick a bright sunny day with clear blue northern skies (southern skies if you are south of the equator) and green grass. If you have an 18% gray card (and having one is a very good idea), bring it along since it is a good standard of reference for medium gray. Find something red and something yellow. That way you will have the basic red, yellow, green, and blue colors covered, plus a gray card. Fill the frame with each subject, being careful not to cast your shadow on the smaller subjects when you get close. Take 5 pictures of each subject in one stop increments from 2 stops less than the camera's recommendations up to 2 stops more. The exposure series will be as follows: -2, -1, 0, +1, +2. Your camera should have an exposure compensation dial which will tell you how many stops you have subtracted or added to the recommended exposure). You may have an LCD screen that looks something like this. Electronic Camera LCD Screen The shutter speed is at the upper left (1/500 second), the aperture at upper right (f/8), the white balance at center left (AWB = Auto White Balance), the ISO setting at center right, and the exposure compensation scale is across the bottom. In this illustration, the exposure compensation is +1, one stop more than the exposure recommended by the camera meter which will result in a subject one stop lighter than a medium tone. After you have taken 5 photos of each subject, you should end up with a group of photos that looks like this. Exposure Compensation Tonality Test Chart For my tonality test, I photographed a gray card (top row), red cloth, blue sky, yellow bowl, and green grass. The left hand column is all of the -2 exposure compensation photos, no compensation in the middle column photos, and +2 compensation in the right column. Compare your subjects to the photos and decide which exposure of each subject looks the most like the real life subject. For my photos, it came out like this: Gray Card: 0 compensationRed Cloth: -1Blue Sky: +1Yellow Bowl: +2Green Grass: -1 Take note that blue sky, depending on elevation, atmospheric conditions, and particulate matter in the sky can easily range from 2 tops darker to two stops lighter than a medium tone. Green grass, depending on the time of year and direction of the sun can vary from -2 to +1 or even lighter. The more you experiment with exposure compensation, the better you will get at deciding how much compensation each subject needs to create a photo that looks like the subject in real life. Breaking Loose, Creative Exposure Compensation Once you have a good handle on exposure compensation, mix things up a bit. Sometimes the best photos come from making the subject look lighter or darker in the photo than it looked in real life. Pros do it all the time. You can make any subject as light or dark as you want. Fashion photographers make dramatic changes in the tonality of a model's skin. Landscape photographers make sunsets lighter or darker all the time. Consider these two photos, taken the same evening from the same location with different focal length lenses. The second photo was taken much later than the first photo and it was much darker out. I tried a variety of exposures for both photos. The exposure I liked for the first photo is much darker and more dramatic than it was in real life. The exposure I liked for the second photo is just the opposite, much lighter than the original scene. Sunset, St. Joseph Lighthouse, Michigan Evening, St. Joseph Lighthouse, Michigan Experiment with exposure compensation. Play with the light! Don't worry. The exposure police won't come and take you away. Get out there and have fun! Be sure and read Part Two of this article, Choosing the Right Tone to Meter. Exposure Articles Why Is Exposure So Important? Speaking Your Camera's Exposure Language: Aperture, Shutter Speed, and ISO Using Reflected Light Meters, Part One Using Reflected Light Meters, Part Two Simplify Your Life with an Incident Light Meter Turn Your Camera Meter Into An Incident Light Meter: Using an ExpoDisc Using a Gray Card, Incident Light Metering on the Cheap The RAW versus Jpeg Exposure Advantage More Information The most detailed information about metering, camera meters, and other metering tools is in my book, Digital Photography Exposure for Dummies. December 22, 2010Updated June 17, 2013
Calibration Target #2, Metered for the Black (Left) Section As you can see. the meter did its best to turn the black section (in real life) into a middle gray tone (in the photo) and everything else ends up lighter in tone. In the following photo, I did exactly the same thing, except I moved in close and metered the white section on the right. Calibration Target #3, Metered for the White (Right) Section The meter did its best to turn the white section (in real life) into a middle gray tone (in the photo) and everything else ends up darker than in real life. To see how well the meter did it's job, look at these "color patches". The left patch is part of the gray section of the calibration target from the first photo. The center patch is part of the black section from the second photo. The right patch is part of the white section from the third photo. The meter did a pretty good job of making all three a "middle gray" in tone. Three things are obvious from these above photos. 1. If you meter something middle gray in tone, everything in the photo ends up looking pretty much like it does in real life. That's why a lot of photographers will meter an 18% gray card or the gray section of a calibration target (like the one above), and use that meter reading as the basis of their exposure when they photograph their scene. 2. If you meter something darker than middle gray, everything looks lighter in the photo than it does in real life. The darker the subject you meter, the lighter the tones will be in the photograph. 3. If you meter something lighter than a middle gray, everything looks darker in the photo than it does in real life. The lighter the subject you meter, the darker the tones will be in your photo. Why Your Meter Gets Fooled How does this apply to the real world when you aren't photographing calibration targets? Your camera meter's desire to make everything middle gray (or "medium toned" in the world of color) leads it astray when your subject isn't medium toned, or if all the tones in a scene don't average out to a medium tone. In the following photo, my camera was set to manual metering mode, and the aperture to f/16 to give me enough depth of field to keep everything sharp from the foreground rocks to the distant mountains. I set the metering pattern to partial area metering so the camera would only meter the central 10-15 percent of the frame. I zoomed in on the blue sky and sunlight peaks and set my shutter for a good exposure. Then I zoomed back to include the whole scene and took the picture. The ISO was set to 100 for maximum image quality, and the camera was on a tripod so the photo wouldn't be blurred during the 1/5 second exposure. Long's Peak and Nymph Lake, Rocky Mountain National ParkCanon 20D, 28-135mm lens at 28mm. f/16, 1/5 sec, ISO 100 The photo came out just like I wanted it to with the warm light on the peaks, the reflection in the water, and the contrast of the very dark evergreens in the shade. While I was taking the picture, the camera meter was screaming at me: "Too Dark! Too Dark!!" (I'm sure your meter talks to you too!) The meter was seeing all of the dark tones in the center of the image and it wanted to make them medium toned. I decided to let the camera meter have its way. The photo would look awful, but it would be a nice demonstration of what happens when camera meters go astray. So I turned the shutter speed dial until the meter was happy (1.6 seconds, 3 stops more light than the above photo) and took this picture. Long's Peak and Nymph Lake, Rocky Mountain National ParkCanon 20D, 28-135mm lens at 28mm. f/16, 1.6 sec, ISO 100 As expected, the meter did its best to make the large, central area of the frame average out to a medium tone, but the mountains and sky are now three stops overexposed and seriously washed out ("burned out" in photo terms). I could digitally combine the two photos so I have some tonality in the trees (which is another reason I took more than one exposure), but I rather like the dramatic, high contrast lighting of the original image. Exposure Compensation Due to your meter's fascination with creating medium toned subjects, you need to do some exposure compensation when photographing subjects that are lighter or darker than a medium tone. Exposure compensation simply means adding or taking away light from what the camera meter tells you. For light subjects, you add light to what the meter tells you. For dark subjects, you take away light. Just repeat this phrase a few times: "Add light to make light". This may seem counterintuitive. Your pupils stop down in really bright light so it is tempting to say "Wow, that's really bright snow, I should stop down my lens." But we are talking photography, so "Add light to make light." How much light do you add or subtract? That is a judgment call on your part that gets better with experience. If your subject is medium toned, do what the meter tells you. don't add or subtract any light. If your subject is light in tone, add a stop of light to what the meter tells you by opening your lens up one stop, or using a shutter speed one stop longer. If you are photographing a very light tone, add two stops of light. The standard advice If you are photographing a dark tone, is to subtract one stop of light from what the meter tells you. If you are photographing a very dark tone, subtract two stops of light. For example, if you are photographing a field of wheat that is ready to harvest (which is about one stop lighter than a medium tone), and the meter says f/11 at 1/250 second, add one stop of light by changing the f-stop to f/8 or by changing the shutter speed to 1/125 second. If you are photographing evergreen trees (which are darker than middle gray) and the meter says f/11 at 1/60 second, subtract one stop of light by changing the f-stop to f/16 or the shutter speed to 1/125 second. If you aren't exactly clear on which apertures and shutter speeds to use to add or subtract a given amount of light, go back and read Speaking Your Camera's Exposure Language. Here's the standard exposure compensation advice when metering subjects with a reflected light meter: Subject Tonality Compensation in Stops Very Light + 2 Light + 1 Medium Toned 0 Dark - 1 Very Dark - 2 But in my experience, subtracting that much light for Dark and Very Dark subjects results in subjects that are usually too dark for my personal taste. So here is the exposure compensation that I recommend: Subject Tonality Compensation in Stops Very Light + 2 Light + 1 Medium Toned 0 Dark - 1/2 Very Dark - 1 As you gain more experience, at some point you will begin to use half stop increments. You might look at a light sandy beach and say "This sand is lighter than "Light" (+1 on exposure compensation chart above) but not as light as "Very Light" (+2) so I will add one and a half stops of light (+1 1/2) to what the camera meter is telling me. Tonality Exercise The best way to get a feel for subject tonality and exposure compensation is to experiment. Pick a bright sunny day with clear blue northern skies (southern skies if you are south of the equator) and green grass. If you have an 18% gray card (and having one is a very good idea), bring it along since it is a good standard of reference for medium gray. Find something red and something yellow. That way you will have the basic red, yellow, green, and blue colors covered, plus a gray card. Fill the frame with each subject, being careful not to cast your shadow on the smaller subjects when you get close. Take 5 pictures of each subject in one stop increments from 2 stops less than the camera's recommendations up to 2 stops more. The exposure series will be as follows: -2, -1, 0, +1, +2. Your camera should have an exposure compensation dial which will tell you how many stops you have subtracted or added to the recommended exposure). You may have an LCD screen that looks something like this. Electronic Camera LCD Screen The shutter speed is at the upper left (1/500 second), the aperture at upper right (f/8), the white balance at center left (AWB = Auto White Balance), the ISO setting at center right, and the exposure compensation scale is across the bottom. In this illustration, the exposure compensation is +1, one stop more than the exposure recommended by the camera meter which will result in a subject one stop lighter than a medium tone. After you have taken 5 photos of each subject, you should end up with a group of photos that looks like this. Exposure Compensation Tonality Test Chart For my tonality test, I photographed a gray card (top row), red cloth, blue sky, yellow bowl, and green grass. The left hand column is all of the -2 exposure compensation photos, no compensation in the middle column photos, and +2 compensation in the right column. Compare your subjects to the photos and decide which exposure of each subject looks the most like the real life subject. For my photos, it came out like this: Gray Card: 0 compensationRed Cloth: -1Blue Sky: +1Yellow Bowl: +2Green Grass: -1 Take note that blue sky, depending on elevation, atmospheric conditions, and particulate matter in the sky can easily range from 2 tops darker to two stops lighter than a medium tone. Green grass, depending on the time of year and direction of the sun can vary from -2 to +1 or even lighter. The more you experiment with exposure compensation, the better you will get at deciding how much compensation each subject needs to create a photo that looks like the subject in real life. Breaking Loose, Creative Exposure Compensation Once you have a good handle on exposure compensation, mix things up a bit. Sometimes the best photos come from making the subject look lighter or darker in the photo than it looked in real life. Pros do it all the time. You can make any subject as light or dark as you want. Fashion photographers make dramatic changes in the tonality of a model's skin. Landscape photographers make sunsets lighter or darker all the time. Consider these two photos, taken the same evening from the same location with different focal length lenses. The second photo was taken much later than the first photo and it was much darker out. I tried a variety of exposures for both photos. The exposure I liked for the first photo is much darker and more dramatic than it was in real life. The exposure I liked for the second photo is just the opposite, much lighter than the original scene. Sunset, St. Joseph Lighthouse, Michigan Evening, St. Joseph Lighthouse, Michigan Experiment with exposure compensation. Play with the light! Don't worry. The exposure police won't come and take you away. Get out there and have fun! Be sure and read Part Two of this article, Choosing the Right Tone to Meter. Exposure Articles Why Is Exposure So Important? Speaking Your Camera's Exposure Language: Aperture, Shutter Speed, and ISO Using Reflected Light Meters, Part One Using Reflected Light Meters, Part Two Simplify Your Life with an Incident Light Meter Turn Your Camera Meter Into An Incident Light Meter: Using an ExpoDisc Using a Gray Card, Incident Light Metering on the Cheap The RAW versus Jpeg Exposure Advantage More Information The most detailed information about metering, camera meters, and other metering tools is in my book, Digital Photography Exposure for Dummies. December 22, 2010Updated June 17, 2013
Shop B&H for our huge inventory of Ring Lights from top brands like Yongnuo, Reflecmedia, Neewer and Godox. Explore our unbeatable selection.
In the following photo, I did exactly the same thing, except I moved in close and metered the white section on the right.
In the following photo, my camera was set to manual metering mode, and the aperture to f/16 to give me enough depth of field to keep everything sharp from the foreground rocks to the distant mountains. I set the metering pattern to partial area metering so the camera would only meter the central 10-15 percent of the frame. I zoomed in on the blue sky and sunlight peaks and set my shutter for a good exposure. Then I zoomed back to include the whole scene and took the picture. The ISO was set to 100 for maximum image quality, and the camera was on a tripod so the photo wouldn't be blurred during the 1/5 second exposure.
For example, if you are photographing a field of wheat that is ready to harvest (which is about one stop lighter than a medium tone), and the meter says f/11 at 1/250 second, add one stop of light by changing the f-stop to f/8 or by changing the shutter speed to 1/125 second. If you are photographing evergreen trees (which are darker than middle gray) and the meter says f/11 at 1/60 second, subtract one stop of light by changing the f-stop to f/16 or the shutter speed to 1/125 second. If you aren't exactly clear on which apertures and shutter speeds to use to add or subtract a given amount of light, go back and read Speaking Your Camera's Exposure Language.
Reflected lightmetervs incident
But in my experience, subtracting that much light for Dark and Very Dark subjects results in subjects that are usually too dark for my personal taste. So here is the exposure compensation that I recommend:
If your light meter says "f/16, and 1/100 second at ISO 100", what it is really telling you is this: "f/16 and 1/100 second at ISO 100 is a good exposure in these lighting conditions if your subject is middle gray in tone." If your subject is lighter or darker than middle gray, you will need to make some adjustments from this recommendation to get the best possible exposure.
1. If you meter something middle gray in tone, everything in the photo ends up looking pretty much like it does in real life. That's why a lot of photographers will meter an 18% gray card or the gray section of a calibration target (like the one above), and use that meter reading as the basis of their exposure when they photograph their scene.
Reflected light meters do a terrific job if your subject is "middle gray" in tone, or if all of the tones in your scene happen to average out to a middle gray. The problem is, most subjects aren't exactly a middle gray, so when a light meter gives you a suggested exposure, it is not giving you an ideal exposure that will work for all subjects of all colors and tones.
Metering Tools Metering and Light Meters In auto exposure modes, your camera meter is perfectly designed to give you "average" exposures in average situations, but it can't give you the "ideal" exposure for subjects of all colors and tones in every situation. If you want to get the best possible exposure, you have to take the camera off "autopilot" and control the metering yourself. Metering is all about taking the wide range of tones (from light to dark), colors, and lighting conditions in the real world and translating them into the much more limited range of tones in a photograph. Metering is the key to good exposures. The human eye can see a huge range of tones from light to dark in sun and shade all at the same time. A camera, whether digital or film, can't capture the whole range of tones that the human eye can see in a single exposure (although several different exposures of the same scene can be combined to approximate what the eye can see ). Lots of choices need to be made for you to end up with an exposure that you like. Light meters (and other tools) will help you get the exposure you want. Modern light meters are absolutely, whiz-bang amazing and do an accurate job, provided you understand what they are (and aren't) designed to do. As long as you know how to talk their language and make them do their tricks for you, they are an excellent tool in most situations to arriving at an excellent exposure decision. Reflected and Incident Light Meters There are two primary kinds of photographic light meters. Reflected light meters measure the intensity of the light that is reflected off the subject. For that reason, you usually point a reflected light meter at the subject. The meter in your camera is a reflected light meter. Incident light meters measure the intensity of the light that is falling on ("incident to") the subject. Therefore, you usually point an incident light meter at the light source. There is an incident light meter with the characteristic white dome in the second photo below. Incident light meters will be covered in another article in this series. In the top photo just above, the photographer is pointing her lens at a row of sunlit buildings and using the camera's reflected light meter to measure the intensity of the light that is reflected off the buildings. In the bottom photo the photographer is using an incident light meter with the white dome pointed at the sun to measure the intensity of the sunlight falling on (incident to) the buildings. Both meters do the same thing, they measure the intensity of the light. Light meters can't "see" like you and me, they just count photons of light. It is very much like sound meters. They can't "hear" like you and me, they just measures the intensity of the sound waves (and some measure the frequency of the waves) but a basic sound meter can't tell if the sound is coming from a symphony or a freight train. Light meters measure the intensity of the light, but they can't tell if the light source is a light bulb, flashlight, moonlight, or campfire. Incident light meters are color blind. Most reflected light meters are also color blind so they don't know if the light bouncing off your subject is dark red, medium green, pale blue, or pink with purple polka dots. Light meters are calibrated for a "middle gray" tone that is about half way in between black and white. Grayscale from a Gretag Macbeth ColorChecker Reflected light meters do a terrific job if your subject is "middle gray" in tone, or if all of the tones in your scene happen to average out to a middle gray. The problem is, most subjects aren't exactly a middle gray, so when a light meter gives you a suggested exposure, it is not giving you an ideal exposure that will work for all subjects of all colors and tones. If your light meter says "f/16, and 1/100 second at ISO 100", what it is really telling you is this: "f/16 and 1/100 second at ISO 100 is a good exposure in these lighting conditions if your subject is middle gray in tone." If your subject is lighter or darker than middle gray, you will need to make some adjustments from this recommendation to get the best possible exposure. "In Camera" Reflected Light Meters vs Hand Held Reflected Light Meters Reflected light meters are found in your camera and are also available as a separate , hand held meter. Most photographers use an "in camera" reflected light meter. It is rare that you will see a photographer using a hand held reflected light meter. Large format landscape photographers are the exception. They don't have a meter in their camera, so many of them use a spot-meter, a hand held reflected light meter that measures a very small area in a scene so the photographer can meter individual tones in the larger scene. Most cameras have a built in reflected light meter. By changing the metering pattern you can meter most of the scene in your viewfinder (center-weighted average), the central area in your viewfinder (partial area metering), or just a tiny spot in the center of your viewfinder (spot metering - just like a hand held spot meter used by large format photographers). In camera reflected light meters have the advantage over hand held reflected light meters because they meter "through the lens" (TTL) and any light robbing accessories you might be using in front of or behind your lens. Teleconverters, extensions tubes, filters, and other other accessories used with the lens reduce the amount of light that reaches the digital sensor or film. Not only that, some lenses get longer (lens extension) as they focus closer so they lose light in the process. Some macro lenses lose as much as two stops of light as they reach maximum magnification (closest point of focus). A hand held reflected light meter is oblivious to these accessories (and lens extension) so they will give you an incorrect meter reading unless you allow for the amount of light that each accessory is costing you. If your 1.4x teleconverter is costing you one stop of light, you need to add one stop of light to what the hand held reflected light meter is telling you. Your TTL in camera meter measures the light after it has gone through your lens and accessories, so no changes need to be made to allow for any accessories you happen to be using. You DO need to make changes to allow for different subject tonalities. Your Reflected Light Meter's Love Affair with Middle Gray Tones Your reflected light meter is in love with middle gray. It does its best to turn anything you meter into a middle gray tone. You can prove this to yourself with gray, black, and white subjects. Just be sure when you meter your subject that the meter sees only the subject, and not any other tones in the scene. In the following photo of a black, gray, and white calibration target, I moved in close and metered just the gray center section and locked in that exposure so it wouldn't change. Then I backed up and photographed the whole calibration target and included some of the background. As a result, the calibration target looks just like it does in real life. Calibration Target #1, Metered for the Gray Center Section In the following photo, I did exactly the same thing, except I moved in close and metered the black section on the left, locked in the exposure, and backed up to take the picture. Calibration Target #2, Metered for the Black (Left) Section As you can see. the meter did its best to turn the black section (in real life) into a middle gray tone (in the photo) and everything else ends up lighter in tone. In the following photo, I did exactly the same thing, except I moved in close and metered the white section on the right. Calibration Target #3, Metered for the White (Right) Section The meter did its best to turn the white section (in real life) into a middle gray tone (in the photo) and everything else ends up darker than in real life. To see how well the meter did it's job, look at these "color patches". The left patch is part of the gray section of the calibration target from the first photo. The center patch is part of the black section from the second photo. The right patch is part of the white section from the third photo. The meter did a pretty good job of making all three a "middle gray" in tone. Three things are obvious from these above photos. 1. If you meter something middle gray in tone, everything in the photo ends up looking pretty much like it does in real life. That's why a lot of photographers will meter an 18% gray card or the gray section of a calibration target (like the one above), and use that meter reading as the basis of their exposure when they photograph their scene. 2. If you meter something darker than middle gray, everything looks lighter in the photo than it does in real life. The darker the subject you meter, the lighter the tones will be in the photograph. 3. If you meter something lighter than a middle gray, everything looks darker in the photo than it does in real life. The lighter the subject you meter, the darker the tones will be in your photo. Why Your Meter Gets Fooled How does this apply to the real world when you aren't photographing calibration targets? Your camera meter's desire to make everything middle gray (or "medium toned" in the world of color) leads it astray when your subject isn't medium toned, or if all the tones in a scene don't average out to a medium tone. In the following photo, my camera was set to manual metering mode, and the aperture to f/16 to give me enough depth of field to keep everything sharp from the foreground rocks to the distant mountains. I set the metering pattern to partial area metering so the camera would only meter the central 10-15 percent of the frame. I zoomed in on the blue sky and sunlight peaks and set my shutter for a good exposure. Then I zoomed back to include the whole scene and took the picture. The ISO was set to 100 for maximum image quality, and the camera was on a tripod so the photo wouldn't be blurred during the 1/5 second exposure. Long's Peak and Nymph Lake, Rocky Mountain National ParkCanon 20D, 28-135mm lens at 28mm. f/16, 1/5 sec, ISO 100 The photo came out just like I wanted it to with the warm light on the peaks, the reflection in the water, and the contrast of the very dark evergreens in the shade. While I was taking the picture, the camera meter was screaming at me: "Too Dark! Too Dark!!" (I'm sure your meter talks to you too!) The meter was seeing all of the dark tones in the center of the image and it wanted to make them medium toned. I decided to let the camera meter have its way. The photo would look awful, but it would be a nice demonstration of what happens when camera meters go astray. So I turned the shutter speed dial until the meter was happy (1.6 seconds, 3 stops more light than the above photo) and took this picture. Long's Peak and Nymph Lake, Rocky Mountain National ParkCanon 20D, 28-135mm lens at 28mm. f/16, 1.6 sec, ISO 100 As expected, the meter did its best to make the large, central area of the frame average out to a medium tone, but the mountains and sky are now three stops overexposed and seriously washed out ("burned out" in photo terms). I could digitally combine the two photos so I have some tonality in the trees (which is another reason I took more than one exposure), but I rather like the dramatic, high contrast lighting of the original image. Exposure Compensation Due to your meter's fascination with creating medium toned subjects, you need to do some exposure compensation when photographing subjects that are lighter or darker than a medium tone. Exposure compensation simply means adding or taking away light from what the camera meter tells you. For light subjects, you add light to what the meter tells you. For dark subjects, you take away light. Just repeat this phrase a few times: "Add light to make light". This may seem counterintuitive. Your pupils stop down in really bright light so it is tempting to say "Wow, that's really bright snow, I should stop down my lens." But we are talking photography, so "Add light to make light." How much light do you add or subtract? That is a judgment call on your part that gets better with experience. If your subject is medium toned, do what the meter tells you. don't add or subtract any light. If your subject is light in tone, add a stop of light to what the meter tells you by opening your lens up one stop, or using a shutter speed one stop longer. If you are photographing a very light tone, add two stops of light. The standard advice If you are photographing a dark tone, is to subtract one stop of light from what the meter tells you. If you are photographing a very dark tone, subtract two stops of light. For example, if you are photographing a field of wheat that is ready to harvest (which is about one stop lighter than a medium tone), and the meter says f/11 at 1/250 second, add one stop of light by changing the f-stop to f/8 or by changing the shutter speed to 1/125 second. If you are photographing evergreen trees (which are darker than middle gray) and the meter says f/11 at 1/60 second, subtract one stop of light by changing the f-stop to f/16 or the shutter speed to 1/125 second. If you aren't exactly clear on which apertures and shutter speeds to use to add or subtract a given amount of light, go back and read Speaking Your Camera's Exposure Language. Here's the standard exposure compensation advice when metering subjects with a reflected light meter: Subject Tonality Compensation in Stops Very Light + 2 Light + 1 Medium Toned 0 Dark - 1 Very Dark - 2 But in my experience, subtracting that much light for Dark and Very Dark subjects results in subjects that are usually too dark for my personal taste. So here is the exposure compensation that I recommend: Subject Tonality Compensation in Stops Very Light + 2 Light + 1 Medium Toned 0 Dark - 1/2 Very Dark - 1 As you gain more experience, at some point you will begin to use half stop increments. You might look at a light sandy beach and say "This sand is lighter than "Light" (+1 on exposure compensation chart above) but not as light as "Very Light" (+2) so I will add one and a half stops of light (+1 1/2) to what the camera meter is telling me. Tonality Exercise The best way to get a feel for subject tonality and exposure compensation is to experiment. Pick a bright sunny day with clear blue northern skies (southern skies if you are south of the equator) and green grass. If you have an 18% gray card (and having one is a very good idea), bring it along since it is a good standard of reference for medium gray. Find something red and something yellow. That way you will have the basic red, yellow, green, and blue colors covered, plus a gray card. Fill the frame with each subject, being careful not to cast your shadow on the smaller subjects when you get close. Take 5 pictures of each subject in one stop increments from 2 stops less than the camera's recommendations up to 2 stops more. The exposure series will be as follows: -2, -1, 0, +1, +2. Your camera should have an exposure compensation dial which will tell you how many stops you have subtracted or added to the recommended exposure). You may have an LCD screen that looks something like this. Electronic Camera LCD Screen The shutter speed is at the upper left (1/500 second), the aperture at upper right (f/8), the white balance at center left (AWB = Auto White Balance), the ISO setting at center right, and the exposure compensation scale is across the bottom. In this illustration, the exposure compensation is +1, one stop more than the exposure recommended by the camera meter which will result in a subject one stop lighter than a medium tone. After you have taken 5 photos of each subject, you should end up with a group of photos that looks like this. Exposure Compensation Tonality Test Chart For my tonality test, I photographed a gray card (top row), red cloth, blue sky, yellow bowl, and green grass. The left hand column is all of the -2 exposure compensation photos, no compensation in the middle column photos, and +2 compensation in the right column. Compare your subjects to the photos and decide which exposure of each subject looks the most like the real life subject. For my photos, it came out like this: Gray Card: 0 compensationRed Cloth: -1Blue Sky: +1Yellow Bowl: +2Green Grass: -1 Take note that blue sky, depending on elevation, atmospheric conditions, and particulate matter in the sky can easily range from 2 tops darker to two stops lighter than a medium tone. Green grass, depending on the time of year and direction of the sun can vary from -2 to +1 or even lighter. The more you experiment with exposure compensation, the better you will get at deciding how much compensation each subject needs to create a photo that looks like the subject in real life. Breaking Loose, Creative Exposure Compensation Once you have a good handle on exposure compensation, mix things up a bit. Sometimes the best photos come from making the subject look lighter or darker in the photo than it looked in real life. Pros do it all the time. You can make any subject as light or dark as you want. Fashion photographers make dramatic changes in the tonality of a model's skin. Landscape photographers make sunsets lighter or darker all the time. Consider these two photos, taken the same evening from the same location with different focal length lenses. The second photo was taken much later than the first photo and it was much darker out. I tried a variety of exposures for both photos. The exposure I liked for the first photo is much darker and more dramatic than it was in real life. The exposure I liked for the second photo is just the opposite, much lighter than the original scene. Sunset, St. Joseph Lighthouse, Michigan Evening, St. Joseph Lighthouse, Michigan Experiment with exposure compensation. Play with the light! Don't worry. The exposure police won't come and take you away. Get out there and have fun! Be sure and read Part Two of this article, Choosing the Right Tone to Meter. Exposure Articles Why Is Exposure So Important? Speaking Your Camera's Exposure Language: Aperture, Shutter Speed, and ISO Using Reflected Light Meters, Part One Using Reflected Light Meters, Part Two Simplify Your Life with an Incident Light Meter Turn Your Camera Meter Into An Incident Light Meter: Using an ExpoDisc Using a Gray Card, Incident Light Metering on the Cheap The RAW versus Jpeg Exposure Advantage More Information The most detailed information about metering, camera meters, and other metering tools is in my book, Digital Photography Exposure for Dummies. December 22, 2010Updated June 17, 2013
In camera reflected light meters have the advantage over hand held reflected light meters because they meter "through the lens" (TTL) and any light robbing accessories you might be using in front of or behind your lens. Teleconverters, extensions tubes, filters, and other other accessories used with the lens reduce the amount of light that reaches the digital sensor or film. Not only that, some lenses get longer (lens extension) as they focus closer so they lose light in the process. Some macro lenses lose as much as two stops of light as they reach maximum magnification (closest point of focus).
Take note that blue sky, depending on elevation, atmospheric conditions, and particulate matter in the sky can easily range from 2 tops darker to two stops lighter than a medium tone. Green grass, depending on the time of year and direction of the sun can vary from -2 to +1 or even lighter.
They can also visualize live suspended samples, for example, certain microorganisms, so that the cell wall or capsule can be seen. In bioassays, they are especially useful because you can observe the behavior of the blood cells, without the need to add any additional reagents.
Metering is all about taking the wide range of tones (from light to dark), colors, and lighting conditions in the real world and translating them into the much more limited range of tones in a photograph. Metering is the key to good exposures. The human eye can see a huge range of tones from light to dark in sun and shade all at the same time. A camera, whether digital or film, can't capture the whole range of tones that the human eye can see in a single exposure (although several different exposures of the same scene can be combined to approximate what the eye can see ). Lots of choices need to be made for you to end up with an exposure that you like.
Compare your subjects to the photos and decide which exposure of each subject looks the most like the real life subject. For my photos, it came out like this:
As you can see. the meter did its best to turn the black section (in real life) into a middle gray tone (in the photo) and everything else ends up lighter in tone.
Large format landscape photographers are the exception. They don't have a meter in their camera, so many of them use a spot-meter, a hand held reflected light meter that measures a very small area in a scene so the photographer can meter individual tones in the larger scene.
incidentlight中文
Darkfield microscopy is a type of optical microscope used in certain types of laboratories. It has the same characteristics as any composite microscope, except that it undergoes modification in the condenser before light reaches the sample. This type of microscope allows the contrast level to be increased, so it is possible to observe certain characteristics that with light-field microscopy would be impossible.
Due to your meter's fascination with creating medium toned subjects, you need to do some exposure compensation when photographing subjects that are lighter or darker than a medium tone. Exposure compensation simply means adding or taking away light from what the camera meter tells you. For light subjects, you add light to what the meter tells you. For dark subjects, you take away light. Just repeat this phrase a few times: "Add light to make light". This may seem counterintuitive. Your pupils stop down in really bright light so it is tempting to say "Wow, that's really bright snow, I should stop down my lens." But we are talking photography, so "Add light to make light."
Long's Peak and Nymph Lake, Rocky Mountain National ParkCanon 20D, 28-135mm lens at 28mm. f/16, 1/5 sec, ISO 100 The photo came out just like I wanted it to with the warm light on the peaks, the reflection in the water, and the contrast of the very dark evergreens in the shade. While I was taking the picture, the camera meter was screaming at me: "Too Dark! Too Dark!!" (I'm sure your meter talks to you too!) The meter was seeing all of the dark tones in the center of the image and it wanted to make them medium toned. I decided to let the camera meter have its way. The photo would look awful, but it would be a nice demonstration of what happens when camera meters go astray. So I turned the shutter speed dial until the meter was happy (1.6 seconds, 3 stops more light than the above photo) and took this picture. Long's Peak and Nymph Lake, Rocky Mountain National ParkCanon 20D, 28-135mm lens at 28mm. f/16, 1.6 sec, ISO 100 As expected, the meter did its best to make the large, central area of the frame average out to a medium tone, but the mountains and sky are now three stops overexposed and seriously washed out ("burned out" in photo terms). I could digitally combine the two photos so I have some tonality in the trees (which is another reason I took more than one exposure), but I rather like the dramatic, high contrast lighting of the original image. Exposure Compensation Due to your meter's fascination with creating medium toned subjects, you need to do some exposure compensation when photographing subjects that are lighter or darker than a medium tone. Exposure compensation simply means adding or taking away light from what the camera meter tells you. For light subjects, you add light to what the meter tells you. For dark subjects, you take away light. Just repeat this phrase a few times: "Add light to make light". This may seem counterintuitive. Your pupils stop down in really bright light so it is tempting to say "Wow, that's really bright snow, I should stop down my lens." But we are talking photography, so "Add light to make light." How much light do you add or subtract? That is a judgment call on your part that gets better with experience. If your subject is medium toned, do what the meter tells you. don't add or subtract any light. If your subject is light in tone, add a stop of light to what the meter tells you by opening your lens up one stop, or using a shutter speed one stop longer. If you are photographing a very light tone, add two stops of light. The standard advice If you are photographing a dark tone, is to subtract one stop of light from what the meter tells you. If you are photographing a very dark tone, subtract two stops of light. For example, if you are photographing a field of wheat that is ready to harvest (which is about one stop lighter than a medium tone), and the meter says f/11 at 1/250 second, add one stop of light by changing the f-stop to f/8 or by changing the shutter speed to 1/125 second. If you are photographing evergreen trees (which are darker than middle gray) and the meter says f/11 at 1/60 second, subtract one stop of light by changing the f-stop to f/16 or the shutter speed to 1/125 second. If you aren't exactly clear on which apertures and shutter speeds to use to add or subtract a given amount of light, go back and read Speaking Your Camera's Exposure Language. Here's the standard exposure compensation advice when metering subjects with a reflected light meter: Subject Tonality Compensation in Stops Very Light + 2 Light + 1 Medium Toned 0 Dark - 1 Very Dark - 2 But in my experience, subtracting that much light for Dark and Very Dark subjects results in subjects that are usually too dark for my personal taste. So here is the exposure compensation that I recommend: Subject Tonality Compensation in Stops Very Light + 2 Light + 1 Medium Toned 0 Dark - 1/2 Very Dark - 1 As you gain more experience, at some point you will begin to use half stop increments. You might look at a light sandy beach and say "This sand is lighter than "Light" (+1 on exposure compensation chart above) but not as light as "Very Light" (+2) so I will add one and a half stops of light (+1 1/2) to what the camera meter is telling me. Tonality Exercise The best way to get a feel for subject tonality and exposure compensation is to experiment. Pick a bright sunny day with clear blue northern skies (southern skies if you are south of the equator) and green grass. If you have an 18% gray card (and having one is a very good idea), bring it along since it is a good standard of reference for medium gray. Find something red and something yellow. That way you will have the basic red, yellow, green, and blue colors covered, plus a gray card. Fill the frame with each subject, being careful not to cast your shadow on the smaller subjects when you get close. Take 5 pictures of each subject in one stop increments from 2 stops less than the camera's recommendations up to 2 stops more. The exposure series will be as follows: -2, -1, 0, +1, +2. Your camera should have an exposure compensation dial which will tell you how many stops you have subtracted or added to the recommended exposure). You may have an LCD screen that looks something like this. Electronic Camera LCD Screen The shutter speed is at the upper left (1/500 second), the aperture at upper right (f/8), the white balance at center left (AWB = Auto White Balance), the ISO setting at center right, and the exposure compensation scale is across the bottom. In this illustration, the exposure compensation is +1, one stop more than the exposure recommended by the camera meter which will result in a subject one stop lighter than a medium tone. After you have taken 5 photos of each subject, you should end up with a group of photos that looks like this. Exposure Compensation Tonality Test Chart For my tonality test, I photographed a gray card (top row), red cloth, blue sky, yellow bowl, and green grass. The left hand column is all of the -2 exposure compensation photos, no compensation in the middle column photos, and +2 compensation in the right column. Compare your subjects to the photos and decide which exposure of each subject looks the most like the real life subject. For my photos, it came out like this: Gray Card: 0 compensationRed Cloth: -1Blue Sky: +1Yellow Bowl: +2Green Grass: -1 Take note that blue sky, depending on elevation, atmospheric conditions, and particulate matter in the sky can easily range from 2 tops darker to two stops lighter than a medium tone. Green grass, depending on the time of year and direction of the sun can vary from -2 to +1 or even lighter. The more you experiment with exposure compensation, the better you will get at deciding how much compensation each subject needs to create a photo that looks like the subject in real life. Breaking Loose, Creative Exposure Compensation Once you have a good handle on exposure compensation, mix things up a bit. Sometimes the best photos come from making the subject look lighter or darker in the photo than it looked in real life. Pros do it all the time. You can make any subject as light or dark as you want. Fashion photographers make dramatic changes in the tonality of a model's skin. Landscape photographers make sunsets lighter or darker all the time. Consider these two photos, taken the same evening from the same location with different focal length lenses. The second photo was taken much later than the first photo and it was much darker out. I tried a variety of exposures for both photos. The exposure I liked for the first photo is much darker and more dramatic than it was in real life. The exposure I liked for the second photo is just the opposite, much lighter than the original scene. Sunset, St. Joseph Lighthouse, Michigan Evening, St. Joseph Lighthouse, Michigan Experiment with exposure compensation. Play with the light! Don't worry. The exposure police won't come and take you away. Get out there and have fun! Be sure and read Part Two of this article, Choosing the Right Tone to Meter. Exposure Articles Why Is Exposure So Important? Speaking Your Camera's Exposure Language: Aperture, Shutter Speed, and ISO Using Reflected Light Meters, Part One Using Reflected Light Meters, Part Two Simplify Your Life with an Incident Light Meter Turn Your Camera Meter Into An Incident Light Meter: Using an ExpoDisc Using a Gray Card, Incident Light Metering on the Cheap The RAW versus Jpeg Exposure Advantage More Information The most detailed information about metering, camera meters, and other metering tools is in my book, Digital Photography Exposure for Dummies. December 22, 2010Updated June 17, 2013
If your subject is light in tone, add a stop of light to what the meter tells you by opening your lens up one stop, or using a shutter speed one stop longer. If you are photographing a very light tone, add two stops of light. The standard advice If you are photographing a dark tone, is to subtract one stop of light from what the meter tells you. If you are photographing a very dark tone, subtract two stops of light.
Incident light meters measure the intensity of the light that is falling on ("incident to") the subject. Therefore, you usually point an incident light meter at the light source. There is an incident light meter with the characteristic white dome in the second photo below. Incident light meters will be covered in another article in this series.
The meter did its best to turn the white section (in real life) into a middle gray tone (in the photo) and everything else ends up darker than in real life.
Consider these two photos, taken the same evening from the same location with different focal length lenses. The second photo was taken much later than the first photo and it was much darker out. I tried a variety of exposures for both photos. The exposure I liked for the first photo is much darker and more dramatic than it was in real life. The exposure I liked for the second photo is just the opposite, much lighter than the original scene.
Calibration Target #1, Metered for the Gray Center Section In the following photo, I did exactly the same thing, except I moved in close and metered the black section on the left, locked in the exposure, and backed up to take the picture. Calibration Target #2, Metered for the Black (Left) Section As you can see. the meter did its best to turn the black section (in real life) into a middle gray tone (in the photo) and everything else ends up lighter in tone. In the following photo, I did exactly the same thing, except I moved in close and metered the white section on the right. Calibration Target #3, Metered for the White (Right) Section The meter did its best to turn the white section (in real life) into a middle gray tone (in the photo) and everything else ends up darker than in real life. To see how well the meter did it's job, look at these "color patches". The left patch is part of the gray section of the calibration target from the first photo. The center patch is part of the black section from the second photo. The right patch is part of the white section from the third photo. The meter did a pretty good job of making all three a "middle gray" in tone. Three things are obvious from these above photos. 1. If you meter something middle gray in tone, everything in the photo ends up looking pretty much like it does in real life. That's why a lot of photographers will meter an 18% gray card or the gray section of a calibration target (like the one above), and use that meter reading as the basis of their exposure when they photograph their scene. 2. If you meter something darker than middle gray, everything looks lighter in the photo than it does in real life. The darker the subject you meter, the lighter the tones will be in the photograph. 3. If you meter something lighter than a middle gray, everything looks darker in the photo than it does in real life. The lighter the subject you meter, the darker the tones will be in your photo. Why Your Meter Gets Fooled How does this apply to the real world when you aren't photographing calibration targets? Your camera meter's desire to make everything middle gray (or "medium toned" in the world of color) leads it astray when your subject isn't medium toned, or if all the tones in a scene don't average out to a medium tone. In the following photo, my camera was set to manual metering mode, and the aperture to f/16 to give me enough depth of field to keep everything sharp from the foreground rocks to the distant mountains. I set the metering pattern to partial area metering so the camera would only meter the central 10-15 percent of the frame. I zoomed in on the blue sky and sunlight peaks and set my shutter for a good exposure. Then I zoomed back to include the whole scene and took the picture. The ISO was set to 100 for maximum image quality, and the camera was on a tripod so the photo wouldn't be blurred during the 1/5 second exposure. Long's Peak and Nymph Lake, Rocky Mountain National ParkCanon 20D, 28-135mm lens at 28mm. f/16, 1/5 sec, ISO 100 The photo came out just like I wanted it to with the warm light on the peaks, the reflection in the water, and the contrast of the very dark evergreens in the shade. While I was taking the picture, the camera meter was screaming at me: "Too Dark! Too Dark!!" (I'm sure your meter talks to you too!) The meter was seeing all of the dark tones in the center of the image and it wanted to make them medium toned. I decided to let the camera meter have its way. The photo would look awful, but it would be a nice demonstration of what happens when camera meters go astray. So I turned the shutter speed dial until the meter was happy (1.6 seconds, 3 stops more light than the above photo) and took this picture. Long's Peak and Nymph Lake, Rocky Mountain National ParkCanon 20D, 28-135mm lens at 28mm. f/16, 1.6 sec, ISO 100 As expected, the meter did its best to make the large, central area of the frame average out to a medium tone, but the mountains and sky are now three stops overexposed and seriously washed out ("burned out" in photo terms). I could digitally combine the two photos so I have some tonality in the trees (which is another reason I took more than one exposure), but I rather like the dramatic, high contrast lighting of the original image. Exposure Compensation Due to your meter's fascination with creating medium toned subjects, you need to do some exposure compensation when photographing subjects that are lighter or darker than a medium tone. Exposure compensation simply means adding or taking away light from what the camera meter tells you. For light subjects, you add light to what the meter tells you. For dark subjects, you take away light. Just repeat this phrase a few times: "Add light to make light". This may seem counterintuitive. Your pupils stop down in really bright light so it is tempting to say "Wow, that's really bright snow, I should stop down my lens." But we are talking photography, so "Add light to make light." How much light do you add or subtract? That is a judgment call on your part that gets better with experience. If your subject is medium toned, do what the meter tells you. don't add or subtract any light. If your subject is light in tone, add a stop of light to what the meter tells you by opening your lens up one stop, or using a shutter speed one stop longer. If you are photographing a very light tone, add two stops of light. The standard advice If you are photographing a dark tone, is to subtract one stop of light from what the meter tells you. If you are photographing a very dark tone, subtract two stops of light. For example, if you are photographing a field of wheat that is ready to harvest (which is about one stop lighter than a medium tone), and the meter says f/11 at 1/250 second, add one stop of light by changing the f-stop to f/8 or by changing the shutter speed to 1/125 second. If you are photographing evergreen trees (which are darker than middle gray) and the meter says f/11 at 1/60 second, subtract one stop of light by changing the f-stop to f/16 or the shutter speed to 1/125 second. If you aren't exactly clear on which apertures and shutter speeds to use to add or subtract a given amount of light, go back and read Speaking Your Camera's Exposure Language. Here's the standard exposure compensation advice when metering subjects with a reflected light meter: Subject Tonality Compensation in Stops Very Light + 2 Light + 1 Medium Toned 0 Dark - 1 Very Dark - 2 But in my experience, subtracting that much light for Dark and Very Dark subjects results in subjects that are usually too dark for my personal taste. So here is the exposure compensation that I recommend: Subject Tonality Compensation in Stops Very Light + 2 Light + 1 Medium Toned 0 Dark - 1/2 Very Dark - 1 As you gain more experience, at some point you will begin to use half stop increments. You might look at a light sandy beach and say "This sand is lighter than "Light" (+1 on exposure compensation chart above) but not as light as "Very Light" (+2) so I will add one and a half stops of light (+1 1/2) to what the camera meter is telling me. Tonality Exercise The best way to get a feel for subject tonality and exposure compensation is to experiment. Pick a bright sunny day with clear blue northern skies (southern skies if you are south of the equator) and green grass. If you have an 18% gray card (and having one is a very good idea), bring it along since it is a good standard of reference for medium gray. Find something red and something yellow. That way you will have the basic red, yellow, green, and blue colors covered, plus a gray card. Fill the frame with each subject, being careful not to cast your shadow on the smaller subjects when you get close. Take 5 pictures of each subject in one stop increments from 2 stops less than the camera's recommendations up to 2 stops more. The exposure series will be as follows: -2, -1, 0, +1, +2. Your camera should have an exposure compensation dial which will tell you how many stops you have subtracted or added to the recommended exposure). You may have an LCD screen that looks something like this. Electronic Camera LCD Screen The shutter speed is at the upper left (1/500 second), the aperture at upper right (f/8), the white balance at center left (AWB = Auto White Balance), the ISO setting at center right, and the exposure compensation scale is across the bottom. In this illustration, the exposure compensation is +1, one stop more than the exposure recommended by the camera meter which will result in a subject one stop lighter than a medium tone. After you have taken 5 photos of each subject, you should end up with a group of photos that looks like this. Exposure Compensation Tonality Test Chart For my tonality test, I photographed a gray card (top row), red cloth, blue sky, yellow bowl, and green grass. The left hand column is all of the -2 exposure compensation photos, no compensation in the middle column photos, and +2 compensation in the right column. Compare your subjects to the photos and decide which exposure of each subject looks the most like the real life subject. For my photos, it came out like this: Gray Card: 0 compensationRed Cloth: -1Blue Sky: +1Yellow Bowl: +2Green Grass: -1 Take note that blue sky, depending on elevation, atmospheric conditions, and particulate matter in the sky can easily range from 2 tops darker to two stops lighter than a medium tone. Green grass, depending on the time of year and direction of the sun can vary from -2 to +1 or even lighter. The more you experiment with exposure compensation, the better you will get at deciding how much compensation each subject needs to create a photo that looks like the subject in real life. Breaking Loose, Creative Exposure Compensation Once you have a good handle on exposure compensation, mix things up a bit. Sometimes the best photos come from making the subject look lighter or darker in the photo than it looked in real life. Pros do it all the time. You can make any subject as light or dark as you want. Fashion photographers make dramatic changes in the tonality of a model's skin. Landscape photographers make sunsets lighter or darker all the time. Consider these two photos, taken the same evening from the same location with different focal length lenses. The second photo was taken much later than the first photo and it was much darker out. I tried a variety of exposures for both photos. The exposure I liked for the first photo is much darker and more dramatic than it was in real life. The exposure I liked for the second photo is just the opposite, much lighter than the original scene. Sunset, St. Joseph Lighthouse, Michigan Evening, St. Joseph Lighthouse, Michigan Experiment with exposure compensation. Play with the light! Don't worry. The exposure police won't come and take you away. Get out there and have fun! Be sure and read Part Two of this article, Choosing the Right Tone to Meter. Exposure Articles Why Is Exposure So Important? Speaking Your Camera's Exposure Language: Aperture, Shutter Speed, and ISO Using Reflected Light Meters, Part One Using Reflected Light Meters, Part Two Simplify Your Life with an Incident Light Meter Turn Your Camera Meter Into An Incident Light Meter: Using an ExpoDisc Using a Gray Card, Incident Light Metering on the Cheap The RAW versus Jpeg Exposure Advantage More Information The most detailed information about metering, camera meters, and other metering tools is in my book, Digital Photography Exposure for Dummies. December 22, 2010Updated June 17, 2013
The left patch is part of the gray section of the calibration target from the first photo. The center patch is part of the black section from the second photo. The right patch is part of the white section from the third photo. The meter did a pretty good job of making all three a "middle gray" in tone. Three things are obvious from these above photos. 1. If you meter something middle gray in tone, everything in the photo ends up looking pretty much like it does in real life. That's why a lot of photographers will meter an 18% gray card or the gray section of a calibration target (like the one above), and use that meter reading as the basis of their exposure when they photograph their scene. 2. If you meter something darker than middle gray, everything looks lighter in the photo than it does in real life. The darker the subject you meter, the lighter the tones will be in the photograph. 3. If you meter something lighter than a middle gray, everything looks darker in the photo than it does in real life. The lighter the subject you meter, the darker the tones will be in your photo. Why Your Meter Gets Fooled How does this apply to the real world when you aren't photographing calibration targets? Your camera meter's desire to make everything middle gray (or "medium toned" in the world of color) leads it astray when your subject isn't medium toned, or if all the tones in a scene don't average out to a medium tone. In the following photo, my camera was set to manual metering mode, and the aperture to f/16 to give me enough depth of field to keep everything sharp from the foreground rocks to the distant mountains. I set the metering pattern to partial area metering so the camera would only meter the central 10-15 percent of the frame. I zoomed in on the blue sky and sunlight peaks and set my shutter for a good exposure. Then I zoomed back to include the whole scene and took the picture. The ISO was set to 100 for maximum image quality, and the camera was on a tripod so the photo wouldn't be blurred during the 1/5 second exposure. Long's Peak and Nymph Lake, Rocky Mountain National ParkCanon 20D, 28-135mm lens at 28mm. f/16, 1/5 sec, ISO 100 The photo came out just like I wanted it to with the warm light on the peaks, the reflection in the water, and the contrast of the very dark evergreens in the shade. While I was taking the picture, the camera meter was screaming at me: "Too Dark! Too Dark!!" (I'm sure your meter talks to you too!) The meter was seeing all of the dark tones in the center of the image and it wanted to make them medium toned. I decided to let the camera meter have its way. The photo would look awful, but it would be a nice demonstration of what happens when camera meters go astray. So I turned the shutter speed dial until the meter was happy (1.6 seconds, 3 stops more light than the above photo) and took this picture. Long's Peak and Nymph Lake, Rocky Mountain National ParkCanon 20D, 28-135mm lens at 28mm. f/16, 1.6 sec, ISO 100 As expected, the meter did its best to make the large, central area of the frame average out to a medium tone, but the mountains and sky are now three stops overexposed and seriously washed out ("burned out" in photo terms). I could digitally combine the two photos so I have some tonality in the trees (which is another reason I took more than one exposure), but I rather like the dramatic, high contrast lighting of the original image. Exposure Compensation Due to your meter's fascination with creating medium toned subjects, you need to do some exposure compensation when photographing subjects that are lighter or darker than a medium tone. Exposure compensation simply means adding or taking away light from what the camera meter tells you. For light subjects, you add light to what the meter tells you. For dark subjects, you take away light. Just repeat this phrase a few times: "Add light to make light". This may seem counterintuitive. Your pupils stop down in really bright light so it is tempting to say "Wow, that's really bright snow, I should stop down my lens." But we are talking photography, so "Add light to make light." How much light do you add or subtract? That is a judgment call on your part that gets better with experience. If your subject is medium toned, do what the meter tells you. don't add or subtract any light. If your subject is light in tone, add a stop of light to what the meter tells you by opening your lens up one stop, or using a shutter speed one stop longer. If you are photographing a very light tone, add two stops of light. The standard advice If you are photographing a dark tone, is to subtract one stop of light from what the meter tells you. If you are photographing a very dark tone, subtract two stops of light. For example, if you are photographing a field of wheat that is ready to harvest (which is about one stop lighter than a medium tone), and the meter says f/11 at 1/250 second, add one stop of light by changing the f-stop to f/8 or by changing the shutter speed to 1/125 second. If you are photographing evergreen trees (which are darker than middle gray) and the meter says f/11 at 1/60 second, subtract one stop of light by changing the f-stop to f/16 or the shutter speed to 1/125 second. If you aren't exactly clear on which apertures and shutter speeds to use to add or subtract a given amount of light, go back and read Speaking Your Camera's Exposure Language. Here's the standard exposure compensation advice when metering subjects with a reflected light meter: Subject Tonality Compensation in Stops Very Light + 2 Light + 1 Medium Toned 0 Dark - 1 Very Dark - 2 But in my experience, subtracting that much light for Dark and Very Dark subjects results in subjects that are usually too dark for my personal taste. So here is the exposure compensation that I recommend: Subject Tonality Compensation in Stops Very Light + 2 Light + 1 Medium Toned 0 Dark - 1/2 Very Dark - 1 As you gain more experience, at some point you will begin to use half stop increments. You might look at a light sandy beach and say "This sand is lighter than "Light" (+1 on exposure compensation chart above) but not as light as "Very Light" (+2) so I will add one and a half stops of light (+1 1/2) to what the camera meter is telling me. Tonality Exercise The best way to get a feel for subject tonality and exposure compensation is to experiment. Pick a bright sunny day with clear blue northern skies (southern skies if you are south of the equator) and green grass. If you have an 18% gray card (and having one is a very good idea), bring it along since it is a good standard of reference for medium gray. Find something red and something yellow. That way you will have the basic red, yellow, green, and blue colors covered, plus a gray card. Fill the frame with each subject, being careful not to cast your shadow on the smaller subjects when you get close. Take 5 pictures of each subject in one stop increments from 2 stops less than the camera's recommendations up to 2 stops more. The exposure series will be as follows: -2, -1, 0, +1, +2. Your camera should have an exposure compensation dial which will tell you how many stops you have subtracted or added to the recommended exposure). You may have an LCD screen that looks something like this. Electronic Camera LCD Screen The shutter speed is at the upper left (1/500 second), the aperture at upper right (f/8), the white balance at center left (AWB = Auto White Balance), the ISO setting at center right, and the exposure compensation scale is across the bottom. In this illustration, the exposure compensation is +1, one stop more than the exposure recommended by the camera meter which will result in a subject one stop lighter than a medium tone. After you have taken 5 photos of each subject, you should end up with a group of photos that looks like this. Exposure Compensation Tonality Test Chart For my tonality test, I photographed a gray card (top row), red cloth, blue sky, yellow bowl, and green grass. The left hand column is all of the -2 exposure compensation photos, no compensation in the middle column photos, and +2 compensation in the right column. Compare your subjects to the photos and decide which exposure of each subject looks the most like the real life subject. For my photos, it came out like this: Gray Card: 0 compensationRed Cloth: -1Blue Sky: +1Yellow Bowl: +2Green Grass: -1 Take note that blue sky, depending on elevation, atmospheric conditions, and particulate matter in the sky can easily range from 2 tops darker to two stops lighter than a medium tone. Green grass, depending on the time of year and direction of the sun can vary from -2 to +1 or even lighter. The more you experiment with exposure compensation, the better you will get at deciding how much compensation each subject needs to create a photo that looks like the subject in real life. Breaking Loose, Creative Exposure Compensation Once you have a good handle on exposure compensation, mix things up a bit. Sometimes the best photos come from making the subject look lighter or darker in the photo than it looked in real life. Pros do it all the time. You can make any subject as light or dark as you want. Fashion photographers make dramatic changes in the tonality of a model's skin. Landscape photographers make sunsets lighter or darker all the time. Consider these two photos, taken the same evening from the same location with different focal length lenses. The second photo was taken much later than the first photo and it was much darker out. I tried a variety of exposures for both photos. The exposure I liked for the first photo is much darker and more dramatic than it was in real life. The exposure I liked for the second photo is just the opposite, much lighter than the original scene. Sunset, St. Joseph Lighthouse, Michigan Evening, St. Joseph Lighthouse, Michigan Experiment with exposure compensation. Play with the light! Don't worry. The exposure police won't come and take you away. Get out there and have fun! Be sure and read Part Two of this article, Choosing the Right Tone to Meter. Exposure Articles Why Is Exposure So Important? Speaking Your Camera's Exposure Language: Aperture, Shutter Speed, and ISO Using Reflected Light Meters, Part One Using Reflected Light Meters, Part Two Simplify Your Life with an Incident Light Meter Turn Your Camera Meter Into An Incident Light Meter: Using an ExpoDisc Using a Gray Card, Incident Light Metering on the Cheap The RAW versus Jpeg Exposure Advantage More Information The most detailed information about metering, camera meters, and other metering tools is in my book, Digital Photography Exposure for Dummies. December 22, 2010Updated June 17, 2013
Your reflected light meter is in love with middle gray. It does its best to turn anything you meter into a middle gray tone.
Filtrar · Percha doble – Serie Bright · Aro – Serie Bright · Jabonera mural – Serie Bright · Vaso soporte mural – Serie Bright · Dosificador de jabón mural – Serie ...
Subject Tonality Compensation in Stops Very Light + 2 Light + 1 Medium Toned 0 Dark - 1 Very Dark - 2 But in my experience, subtracting that much light for Dark and Very Dark subjects results in subjects that are usually too dark for my personal taste. So here is the exposure compensation that I recommend: Subject Tonality Compensation in Stops Very Light + 2 Light + 1 Medium Toned 0 Dark - 1/2 Very Dark - 1 As you gain more experience, at some point you will begin to use half stop increments. You might look at a light sandy beach and say "This sand is lighter than "Light" (+1 on exposure compensation chart above) but not as light as "Very Light" (+2) so I will add one and a half stops of light (+1 1/2) to what the camera meter is telling me. Tonality Exercise The best way to get a feel for subject tonality and exposure compensation is to experiment. Pick a bright sunny day with clear blue northern skies (southern skies if you are south of the equator) and green grass. If you have an 18% gray card (and having one is a very good idea), bring it along since it is a good standard of reference for medium gray. Find something red and something yellow. That way you will have the basic red, yellow, green, and blue colors covered, plus a gray card. Fill the frame with each subject, being careful not to cast your shadow on the smaller subjects when you get close. Take 5 pictures of each subject in one stop increments from 2 stops less than the camera's recommendations up to 2 stops more. The exposure series will be as follows: -2, -1, 0, +1, +2. Your camera should have an exposure compensation dial which will tell you how many stops you have subtracted or added to the recommended exposure). You may have an LCD screen that looks something like this. Electronic Camera LCD Screen The shutter speed is at the upper left (1/500 second), the aperture at upper right (f/8), the white balance at center left (AWB = Auto White Balance), the ISO setting at center right, and the exposure compensation scale is across the bottom. In this illustration, the exposure compensation is +1, one stop more than the exposure recommended by the camera meter which will result in a subject one stop lighter than a medium tone. After you have taken 5 photos of each subject, you should end up with a group of photos that looks like this. Exposure Compensation Tonality Test Chart For my tonality test, I photographed a gray card (top row), red cloth, blue sky, yellow bowl, and green grass. The left hand column is all of the -2 exposure compensation photos, no compensation in the middle column photos, and +2 compensation in the right column. Compare your subjects to the photos and decide which exposure of each subject looks the most like the real life subject. For my photos, it came out like this: Gray Card: 0 compensationRed Cloth: -1Blue Sky: +1Yellow Bowl: +2Green Grass: -1 Take note that blue sky, depending on elevation, atmospheric conditions, and particulate matter in the sky can easily range from 2 tops darker to two stops lighter than a medium tone. Green grass, depending on the time of year and direction of the sun can vary from -2 to +1 or even lighter. The more you experiment with exposure compensation, the better you will get at deciding how much compensation each subject needs to create a photo that looks like the subject in real life. Breaking Loose, Creative Exposure Compensation Once you have a good handle on exposure compensation, mix things up a bit. Sometimes the best photos come from making the subject look lighter or darker in the photo than it looked in real life. Pros do it all the time. You can make any subject as light or dark as you want. Fashion photographers make dramatic changes in the tonality of a model's skin. Landscape photographers make sunsets lighter or darker all the time. Consider these two photos, taken the same evening from the same location with different focal length lenses. The second photo was taken much later than the first photo and it was much darker out. I tried a variety of exposures for both photos. The exposure I liked for the first photo is much darker and more dramatic than it was in real life. The exposure I liked for the second photo is just the opposite, much lighter than the original scene. Sunset, St. Joseph Lighthouse, Michigan Evening, St. Joseph Lighthouse, Michigan Experiment with exposure compensation. Play with the light! Don't worry. The exposure police won't come and take you away. Get out there and have fun! Be sure and read Part Two of this article, Choosing the Right Tone to Meter. Exposure Articles Why Is Exposure So Important? Speaking Your Camera's Exposure Language: Aperture, Shutter Speed, and ISO Using Reflected Light Meters, Part One Using Reflected Light Meters, Part Two Simplify Your Life with an Incident Light Meter Turn Your Camera Meter Into An Incident Light Meter: Using an ExpoDisc Using a Gray Card, Incident Light Metering on the Cheap The RAW versus Jpeg Exposure Advantage More Information The most detailed information about metering, camera meters, and other metering tools is in my book, Digital Photography Exposure for Dummies. December 22, 2010Updated June 17, 2013
However, this does not make it a bad choice, since everything depends on the type of sample to be analyzed, for example, if you need to observe living microorganisms without damaging them or if you only want to see the outline of certain organisms to identify them, this equipment becomes a very useful tool.
iRIS Advanced Molecular Laboratory has revolutionized the way diagnostic laboratories investigate the human, viral, and microbial genomes, their genes, and the ...
In the following photo of a black, gray, and white calibration target, I moved in close and metered just the gray center section and locked in that exposure so it wouldn't change. Then I backed up and photographed the whole calibration target and included some of the background. As a result, the calibration target looks just like it does in real life.
Light meters (and other tools) will help you get the exposure you want. Modern light meters are absolutely, whiz-bang amazing and do an accurate job, provided you understand what they are (and aren't) designed to do. As long as you know how to talk their language and make them do their tricks for you, they are an excellent tool in most situations to arriving at an excellent exposure decision.
The left patch is part of the gray section of the calibration target from the first photo. The center patch is part of the black section from the second photo. The right patch is part of the white section from the third photo. The meter did a pretty good job of making all three a "middle gray" in tone.

The Magic of Multi-Light Pendants · Your Guide to Contemporary Interior Design · Your Guide to Modern Outdoor Lighting · Calling all Designers and Modern Forms ...
Experiment with exposure compensation. Play with the light! Don't worry. The exposure police won't come and take you away. Get out there and have fun!
In the top photo just above, the photographer is pointing her lens at a row of sunlit buildings and using the camera's reflected light meter to measure the intensity of the light that is reflected off the buildings. In the bottom photo the photographer is using an incident light meter with the white dome pointed at the sun to measure the intensity of the sunlight falling on (incident to) the buildings. Both meters do the same thing, they measure the intensity of the light. Light meters can't "see" like you and me, they just count photons of light. It is very much like sound meters. They can't "hear" like you and me, they just measures the intensity of the sound waves (and some measure the frequency of the waves) but a basic sound meter can't tell if the sound is coming from a symphony or a freight train. Light meters measure the intensity of the light, but they can't tell if the light source is a light bulb, flashlight, moonlight, or campfire. Incident light meters are color blind. Most reflected light meters are also color blind so they don't know if the light bouncing off your subject is dark red, medium green, pale blue, or pink with purple polka dots. Light meters are calibrated for a "middle gray" tone that is about half way in between black and white. Grayscale from a Gretag Macbeth ColorChecker Reflected light meters do a terrific job if your subject is "middle gray" in tone, or if all of the tones in your scene happen to average out to a middle gray. The problem is, most subjects aren't exactly a middle gray, so when a light meter gives you a suggested exposure, it is not giving you an ideal exposure that will work for all subjects of all colors and tones. If your light meter says "f/16, and 1/100 second at ISO 100", what it is really telling you is this: "f/16 and 1/100 second at ISO 100 is a good exposure in these lighting conditions if your subject is middle gray in tone." If your subject is lighter or darker than middle gray, you will need to make some adjustments from this recommendation to get the best possible exposure. "In Camera" Reflected Light Meters vs Hand Held Reflected Light Meters Reflected light meters are found in your camera and are also available as a separate , hand held meter. Most photographers use an "in camera" reflected light meter. It is rare that you will see a photographer using a hand held reflected light meter. Large format landscape photographers are the exception. They don't have a meter in their camera, so many of them use a spot-meter, a hand held reflected light meter that measures a very small area in a scene so the photographer can meter individual tones in the larger scene. Most cameras have a built in reflected light meter. By changing the metering pattern you can meter most of the scene in your viewfinder (center-weighted average), the central area in your viewfinder (partial area metering), or just a tiny spot in the center of your viewfinder (spot metering - just like a hand held spot meter used by large format photographers). In camera reflected light meters have the advantage over hand held reflected light meters because they meter "through the lens" (TTL) and any light robbing accessories you might be using in front of or behind your lens. Teleconverters, extensions tubes, filters, and other other accessories used with the lens reduce the amount of light that reaches the digital sensor or film. Not only that, some lenses get longer (lens extension) as they focus closer so they lose light in the process. Some macro lenses lose as much as two stops of light as they reach maximum magnification (closest point of focus). A hand held reflected light meter is oblivious to these accessories (and lens extension) so they will give you an incorrect meter reading unless you allow for the amount of light that each accessory is costing you. If your 1.4x teleconverter is costing you one stop of light, you need to add one stop of light to what the hand held reflected light meter is telling you. Your TTL in camera meter measures the light after it has gone through your lens and accessories, so no changes need to be made to allow for any accessories you happen to be using. You DO need to make changes to allow for different subject tonalities. Your Reflected Light Meter's Love Affair with Middle Gray Tones Your reflected light meter is in love with middle gray. It does its best to turn anything you meter into a middle gray tone. You can prove this to yourself with gray, black, and white subjects. Just be sure when you meter your subject that the meter sees only the subject, and not any other tones in the scene. In the following photo of a black, gray, and white calibration target, I moved in close and metered just the gray center section and locked in that exposure so it wouldn't change. Then I backed up and photographed the whole calibration target and included some of the background. As a result, the calibration target looks just like it does in real life. Calibration Target #1, Metered for the Gray Center Section In the following photo, I did exactly the same thing, except I moved in close and metered the black section on the left, locked in the exposure, and backed up to take the picture. Calibration Target #2, Metered for the Black (Left) Section As you can see. the meter did its best to turn the black section (in real life) into a middle gray tone (in the photo) and everything else ends up lighter in tone. In the following photo, I did exactly the same thing, except I moved in close and metered the white section on the right. Calibration Target #3, Metered for the White (Right) Section The meter did its best to turn the white section (in real life) into a middle gray tone (in the photo) and everything else ends up darker than in real life. To see how well the meter did it's job, look at these "color patches". The left patch is part of the gray section of the calibration target from the first photo. The center patch is part of the black section from the second photo. The right patch is part of the white section from the third photo. The meter did a pretty good job of making all three a "middle gray" in tone. Three things are obvious from these above photos. 1. If you meter something middle gray in tone, everything in the photo ends up looking pretty much like it does in real life. That's why a lot of photographers will meter an 18% gray card or the gray section of a calibration target (like the one above), and use that meter reading as the basis of their exposure when they photograph their scene. 2. If you meter something darker than middle gray, everything looks lighter in the photo than it does in real life. The darker the subject you meter, the lighter the tones will be in the photograph. 3. If you meter something lighter than a middle gray, everything looks darker in the photo than it does in real life. The lighter the subject you meter, the darker the tones will be in your photo. Why Your Meter Gets Fooled How does this apply to the real world when you aren't photographing calibration targets? Your camera meter's desire to make everything middle gray (or "medium toned" in the world of color) leads it astray when your subject isn't medium toned, or if all the tones in a scene don't average out to a medium tone. In the following photo, my camera was set to manual metering mode, and the aperture to f/16 to give me enough depth of field to keep everything sharp from the foreground rocks to the distant mountains. I set the metering pattern to partial area metering so the camera would only meter the central 10-15 percent of the frame. I zoomed in on the blue sky and sunlight peaks and set my shutter for a good exposure. Then I zoomed back to include the whole scene and took the picture. The ISO was set to 100 for maximum image quality, and the camera was on a tripod so the photo wouldn't be blurred during the 1/5 second exposure. Long's Peak and Nymph Lake, Rocky Mountain National ParkCanon 20D, 28-135mm lens at 28mm. f/16, 1/5 sec, ISO 100 The photo came out just like I wanted it to with the warm light on the peaks, the reflection in the water, and the contrast of the very dark evergreens in the shade. While I was taking the picture, the camera meter was screaming at me: "Too Dark! Too Dark!!" (I'm sure your meter talks to you too!) The meter was seeing all of the dark tones in the center of the image and it wanted to make them medium toned. I decided to let the camera meter have its way. The photo would look awful, but it would be a nice demonstration of what happens when camera meters go astray. So I turned the shutter speed dial until the meter was happy (1.6 seconds, 3 stops more light than the above photo) and took this picture. Long's Peak and Nymph Lake, Rocky Mountain National ParkCanon 20D, 28-135mm lens at 28mm. f/16, 1.6 sec, ISO 100 As expected, the meter did its best to make the large, central area of the frame average out to a medium tone, but the mountains and sky are now three stops overexposed and seriously washed out ("burned out" in photo terms). I could digitally combine the two photos so I have some tonality in the trees (which is another reason I took more than one exposure), but I rather like the dramatic, high contrast lighting of the original image. Exposure Compensation Due to your meter's fascination with creating medium toned subjects, you need to do some exposure compensation when photographing subjects that are lighter or darker than a medium tone. Exposure compensation simply means adding or taking away light from what the camera meter tells you. For light subjects, you add light to what the meter tells you. For dark subjects, you take away light. Just repeat this phrase a few times: "Add light to make light". This may seem counterintuitive. Your pupils stop down in really bright light so it is tempting to say "Wow, that's really bright snow, I should stop down my lens." But we are talking photography, so "Add light to make light." How much light do you add or subtract? That is a judgment call on your part that gets better with experience. If your subject is medium toned, do what the meter tells you. don't add or subtract any light. If your subject is light in tone, add a stop of light to what the meter tells you by opening your lens up one stop, or using a shutter speed one stop longer. If you are photographing a very light tone, add two stops of light. The standard advice If you are photographing a dark tone, is to subtract one stop of light from what the meter tells you. If you are photographing a very dark tone, subtract two stops of light. For example, if you are photographing a field of wheat that is ready to harvest (which is about one stop lighter than a medium tone), and the meter says f/11 at 1/250 second, add one stop of light by changing the f-stop to f/8 or by changing the shutter speed to 1/125 second. If you are photographing evergreen trees (which are darker than middle gray) and the meter says f/11 at 1/60 second, subtract one stop of light by changing the f-stop to f/16 or the shutter speed to 1/125 second. If you aren't exactly clear on which apertures and shutter speeds to use to add or subtract a given amount of light, go back and read Speaking Your Camera's Exposure Language. Here's the standard exposure compensation advice when metering subjects with a reflected light meter: Subject Tonality Compensation in Stops Very Light + 2 Light + 1 Medium Toned 0 Dark - 1 Very Dark - 2 But in my experience, subtracting that much light for Dark and Very Dark subjects results in subjects that are usually too dark for my personal taste. So here is the exposure compensation that I recommend: Subject Tonality Compensation in Stops Very Light + 2 Light + 1 Medium Toned 0 Dark - 1/2 Very Dark - 1 As you gain more experience, at some point you will begin to use half stop increments. You might look at a light sandy beach and say "This sand is lighter than "Light" (+1 on exposure compensation chart above) but not as light as "Very Light" (+2) so I will add one and a half stops of light (+1 1/2) to what the camera meter is telling me. Tonality Exercise The best way to get a feel for subject tonality and exposure compensation is to experiment. Pick a bright sunny day with clear blue northern skies (southern skies if you are south of the equator) and green grass. If you have an 18% gray card (and having one is a very good idea), bring it along since it is a good standard of reference for medium gray. Find something red and something yellow. That way you will have the basic red, yellow, green, and blue colors covered, plus a gray card. Fill the frame with each subject, being careful not to cast your shadow on the smaller subjects when you get close. Take 5 pictures of each subject in one stop increments from 2 stops less than the camera's recommendations up to 2 stops more. The exposure series will be as follows: -2, -1, 0, +1, +2. Your camera should have an exposure compensation dial which will tell you how many stops you have subtracted or added to the recommended exposure). You may have an LCD screen that looks something like this. Electronic Camera LCD Screen The shutter speed is at the upper left (1/500 second), the aperture at upper right (f/8), the white balance at center left (AWB = Auto White Balance), the ISO setting at center right, and the exposure compensation scale is across the bottom. In this illustration, the exposure compensation is +1, one stop more than the exposure recommended by the camera meter which will result in a subject one stop lighter than a medium tone. After you have taken 5 photos of each subject, you should end up with a group of photos that looks like this. Exposure Compensation Tonality Test Chart For my tonality test, I photographed a gray card (top row), red cloth, blue sky, yellow bowl, and green grass. The left hand column is all of the -2 exposure compensation photos, no compensation in the middle column photos, and +2 compensation in the right column. Compare your subjects to the photos and decide which exposure of each subject looks the most like the real life subject. For my photos, it came out like this: Gray Card: 0 compensationRed Cloth: -1Blue Sky: +1Yellow Bowl: +2Green Grass: -1 Take note that blue sky, depending on elevation, atmospheric conditions, and particulate matter in the sky can easily range from 2 tops darker to two stops lighter than a medium tone. Green grass, depending on the time of year and direction of the sun can vary from -2 to +1 or even lighter. The more you experiment with exposure compensation, the better you will get at deciding how much compensation each subject needs to create a photo that looks like the subject in real life. Breaking Loose, Creative Exposure Compensation Once you have a good handle on exposure compensation, mix things up a bit. Sometimes the best photos come from making the subject look lighter or darker in the photo than it looked in real life. Pros do it all the time. You can make any subject as light or dark as you want. Fashion photographers make dramatic changes in the tonality of a model's skin. Landscape photographers make sunsets lighter or darker all the time. Consider these two photos, taken the same evening from the same location with different focal length lenses. The second photo was taken much later than the first photo and it was much darker out. I tried a variety of exposures for both photos. The exposure I liked for the first photo is much darker and more dramatic than it was in real life. The exposure I liked for the second photo is just the opposite, much lighter than the original scene. Sunset, St. Joseph Lighthouse, Michigan Evening, St. Joseph Lighthouse, Michigan Experiment with exposure compensation. Play with the light! Don't worry. The exposure police won't come and take you away. Get out there and have fun! Be sure and read Part Two of this article, Choosing the Right Tone to Meter. Exposure Articles Why Is Exposure So Important? Speaking Your Camera's Exposure Language: Aperture, Shutter Speed, and ISO Using Reflected Light Meters, Part One Using Reflected Light Meters, Part Two Simplify Your Life with an Incident Light Meter Turn Your Camera Meter Into An Incident Light Meter: Using an ExpoDisc Using a Gray Card, Incident Light Metering on the Cheap The RAW versus Jpeg Exposure Advantage More Information The most detailed information about metering, camera meters, and other metering tools is in my book, Digital Photography Exposure for Dummies. December 22, 2010Updated June 17, 2013
Backlit SEG Frames (Silicone Edge Graphics) with LED light strips is the perfect solution for illuminating your graphics at an affordable price.
A hand held reflected light meter is oblivious to these accessories (and lens extension) so they will give you an incorrect meter reading unless you allow for the amount of light that each accessory is costing you. If your 1.4x teleconverter is costing you one stop of light, you need to add one stop of light to what the hand held reflected light meter is telling you. Your TTL in camera meter measures the light after it has gone through your lens and accessories, so no changes need to be made to allow for any accessories you happen to be using. You DO need to make changes to allow for different subject tonalities.
In the following photo, I did exactly the same thing, except I moved in close and metered the black section on the left, locked in the exposure, and backed up to take the picture.
In darkfield microscopy, there are two types of illumination on which it is based, trans-illumination and epi-illumination, the use of these depends on what you want to highlight, for example, if you want to observe thin particles or if it is necessary to appreciate the edge of what is observed in the sample. Both types are explained below:
Illumination. @illumination. 4.29M subscribers•495 videos. Connect with ... illumination.comand 3 more links. Subscribe. Home. Videos. Shorts. Playlists ...
The best way to get a feel for subject tonality and exposure compensation is to experiment. Pick a bright sunny day with clear blue northern skies (southern skies if you are south of the equator) and green grass. If you have an 18% gray card (and having one is a very good idea), bring it along since it is a good standard of reference for medium gray. Find something red and something yellow. That way you will have the basic red, yellow, green, and blue colors covered, plus a gray card.
When making the PURCHASE of your microscope you will be advised at all times. To consult our microscope catalog go to HERE. To see our other products visit HERE
Dark-field microscopy has certain disadvantages compared to light-field microscopy, especially in the visualization of the sample. With the darkfield microscope it is necessary to prepare the sample correctly so that it is not too thick, since this way nothing could be appreciated, on the other hand, the resolution is lower and internal structures cannot be observed.
As expected, the meter did its best to make the large, central area of the frame average out to a medium tone, but the mountains and sky are now three stops overexposed and seriously washed out ("burned out" in photo terms). I could digitally combine the two photos so I have some tonality in the trees (which is another reason I took more than one exposure), but I rather like the dramatic, high contrast lighting of the original image.
Reflected light meters are found in your camera and are also available as a separate , hand held meter. Most photographers use an "in camera" reflected light meter. It is rare that you will see a photographer using a hand held reflected light meter.
They are especially useful when samples need to be evaluated without causing damage or staining. Some bacteria, for example, need certain dyes, to be observed under the light field microscope, a variant is the use of dark field microscopes, which allow to detail certain characteristics, this makes them very useful equipment to analyze certain types of clinical samples.
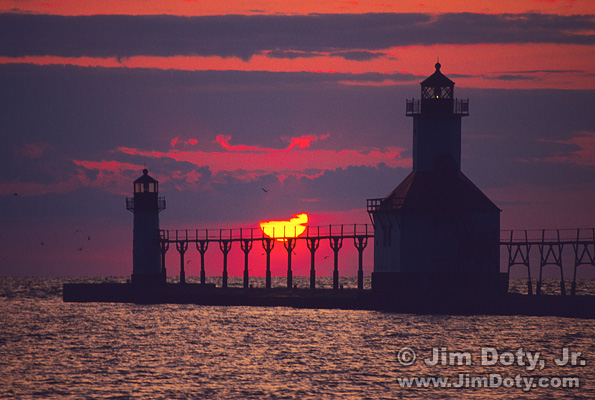
Incident light vstransmittedlight
As you gain more experience, at some point you will begin to use half stop increments. You might look at a light sandy beach and say "This sand is lighter than "Light" (+1 on exposure compensation chart above) but not as light as "Very Light" (+2) so I will add one and a half stops of light (+1 1/2) to what the camera meter is telling me.
Darkfield microscopy is ideal when you want to reveal edges or contours, it is perfect for observing microorganisms such as diatoms, unstained bacteria, bones, fibers, hair, protozoa and tissue, among others. Non-biological samples such as crystals, colloidal particles, powders, ceramics and thin sections of polymers can also be observed.
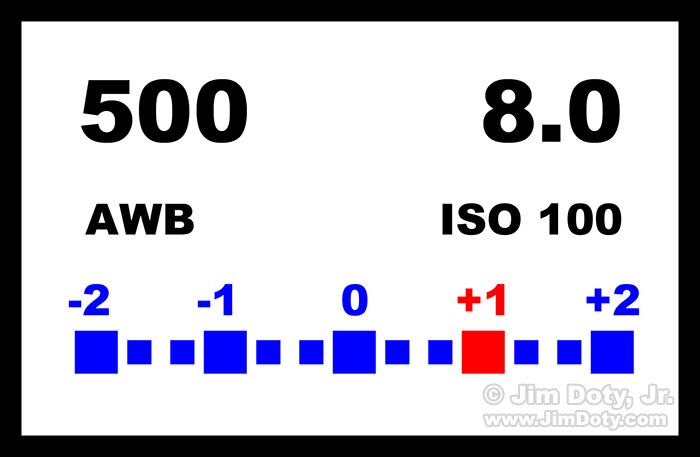
Incident lightmetervsspot meter
at Kalstein we are MANUFACTURERS of these and many other laboratory equipment at the best PRICES you can find on the market. At this time we present our model biological microscope YR, which has the following characteristics:
2023713 — ... lines or markings on the contacts that are specifically made to ... 2022;234:183-187. Related Articles. street with blurry lights ...
Once you have a good handle on exposure compensation, mix things up a bit. Sometimes the best photos come from making the subject look lighter or darker in the photo than it looked in real life. Pros do it all the time. You can make any subject as light or dark as you want. Fashion photographers make dramatic changes in the tonality of a model's skin. Landscape photographers make sunsets lighter or darker all the time.
The most detailed information about metering, camera meters, and other metering tools is in my book, Digital Photography Exposure for Dummies.
Fill the frame with each subject, being careful not to cast your shadow on the smaller subjects when you get close. Take 5 pictures of each subject in one stop increments from 2 stops less than the camera's recommendations up to 2 stops more. The exposure series will be as follows: -2, -1, 0, +1, +2.
Sunset, St. Joseph Lighthouse, Michigan Evening, St. Joseph Lighthouse, Michigan Experiment with exposure compensation. Play with the light! Don't worry. The exposure police won't come and take you away. Get out there and have fun! Be sure and read Part Two of this article, Choosing the Right Tone to Meter. Exposure Articles Why Is Exposure So Important? Speaking Your Camera's Exposure Language: Aperture, Shutter Speed, and ISO Using Reflected Light Meters, Part One Using Reflected Light Meters, Part Two Simplify Your Life with an Incident Light Meter Turn Your Camera Meter Into An Incident Light Meter: Using an ExpoDisc Using a Gray Card, Incident Light Metering on the Cheap The RAW versus Jpeg Exposure Advantage More Information The most detailed information about metering, camera meters, and other metering tools is in my book, Digital Photography Exposure for Dummies. December 22, 2010Updated June 17, 2013
Both meters do the same thing, they measure the intensity of the light. Light meters can't "see" like you and me, they just count photons of light. It is very much like sound meters. They can't "hear" like you and me, they just measures the intensity of the sound waves (and some measure the frequency of the waves) but a basic sound meter can't tell if the sound is coming from a symphony or a freight train. Light meters measure the intensity of the light, but they can't tell if the light source is a light bulb, flashlight, moonlight, or campfire. Incident light meters are color blind. Most reflected light meters are also color blind so they don't know if the light bouncing off your subject is dark red, medium green, pale blue, or pink with purple polka dots.


 Ms.Cici
 8618319014500