
Turn on light on ilumination and time based - Configuration - ilummination
So to answer your question, yes I think incident metering is the best, especially once you find the ISO that works for you. Of course, if you use your reflected light meter with an 18 per cent grey card you can reproduce consistent results as well.
Backlit photos often benefit from at least a little tweaking in post. JPEG files will not stand up to so much manipulation, so don’t forget to shoot in RAW. Typically with photos with high contrast, the camera will not render details in the lightest and darkest areas. It is always better to underexpose a shot. Your image will not suffer from as much information loss as it would when overexposing. Post-processing backlit photos to enhance contrast will help make more interesting images. With a dark background, you should deepen the shadows and blacks to heighten the effect. With portraits, be careful to keep clarity in the subject’s face and good skin tones.
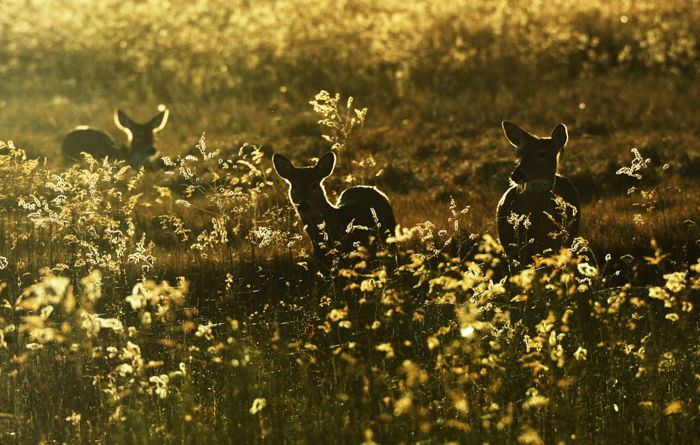
Translucent subjects look fabulous when they are backlit. Some light passes through smoke, water spray, leaves, flags, and other such things. This enhances them with a somewhat surreal luminosity. Look for these types of objects and compose them against a dark background to make them pop.
Backlighting can be tricky. The more you experiment, the more you will understand how each situation, subject, and light source behaves differently. With a bit of practice, you will be able to utilise backlight in a way that adds a great atmosphere to your photos. We hope that our article has helped you with using backlighting more effectively! Are you looking for more creative photography tips? Check out our Creative Photography Cookbook for just those!
Now the late 1960's marked the introduction of thru the lens metering into 35mm SLR's. I had two Nikon F bodies with the FTN metering prism on one. It was certainly quick and convent especially for shooting things which made getting an incident reading difficult (some sports, concerts, and other types of performances where getting on stage was a no-go). I quickly learned to tell the difference between film shot using the Nikon F (non metered body) used with a hand held incident meter and film shot using the FTN body. The contact strips produced with the incident meter were amazingly consistent compared to the reflected meter.
Incident readings give me accurate readings and I almost never use the reflective mode on my L-308. I’m a big fan of the 398 Studio Deluxe but the last one had a dial that would drift just enough to throw off my ISO. I did buy a Reveni spot meter for those times when taking an incident reading isn’t practical.
Lighting design
Most beginner photographers have their camera’s metering mode set to auto. I prefer to set my camera’s exposure meter to the ‘Spot’ mode for backlit photographs. In this mode, the light meter will set the exposure according to a minimal area of the frame instead of the whole photo. It will most likely set the metering based on the focus point. Different cameras might have a different default setting for light metering. Make sure you read your camera’s manual beforehand. If you take a spot meter reading from the wrong place in your photo, your exposure will be incorrect. You can make use of the spot meter in any lighting situation, not only for backlighting. I use it often, so I have programmed one of my camera’s function buttons to activate the spot meter when I press it.
Incident metering, when it is possible. No matter what the subject is, the incoming light will be measured. So you won´t have problems with
Using the sun as a light source requires that you are in a position to take your photos at the right time of the day. If you cannot move the light source (such as the sun), you may need to consider returning at a different time of day. If you are somewhere in the morning and the light is not right, consider how it may look in the evening. You might be able to produce a photo with far more interesting backlighting. When shooting outdoors, use a lens hood and position yourself to minimise unwanted lens flare. Move around the scene and try to block the sun out with another object, such as a house or the leaves of a tree. Hiding the light source behind the subject can work when your subject is large and close enough to your camera. When the light source is higher, you may still get some flare. If you do not want this, You can shade the front of the lens with your left hand. The higher your subject the light source is, the less dramatic the backlighting effect will be.
Side lighting definition film
I rarely bracket exposures these days, due to the high cost of film it’s a good incentive to consider exposures carefully especially with film-hungry cameras such as my Fuji 6x9’s and 6x17.
All camera meters are based on reflective metering, and then photographers make adjustments based on the reading, so why switch to another method just because there isn’t a meter in the camera?
Exactly. I could cite the old classic of trying to photograph a bride and groom, white dress, dark suit etc, on a sunny day with a ttl or hand held reflected reading. Hardly seems worth it.
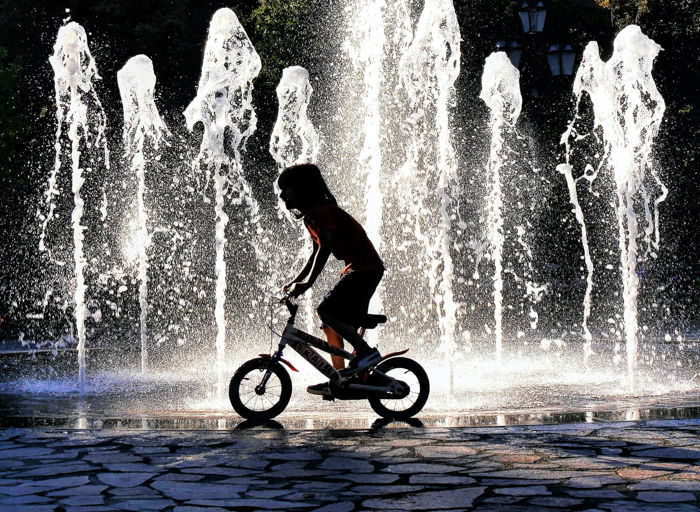
Sometimes you will want to expose your photo so the background is exposed correctly and your subject is underexposed. You can create silhouettes like this. If you have your camera set to evaluative metering, the camera will take the subject into account and meter the light accordingly. This may cause your background to be overexposed. It might vary on how much of the frame your subject takes up. Set the metering mode to spot metering. This will give the background more accurate exposure settings than using evaluative metering. When photographing directly towards the sun when it is at a low angle, your exposure can be affected. Make sure not to let the image blow out when facing the light source. Instead, you can use manual mode or exposure compensation to choose settings that result in a darker picture, thus highlighted sky.
Backlighting means that you compose your pictures so that the primary light source is behind your subject. This can add a unique atmosphere to your photos while emphasising the subject. Backlight works as a dramatic effect that adds contrast and separates the subject from the background. This technique is challenging to perform well. The light behind your subject has a strong influence on exposure. If you do not use the correct metering mode and settings, your subject will appear too dark and underexposed. With auto exposure settings, you will need to compensate for the strong light affecting your camera’s choice of exposure. In manual mode, you must choose appropriate exposure settings so your subject is well exposed and looks the way you want. At times you will want your subject to appear darkened, creating a silhouette effect. When you want your subject to be well exposed, you will need to ensure your camera meter reads the light reflecting off your subject only.
Backlightingexamples
Backlighting most often results in a composition that is not evenly exposed. If you want that a nice bell-shaped histogram, give it up now. It’s not going to happen in backlit photos. But this is not a bad thing. In fact, forgetting about technical perfection will let you capture some interesting effects using backlight.
All camera meters are based on reflective metering, and then photographers make adjustments based on the reading, so why switch to another method just because there isn’t a meter in the camera?
What isbacklight in photography
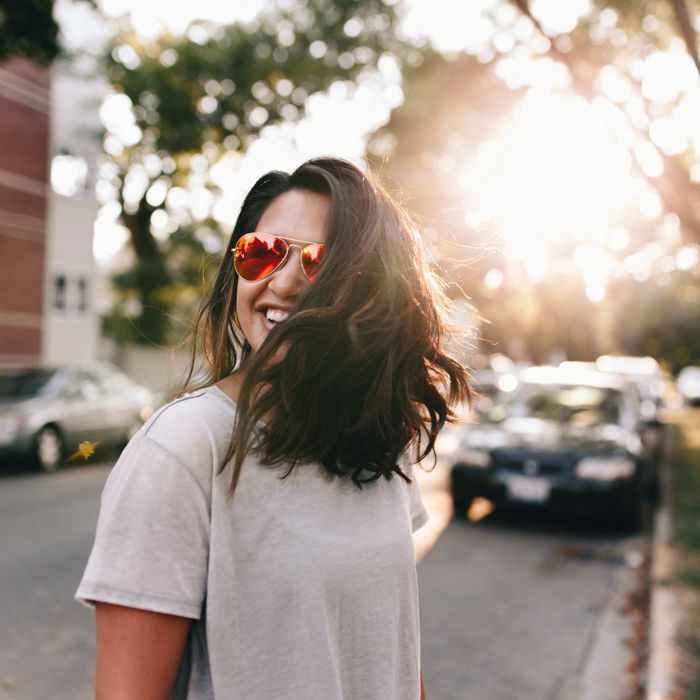
I almost always use spot metering for portraits, taking a reading from my subject’s face. This gives me the information to create a photo with the model’s skin tone exposed correctly. Typically, I will use a reflector to bounce light back into their face, so the contrast in the photo is not so high. Adding reflected light onto a subject will help bring balance. You can use a large reflector to expose the subject’s face to be like the exposure in the background.
ExpertPhotography is part of several affiliate sales networks. This means we may receive a commission if you purchase something by clicking on one of our links.
Editing any RAW image file is better than a JPEG. When you are taking a JPEG picture, the camera processes it for you. This does not happen with RAW format. RAW gives you all the image data, retaining higher quality during editing. This is especially important in the case of backlit photos, where you will adjust the exposure during post-processing. So, change the file format to RAW before working with backlight.
Most of the early on camera meter attachments like the MR or early Photomics offered a choice of both incident and reflective metering. That changed when Pentax put the meter in the body leaving reflective as the default choice. In camera meters evolved rapidly and began to offer many more modes than hand held meters. I never owned a M5 but many say the semi-spot was one of the best in camera meters.
All camera meters are based on reflective metering not because it's better, but because it's impossible for them to do it otherwise. With an incident meter you can easily do better, so why settle for a compromise just because cameras have to?
When Leica introduced the M6, its metering is quite good. I used it with a lot of Kodachrome and always had accurate exposures. Now I own a M4 and a M4-2 and found incident metering works best for a majority of subjects. I still use reflective metering occasionally but it’s nice to have a choice.
I prefer reflective simplified zone-readings. Measure the darkest area that should have full definition in the developed negative and correct it by -2 stops. Or pick any other area that you know should have a definite correction compared to middle grey if there is no important darkest area. Modern films tolerate overexposure very nicely, straight curves up to the top. But underexposed shaddows are still empty and no incident metering will tell you how dark a certain corner under a tree, where you want defintion and detail will be. Takes some time ro learn but for me the answer to the problem.
Incident is the simplest & easiest to use. Go to the subject (Or a substitute place.) Point the hemisphere at the lens (Or a substitute place.). Push the button. Read the exposure. Good exposures. Most of the time.
Examples ofbacklightingin film
You can also use your camera’s monitor to determine the exposure. Many cameras will show how the exposure will appear on the LCD screen in live view mode when set to manual mode. By paying careful attention to the light reflecting off a backlit subject, you can make exposure adjustments to obtain the look you want. You will see the effect of these changes in real-time on your camera’s LCD screen. You can try taking photos with the auto mode if you are unsure about using the spot meter or manual mode. When you have taken a photo of your backlit subject, check your LCD screen to see how it looks. If it is too dark, use the exposure compensation and dial in plus one or two compensation. Take another photo and review. Keep tweaking the compensation until you are happy with the way your subject looks. This method will be slower to use because of the need to take several photos and check each before making exposure adjustments. Initially, you are better off with an underexposed photo. Overexposure makes the image lose detail that will be harder to bring back than in the case of underexposure.
All camera meters are based on reflective metering, and then photographers make adjustments based on the reading, so why switch to another method just because there isn’t a meter in the camera?
Whyis backlightingused in films
backlight背光
Reflected is a little more complex. But not much more. Visualize or view the angle of coverage of the meter. Read the important part, or parts of the subject or scene. Adjust the reading as per Steve's good advice in Post #4, just above. Good exposures. Most of the time.
Backlighting in photography happens when the main light is behind your subject and facing the camera. Backlight photography can be challenging, especially if you are used to using the auto exposure modes on your camera. It’s easy to accidentally create an unpleasant exposure with a strong light behind your subject. This article will show you how to use backlighting for flattering portraits and how to create a correct exposure with it.
The first type of metering I was taught (as opposed to just matching the needle) was reflective metering as part of the Zone System. And since then I've never not thought reflective metering wasn't the most accurate metering, it allows you to place tones, and react to large changes in contrast levels, and gives you a firm basis of translating into the negative what you are aiming for. In essence reflective metering allows for having an opinion, so long as the consequences of an opinion are understood. It can often mean changing development times, or developers, but it's not as rigid as an incident light metering regimen best suited for slide film.
A correction for the typographical error: It is the MC meter (The predecessor to the MR) that has an incident cover for its selenium cell. It also has an incident cover for its meter booster cell.
Incident almost all the time, with one of my five Sekonic L-208 meters. The only time it does not work is on an overcast day when it tends to give an overexposure.
What isbacklight on TV
All camera meters are based on reflective metering not because it's better, but because it's impossible for them to do it otherwise. With an incident meter you can easily do better, so why settle for a compromise just because cameras have to?
I discovered incident metering about 1972 and it has given me better more consistent negatives than I ever saw using reflected light metering.
For portraits I almost always use incident metering, landscapes are dependent on the film and/or which camera I’m using. My usual method is to take a series of spot readings from the scene for an average and use my intuition from there.
Strong contrast in backlit photos can create drama. When you add another light source or reflector as a fill light, it brings balance to your exposure. When doing street photography, look for situations where backlit subjects have something reflecting light onto their faces. Without any reflection back into the subject’s face, their skin tone would be too dark. Controlling the light using a reflector can help you get better exposures when making portraits using an outdoor studio.
ExpertPhotography is a participant in the Amazon Services LLC Associates Program, an affiliate advertising program designed to provide a means for sites to earn advertising fees by advertising and linking to amazon.com.
Mostly yes, except when incident metering isn't possible, or when the subject is very high in contrast. I'll use a spotmeter in such cases. Otherwise the incident meter is king.
Backlighting in photography can produce many varied styles of pictures. A low light source, down and behind your subject, can cause a lens flare. This is great if it’s the effect you want, but keep in mind that a lens flare can also ruin a photo. To create an aesthetic lens flare, start moving around your subject. Watch how your camera position changes the way the light looks as it falls on your subject. When using backlighting in a studio and creating a lens flare, you can reposition the light source. Place it slightly behind and above your subject. This way, when your camera is pointing at the model, you will get a bit of lens flare coming from above. You can change the strength of this flare by adjusting the strength of the light. You can also cut some of the light out from the frame by changing the composition.


 Ms.Cici
 8618319014500