
Euromex - Bright field microscopes - bright-field microscopy
One of the key components of machine vision imaging is determining what kind of lighting is optimal for your set-up to achieve the best light-dark contrast; bright field lighting or dark field lighting. Bright field is the more commonly used lighting technique whereas dark field is advantageous when imaging things such as reflective surfaces and edge inspections. In this blog we will discuss the lighting requirements for Bright Field and Dark Field Illumination and their advantages and disadvantages in imaging.
Differential interference contrastmicroscopy
From small Dome flush mount lights that seamlessly blend in with their surroundings to large Dome flush mount ceiling lights that illuminate large spaces, we ...
The only answer I can give you why a darkfield image is preferred over a brightfield image: With a darkfield image you clearify the edges or structures of sampels, this method is used to detect or check non-uniformities like a defect or if a required structure is present. Like in the wikipedia site, they do this to see the edges of bloodcells, making them easy to count, check on “roundness”, or detect non-uniformities.
Darkfield microscopy is not a area where we at Adimec specialize in, and we focus mainly on the camera (so only a bit on lighting & lenses), so I can’t give much feedback on your question.
In short, bright-field microscopy is most likely the technique your high school science teacher used for their classes. Many modern, easy to access microscopes use this technique, but there’s a lot more to it than you might expect!
2024521 — Importance of PCB Inspection in Manufacturing · Solder Joint Defects: Poor solder joints can lead to intermittent connections or complete ...
Transmission electronmicroscopy
By using an iris diaphragm, the light source can be reduced or increased, adjusting the strength of the light. An iris diaphragm is much like the iris in a human eye; it is a thin, opaque circle with an opening (called an aperture), at the center. Its job is to stop light from passing through, except for the light that goes through the aperture. When a diaphragm is placed in the light path of a lens, the aperture regulates the amount of light that passes through.
An oil-immersion objective lens can decrease the blurring of a sample when magnification is increased. Oil-immersion is a technique in which both the objective lens and a glass—later placed on top of the sample specimen—are dipped in transparent oil.
Simplicity makes the bright-field technique popular, but it does have its limitations. The white background has a very low contrast to most biological samples. So, samples that are naturally colorless and transparent cannot be seen well. These samples must be stained, which entails adding a colored dye to the liquid in cells to increase contrast. This is an effective method, but staining may create incorrect details in the specimen.
The well known Photo Response Non-Uniformity, or PRNU, calibration is optimized to reduce the pixel-to-pixel variation independent of the shading caused by the camera lens. This calibration combined with bright field lighting allows for the optimization of bright field measurement. Often this calibration is used in conjunction with the Low Frequency Flat Field correction, which is a calibration that not only removes shading caused by the lens, but by using multiple live sets of calibrations it can correct for the shading of the different light sources. Thanks to camera sensitivity matching and these calibrations, the same lighting recipe can be used with each Adimec camera. They all will return the exact same measurement, independent of which camera you put in your machine.
Type of microscope
Caring eye doctors providing thorough eye exams. Modern optical offering latest trends in glasses and sunglasses. In Plano, TX.
Confocalmicroscopy
20241018 — Backlighting means that you compose your pictures so that the primary light source is behind your subject. This can add a unique atmosphere to ...
An oil-immersion objective lens can decrease the blurring of a sample when magnification is increased. Oil-immersion is a technique in which both the objective lens and the sample specimen are dipped in transparent oil. Immersion oil is like glass—it improves the resolution of the lens and the specimen.
The bright-field technique requires a strong light source for high magnification. This can produce heat and damage specimens, and can even kill living microorganisms.
Teledyne Adimec is an ISO 9001:2015 certified medium- sized company that designs and produces reliable industrial cameras in small batches to meet customer demands at global OEMs. We serve three strategic markets. – Machine Vision, Healthcare and Global Security.
Find the perfect LED light bar Vertical Bar Mount for your vehicle that holds your new light bar securely, provides the protection it deserves and lasts the ...
The second disadvantage is the limit of magnification. The practical limit is around 1300x. Higher magnification is possible, but it becomes difficult to keep the image clear. Because of this, images will be blurry and less detailed.
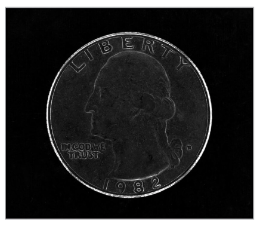
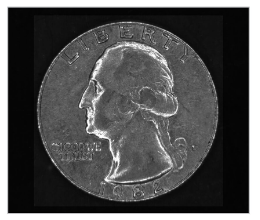
See below a comparison of images taken with Bright Field Illumination and images taken with Dark Field illumination to see the differences between the two lighting techniques:
Dark fieldscattering spectroscopy
Brandon is an enthusiast, hobbyist, and amateur in the world of microscopy. His love for science and all things microscopic moves him to share everything he knows about microscopy and microbiology.
There are an estimated one trillion species of microbes on earth with over 99.99% of the species yet to be discovered. Amongst the discovered species are parasitic worms called...
Bright field lighting is the method for imaging reflected light. That is, the light coming from the source is reflected into the camera so that small defects and edges which typically scatter light are not picked up by the camera. This creates a bright image, but areas with engravings, scratches, or indentations may not be as well defined. In addition, due to the reflection of light, reflective surfaces are difficult to image with this lighting set-up. The light source will be scattered less by the object’s surface and more light will be reflected back into the camera, causing a bright spot in the image, as seen below. To properly set up Bright Field Lighting, you want the light sources to be at an angle to the subject or imaging surface of 45 and 90 degrees. Typically positioning these light sources closer to the subject or surface is advantageous, as this helps cover a larger surface area and can help eliminate some of the issues seen with imaging reflective surfaces or edges.
Fortunately, many of these limitations can be altered, or fixed entirely, by adjusting the microscope’s equipment. Using sample-staining methods such as simple stains or differential stains, you can add contrast to hard-to-see samples without damaging the specimen. Or, using a colored (usually blue-tinted) lens on the light source can highlight samples that can’t be seen under white light.
Mar 8, 2013 — All so-called LED TVs are really just LCD TVs that use LEDs for their backlight. This backlight creates the light that allows the LCD to create an image.
However, Hooke had difficulty with the magnified image becoming blurry when more than two lenses were used. It wasn’t until the beginning of the 19th century when Joseph von Fraunhofer was able to produce powerful microscopes that kept the magnified image from blurring so much. In the mid 19th century, Ernst Abbe calculated optics for making lenses. Before his work, microscope lenses had been made with trial and error methods; now, they were more uniform. Check out this post if you are interested in learning more about the history of microscopes.
Stroboscopic, flickering with frequency, the rapid and repeated change of light over time is called stroboscopic, and the direct feeling is that the image is ...
Optical Services Company's Custom reticles (cross hairs) can be made with nearly any size dot desired. We offer a fine crosshair (.0002) and a medium crosshair ...
Adimec’s cameras are optimized to have the lowest read noise when they leave the factory. By supporting analog gain the read noise can even further be decreased. This optimization increases the measurement accuracy in the darkest parts of an image. The cameras are calibrated in Adimec’s factory by using a Dark Signal Non-Uniformity (DSNU) calibration. While they are calibrated in factory, these cameras can be re-calibrated in a system to optimize the image even further depending on the use case. This DSNU reduces pixel-to-pixel fixed pattern, which in turn increases the measurement accuracy
Dark field microscopy
Robert Hooke made the new science of microscopy more well-known amongst the public, with the help of instrument maker Christopher Cock. Cock made the microscopes, refining the creation process by combining a simple oil lamp with a glass flask filled with water that focuses light. Then he delivered the microscope to Hooke, who published a book about his observations. His drawings and diagrams—magnified to 50x—made the too-small-to-be-seen organisms that he observed more accessible for the wider public.
Anabaena is a genus of nitrogen-fixing cyanobacteria that exist as plankton. The blue-green algae are symbiotic in nature but produce neurotoxins, which are detrimental to plants, wildlife, and even...
An iris diaphragm is different from any other type of diaphragm because it is made of “leaves” that can constrict and dilate, just the same as the iris of an eye can grow and shrink to adjust the passage of light.
The idea of magnifying objects with glass lenses has been around since the early 16th century, but it wasn’t until the end of the century that the idea became reality. In 1609, Galileo Galilei converted one of his telescopes into a simple microscope, arguably by accident.
But the credit for the first compound microscope ever created belongs to the father and son spectacle makers, Hans and Zacharias Jannsen. In the very last decade of the century, the two of them positioned two glass lenses one in front of the other, creating a basic microscope capable of adjusting magnification between 3x and 9x.
Allied Lighting | Allied Lighting is known for expert lighting knowledge and commitment to excellent customer service.
Because of the simplicity of its setup, a bright-field microscope requires only basic equipment. Nothing beyond the normal light microscope components is required. The microscope is made of these basic parts:
However, this definition remains fluid as microscope lens makers are striving to make super apochromatic objective lenses that each have a single.
We are avid microscope enthusiasts and general explorers of all things tiny. There is a world out there that is all around us and microscopes give us the ability to see the invisible and learn some amazing things about this world and others. The goal for Microscope Clarity is to be the ultimate source for any information on microscopes and microbiology for fun or scientific inquiry.
Microscope Clarity is a participant in the Amazon Services LLC Associates Program, an affiliate advertising program designed to provide a means for sites to earn advertising fees by advertising and linking to Amazon.com.
Phase contrastmicroscopy
Hi Scott, let me introduce myself, Recently I’m doing research to build a Dark Field Microscopy that is able to observe an exosome. So, if you willing you can reply my question by emailing me. I want to ask about the light that we can use for darkfield microscope. Which do you recommend between using laser or light to apply it to the darkfield microscope and can you provide the potential candidate of the light source? . Second question is how we know the required intensity is needed for the dark field imaging system (if know do you know how to calculate it?). Third question do you know the reason why darkfield will achieve better resolution than brightfield? (if you know the calculation you can provide to me).
Lightfield microscopy
Bright-field microscopy is a very basic, popular technique in which the magnified image appears dark against a white background. Thus, the name: a bright field. It is fairly easy to magnify with bright-field microscopy, but it is a more limited technique compared to others.
These are the basics, but the microscope can be adapted with new technology, and optional equipment can be added. Once set up, it requires fewer adjustments to view specimens. Some specimens can even be seen without staining and the optics used in the bright-field technique doesn’t alter the color of specimens. Even living cells can be seen with little difficulty.
Whoever I looked into darkfield Microscopy, and there is a short animation of how it works on wikipedia (https://en.wikipedia.org/wiki/Dark-field_microscopy) To work with this method to check on exomes, I can imagine some wavelengths work better than others based on the type and size of the exome (so that specific light is scattered more and gives a better/sharper image results) I do not have any formulas to for you to work with, but note that a lot of factors are dependent on the setup you are using (lenses, wavelength, size and angle of darkfield patch stop, and distances from Lightsource-to sample- to camera, in addition to the sample properties (thickness, transparency etc).
Unlike in bright field lighting, where reflected light is imaged, dark field lighting only captures scattered light. By imaging only the scattered light, edges and surface defects become more prominent in the image as they are the things that best scatter light. To best set up a light source for this light scattering, a low angle of light (usually from ring lights) of around 10-15 degrees is ideal. This low angle allows for edges, defects, ridges, etc. to properly scatter the light while not having the surface of the target reflect too much light back to the camera. This technique can also be used to effectively inspect highly reflective or mirrored surfaces which you would otherwise be unable to inspect with bright field lighting.
Ultimately, these lighting techniques are used to help you achieve the key principle of machine vision illumination, which is to capture the correct light-dark contrast in the image. The techniques and principles for dark field and bright field illumination are there to assist you with properly setting up the best illumination for what you are imaging, and it is always advisable to test with a few different illumination set-ups. An inspection may in theory be best suited by bright field illumination, but you may discover that after testing the set-up, there could be a reflection that makes the inspection impossible, at which point understanding the lighting techniques for dark field illumination can assist you in eliminating this reflection.
In a bright-field microscope, light travels from the light source, down to the specimen, through the lens and eyepiece, then to the user’s eye. The light is transmitted through the specimen, making it appear dark against an illuminated white background.
Bright-field microscopy has become a convenient and readily available technology in our world today. However, it has gone through many changes to get to this point.


 Ms.Cici
 8618319014500