
LED Drivers | Advance - advanced led lights
Bright fieldmicroscope diagram
When shooting with the prime lens the background is less distracting thus drawing attention to the subject of your portrait.
Since unstained living cells absorb practically no light this results in extremely small differences in the intensity distribution in the image which are invisible to the human eye. However, using a special adapter (phase plate) which slows down the wavelength of light by ¼ (phase shift) results in the cell having different refractive index than its surroundings. In a phase contrast microscope, these phase shifts are converted into changes in amplitude, which then can be observed as differences in image contrast.
Brightfield microscopy is one of the simplest and most widely used observation method in optical microscopy, generally used with compound microscopes. In brightfield microscopy, illumination light positioned below or above the sample and it is transmitted through the sample and the contrast is generated by the absorption of light in dense areas of the specimen. A typical brightfield illumination image show dark sample with white background. With a conventional bright field microscope, light from a bright source is aimed toward a lens beneath the stage called the condenser, through the specimen, through an objective lens, and to the eye through a second magnifying lens, the ocular or eyepiece.
The advantage of using darkfield illumination is that unstained specimens can remain alive. The main limitation of dark-field microscopy is the low light levels seen in the final image. This means that the sample must be very strongly illuminated, which can cause damage to the sample. Dark-field microscopy techniques are almost entirely free of artifacts, due to the nature of the process.
Bright fieldmicroscope advantages
One of the advantages of brighfield microscopy is that not only stained but specimen without staining can also be viewed and the optics used in bright- field technique don’t alter the colour of the specimen. The limitations of brightfield microscopy include low contrast for weakly absorbing samples such as cellular or biological samples and low optical resolution due to the limitation of light's wavelength.
Phase contrast is by far the most frequently used method in biological light microscopy. It is an established microscopy technique in cell culture and live cell imaging. When using this inexpensive technique, living cells can be observed and analysed in their natural state without previous fixation or labelling. A typical phase contrast image has a neutral background and surrounding with varying contrast where light is altered by the specimen.
Widefield exposes whole specimens to light. Brightfield allows you to illuminate the sample from the bottom with white light, and observe the sample from the top.
Bright fieldmicroscope procedure
DIC is a polarization technique rendering contrast in transparent specimens. This method is a good alternative to bright field microscopy producing detailed images of thick unstained samples that often provide poorer images in brightfield. This method also creates pseudo-3D relief shading images making the technique ideal for electrophysiology experiments. The image appearance shows details about colour, optical path boundaries and refractive indices along with whether or not a specimen is isotropic and anisotropic.DIC uses polarized light and additional light-shearing prisms to convert phase delays into intensity changes (contrast). The effect is called differential, because contrast is created only in adjacent structures where differences in thickness and /or refractive indices is present.
To visualize the molecule of interest, fluorophore-coupled specific antibodies or fluorescent proteins, for example, are transferred into the cell. The specimen is then illuminated at the excitation wavelength and viewed through a filter that allows only the emitted wavelength to pass through. Whereas the background is dark, the structures with a bound fluorophore emit light, indicating the presence of the structure of interest. Widefield illumination means that the whole specimen in the field of view is exposed to the light therefore fluorescent signals from all focal planes are detected. Therefore, widefield microscopy is best applied with thin specimens with low background autofluorescence.
Hey buddy! Not so fast. When considering a lens we don’t just think about the focal length or the zoom range. The other consideration is speed. When we are talking lenses the aperture might be just as important as the zoom range or focal length. If you are shooting portraits you may be super interested in getting images with a creamy out of focus background (bokeh). Yea, that is what I want! For that, you are going to need a fast lens. Let me take a minute to explain how this works. The way to get that bokeh everyone keeps talking about is by narrowing the depth of field. Here is what we need to know about that. The larger the aperture (lower f-stop) that we can open our lens, the less the depth of field so we are heading in the right direction if we are trying to get nice bokeh. Let’s say you have a 24-120 zoom and it has an aperture of f4. You also have an 85mm f1.8 prime lens. Better yet let’s say you have an 85 f1.4 (You are innocent when you dream). You can set the 24-120to the 85mm focal length. However, your maximum wide open aperture with the zoom is f4. 85mm at f4 is not going to produce the bokeh we are looking for because at f4 we have too much depth of field. Now we switch lenses to the prime 85mm and we open the aperture to f1.4. Guess what? Super nice bokeh, that very creamy out of focus background that we are going for. If you have a 50mm f1.8 and compare the results you would get from using that at f1.8, you will get a nicer bokeh than you will with the 24-120 at f4. The 85mm f1.4 will give better results than the50mm f1.8 for two reasons. First, the 85mm f1.4 has the wider aperture and we already know that the lower f-stop gives less depth of field. Second, we also know that the longer the lens, the less depth of field at the same aperture. So at f1.8the 85mm has less depth of field than the 50mm. Now open the 85 to 1.4 and you are really in the bokeh business. Of course, when we are going for a nice out-of-focus background the other thing to consider is your distance to your subject and the distance of your subject to the background. This all plays into the final results.
Darkfieldmicroscopy
Prime lenses are identified by their fixed focal length. There are many, many lengths available but just for some examples 14mm, 24mm, 50mm, 85mm,300mm, and 500mm or longer. When using a prime lens you look in your camera and what you see is what you get. There is no zooming so if you need to get closer you start walking closer. If you want a wider angle you walk in the other direction. When using a prime lens you zoom with your feet. So it sounds like a zoom lens is the way to go, right?

Bright fieldmicroscopy
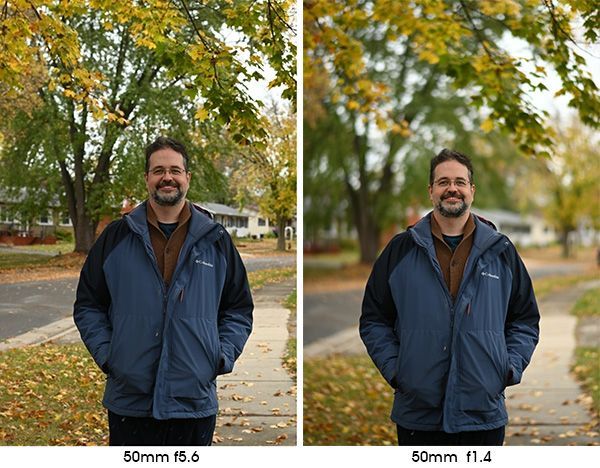
Here are two pictures shot with a 50mm f1.4 lens and you can see the effect that the aperture has on the depth of field.
Bright fieldmicroscope image
If you get closer to your subject you might be able to have the background completely out of focus forcing the viewer to concentrate only on your main subject.
There is a wide price range in prime lenses. Depending on what make of camera you have you could get started with a 50mm f1.8 in the $130.00 to $200.00 price range. Even the 85mm f1.8 lenses are not super expensive. When you start looking at the faster f1.4 50 and 85mm lenses the price can go up pretty fast. But starting with a 50mm f1.8 is a great idea for just about everyone. They are quite small and light and will be very useful for low light photos like a kid's birthday party! I will go so far as to say that it might be one of the best and most handy investments you can add to your camera bag.The pictures below were shot with an 80mm lens.
Widefield fluorescence microscopy is an optical microscopy technique that utilizes fluorescence, which is induced using fluorophores, as opposed to absorption, scatter, or reflection. This method is mainly applied for the detection of specific structures, molecules or proteins within the cell. Fluorescence microscope systems can range from very simple, such as an epifluorescent microscope, to extremely complex, such as confocal or multiphoton systems. Whether simple or complex, fluorescence microscopes share the same basic concept: excitation energy is used to illuminate a sample containing your fluorophore which then emits lower energy (longer wavelength) light, that, although weak, is quantifiable. The excitation and emission wavelengths do not share the same centre wavelength, and this allows specialized optical filters to increase overall contrast and signal. The three critical filters needed for a fluorescence microscope are the excitation, dichroic, and emission filters which in simple terms separate the excitation and emission wavelengths.
Zoom lenses are identified by their range of focal lengths. 14-24,24-70, 70-200, 150-600 and so on. There are zoom lenses that have a very wide range of focal lengths like 18-400. In the case of the 18-400 for example by zooming the lens from 18mm to 400mm you can get anything from a wide-angle to a long telephoto shot without you having to move forward or backward. At 18mm you can get a picture of the whole team while standing right in front of them on the sideline. Zoom the lens to 400mmand now you can get the shot of a single player that is out on the field. All without having to walk closer or backing up.
Dark field illumination is a technique in optical microscopy that eliminates scattered light from the sample image. To view a specimen in dark field, an opaque disc is placed underneath the condenser lens, only allowing light to be transmitted around the edges of the condenser, effectively illuminating the sample obliquely. Only light that is scattered by objects on the slide can reach the eye and all transmitted light will be omitted. Instead of coming up through the specimen, the light is reflected by particles on the slide. This yields an image with a dark background around the specimen and is essentially the complete opposite of the brightfield illumination technique. The primary imaging goal of the darkfield illumination technique is to enhance the contrast of an unstained sample.
There are some pretty fast zooms available like 70-200 f2.8and those are great for wildlife and sports but if we set it at 50mm or 85mm we are still stuck at f2.8 and the 50 1.8 or 85 1.4 will still beat it at bokeh.


 Ms.Cici
 8618319014500