
Interior Utility & Dome Lights - Vehicle Lighting - dome light
Documentary photography examples
One of my friends once had the mirror of his DSLR break in extremely cold weather – not a problem with mirrorless cameras, of course.
As you would expect, there are differences between photos taken with a large aperture versus photos taken with a small aperture. Aperture size has a direct impact on the brightness of a photograph, with larger apertures letting in more light into the camera compared to smaller ones. However, that isn’t the only thing that aperture affects.
On Photography Life, you already get world-class articles with no advertising every day for free. As a Member, you'll get even more:
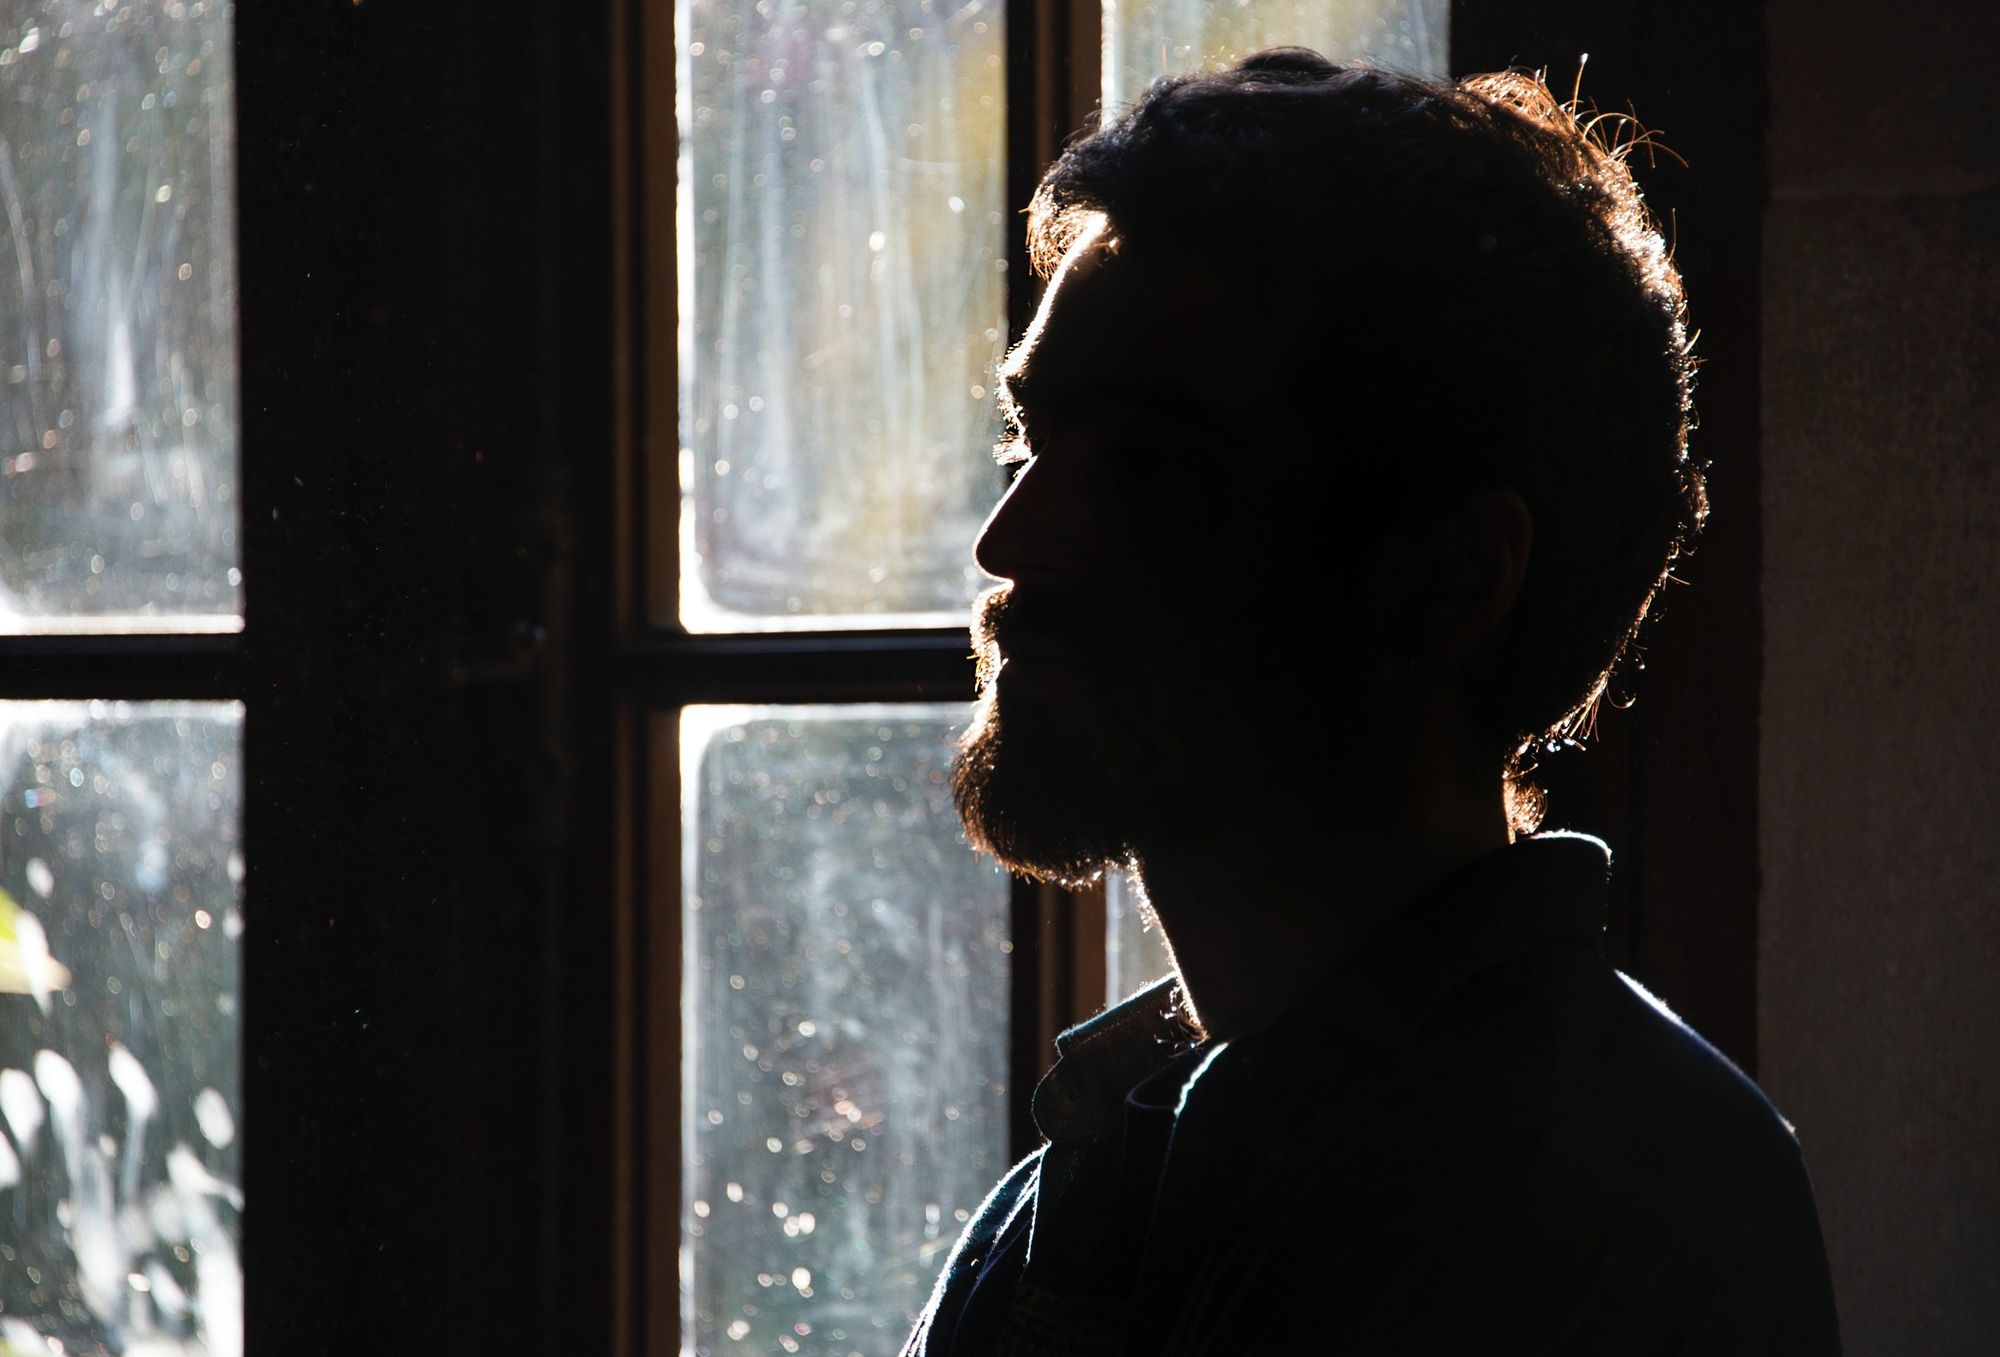
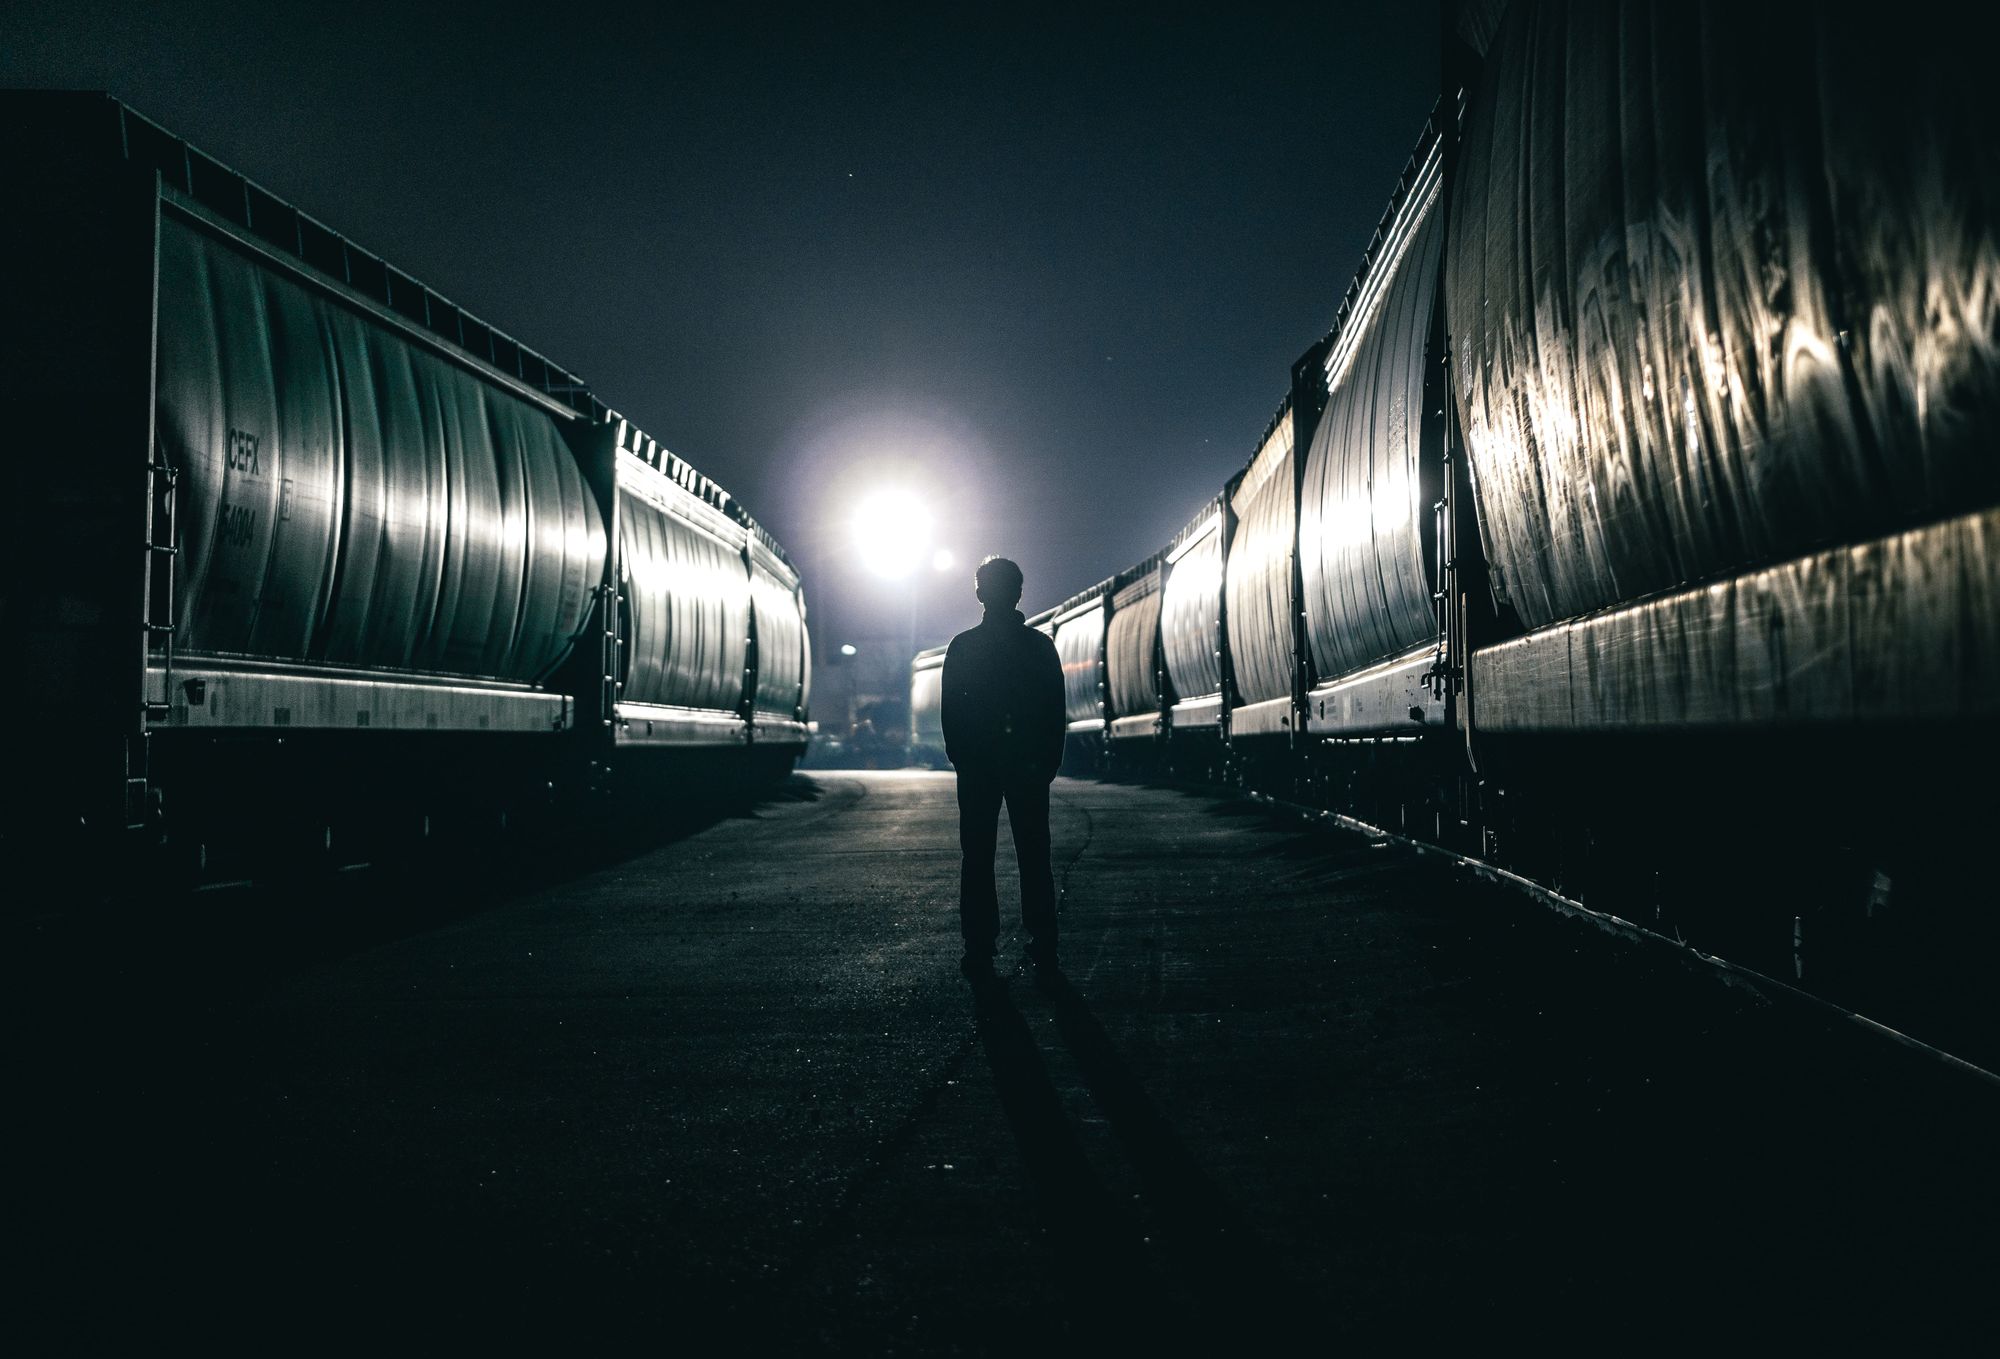
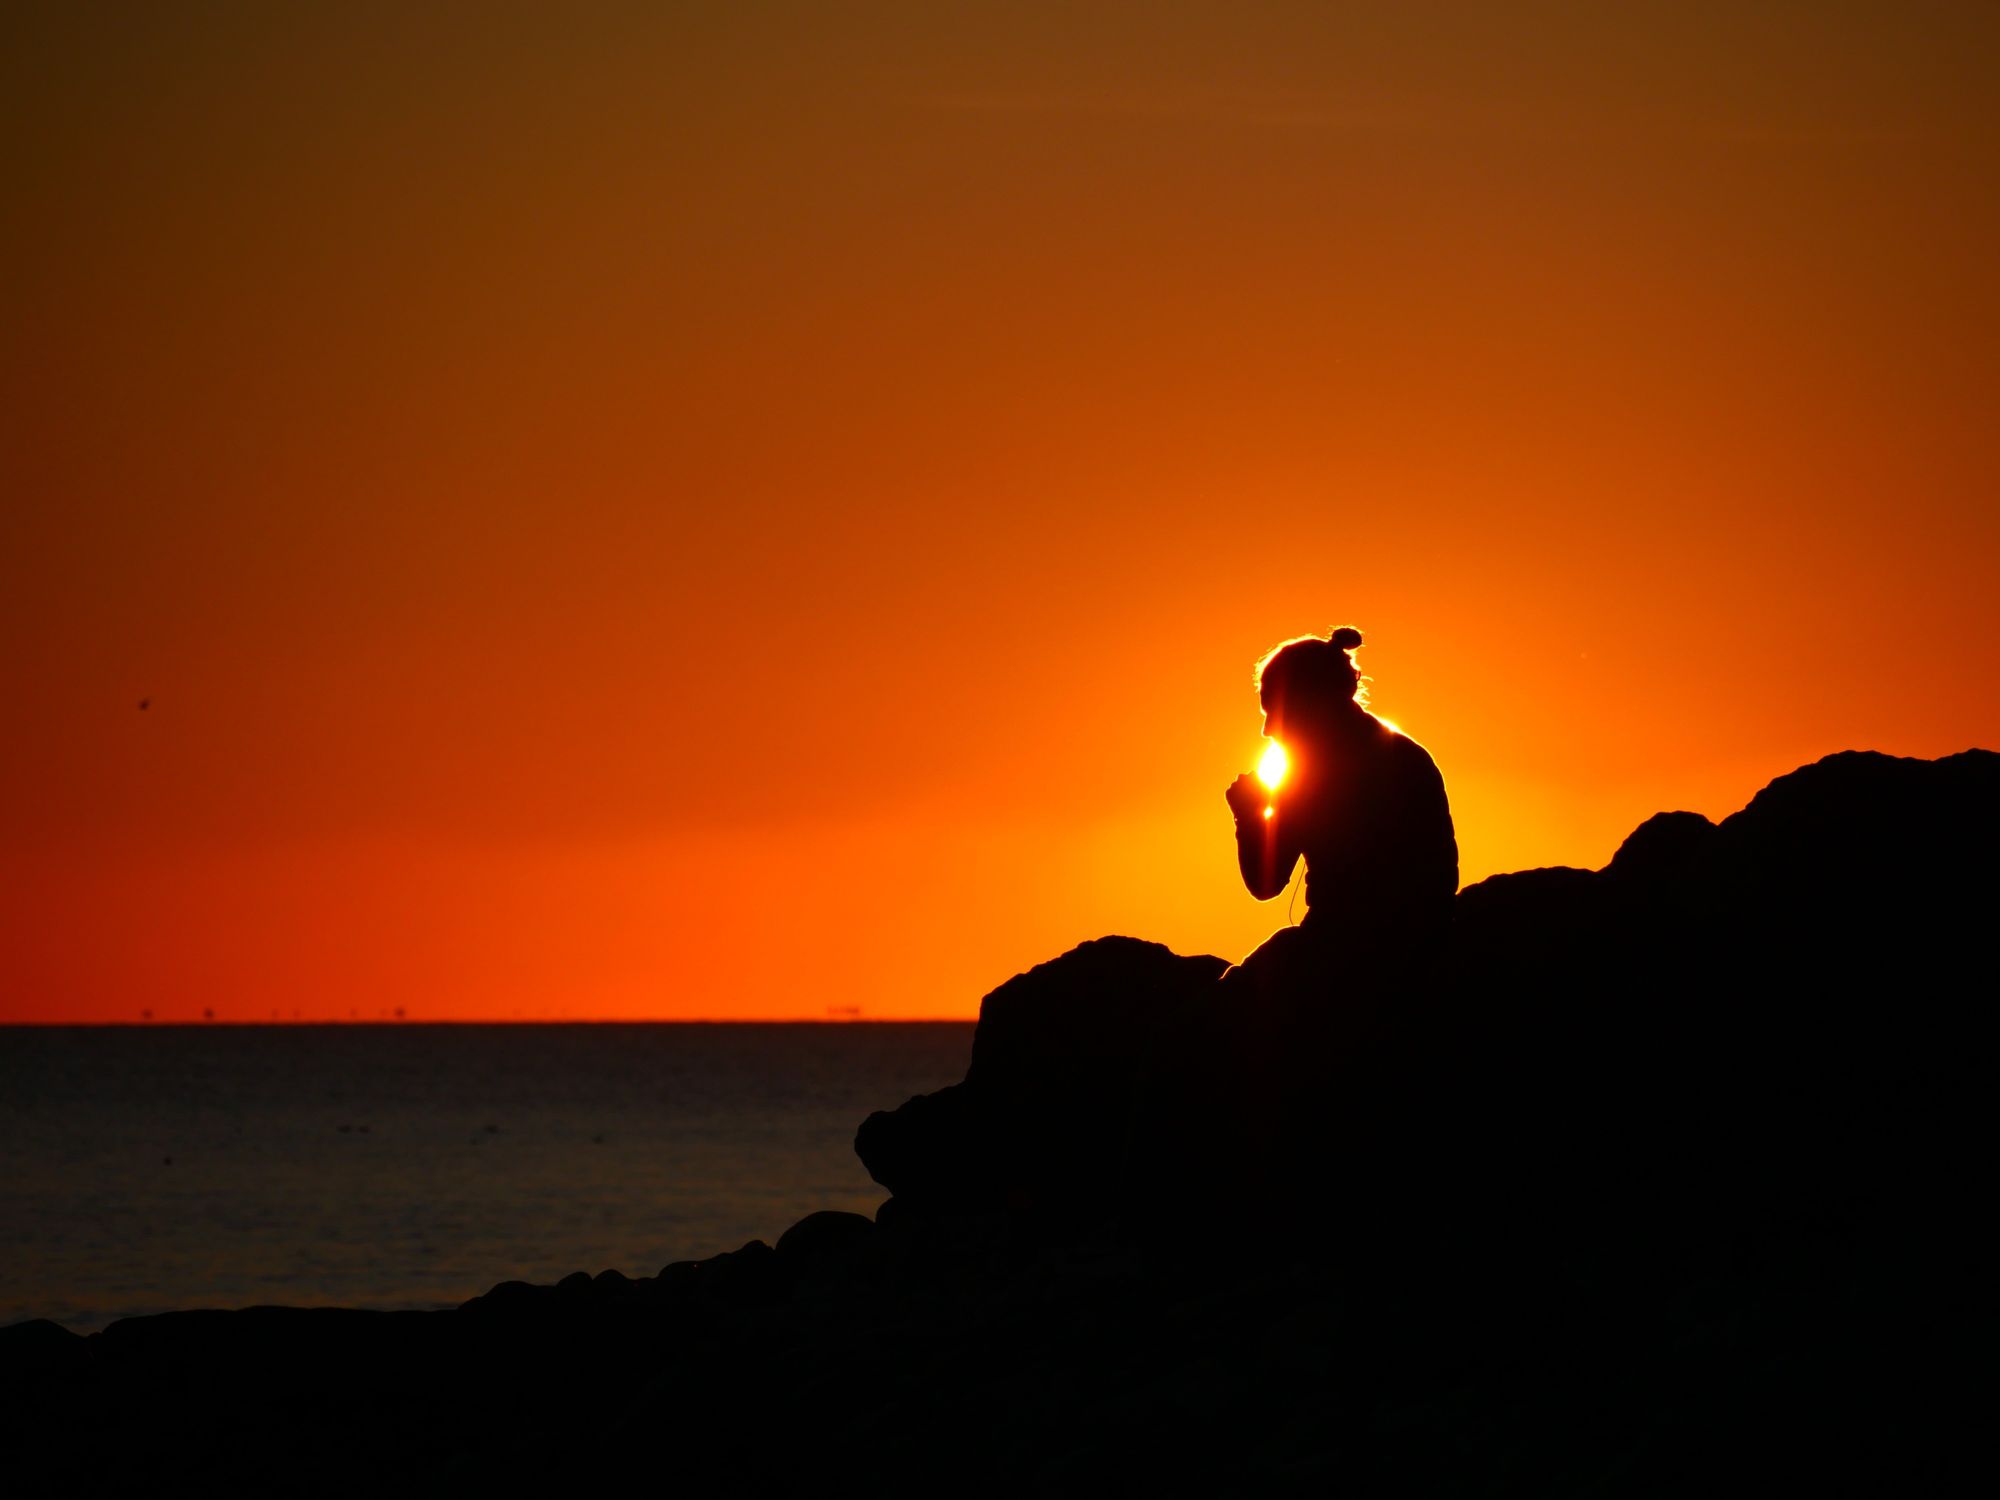
As the name suggests, a backlight hits the subject from behind. The angle of backlighting can vary, but it is usually placed from a slightly higher place. This way, we create a glowing effect on the edges of surfaces (particularly on curved ones such as the human body) and separate our object from the background, giving the shot more shape and depth (and even drama).
If someone tells you to use a large aperture, they’re recommending an f-stop like f/1.4, f/2, or f/2.8. If someone tells you to use a small aperture, they’re recommending an f-stop like f/8, f/11, or f/16.
Photographers generally don’t care as much about the smallest or “minimum” aperture that the lens allows, which is why manufacturers don’t put that information in the name of the lens. However, if it matters to you, you will always be able to find this specification on the manufacturer’s website. A lens’s smallest aperture is typically something like f/16, f/22, or f/32.
The backlight is the third and final light of your three-point setup. At this point, you have two lights standing in front of your subject, which can make it flat and lose dimensionality. To counterpose of this effect, you place a low-intensity light behind it - the backlight. This way, you will get more depth and the cinematic feel you've been trying to achieve.
The second page of our aperture article dives into every single effect of aperture in your photos. It includes things like diffraction, sunstars, lens aberrations, and so on. However, as important as all that is, it’s not what you really need to know – especially at first.
Adjusting your aperture is one of the best tools you have to capture the right images. You can adjust it by entering your camera’s aperture-priority mode or manual mode, both of which give you free rein to pick whatever aperture you like. That is why I only ever shoot in aperture-priority or manual modes!
Below are some examples of photographs captured at different f-stops from f/2.8 to f/16, to give you an idea of how they are used in the field:
Remember, your work is flat. Whether displayed in a movie theatre or on an old kitchen TV, your shots are depthless. Film backlight will help you transform a boring flat shot into a frame that feels three-dimensional and much more realistic.
Instead, just know that the two biggest reasons to adjust your aperture are to change brightness (exposure) and depth of field. Learn those first. They have the most obvious impact on your images, and you can always read about the more minor effects later.
Fill lightexample
This is very interesting! As you can see, in the f/4 photo, only a thin slice of the lizard’s head appears sharp. The background of the photo is very blurry. This is known as depth of field.
The key light is used as your primary lighting point and the brightest of the three. It is placed in front of your subject at an angle. For a cinematic effect, this light usually illuminates the front section of your object, facing away from the camera.
Typically, the “maximum” aperture of a lens, which is also often referred to as “wide-open” aperture, will be something like f/1.4, f/1.8, f/2, f/2.8, f/3.5, f/4, or f/5.6.
Consider backlighting a tango dance between the subject and the background. When and how to use it all depends on what type of dynamic you want between those two.
You can think of an aperture of f/8 as the fraction 1/8 (one-eighth). An aperture of f/2 is equivalent to 1/2 (one-half). An aperture of f/16 is 1/16 (one-sixteenth). And so on.
Moreover, as a filmmaker, you want to command the viewer. You want to guide their attention and make sure they are looking exactly where you want them to.
If you have a 50mm f/1.4 lens, the largest aperture you can use is f/1.4. Professional constant aperture zoom lenses like a 24-70mm f/2.8 will have f/2.8 as their maximum aperture at every focal length. Whereas cheaper consumer-grade lenses such as 18-55mm f/3.5-5.6 will have their maximum aperture change depending on focal length. At 18mm, the maximum is at f/3.5, while at 55mm, it changes to f/5.6. In between is a gradual shift from one to the other.
Perhaps your video just looks boring for some reason you can't explain. It lacks intensity or suspense - try playing around with a blacklight.
Likely, you are first going to try out a blacklight within a three-point lighting setup context, so let us go back for a second.
Since people care so much about maximum aperture, camera manufacturers decided to include that number in the name of the lens. For example, one of my favorite lenses is the Nikon 20mm f/1.8G. The largest aperture it offers is f/1.8.
Thank you so much for explaining this topic in a way I finally understand ! I have just started photography using a Nikon d3200 with 70-300mm lens primarily for wildlife .. I wish I had read this article before I started !
Luckily, you have the building blocks. Aperture and f-stop aren’t complicated topics, but they can seem a bit counterintuitive for photographers who are just starting out. Hopefully, this article clarified some of the confusion, and you now have a better understanding of the fundamentals of aperture.
On the flip side, you should be able to see why landscape photographers prefer using f-stops like f/8, f/11, or f/16. If you want your entire photo sharp out to the horizon, this is what you should use.
If you're looking for more, download our deep dive guide into the tech specs, film lighting techniques, and everything film lighting in one place.
Usually, the sharpest f-stop on a lens will occur somewhere in the middle of this range — f/4, f/5.6, or f/8. However, sharpness isn’t as important as things like depth of field, so don’t be afraid to set other values when you need them. There’s a reason why your lens has so many possible aperture settings.
One safe way of making sure you get it right is to give it a go during the golden hours of daylight. Roughly an hour after sunrise and an hour before sunset, the sunlight turns soft and golden, and it works wonderfully as a backlight. Your subjects will be outlined with a "halo" effect, and your shots will look magical.
These are the main aperture “stops,” but most cameras and lenses today let you set some values in between, such as f/1.8 or f/3.5.
Several aspects contribute for a movie scene to look breathtaking and intense, some of which you may already have applied to your filmmaking game, such as a good quality camera, smart framing, Lion King's soundtrack, etc. Despite all these efforts, you probably find yourself unable to achieve the cinematic feel that Hollywood delivers.
Although backlight is one of the main elements of the "three-point lighting setup", a good filmmaker must understand it individually, as it's a great technique by itself.
This is a cool concept. It also makes it easy to visualize why an aperture of f/4 would be larger than an aperture of f/16. Physically, at f/4, your aperture blades are open much wider, as shown below:
A lot of photographers ask me an interesting question: What does the “f” stand for in f-stop, or in the name of aperture (like f/8)?
For instance, if your subjects look like cardboard cut-outs, definitely get a backlight. One other way is to ask a friend to take a look at your frames - is it not clear for your friend where or at who they are supposed to be looking at?
If you're looking for more, download our deep dive guide into the tech specs, film lighting techniques, and everything film lighting in one place.
These blades form a small hole, almost circular in shape — your aperture. They also can open and close, changing the size of the aperture.
Usually, you start by placing the key light and the fill light in front of the subject on opposite sides. A backlight is the third light you position for your video lighting setup. Generally, you place it on the same side as the key light and then move it behind the subject until you get the result you are looking for.
The other more important impact is depth of field – the amount of your photo that appears to be sharp from front to back. For example, the two illustrations below have different depths of field, depending on the size of aperture:
Take a look inside your camera lens. If you shine a light at the proper angle, you’ll see something that looks like this:
As we have previously defined, aperture is basically a hole in your camera’s lens that lets light pass through. It’s not a particularly complicated topic, but it helps to have a good mental concept of aperture blades in the first place.
Why is large maximum aperture in a lens so important? Because a lens with a larger maximum aperture lets more light into the camera. For example, a lens with a maximum aperture of f/2.8 lets in twice as much light when compared to a lens with a maximum aperture of f/4.0. This difference could be a big deal when shooting in low-light conditions.
Or, if you already got that covered, get your hands in your lighting setup. Rent or subscribe to your needed lighting equipment.
This is why portrait photographers love f-stops like f/1.4, f/2, or f/2.8. They give you a pleasant “shallow focus” effect, where only a thin slice of your subject is sharp (such as your subject’s eyes). You can see how that looks here:
Hopefully, you know how fractions work. 1/2 cup of sugar is much more than 1/16 cup of sugar. A 1/4 pound burger is larger than a 1/10 pound slider.
Side lighting examples
We will give you a hint: it's not Leonardo DiCaprio. In fact, a video of you pouring coffee can look as breathtaking as Interstellar.
As with every light, there are no straight-up formulas on when and how to apply them. However, there are some typical situations in which a backlight can undoubtedly elevate your frame.
VERY helpful article for this novice. As you are in Colorado, perhaps you can help on this topic: I’m going on a northern lights tour in a few weeks, and am considering getting a camera better than my iPhone. I’ve read many articles recommending various cameras (Sony a6000 keeps coming up), but then when looking at specs, most [affordable in my budget] cameras state an operating temperature only down to 32f. I’ll be in Norway with tens in the teens and 20’s. Are the manufacturer specs to be taken seriously for real-world use? Would I ruin a camera using it in temps 20 degrees cooler than its rating?
Backlightingphotography
Thanks for the explanation. As a newbie I could not figure out why the aperture number increased in value even though the opening decreased. Knowing now that the value is actually a fraction has eliminated the confusion.
By that same logic, an aperture of f/2 is much larger than an aperture of f/16. If you ever read an article online that ignores this simple fact, you’ll be very confused.
Backlighting isn't the only essential lighting technique you need to be familiar with when it comes to how you can capture that perfect shot.
You might have seen this in your camera before. On your camera’s LCD screen or viewfinder, the f-stop looks like this: f/2.8, f/4, f/5.6, f/8, f/11, and so on. Sometimes, it will be shown without a slash in between like f2.8, or with a capital “F” letter in the front like F2.8, which means the exact same thing as f/2.8. These are just examples of different f-stops, and you might come across much smaller numbers like f/1.2 or much larger ones like f/64.
Front lighting examples
I'm Spencer Cox, a landscape photographer based in Colorado. I started writing for Photography Life a decade ago, and now I run the website in collaboration with Nasim. I've used nearly every digital camera system under the sun, but for my personal work, I love the slow-paced nature of large format film. You can see more at my personal website and my not-exactly-active Instagram page.
I always find that it’s easiest to understand depth of field by looking at photos, such as the comparison below. In this case, I used a relatively large aperture of f/4 for the photo on the left, and an incredibly small aperture of f/32 for the photo on the right. The differences should be obvious:
You can think of depth of field as a glass window pane that intersects with your subject. Any part of your photo that intersects with the window glass will be sharp. The thickness of the glass changes depending upon your aperture. At something like f/4, the glass is relatively thin. At something like f/32, the glass is very thick. Also, depth of field falls off gradually rather than dropping sharply, so the window glass analogy is definitely a simplification.
As the name suggests, this light is meant to fill in the missing light for your video. The key light is placed facing your subject but on the opposite side and is far less intense.
You already know the answer to this question, because aperture is a fraction. Clearly, 1/8 is larger than 1/22. So, f/8 is the larger aperture.
For example, you don't want people to be distracted with the waitress while filming a dinner party (unless the waiter is Tom Cruise in disguise, but that's a whole different situation).
For example, say that you have an 80-200mm f/2.8 lens fully zoomed out to 80mm. If your f-stop is set to f/4, the diameter of the aperture blades in your lens will look exactly 20 millimeters across (80mm / 4), whereas at f/16, the diameter will be reduced to mere 5 millimeters (80mm / 16).
As a beginner photographer, you might have heard of such terms as f-stop or f-number and wondered what they actually mean. In this article, we will dive into these in detail and talk about how to use them for your photography.
Unfortunately, you can’t just set any f-stop value that you want. At some point, the aperture blades in your lens won’t be able to close any smaller, or they won’t be able to open any wider.
Commonly, to produce a natural-looking scene, artists use the "three-point lighting setup". This setup includes three lights (shocking): the key light. the fill light, and the backlight. Each illuminates a separate dimension of the subject, which results in a realistic representation of height, width, and depth. They differ in their position and intensity.
Why is your aperture written like that? What does something like “f/8” even mean? Actually, this is one of the most important parts about aperture: it’s written as a fraction.
The f-stop, which is also known as the f-number, is the ratio of the lens focal length to the diameter of the entrance pupil. If you did not understand that, don’t worry, because there is a much easier explanation of it for beginners. In very simple language, f-stop is the number that your camera shows you when you change the size of the lens aperture.
PL provides various digital photography news, reviews, articles, tips, tutorials and guides to photographers of all levels
Remember, for natural-looking scenes; you want your backlight to be diffuse. Meaning that if you place your subject between you and a bright ball of fire, it's unlikely that you will get smooth results. Still, it isn't ideal for it to be too low either, as you risk getting bursts of sunshine directly into the lens. Let us go for a middle term: this technique works best when the sun is at a 45-degree angle.
Of course, putting everything into practice is another matter. Even if this entire article makes sense for now, you’ll still need to take hundreds of photos in the field, if not thousands, before these concepts become completely intuitive.
Quite simply, the “f” stands for “focal length”. When you substitute focal length into the fraction, you’re solving for the diameter of the aperture blades in your lens. (Or, more accurately, the diameter that the blades appear to be when you look through the front of the lens).
Not a fan of artificial light? The sun has got your back (well, your subjects' back). You can work with the sun to produce beautiful backlit frames with little effort and zero electricity.
Examplesof backlightingin film
However, this technique is not only used to fix conditions or elevate your shoot. Film blacklight can be the protagonist in your creation, for instance, to generate alluring silhouette compositions, or produce beautiful images with translucent objects (just as water and smoke).
That’s a great question. I constantly use my cameras in colder weather than 32F, no matter what they’re rated for. Even sub-zero temperatures (still talking Fahrenheit) don’t concern me, although I don’t think the camera warranty would still apply if something did go wrong in those temperatures.
Sarah is a digital marketing content specialist who enjoys telling unique stories that captivate audiences. She loves going a few rounds in a boxing ring just as much as picking up a great book.
That is an important concept! Often, you’ll hear other photographers talking about large versus small apertures. They will tell you to “stop down” (close) or “open up” (widen) the aperture blades for a particular photo.
A lot of photographers really care about the maximum aperture that their lenses offer. Sometimes, they’ll pay hundreds of extra dollars just to buy a lens with a maximum aperture of f/2.8 rather than f/4, or f/1.4 rather than f/1.8.


 Ms.Cici
 8618319014500