
QACE - my evidence
The short version of how to replace your Oculus Quest 2 controller batteries is this: Remove the battery cover on your Quest controller. It’s on the grip of it on the side that doesn’t have the grip button. Then take out the old battery, dispose of it or recharge it, and replace it with a replacement battery before slipping the battery compartment cover back on. For a longer explanation with details and pictures, keep reading this article.
If you have fragile nails or simply don’t want to use them to remove the battery, get a thin tool like a pair of tweezers or thin spatula. You’ll either need to use that or one of your fingernails to remove the battery from the compartment.
ReplacebatteryinOculusQuest 2 headset
That said, finding the battery when it's time to change it out might have some gamers scratching their heads. The engineers who designed the Oculus controllers wanted them to feel smooth and seamless, so there isn't an obvious clasp or anything like that to indicate where the user needs to open it up when it comes time to change out the battery. The process is pretty simple when you know how though.
OculusQuestcontroller batteryreplacement
To remove the battery wedge one of your nails between the top of the battery on the positive end (or a thin tool that can fit in the gap). Then press down on the battery so that the top part of it comes away from the inside of the compartment. This will give you room to pull the battery towards you and out of the controller.
Best batteries forOculusQuest 2 controllers
Now that the battery compartment is empty get your new battery and determine the positive and negative ends. The positive end will have a little nub on top, there should also be + and - signs on each side that show which end is positive and negative.
OculusQuest 2batteryreplacement cost
When the battery level of your Oculus Quest 2 controllers gets low you’ll need to change the batteries. If you want to know the best way to change your Oculus Quest 2 controller batteries and replace them, then here’s how. After all, you can’t enjoy Virtual Reality with no Oculus Controller battery power.
Using AAs allows the gamer to choose between disposable and rechargeable options while also freeing them up to swap out dead batteries in an instant rather than having a game session ruined when one of the controllers goes dead in the middle of a round of "Beat Saber." It's also one of the many ways that Meta keeps production costs low which has allowed the Quest 2 to remain one of the cheaper performance VR headsets on the market even after its unwelcome price hike in 2022.

If you’re still experiencing power issues with your Oculus Quest controllers like the battery percentage not updating, or the controllers still showing as being low power even with new batteries, then you should contact the Meta support team and possibly get replacement controllers.
First locate where the cover is. That will be on the outer side of the grip of the controller, the side that does not have the grip button and is completely smooth. If you haven’t removed the stickers indicating which hand to hold the controller in, that will be the side with the “L” or “R” sticker.
Once you’ve located the cover, hold the controller in both hands and gently press your thumbs down in the center of the compartment. Then push the cover out towards the bottom of the controller. The goal here is to push the cover slightly inwards and outwards, unlatching it and also moving it away so that you can place in your new AA battery. This can be a little tricky your first few times doing it, and new quest controllers can be a little more stiff and difficult, but keep at it and you’ll get it.
How to openOculusQuest 2controller battery
Hey VR gamers and Metro lovers. Here's a few ways you can increase your success and enjoyment of Metro Awakening aka Metro VR aka finally another quality Virtual Reality shooter that isn't another sandbox or procedurally generated roguelike.
There have been several iterations of the Oculus, (now Meta) controller, and most of them run on AA batteries. This might seem like a primitive power source in this day in age, but it's designed that way for the user's convenience. Rechargeable controllers with built-in batteries are great for most consoles since you can simply play with them plugged in when they run out of juice. But tethering VR controllers to a power outlet can cause all sorts of problems.
How tochangeMeta Quest 3controller battery
Once you’ve got your batteries it’s time to open the battery covers on the Quest 2 controllers so that you can remove the old AA batteries and replace them with new ones. Since there’s no latch or indentation in the controller it’s not immediately obvious how to do this, so we’ll go through it step by step.
Unlike the Quest 2 headset itself or the Meta Quest Pro controllers, the Quest 2 touch controllers don’t have an internal battery or integrated battery that can be charged with a usb-c cable. Hopefully a built-in rechargeable battery will be included in future Quest models.
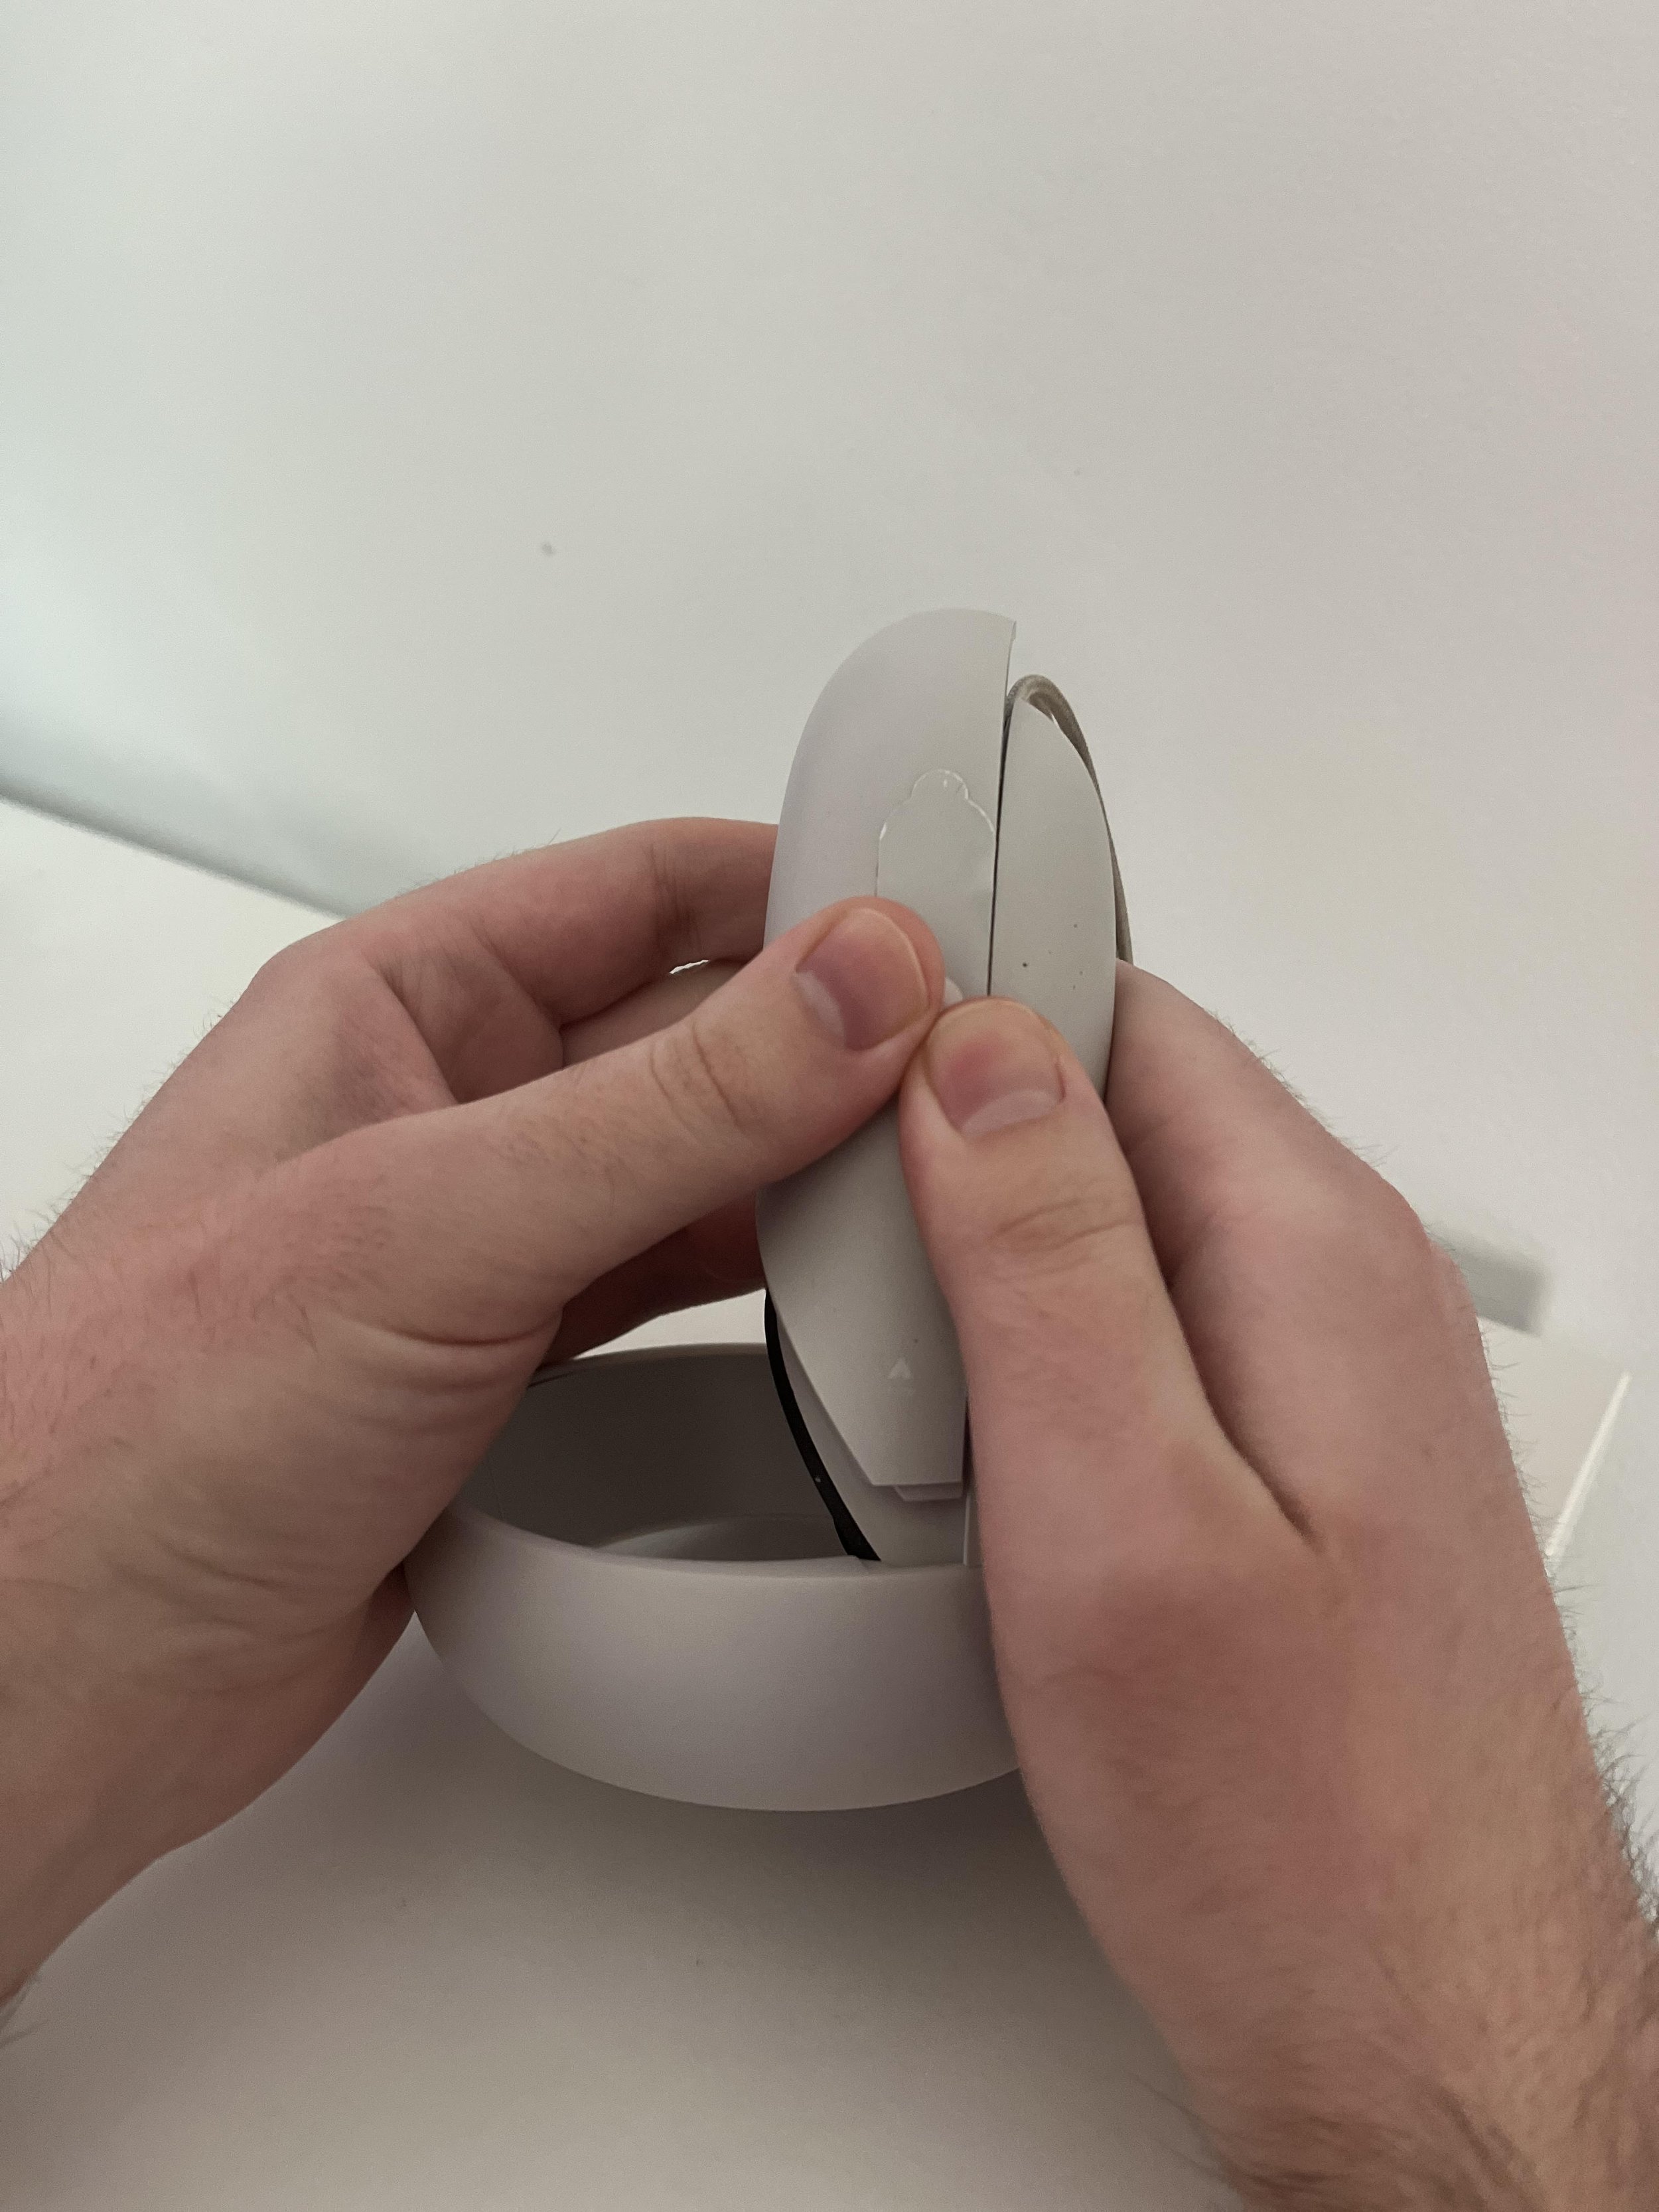
If you look closely at one of the Oculus controllers, you should see a seam separating the plastic panels on the grip. One of these panels is permanently fixed to the controller while the other is magnetically held in place. Place your thumb at the top of the panel opposite the triggers, just below the face where most of the buttons are located. Now apply pressure toward the bottom of the controller to break the magnetic hold and slide the panel out of place. You should now be able to see the battery inside.
At the top of the battery compartment cover you’ll also see a little downwards arrow indented into the plastic, right below the ring at the top of the controller. This small eject icon shows you the direction to push to unlatch the battery cover. It can be hard to see, but easier to feel with one of your fingers.
Remove the battery and replace it with a new AA, making sure that the positive side of the new battery is facing the bottom of the controller. If you haven't already, this is a good opportunity to swap out any disposable batteries for some quality rechargeable ones. In addition to being more environmentally friendly, they're also much more cost-effective in the long run.
How to openOculus controller battery
There are a ton of fantastic weapons to find and use in Metro Awakening: VR, and they’re pretty unique as far as Virtual Reality shooter weapons go. Despite Metro VR having about a fifth as many weapon options as any flatscreen Metro title, there are still some very fun guns and other gadgets to use in the game.
Once the new battery is inside, push the battery cover back down over the compartment. When you start up your Meta Quest 2 again, you will see the battery life percentage of your controllers update to reflect the charge of the new battery. It is recommended that you change the batteries of both controllers at the same time.
If you use your Oculus Quest 2 a lot then you might want to consider getting some rechargeable AA batteries that come with battery chargers, so that you won’t have to throw away old disposable batteries and constantly have to buy more. It’s a good idea to keep your controller battery life from ruining your best Quest 2 experience.
Grab a single AA battery, making sure the positive end is up, and slip the negative end into the bottom of the compartment (when the grip is pointed upwards as in these pictures). You can push down on the battery so that you have room to slip in the positive end facing upwards. If you’re still confused on which way the ends should go, there is a little diagram inside of the battery compartment which shows which way the positive end of the battery should go.
First you’ll want to grab a couple of single AA batteries. The Meta Quest 2 controllers take alkaline batteries, disposable or rechargeable. Luckily the alkaline battery is the kind most commonly used in all sorts of appliances, and is what you’d call a typical AA battery.
OculusQuest 2controller batterycover stuck
Once the new battery has been inserted, all that's left to do is replace the magnetic panel and then repeat the process on the other controller. They should automatically re-synch with the Oculus client app once you press any button to turn each of them back on. Then you should be all set to dive back into your virtual world.
If you want to know more about the story in Metro Awakening: VR then here I’ll give you a quick spoiler free intro here at the start, and then delve into the full explanation of the Metro Awakening story afterwards.
Once the covers are removed make sure to dispose of the old batteries. Googling “nearby battery recycling” can show you some potential locations to dispose of old AA batteries.
Here I’ll show you all of the Metro Awakening weapons including the order you find them in, how they function, and what each is good at.
It is also very easy to just use rechargeable batteries, like those found here on amazon. If there are four then you can just recharge the two old ones using the battery charger after replacing them with two new batteries. This means you don’t have to constantly buy new AA batteries and throw out old ones. It’s also good to reduce your environmental impact, and is just an overall win-win.

Leave the cover somewhere you won’t lose it for now. It’s time to remove the old battery and replace it. This can also be a little tricky and stiff the first couple of times, but once you get used to this it will be easy. As you can see in the little battery diagram inside the battery compartment, the positive end of the battery is the end that is pointing to the bottom of the controller grip. The negative end is pointed towards the ring.


 Ms.Cici
 8618319014500